> ## Documentation Index
> Fetch the complete documentation index at: https://docs.comfy.org/llms.txt
> Use this file to discover all available pages before exploring further.
# Custom Nodes
> Learn about installing, enabling dependencies, updating, disabling, and uninstalling custom nodes in ComfyUI
## About Custom Nodes
After installing ComfyUI, you'll discover that it includes many built-in nodes. These native nodes are called **Comfy Core** nodes, which are officially maintained by ComfyUI.
Additionally, there are numerous [**custom nodes**](https://registry.comfy.org) created by various authors from the ComfyUI community. These custom nodes bring extensive functionality to ComfyUI, greatly expanding its capabilities and feature boundaries.
In this guide, we'll cover various operations related to custom nodes, including installation, updates, disabling, uninstalling, and dependency installation.
Anyone can develop their own custom extensions for ComfyUI and share them with others. You can find many community custom nodes [here](https://registry.comfy.org). If you want to develop your own custom nodes, visit the section below to get started:
Learn how to start developing a custom node
## Custom Node Management
In this section we will cover:
* Installing custom nodes
* Installing node dependencies
* Custom node version control
* Uninstalling custom nodes
* Temporarily disabling custom nodes
* Handling custom node dependency conflicts
### 1. Installing Custom Nodes
Currently, ComfyUI supports installing custom nodes through multiple methods, including:
* [Install via ComfyUI Manager (Recommended)](#install-via-comfyui-manager)
* Install via Git
* Manual installation
We recommend installing custom nodes through **ComfyUI Manager**, which is a highly significant tool in the ComfyUI custom node ecosystem. It makes custom node management (such as searching, installing, updating, disabling, and uninstalling) simple - you just need to search for the node you want to install in ComfyUI Manager and click install.
However, since all custom nodes are currently stored on GitHub, for regions that cannot access GitHub normally, we have written detailed instructions for different custom node installation methods in this guide.
Additionally, since we recommend using **ComfyUI Manager** for plugin management, we recommend using this tool for plugin management. You can find its source code [here](https://github.com/Comfy-Org/ComfyUI-Manager).
Therefore, in this documentation, we will use installing ComfyUI Manager as a custom node installation example, and supplement how to use it for node management in the relevant introduction sections.
Since ComfyUI Manager has very rich functionality, we will use a separate document to introduce the ComfyUI Manager installation chapter. Please visit the link below to learn how to use ComfyUI Manager to install custom nodes.
Learn how to use ComfyUI Manager to install custom nodes
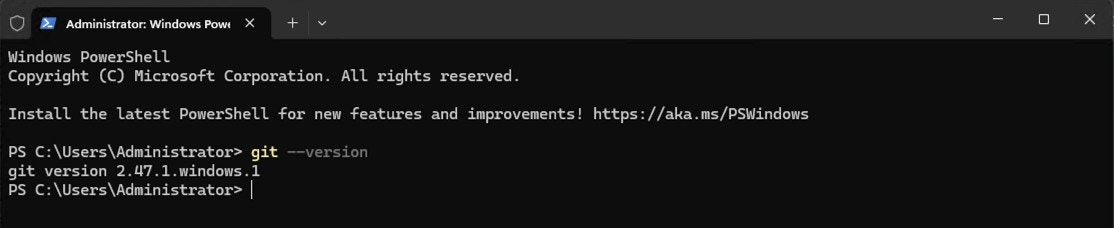
First, you need to ensure that Git is installed on your system. You can check if Git is installed by entering the following command in your system terminal:
```bash theme={null}
git --version
```
If Git is installed, you will see output similar to the following:
 If not yet installed, please visit [git-scm.com](https://git-scm.com/) to download the corresponding installation package. Linux users please refer to [git-scm.com/downloads/linux](https://git-scm.com/downloads/linux) for installation instructions.
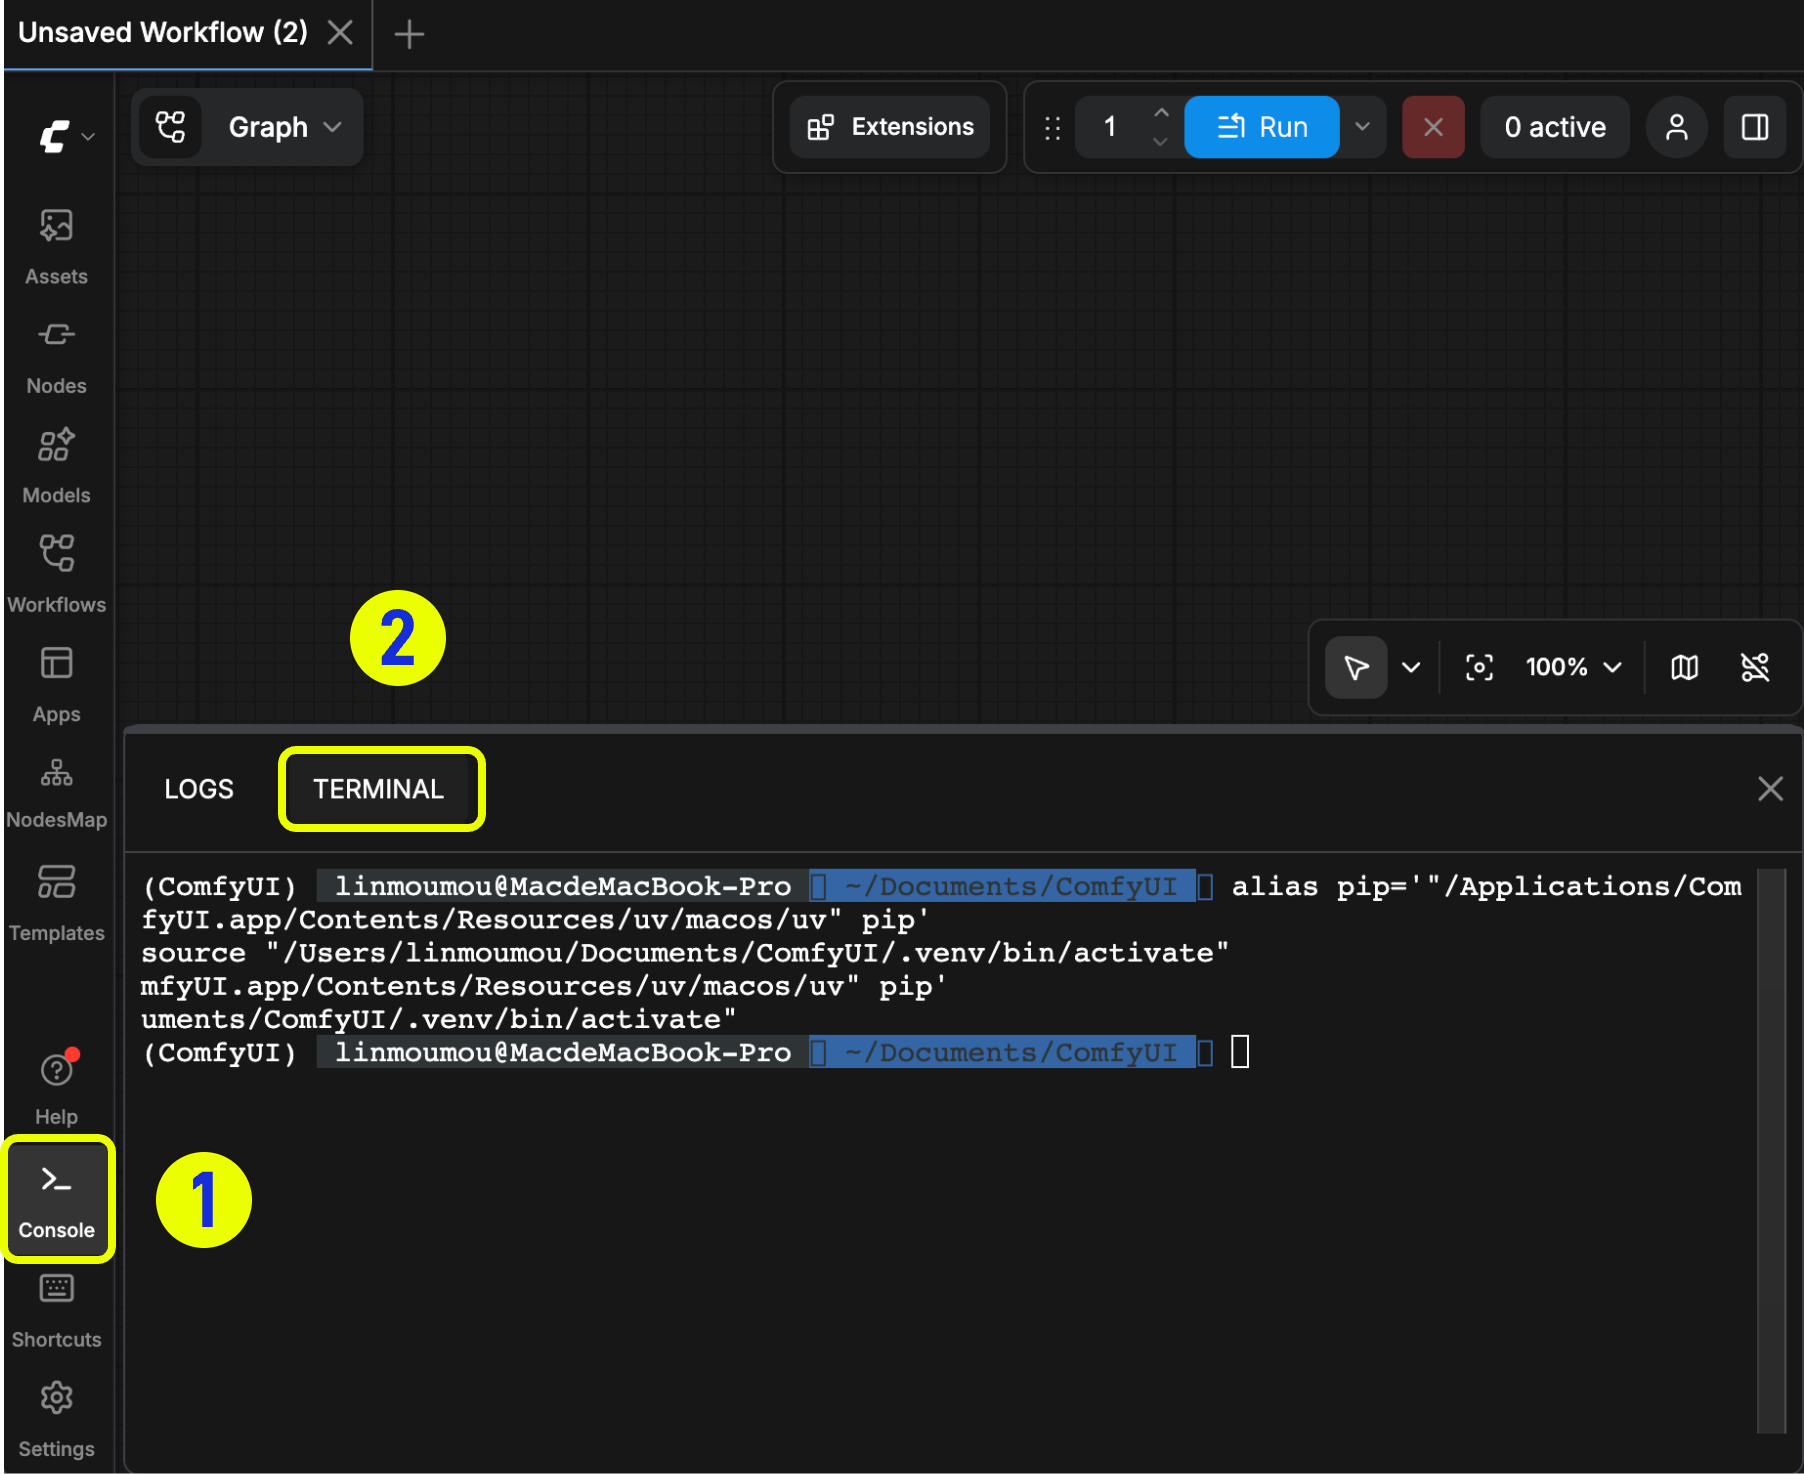
For Comfy Desktop version, you can use the Desktop terminal as shown below to complete the installation.
If not yet installed, please visit [git-scm.com](https://git-scm.com/) to download the corresponding installation package. Linux users please refer to [git-scm.com/downloads/linux](https://git-scm.com/downloads/linux) for installation instructions.
For Comfy Desktop version, you can use the Desktop terminal as shown below to complete the installation.
 After completing the Git installation, we need the repository address of the custom node. Here we use the ComfyUI-Manager repository address as an example:
```bash theme={null}
https://github.com/Comfy-Org/ComfyUI-Manager
```
For regions that cannot access GitHub smoothly, you can try using other code hosting service websites to fork the corresponding repository, then use that repository address to complete the node installation, such as gitee, etc.
First, we need to navigate to the ComfyUI custom nodes directory. Using ComfyUI portable version as an example, if the folder location is `D:\ComfyUI_windows_portable`, then you should be able to find the custom nodes folder at `D:\ComfyUI_windows_portable\ComfyUI\custom_nodes`. First, we need to use the `cd` command to enter the corresponding directory:
```bash theme={null}
cd D:\ComfyUI_windows_portable\ComfyUI\custom_nodes
```
Then we use the `git clone` command to complete the node installation:
```bash theme={null}
git clone https://github.com/Comfy-Org/ComfyUI-Manager
```
If everything goes smoothly, you will see output similar to the following:
After completing the Git installation, we need the repository address of the custom node. Here we use the ComfyUI-Manager repository address as an example:
```bash theme={null}
https://github.com/Comfy-Org/ComfyUI-Manager
```
For regions that cannot access GitHub smoothly, you can try using other code hosting service websites to fork the corresponding repository, then use that repository address to complete the node installation, such as gitee, etc.
First, we need to navigate to the ComfyUI custom nodes directory. Using ComfyUI portable version as an example, if the folder location is `D:\ComfyUI_windows_portable`, then you should be able to find the custom nodes folder at `D:\ComfyUI_windows_portable\ComfyUI\custom_nodes`. First, we need to use the `cd` command to enter the corresponding directory:
```bash theme={null}
cd D:\ComfyUI_windows_portable\ComfyUI\custom_nodes
```
Then we use the `git clone` command to complete the node installation:
```bash theme={null}
git clone https://github.com/Comfy-Org/ComfyUI-Manager
```
If everything goes smoothly, you will see output similar to the following:
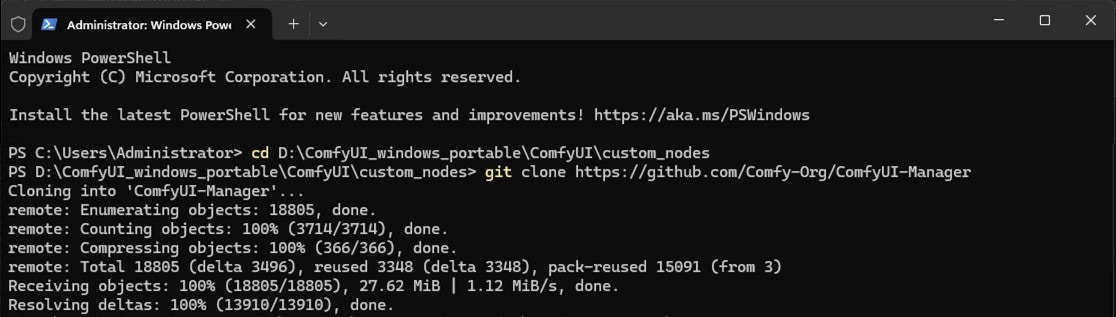 This means you have successfully cloned the custom node code. Next, we need to install the corresponding dependencies.
Please refer to the instructions in the [Installing Node Dependencies](#installing-node-dependencies) section for dependency installation.
Manual installation is not the recommended installation method, but it serves as a backup option when you cannot install smoothly using git.
Plugins installed this way will lose the corresponding git version history information and will not be convenient for subsequent version management.
For manual installation, we need to first download the corresponding node code and then extract it to the appropriate directory.
This means you have successfully cloned the custom node code. Next, we need to install the corresponding dependencies.
Please refer to the instructions in the [Installing Node Dependencies](#installing-node-dependencies) section for dependency installation.
Manual installation is not the recommended installation method, but it serves as a backup option when you cannot install smoothly using git.
Plugins installed this way will lose the corresponding git version history information and will not be convenient for subsequent version management.
For manual installation, we need to first download the corresponding node code and then extract it to the appropriate directory.
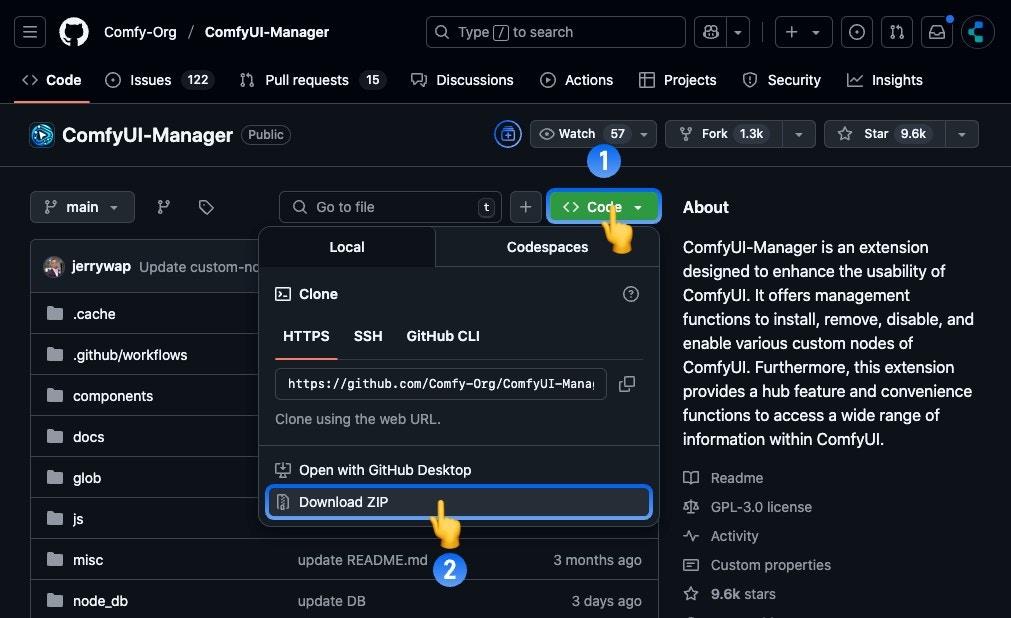 Visit the corresponding custom node repository page:
1. Click the `Code` button
2. Then click the `Download ZIP` button to download the ZIP package
3. Extract the ZIP package
Copy the extracted code from the above steps to the ComfyUI custom nodes directory. Using ComfyUI portable version as an example, if the folder location is `D:\ComfyUI_windows_portable`, then you should be able to find the custom nodes folder at `D:\ComfyUI_windows_portable\ComfyUI\custom_nodes`. Copy the extracted code from the above steps to the corresponding directory.
Please refer to the instructions in the [Installing Node Dependencies](#installing-node-dependencies) section for dependency installation.
### 2. Installing Node Dependencies
Custom nodes all require the installation of related dependencies. For example, for ComfyUI-Manager, you can visit the [requirements.txt](https://github.com/Comfy-Org/ComfyUI-Manager/blob/main/requirements.txt) file to view the dependency package requirements.
In the previous steps, we only cloned the custom node code locally and did not install the corresponding dependencies, so next we need to install the corresponding dependencies.
Actually, if you use ComfyUI-Manager to install plugins, ComfyUI Manager will automatically help you complete the dependency installation. You just need to restart ComfyUI after installing the plugin. This is why we strongly recommend using ComfyUI Manager to install custom nodes.
But perhaps you may not be able to use ComfyUI Manager to install custom nodes smoothly in some situations, so we provide this more detailed dependency installation guide.
In the [Dependencies](/development/core-concepts/dependencies) chapter, we introduced the relevant content about dependencies in ComfyUI. ComfyUI is a **Python**-based project, and we built an independent **Python** runtime environment for running ComfyUI. All related dependencies need to be installed in this independent **Python** runtime environment.
If you run `pip install -r requirements.txt` directly in the system-level terminal, the corresponding dependencies may be installed in the system-level **Python** environment, which will cause the dependencies to still be missing in ComfyUI's environment, preventing the corresponding custom nodes from running normally.
So next we need to use ComfyUI's independent Python runtime environment to complete the dependency installation.
Depending on different ComfyUI versions, we will use different methods to install the corresponding dependencies:
For ComfyUI Portable version, it uses an embedded Python located in the `\ComfyUI_windows_portable\python_embeded` directory. We need to use this Python to complete the dependency installation.
First, start the terminal in the portable version directory, or use the `cd` command to navigate to the `\ComfyUI_windows_portable\` directory after starting the terminal.
Visit the corresponding custom node repository page:
1. Click the `Code` button
2. Then click the `Download ZIP` button to download the ZIP package
3. Extract the ZIP package
Copy the extracted code from the above steps to the ComfyUI custom nodes directory. Using ComfyUI portable version as an example, if the folder location is `D:\ComfyUI_windows_portable`, then you should be able to find the custom nodes folder at `D:\ComfyUI_windows_portable\ComfyUI\custom_nodes`. Copy the extracted code from the above steps to the corresponding directory.
Please refer to the instructions in the [Installing Node Dependencies](#installing-node-dependencies) section for dependency installation.
### 2. Installing Node Dependencies
Custom nodes all require the installation of related dependencies. For example, for ComfyUI-Manager, you can visit the [requirements.txt](https://github.com/Comfy-Org/ComfyUI-Manager/blob/main/requirements.txt) file to view the dependency package requirements.
In the previous steps, we only cloned the custom node code locally and did not install the corresponding dependencies, so next we need to install the corresponding dependencies.
Actually, if you use ComfyUI-Manager to install plugins, ComfyUI Manager will automatically help you complete the dependency installation. You just need to restart ComfyUI after installing the plugin. This is why we strongly recommend using ComfyUI Manager to install custom nodes.
But perhaps you may not be able to use ComfyUI Manager to install custom nodes smoothly in some situations, so we provide this more detailed dependency installation guide.
In the [Dependencies](/development/core-concepts/dependencies) chapter, we introduced the relevant content about dependencies in ComfyUI. ComfyUI is a **Python**-based project, and we built an independent **Python** runtime environment for running ComfyUI. All related dependencies need to be installed in this independent **Python** runtime environment.
If you run `pip install -r requirements.txt` directly in the system-level terminal, the corresponding dependencies may be installed in the system-level **Python** environment, which will cause the dependencies to still be missing in ComfyUI's environment, preventing the corresponding custom nodes from running normally.
So next we need to use ComfyUI's independent Python runtime environment to complete the dependency installation.
Depending on different ComfyUI versions, we will use different methods to install the corresponding dependencies:
For ComfyUI Portable version, it uses an embedded Python located in the `\ComfyUI_windows_portable\python_embeded` directory. We need to use this Python to complete the dependency installation.
First, start the terminal in the portable version directory, or use the `cd` command to navigate to the `\ComfyUI_windows_portable\` directory after starting the terminal.
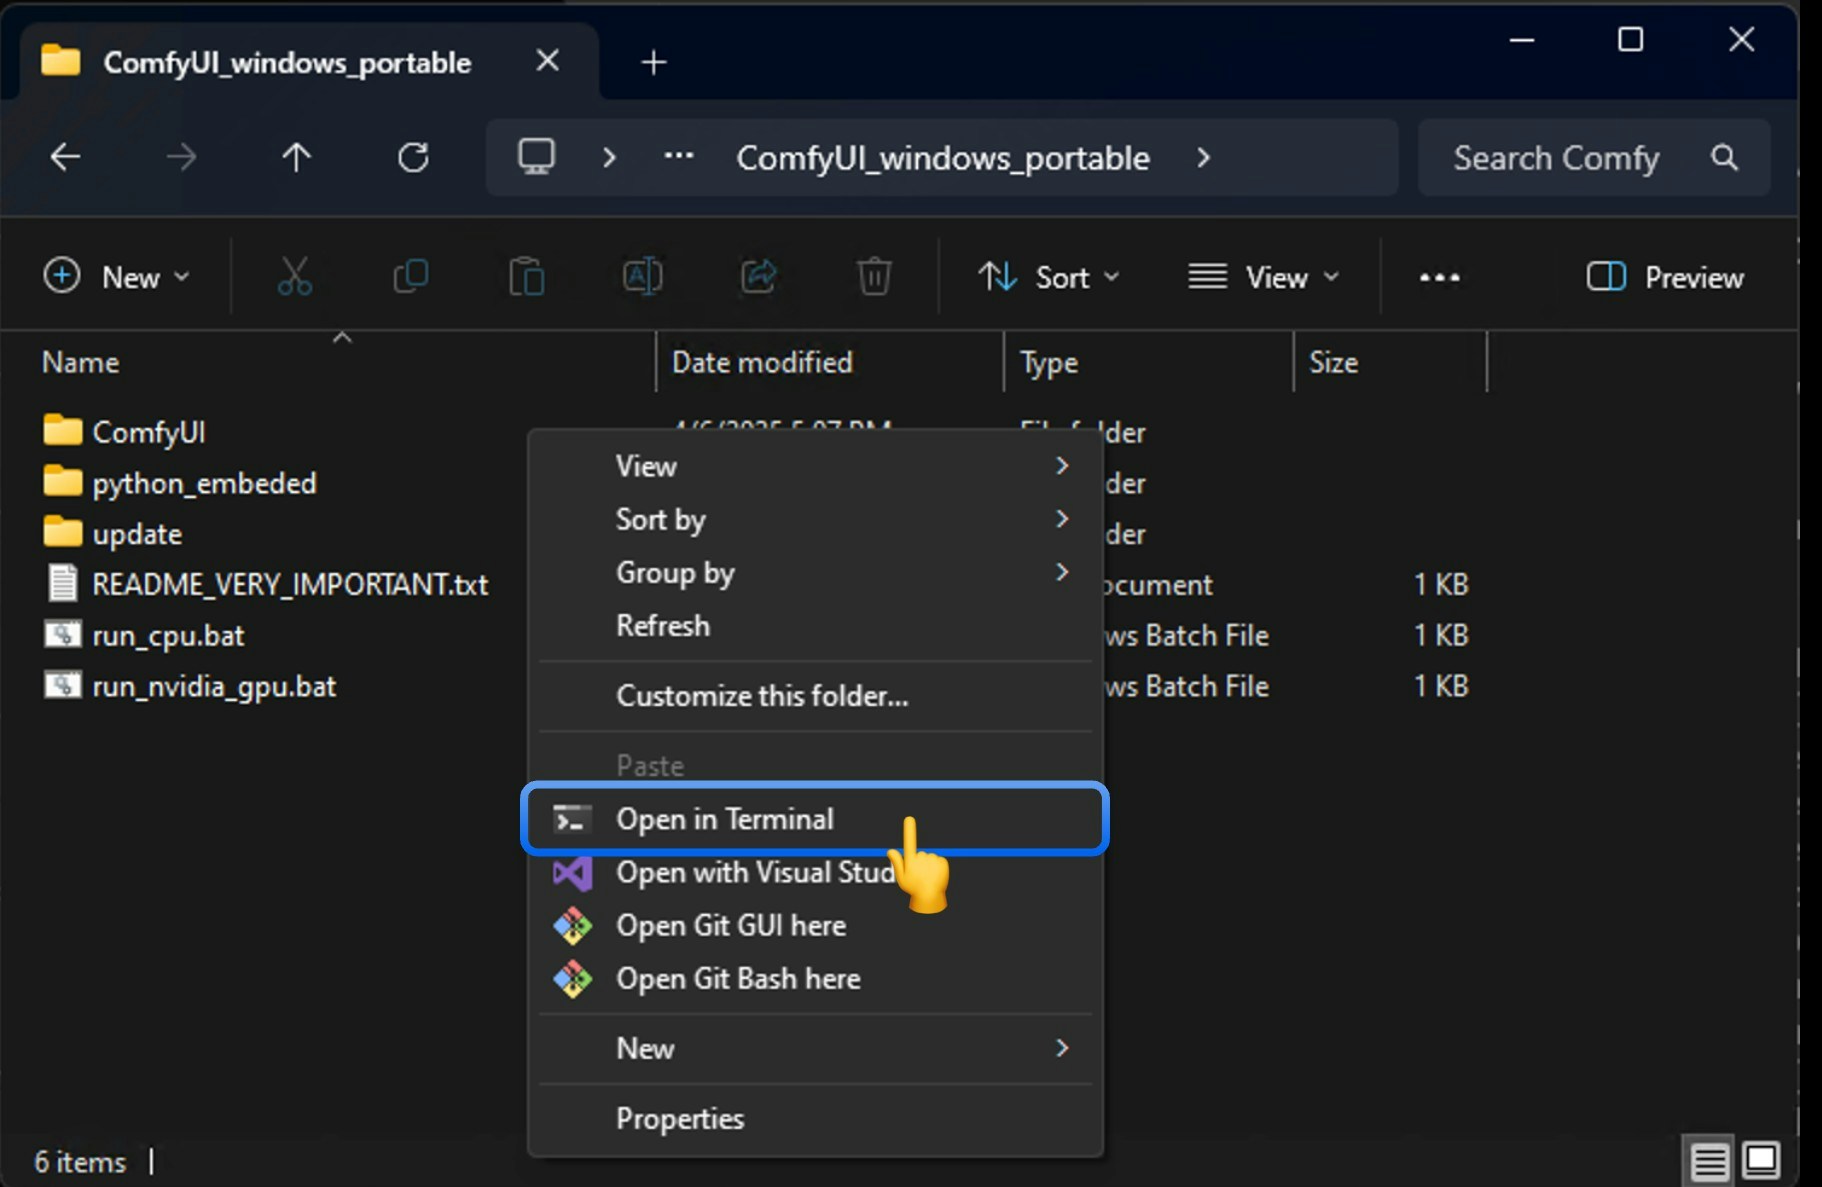 Ensure that the terminal directory is `\ComfyUI_windows_portable\`, as shown below for `D:\ComfyUI_windows_portable\`
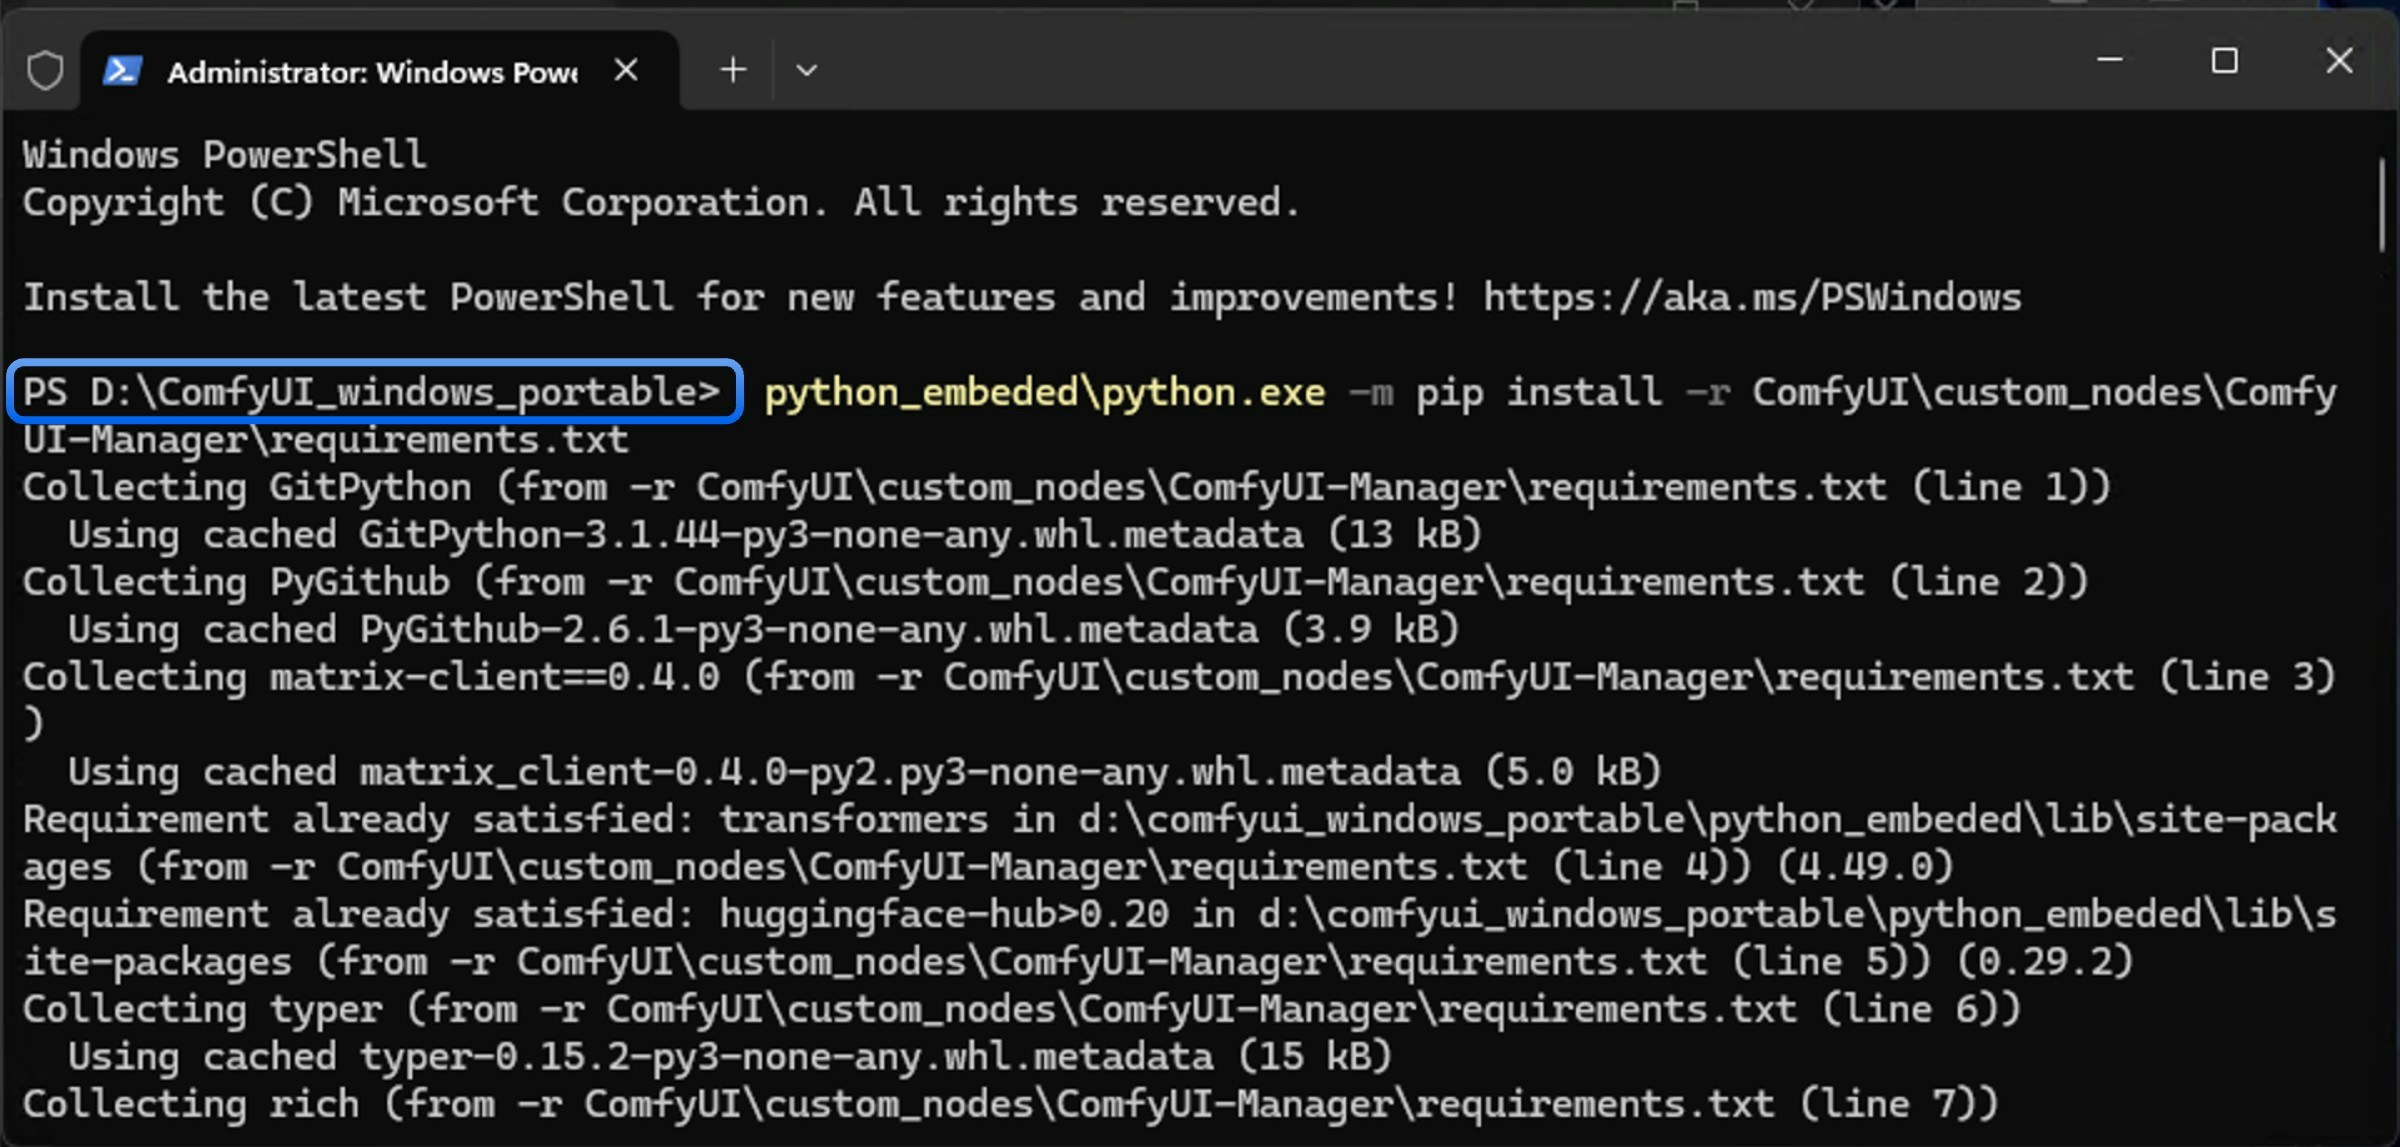 Then use `python_embeded\python.exe` to complete the dependency installation:
```bash theme={null}
python_embeded\python.exe -m pip install -r ComfyUI\custom_nodes\ComfyUI-Manager\requirements.txt
```
Of course, you can replace ComfyUI-Manager with the name of the custom node you actually installed, but make sure that a `requirements.txt` file exists in the corresponding node directory.
Since Comfy Desktop already has ComfyUI-Manager and its dependencies installed during the installation process, and this guide uses ComfyUI Manager as an example for custom node installation, you don't actually need to perform ComfyUI Manager dependency installation in the desktop version.
If there are no unexpected issues, we recommend using ComfyUI Manager to install custom nodes, so you don't need to manually install dependencies.
Then use the following command to install the dependencies for the corresponding plugin:
```bash theme={null}
pip install -r .\custom_nodes\\requirements.txt
```
As shown below, this is the dependency installation for ComfyUI-Hunyuan3Dwrapper:
Then use `python_embeded\python.exe` to complete the dependency installation:
```bash theme={null}
python_embeded\python.exe -m pip install -r ComfyUI\custom_nodes\ComfyUI-Manager\requirements.txt
```
Of course, you can replace ComfyUI-Manager with the name of the custom node you actually installed, but make sure that a `requirements.txt` file exists in the corresponding node directory.
Since Comfy Desktop already has ComfyUI-Manager and its dependencies installed during the installation process, and this guide uses ComfyUI Manager as an example for custom node installation, you don't actually need to perform ComfyUI Manager dependency installation in the desktop version.
If there are no unexpected issues, we recommend using ComfyUI Manager to install custom nodes, so you don't need to manually install dependencies.
Then use the following command to install the dependencies for the corresponding plugin:
```bash theme={null}
pip install -r .\custom_nodes\\requirements.txt
```
As shown below, this is the dependency installation for ComfyUI-Hunyuan3Dwrapper:
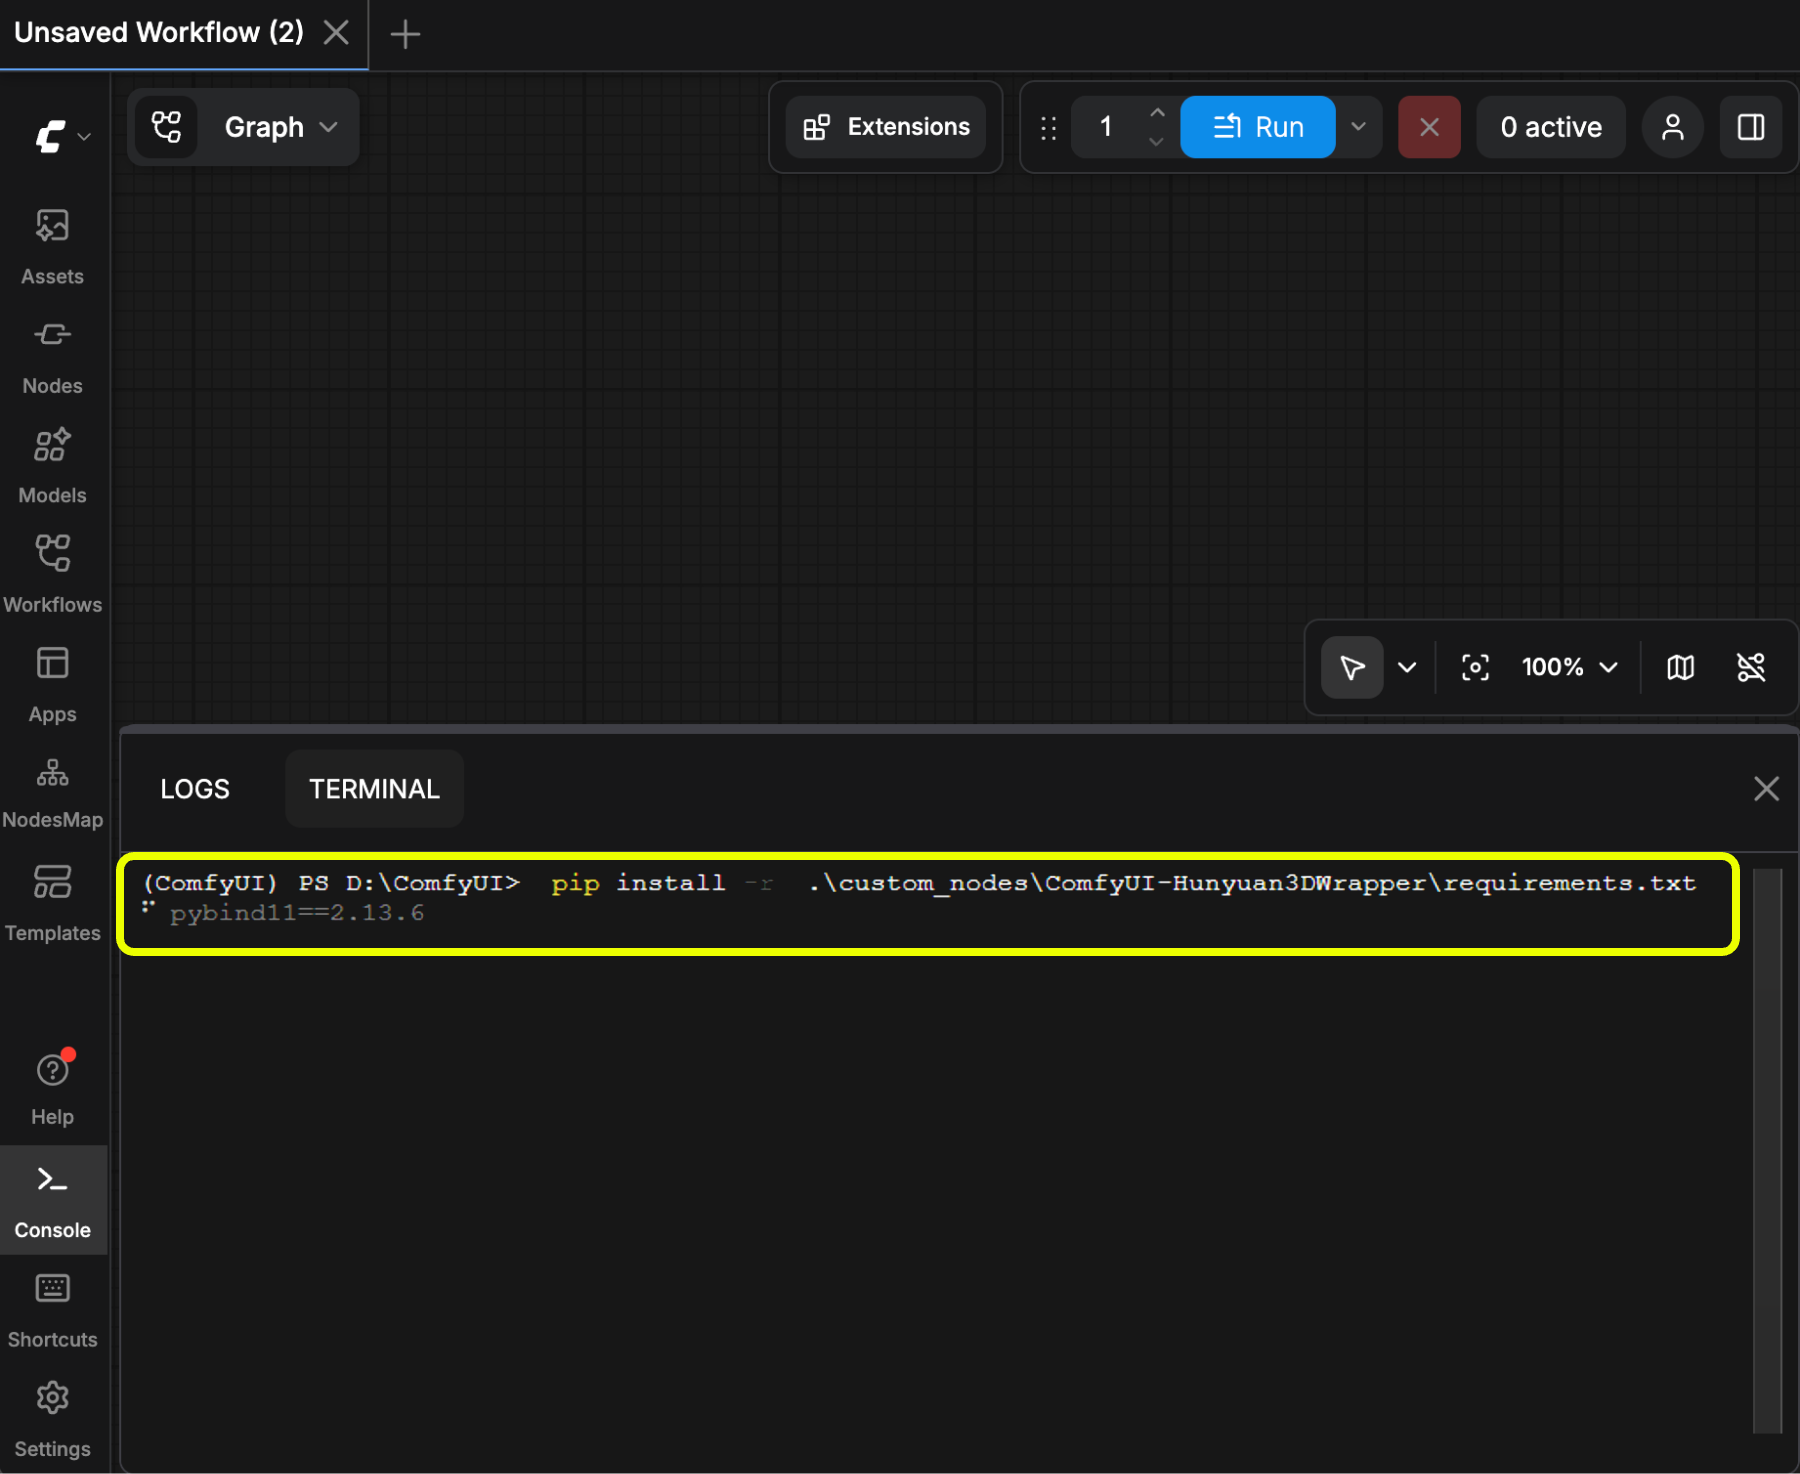 For users with custom Python environments, we recommend using `pip install -r requirements.txt` to complete the dependency installation.
### Custom Node Version Control
Custom node version control is actually based on Git version control. You can manage node versions through Git, but ComfyUI Manager has already integrated this version management functionality very well. Many thanks to [@Dr.Lt.Data](https://github.com/ltdrdata) for bringing us such a convenient tool.
In this section, we will still explain these two different plugin version management methods for you, but if you use ZIP packages for manual installation, the corresponding git version history information will be lost, making it impossible to perform version management.
Since we are iterating on ComfyUI Manager, the actual latest interface and steps may change significantly
Perform the corresponding operations as shown to enter the ComfyUI Manager interface
You can use the corresponding filters to filter out installed node packages and then perform the corresponding node management
Switch to the corresponding version. Manager will help you complete the corresponding dependency updates and installation. Usually, you need to restart ComfyUI after switching versions for the changes to take effect.
Find the directory folder where your corresponding node is located, such as `ComfyUI/custom_nodes/ComfyUI-Manager`
Use the `cd` command to enter the corresponding folder:
```bash theme={null}
cd /ComfyUI/custom_nodes/ComfyUI-Manager
```
You can use the following command to view all available tags and releases:
```bash theme={null}
git tag
```
This will list all version tags, and you can choose the version you want to switch to.
Use the following command to switch to a specified tag or release:
```bash theme={null}
git checkout
```
Replace `` with the specific version tag you want to switch to.
If you want to switch to a specific commit version, you can use the following command:
```bash theme={null}
git checkout
```
Replace `` with the specific commit hash you want to switch to.
Since the dependencies of the corresponding custom node package may change after version switching, you need to reinstall the dependencies for the corresponding node. Please refer to the instructions in the [Installing Node Dependencies](#2-installing-node-dependencies) section to enter the corresponding environment for installation.
### Uninstalling Custom Nodes
To be updated
### Temporarily Disabling Custom Nodes
To be updated
### Custom Node Dependency Conflicts
To be updated
## ComfyUI Manager
For users with custom Python environments, we recommend using `pip install -r requirements.txt` to complete the dependency installation.
### Custom Node Version Control
Custom node version control is actually based on Git version control. You can manage node versions through Git, but ComfyUI Manager has already integrated this version management functionality very well. Many thanks to [@Dr.Lt.Data](https://github.com/ltdrdata) for bringing us such a convenient tool.
In this section, we will still explain these two different plugin version management methods for you, but if you use ZIP packages for manual installation, the corresponding git version history information will be lost, making it impossible to perform version management.
Since we are iterating on ComfyUI Manager, the actual latest interface and steps may change significantly
Perform the corresponding operations as shown to enter the ComfyUI Manager interface
You can use the corresponding filters to filter out installed node packages and then perform the corresponding node management
Switch to the corresponding version. Manager will help you complete the corresponding dependency updates and installation. Usually, you need to restart ComfyUI after switching versions for the changes to take effect.
Find the directory folder where your corresponding node is located, such as `ComfyUI/custom_nodes/ComfyUI-Manager`
Use the `cd` command to enter the corresponding folder:
```bash theme={null}
cd /ComfyUI/custom_nodes/ComfyUI-Manager
```
You can use the following command to view all available tags and releases:
```bash theme={null}
git tag
```
This will list all version tags, and you can choose the version you want to switch to.
Use the following command to switch to a specified tag or release:
```bash theme={null}
git checkout
```
Replace `` with the specific version tag you want to switch to.
If you want to switch to a specific commit version, you can use the following command:
```bash theme={null}
git checkout
```
Replace `` with the specific commit hash you want to switch to.
Since the dependencies of the corresponding custom node package may change after version switching, you need to reinstall the dependencies for the corresponding node. Please refer to the instructions in the [Installing Node Dependencies](#2-installing-node-dependencies) section to enter the corresponding environment for installation.
### Uninstalling Custom Nodes
To be updated
### Temporarily Disabling Custom Nodes
To be updated
### Custom Node Dependency Conflicts
To be updated
## ComfyUI Manager
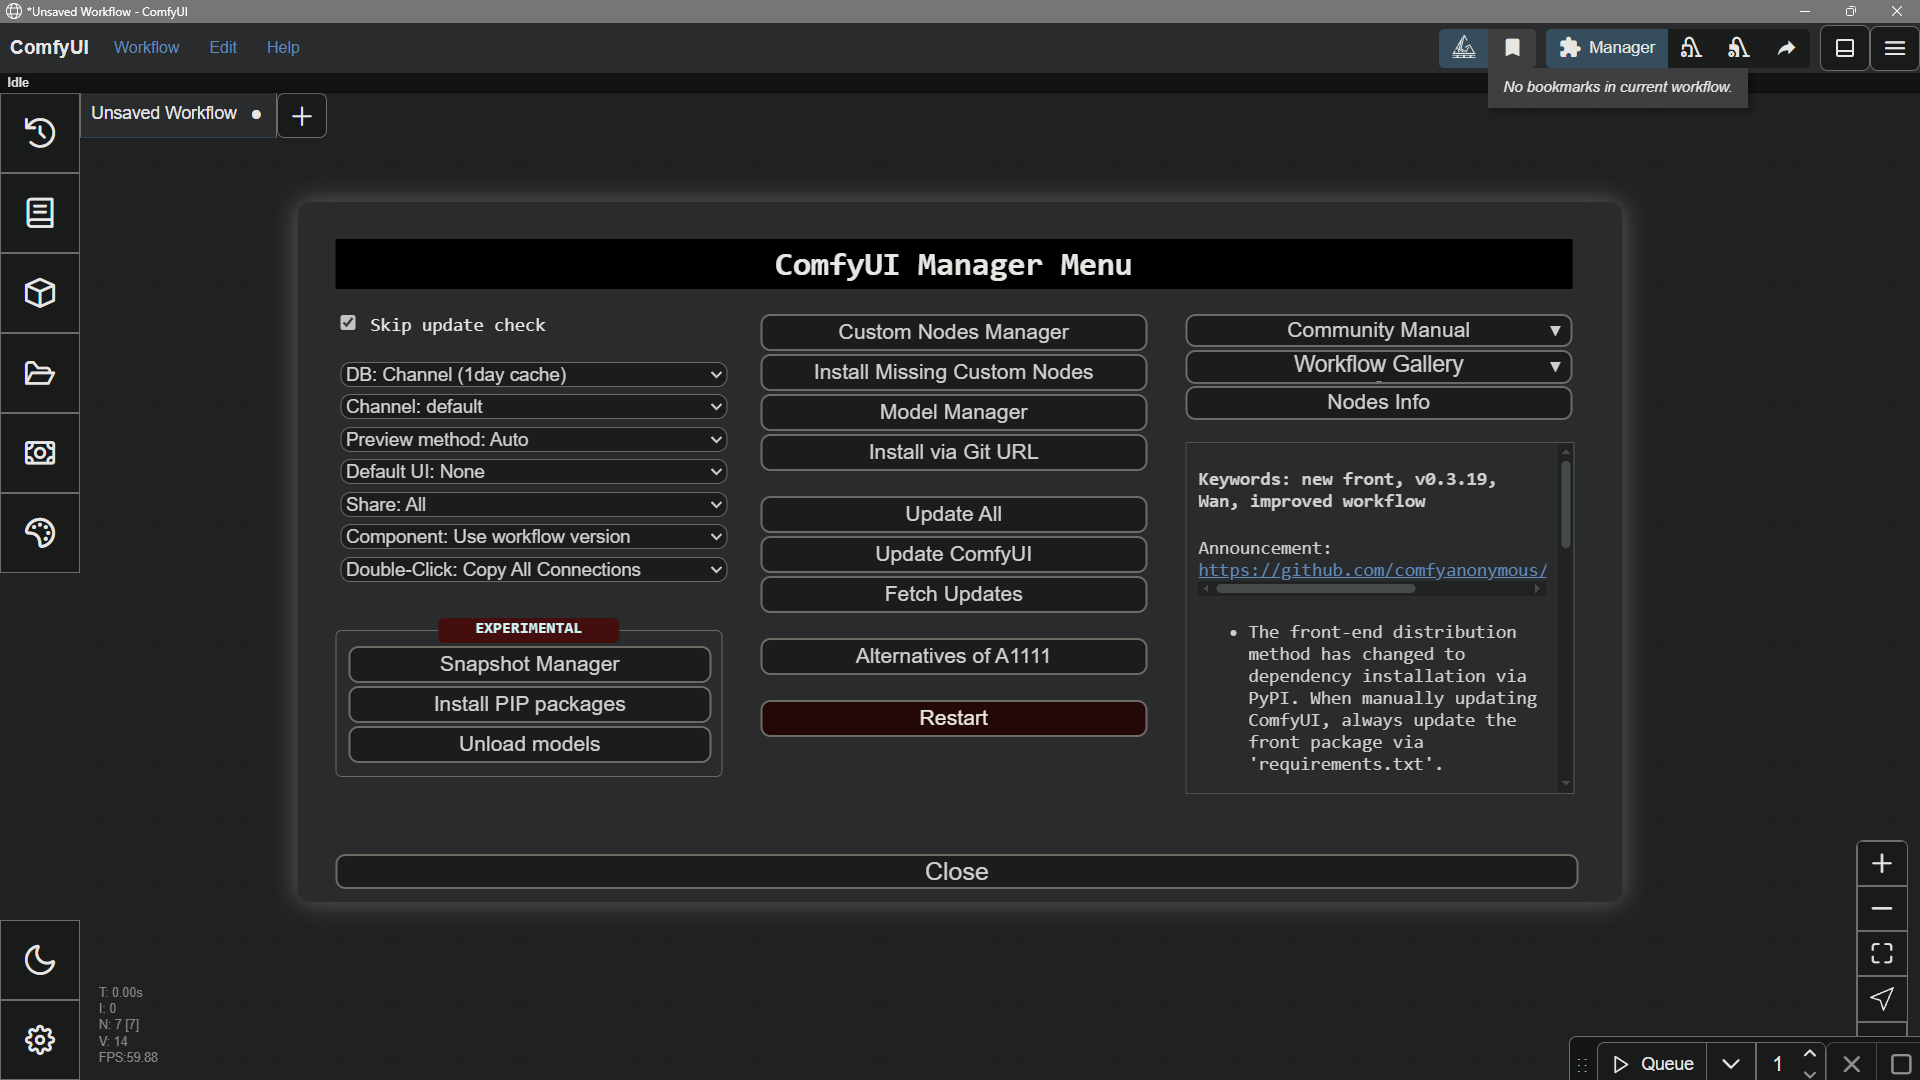 This tool is currently included by default in the [Desktop version](/installation/desktop/windows), while in the [Portable version](/installation/comfyui_portable_windows), you need to refer to the installation instructions in the [Install Manager](#installing-custom-nodes) section of this document.
As ComfyUI continues to develop, ComfyUI Manager plays an increasingly important role in ComfyUI. Currently, ComfyUI-Manager has officially joined the Comfy Org organization, officially becoming part of ComfyUI's core dependencies, and continues to be maintained by the original author [Dr.Lt.Data](https://github.com/ltdrdata). You can read [this blog post](https://blog.comfy.org/p/comfyui-manager-joins-comfy-org) for more information.
In future iterations, we will greatly optimize the use of ComfyUI Manager, so the interface shown in this documentation may differ from the latest version of ComfyUI Manager.
### Installing the Manager
If you are running the ComfyUI server application, you need to install the manager. If ComfyUI is running, please close it before continuing.
The first step is to install Git, which is a command-line application for software version control. Git will download the ComfyUI manager from [github.com](https://github.com). Download and install Git from [git-scm.com](https://git-scm.com/).
After installing Git, navigate to the ComfyUI server program directory and enter the folder labeled **custom\_nodes**. Open a command window or terminal. Make sure the command line shows the current directory path as **custom\_nodes**. Run the following command to clone the ComfyUI-Manager repository:
```bash theme={null}
git clone https://github.com/Comfy-Org/ComfyUI-Manager.git
```
This will download the manager. Technically, this is called *cloning a Git repository*.
### Detecting Missing Nodes
After installing the manager, you can detect missing nodes in the manager.
## Developing a Custom Node
If you have some development capabilities, please start with the documentation below to learn how to begin developing a custom node.
Learn how to start developing a custom node
This tool is currently included by default in the [Desktop version](/installation/desktop/windows), while in the [Portable version](/installation/comfyui_portable_windows), you need to refer to the installation instructions in the [Install Manager](#installing-custom-nodes) section of this document.
As ComfyUI continues to develop, ComfyUI Manager plays an increasingly important role in ComfyUI. Currently, ComfyUI-Manager has officially joined the Comfy Org organization, officially becoming part of ComfyUI's core dependencies, and continues to be maintained by the original author [Dr.Lt.Data](https://github.com/ltdrdata). You can read [this blog post](https://blog.comfy.org/p/comfyui-manager-joins-comfy-org) for more information.
In future iterations, we will greatly optimize the use of ComfyUI Manager, so the interface shown in this documentation may differ from the latest version of ComfyUI Manager.
### Installing the Manager
If you are running the ComfyUI server application, you need to install the manager. If ComfyUI is running, please close it before continuing.
The first step is to install Git, which is a command-line application for software version control. Git will download the ComfyUI manager from [github.com](https://github.com). Download and install Git from [git-scm.com](https://git-scm.com/).
After installing Git, navigate to the ComfyUI server program directory and enter the folder labeled **custom\_nodes**. Open a command window or terminal. Make sure the command line shows the current directory path as **custom\_nodes**. Run the following command to clone the ComfyUI-Manager repository:
```bash theme={null}
git clone https://github.com/Comfy-Org/ComfyUI-Manager.git
```
This will download the manager. Technically, this is called *cloning a Git repository*.
### Detecting Missing Nodes
After installing the manager, you can detect missing nodes in the manager.
## Developing a Custom Node
If you have some development capabilities, please start with the documentation below to learn how to begin developing a custom node.
Learn how to start developing a custom node