> ## Documentation Index
> Fetch the complete documentation index at: https://docs.comfy.org/llms.txt
> Use this file to discover all available pages before exploring further.

# Getting Started with AI Image Generation

> This tutorial will guide you through your first image generation with ComfyUI, covering basic interface operations like workflow loading, model installation, and image generation

<Note>
  This guide is intended for **local users** running ComfyUI on their own device. If you'd prefer not to install anything locally, try our official cloud service instead.
</Note>

<Card title="Try Comfy Cloud" icon="cloud" href="http://cloud.comfy.org/?template=image_z_image_turbo&utm_source=docs">
  Run ComfyUI online with zero setup. Sign in with Google to get **400 free credits every month**.
</Card>

This guide aims to help you understand ComfyUI's basic operations and complete your first image generation. We'll cover:

1. Loading example workflows
   * Loading from ComfyUI's workflow templates
   * Loading from images with workflow metadata
2. Model installation guidance
   * Automatic model installation
   * Manual model installation
3. Completing your first text-to-image generation

## About Text-to-Image

Text-to-Image is a fundamental AI drawing feature that generates images from text descriptions. It's one of the most commonly used functions in AI art generation. You can think of the process as telling your requirements (positive and negative prompts) to an artist (the drawing model), who will then create what you want. Detailed explanations about text-to-image will be covered in the [Text to Image](/tutorials/basic/text-to-image) chapter.

## ComfyUI Text-to-Image Workflow Tutorial

### 1. Launch ComfyUI

Make sure you've followed the [installation guide](/installation/system_requirements) to start ComfyUI and can successfully enter the ComfyUI interface. Alternatively, you can use [Comfy Cloud](/get_started/cloud) to use ComfyUI without any installation.

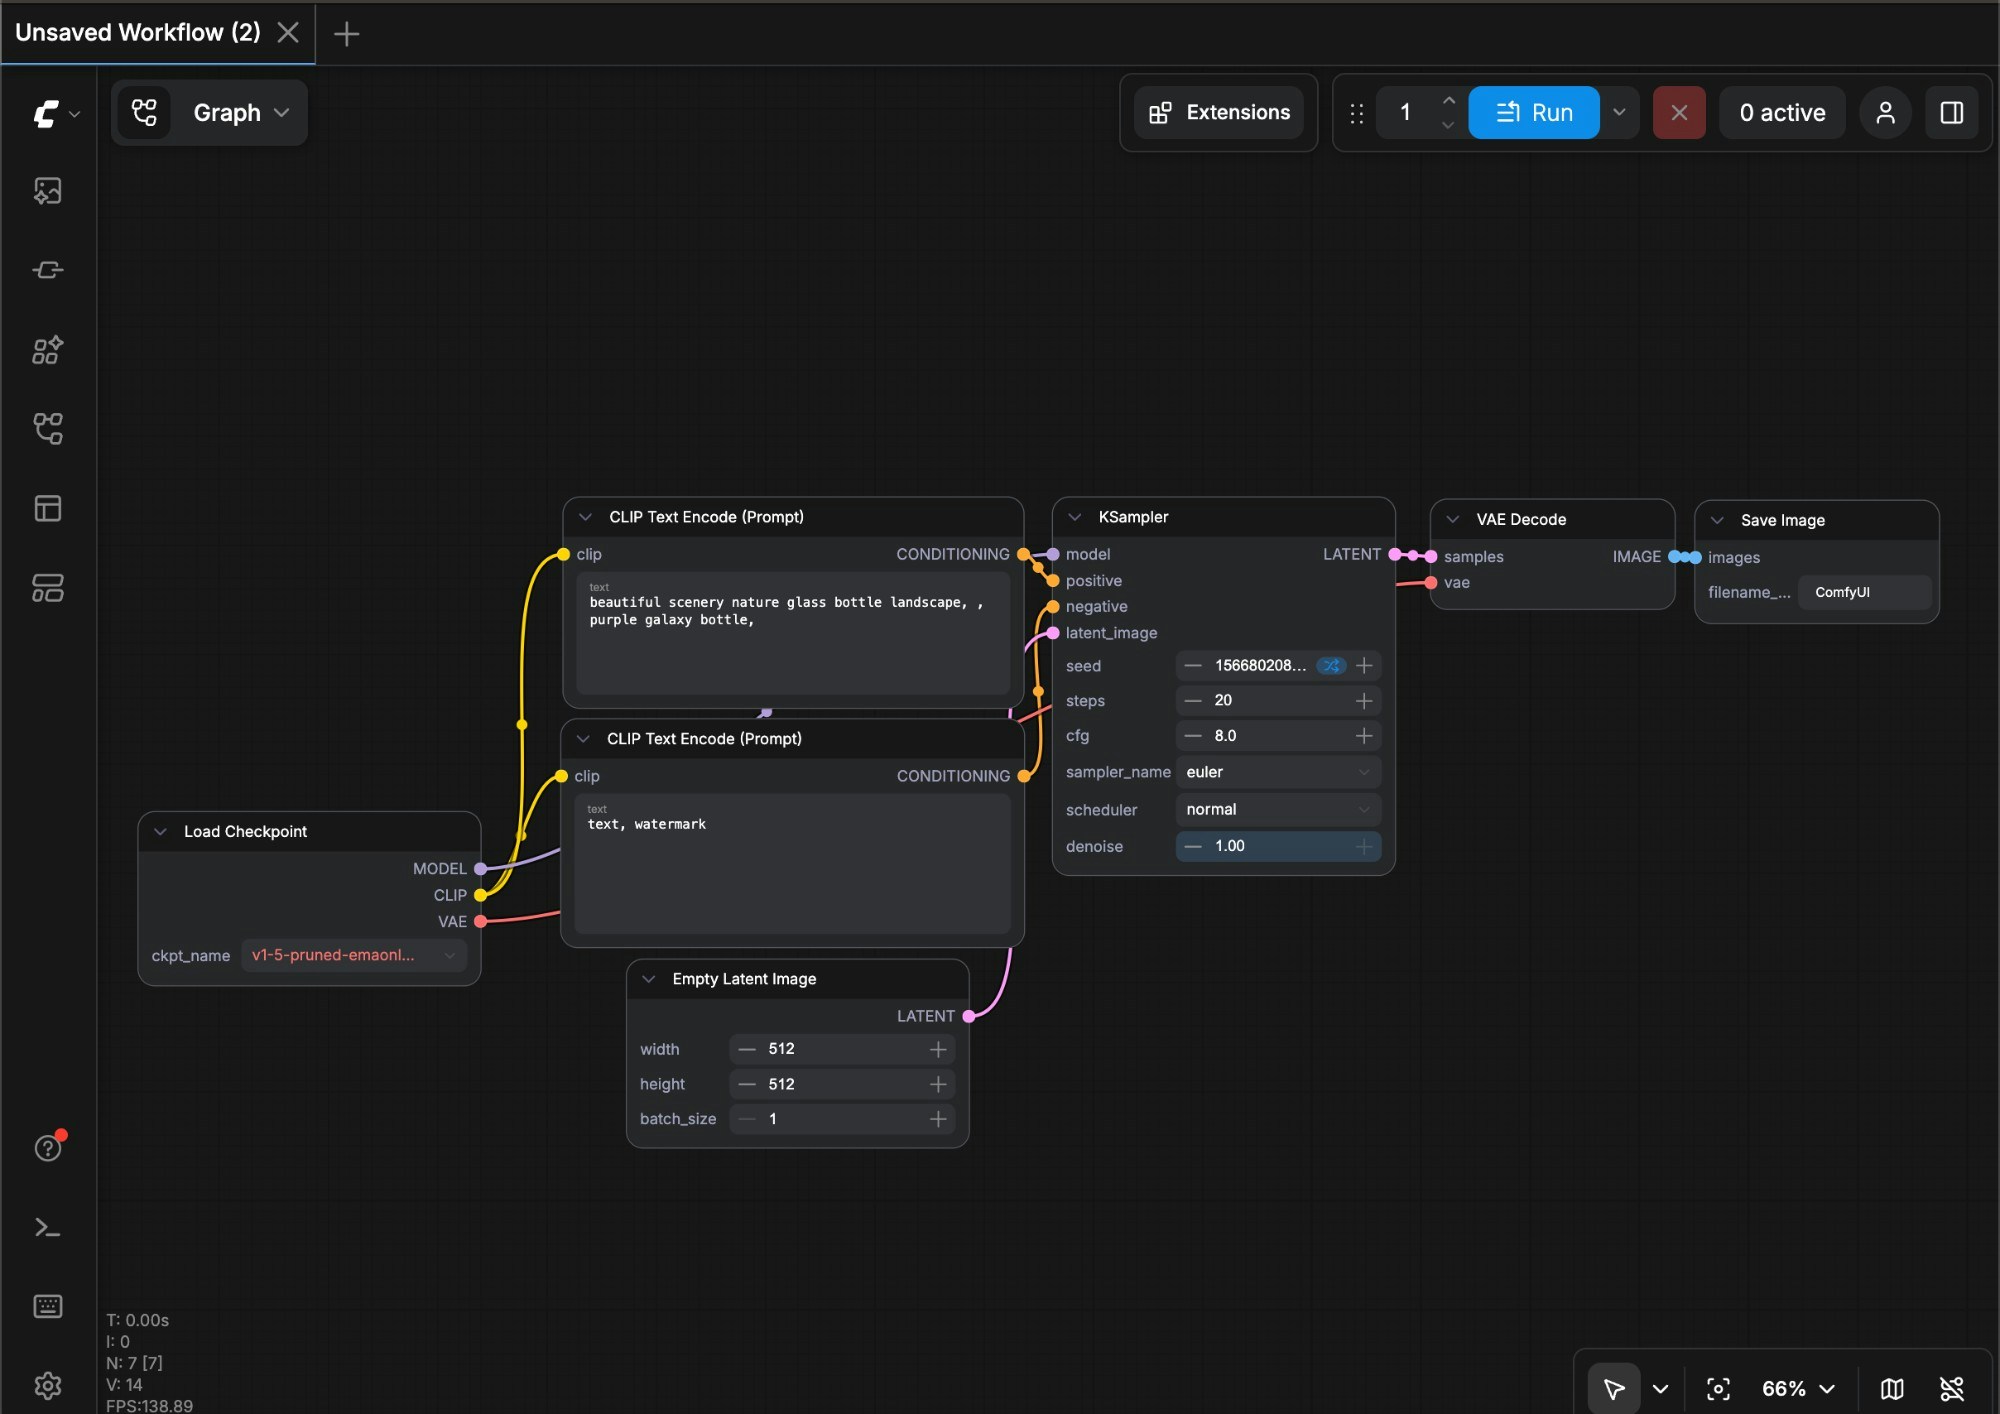
<img src="https://mintcdn.com/dripart/-uf1LbfqYw9IrpmN/images/desktop/comfyui-interface.jpg?fit=max&auto=format&n=-uf1LbfqYw9IrpmN&q=85&s=5fc5c0932897a4ab0076db79fec7b4ea" alt="ComfyUI Interface" width="2000" height="1414" data-path="images/desktop/comfyui-interface.jpg" />

If you have not installed ComfyUI, please choose a suitable version to install based on your device.
<AccordionGroup>
  <Accordion title="ComfyUI Desktop">
    ComfyUI Desktop currently supports standalone installation for **Windows and MacOS (ARM)**, currently in Beta

    * Code is open source on [Github](https://github.com/Comfy-Org/desktop)

    <Tip>
      Because Desktop is always built based on the **stable release**, so the latest updates may take some time to experience for Desktop, if you want to always experience the latest version, please use the portable version or manual installation
    </Tip>

    You can choose the appropriate installation for your system and hardware below

    <Tabs>
      <Tab title="Windows">
        <Card title="ComfyUI Desktop (Windows) Installation Guide" icon="link" href="/installation/desktop/windows">
          Suitable for **Windows** version with **Nvidia** GPU
        </Card>
      </Tab>

      <Tab title="MacOS(Apple Silicon)">
        <Card title="ComfyUI Desktop (MacOS) Installation Guide" icon="link" href="/installation/desktop/macos">
          Suitable for MacOS with **Apple Silicon**
        </Card>
      </Tab>

      <Tab title="Linux">
        <Note>ComfyUI Desktop **currently has no Linux prebuilds**, please visit the [Manual Installation](/installation/manual_install) section to install ComfyUI</Note>
      </Tab>
    </Tabs>
  </Accordion>

  <Accordion title="ComfyUI Portable (Windows)">
    Portable version is a ComfyUI version that integrates an independent embedded Python environment, using the portable version you can experience the latest features, currently only supports **Windows** system

    <Card title="ComfyUI Portable (Windows) Installation Guide" icon="link" href="/installation/comfyui_portable_windows">
      Supports **Windows** ComfyUI version running on **Nvidia GPUs** or **CPU-only**, always use the latest commits and completely portable.
    </Card>
  </Accordion>

  <Accordion title="Manual Installation">
    <Card title="ComfyUI Manual Installation Guide" icon="link" href="/installation/manual_install">
      Supports all system types and GPU types (Nvidia, AMD, Intel, Apple Silicon, Ascend NPU, Cambricon MLU)
    </Card>
  </Accordion>
</AccordionGroup>

### 2. Load Default Text-to-Image Workflow

ComfyUI usually loads the default text-to-image workflow automatically when launched. However, you can try different methods to load workflows to familiarize yourself with ComfyUI's basic operations:

<Tabs>
  <Tab title="Load from Workflow Template">
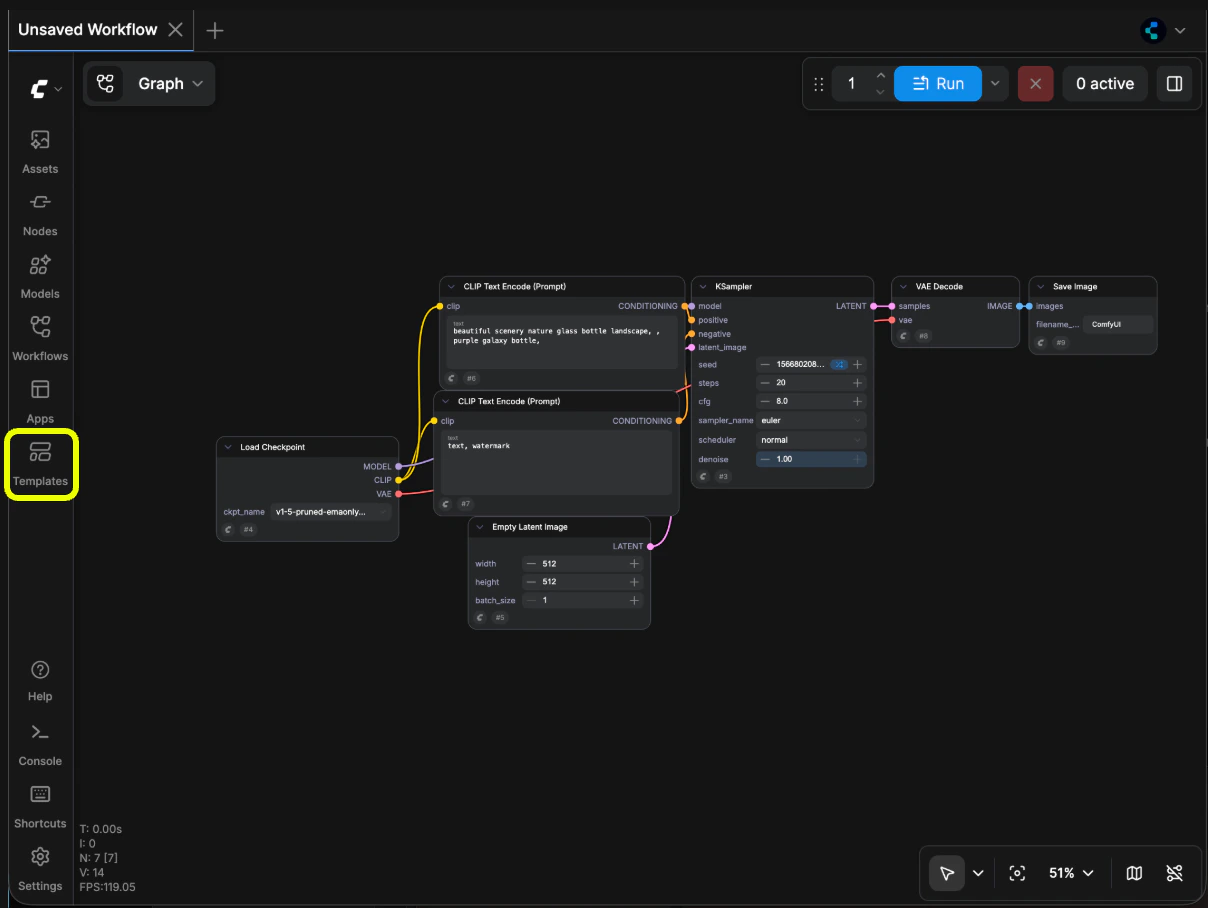
    <img src="https://mintcdn.com/dripart/Y1vvksJIVhyGxEpl/images/tutorial/gettingstarted/sidebar_template.png?fit=max&auto=format&n=Y1vvksJIVhyGxEpl&q=85&s=21ba5bae078af1b47ecdb23319f4d788" alt="ComfyUI Interface" width="1208" height="908" data-path="images/tutorial/gettingstarted/sidebar_template.png" />

    Follow the numbered steps in the image:

    1. Click the **Fit View** button in the bottom right to ensure any loaded workflow isn't hidden
    2. Click the **folder icon (workflows)** in the sidebar
    3. Click the **Browse example workflows** button at the top of the Workflows panel

    Continue with:
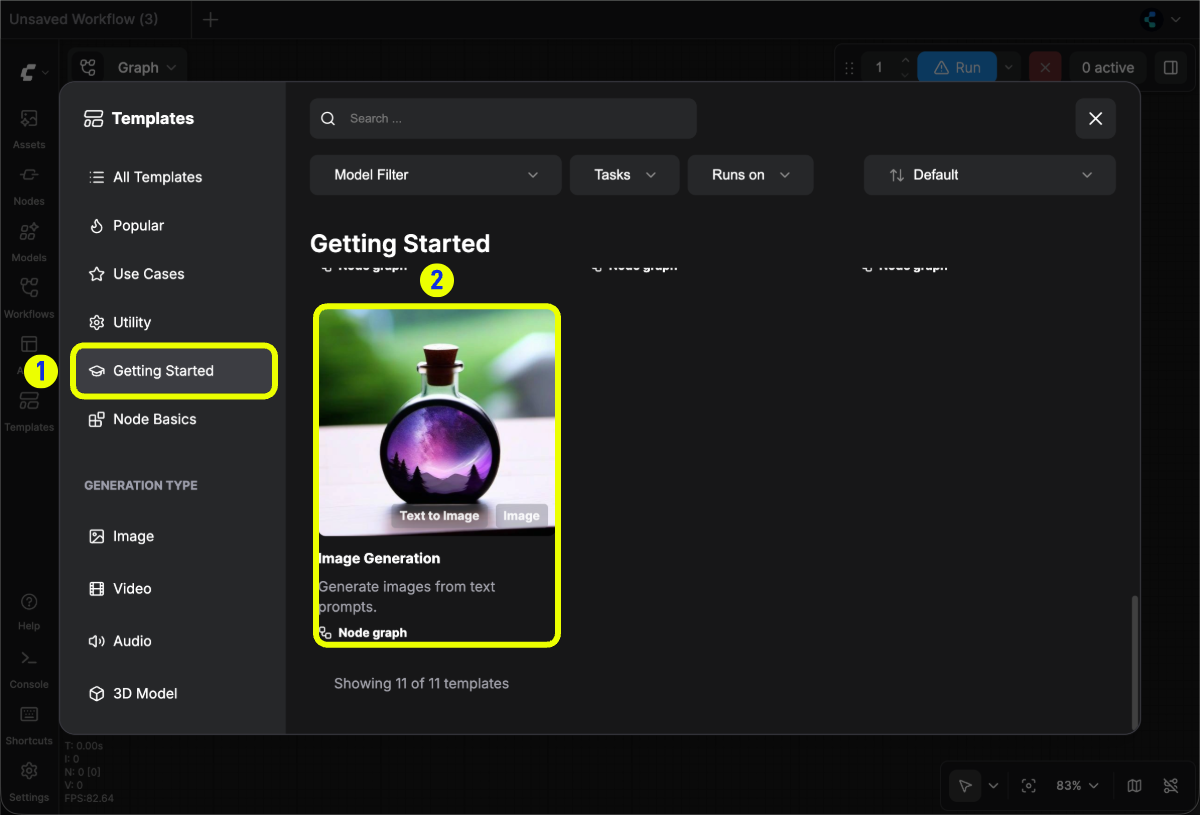
    <img src="https://mintcdn.com/dripart/Y1vvksJIVhyGxEpl/images/tutorial/gettingstarted/template_library_default_workflow.png?fit=max&auto=format&n=Y1vvksJIVhyGxEpl&q=85&s=f58afb4ee18b0323fa8ba3fe87f365a9" alt="Load Workflow" width="1200" height="815" data-path="images/tutorial/gettingstarted/template_library_default_workflow.png" />

    4. Select the first default workflow **Image Generation** to load it
  </Tab>

  <Tab title="Load from Images with Metadata">
    All images generated by ComfyUI contain metadata including workflow information. You can load workflows by:

    * Dragging and dropping a ComfyUI-generated image into the interface
    * Using menu **Workflows** -> **Open** to open an image

    Try loading the workflow using this example image:
    ![ComfyUI-Text to Image Workflow](https://raw.githubusercontent.com/Comfy-Org/example_workflows/refs/heads/main/text-to-image-workflow.png)
  </Tab>

  <Tab title="Load from workflow.json">
    ComfyUI workflows can be stored in JSON format. You can export workflows using menu **Workflows** -> **Export**.

    Try downloading and loading this example workflow:

    <a className="prose" href="https://github.com/Comfy-Org/docs/blob/main/public/text-to-image.json" download style={{ display: 'inline-block', backgroundColor: '#0078D6', color: '#ffffff', padding: '10px 20px', borderRadius: '8px', borderColor: "transparent", textDecoration: 'none', fontWeight: 'bold'}}>
      <p className="prose" style={{ margin: 0, fontSize: "0.8rem" }}>Download text-to-image.json</p>
    </a>

    After downloading, use menu **Workflows** -> **Open** to load the JSON file.
  </Tab>
</Tabs>

### 3. Model Installation

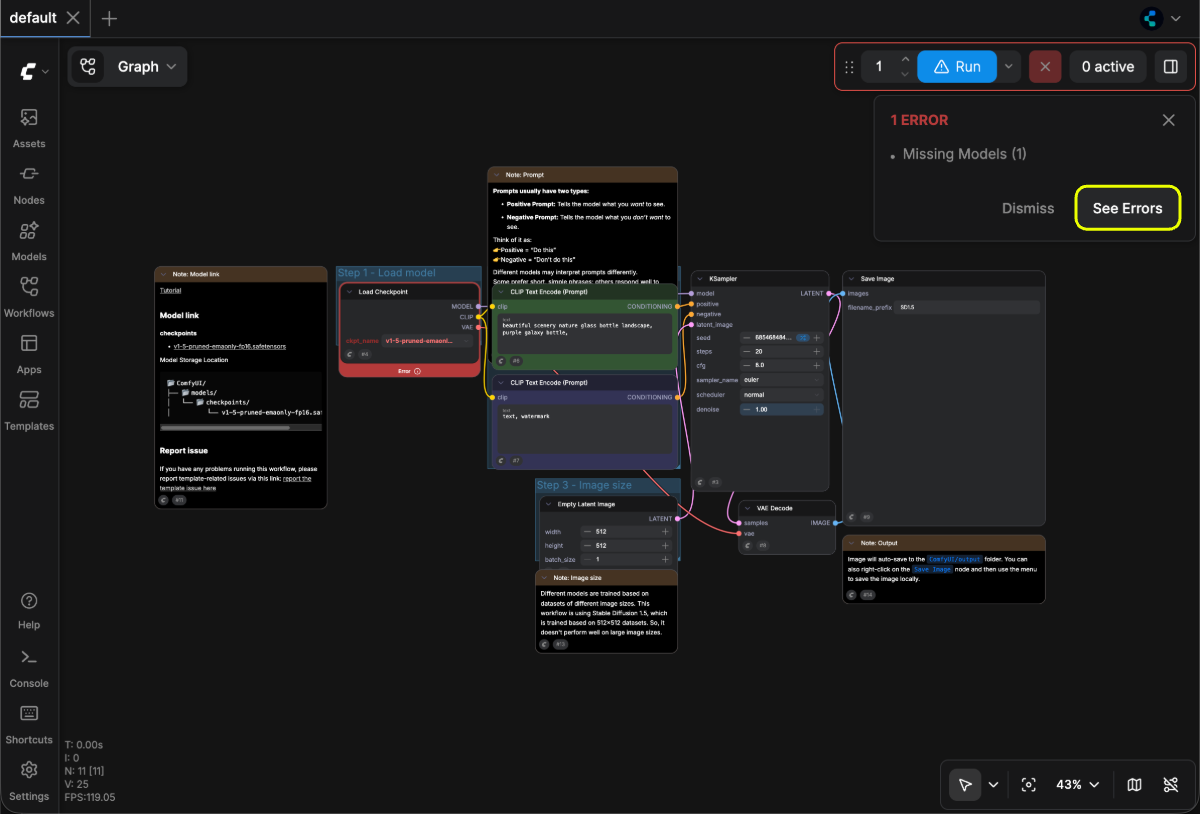
Most ComfyUI installations don't include base models by default. After loading the workflow, if you don't have the [v1-5-pruned-emaonly-fp16.safetensors](https://huggingface.co/Comfy-Org/stable-diffusion-v1-5-archive/blob/main/v1-5-pruned-emaonly-fp16.safetensors) model installed, you'll see this prompt:

First, ComfyUI will warn you that some models are missing:

<img src="https://mintcdn.com/dripart/Y1vvksJIVhyGxEpl/images/tutorial/gettingstarted/missing_model_warning_1.png?fit=max&auto=format&n=Y1vvksJIVhyGxEpl&q=85&s=0587d7f045f981756c232644569b3b59" alt="Missing models warning" width="1200" height="814" data-path="images/tutorial/gettingstarted/missing_model_warning_1.png" />

Click the warning to see which model is missing and the download link:
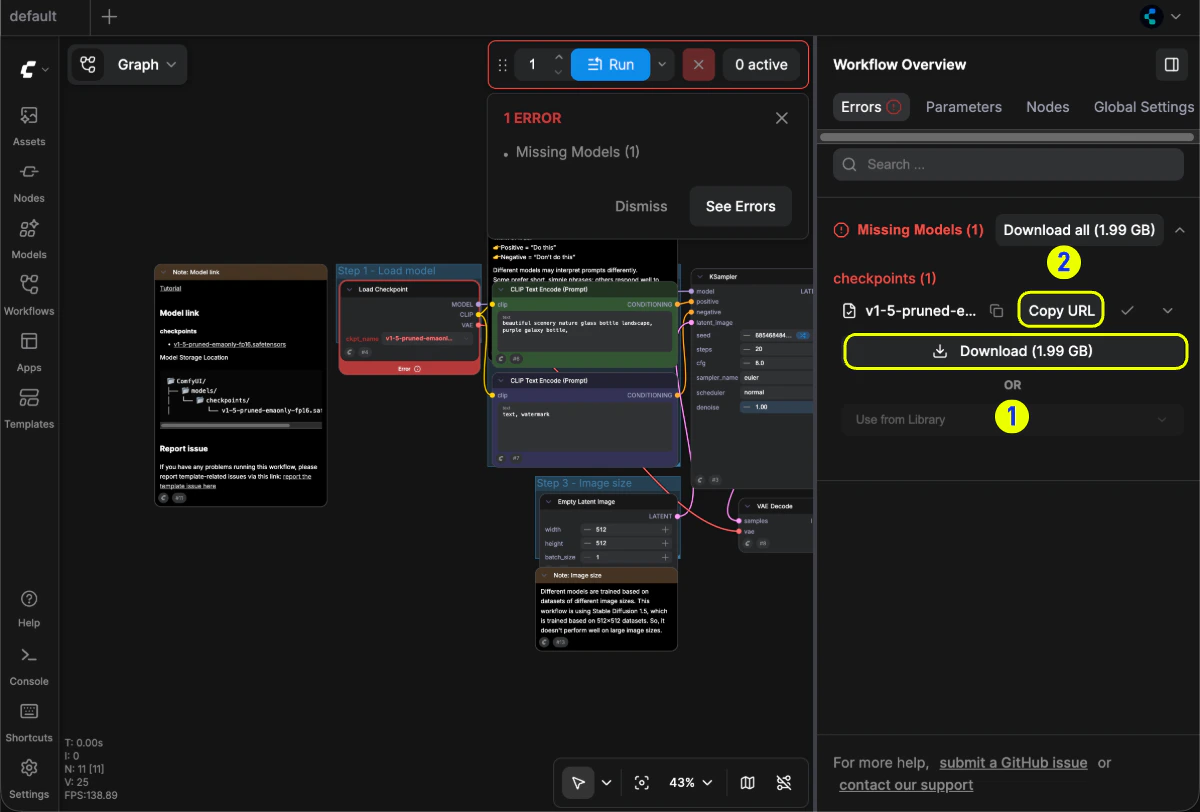
<img src="https://mintcdn.com/dripart/Y1vvksJIVhyGxEpl/images/tutorial/gettingstarted/missing_model_warning_2.png?fit=max&auto=format&n=Y1vvksJIVhyGxEpl&q=85&s=bf61da1c5711d935b7d49dd7e236f275" alt="Missing model details" width="1200" height="812" data-path="images/tutorial/gettingstarted/missing_model_warning_2.png" />

All models are stored in `<your ComfyUI installation>/ComfyUI/models/` with subfolders like `checkpoints`, `embeddings`, `vae`, `lora`, `upscale_model`, etc. ComfyUI detects models in these folders and paths configured in `extra_model_paths.yaml` at startup.

<Tabs>
  <Tab title="ComfyUI Desktop (Find models folder)">
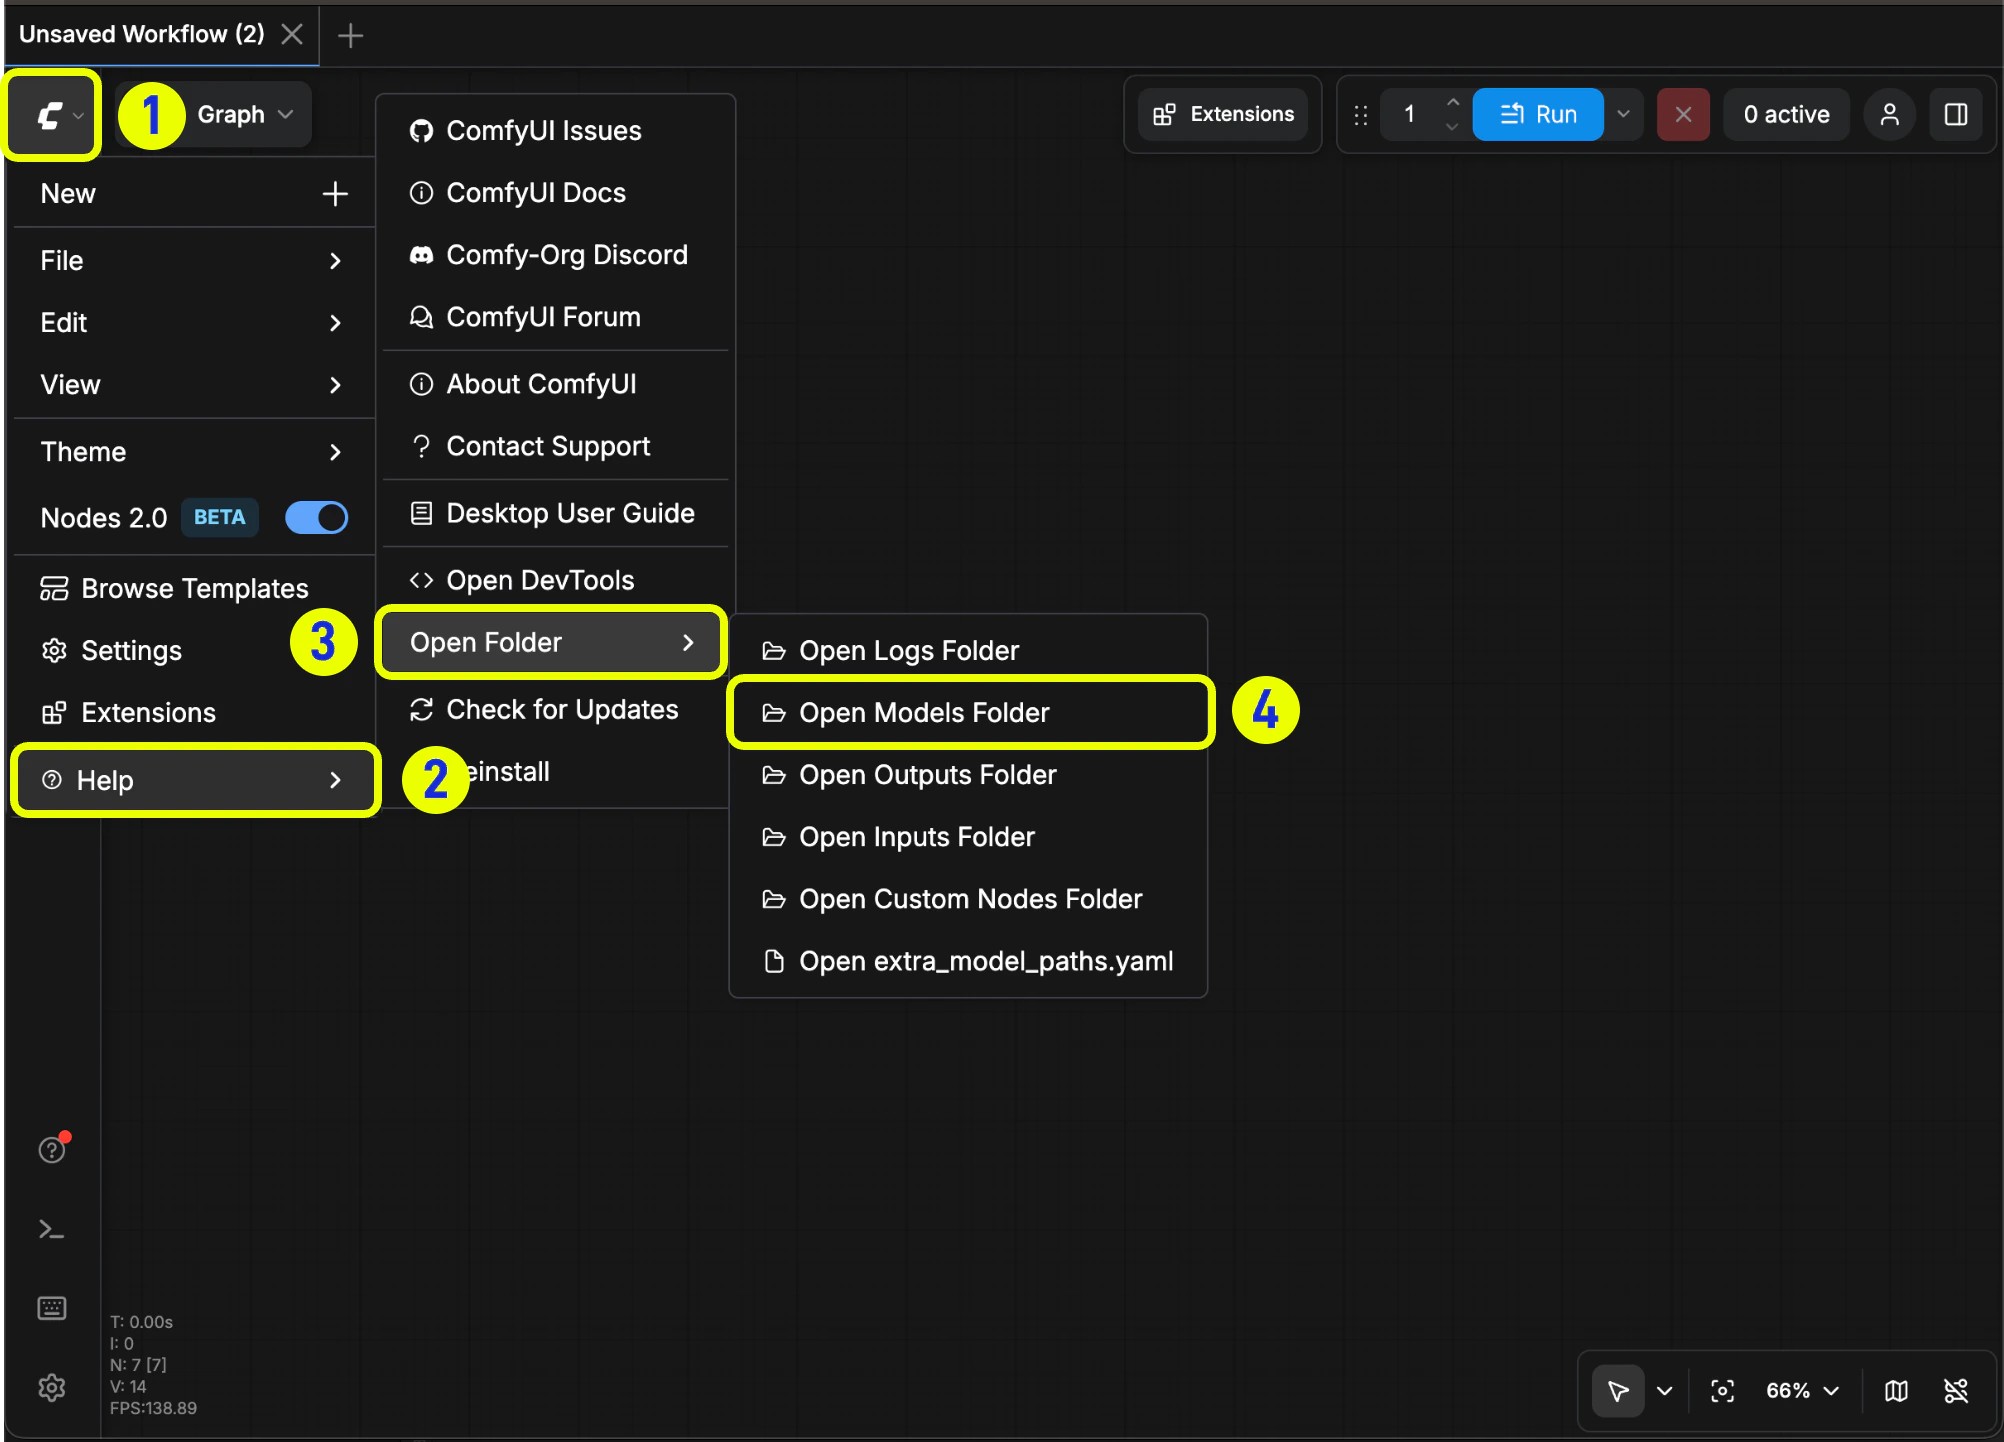
    <img src="https://mintcdn.com/dripart/Y1vvksJIVhyGxEpl/images/tutorial/gettingstarted/desktop_model_folder_path.png?fit=max&auto=format&n=Y1vvksJIVhyGxEpl&q=85&s=583ed638f72345a36464c7cfbb6f1eaa" alt="Desktop models folder path" width="2004" height="1442" data-path="images/tutorial/gettingstarted/desktop_model_folder_path.png" />

    On **ComfyUI Desktop**, the models folder location may differ from portable/other installs. Follow these steps:

    1. Click the **logo** at the top-left
    2. Open **Help** → **Open folder**
    3. Choose **Open models folder**

    If your interface is in another language, the exact menu text may differ, but the flow is the same: **Help** → **Open folder** → **Open models folder** (or the closest equivalent in your language).
  </Tab>

  <Tab title="ComfyUI Portable (Find models folder)">
    For the portable version, the models folder is usually located at:

    `ComfyUI_windows_portable/ComfyUI/models/`
  </Tab>
</Tabs>

You can install models through:

<Tabs>
  <Tab title="Automatic Download">
    After you click the **Download** button, ComfyUI will execute the download, and different behaviors will be performed depending on the version you are using.

    <Tabs>
      <Tab title="ComfyUI Desktop">
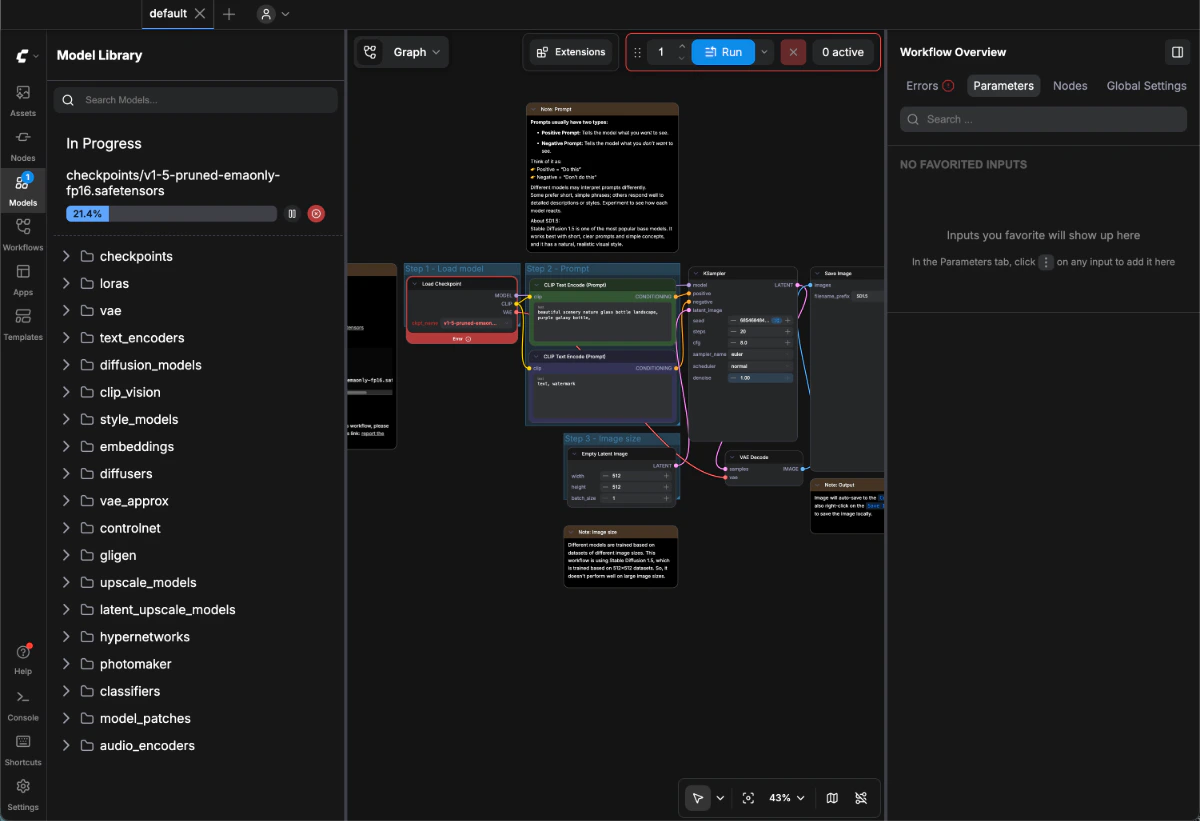
        The desktop version will automatically complete the model download and save it to the `<your ComfyUI installation location>/ComfyUI/models/checkpoints` directory.
        You can wait for the installation to complete or view the installation progress in the model panel on the sidebar.

        <img src="https://mintcdn.com/dripart/Y1vvksJIVhyGxEpl/images/tutorial/gettingstarted/desktop_download_status.png?fit=max&auto=format&n=Y1vvksJIVhyGxEpl&q=85&s=a1573451803b46539fca14c1b1ef4dd2" alt="Model Download Progress" width="1200" height="821" data-path="images/tutorial/gettingstarted/desktop_download_status.png" />

        <Warning>
          Automatic downloads typically fetch models from **Hugging Face**. Make sure your network can reliably reach Hugging Face.

          If the download **does not start** or shows **no progress for a long time**, copy the model link from the missing-model details (or use the manual installation section below) and install the model manually.
        </Warning>
      </Tab>

      <Tab title="ComfyUI Portable">
        The browser will execute file downloads. Please save the file to the `<your ComfyUI installation location>/ComfyUI_windows_portable/ComfyUI/models/checkpoints` directory after the download is complete.
      </Tab>
    </Tabs>
  </Tab>

  <Tab title="Manual Installation">
    Visit [v1-5-pruned-emaonly-fp16.safetensors](https://huggingface.co/Comfy-Org/stable-diffusion-v1-5-archive/blob/main/v1-5-pruned-emaonly-fp16.safetensors) and follow this guide:

    <img src="https://mintcdn.com/dripart/TwfNQ2dEaWQA7tIL/images/tutorial/gettingstarted/first-image-generation-5-hugging-face.jpg?fit=max&auto=format&n=TwfNQ2dEaWQA7tIL&q=85&s=15c2560c44e7e4276b6a351809f7bf9f" alt="Hugging Face Model Download" width="769" height="727" data-path="images/tutorial/gettingstarted/first-image-generation-5-hugging-face.jpg" />

    Save the downloaded file to:

    <Tabs>
      <Tab title="ComfyUI Desktop">
        Save to `<your ComfyUI installation>/ComfyUI/models/checkpoints`

        <img src="https://mintcdn.com/dripart/TwfNQ2dEaWQA7tIL/images/tutorial/gettingstarted/first-image-generation-6-2-desktop.jpg?fit=max&auto=format&n=TwfNQ2dEaWQA7tIL&q=85&s=275add7233b1f048455cff0f162847b9" alt="ComfyUI Desktop Model Save Location" width="911" height="710" data-path="images/tutorial/gettingstarted/first-image-generation-6-2-desktop.jpg" />
      </Tab>

      <Tab title="ComfyUI Portable">
        Save to `ComfyUI_windows_portable/ComfyUI/models/checkpoints`

        <img src="https://mintcdn.com/dripart/TwfNQ2dEaWQA7tIL/images/tutorial/gettingstarted/first-image-generation-6-1-portable.jpg?fit=max&auto=format&n=TwfNQ2dEaWQA7tIL&q=85&s=48976b87bcfdba962b119d901c43b286" alt="ComfyUI Portable Model Save Location" width="1081" height="709" data-path="images/tutorial/gettingstarted/first-image-generation-6-1-portable.jpg" />
      </Tab>
    </Tabs>

    Refresh or restart ComfyUI after saving.
  </Tab>
</Tabs>

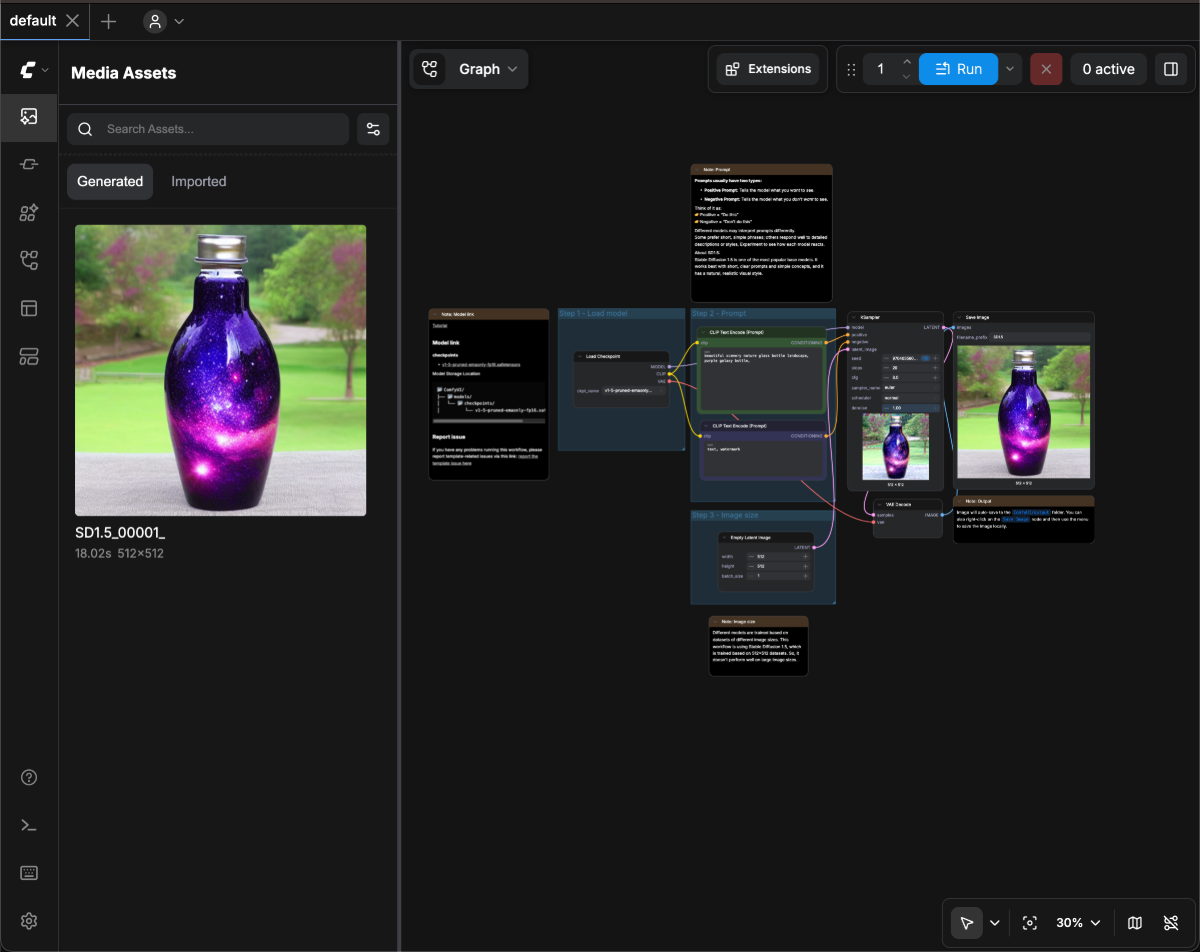
### 4. Load Model and Generate Your First Image

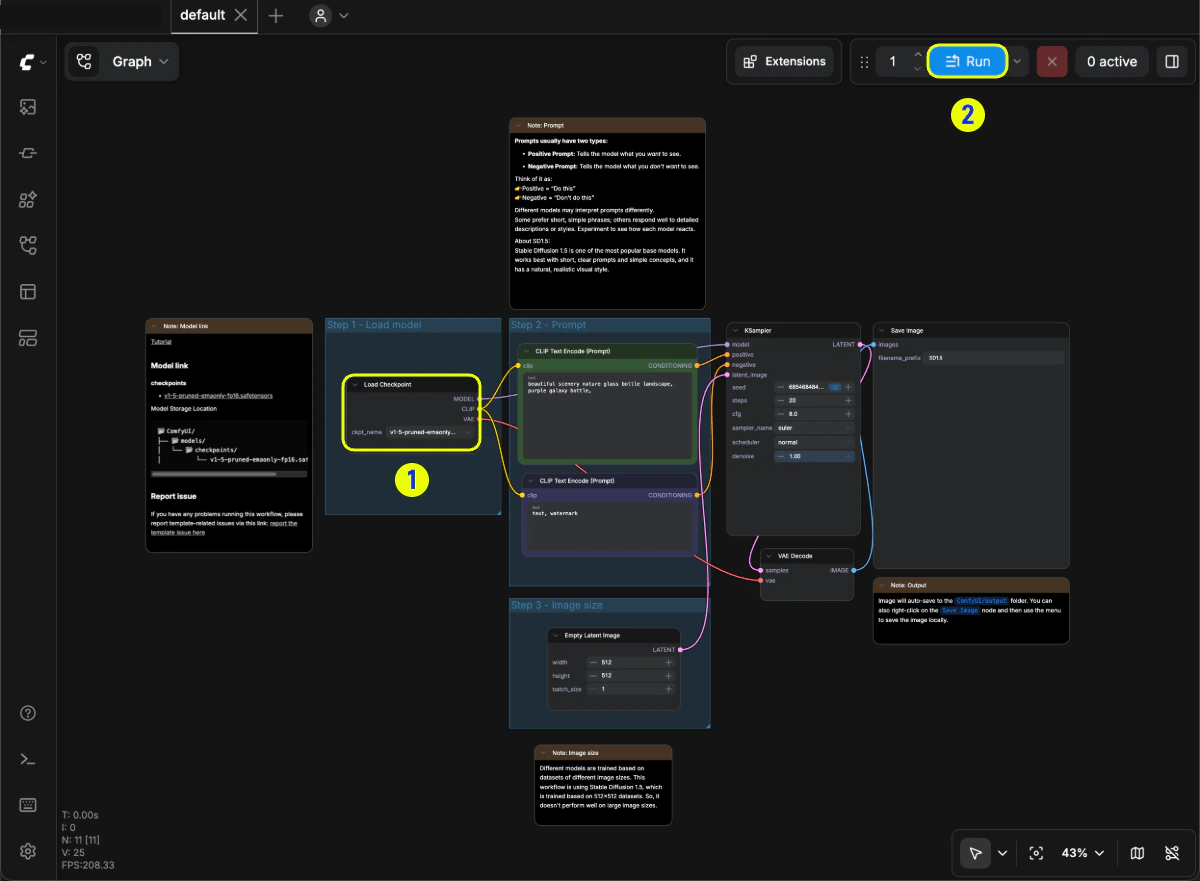
After you install or update models, press **`R`** on your keyboard to refresh object definitions and update model lists in nodes (for example, the dropdown in **Load Checkpoint**). Then continue with the steps below:

<img src="https://mintcdn.com/dripart/Y1vvksJIVhyGxEpl/images/tutorial/gettingstarted/run_workflow.png?fit=max&auto=format&n=Y1vvksJIVhyGxEpl&q=85&s=d8cb64b219e93cfd903723255d5e7d11" alt="Run workflow" width="1200" height="881" data-path="images/tutorial/gettingstarted/run_workflow.png" />

1. In the **Load Checkpoint** node, ensure **v1-5-pruned-emaonly-fp16.safetensors** is selected
2. Click `Run` or press `Ctrl + Enter` to generate

The result will appear in the **Save Image** node. Right-click to save locally.
<img src="https://mintcdn.com/dripart/Y1vvksJIVhyGxEpl/images/tutorial/gettingstarted/result.png?fit=max&auto=format&n=Y1vvksJIVhyGxEpl&q=85&s=dd253cd626d72716f52322245c5526cc" alt="ComfyUI First Image Generation Result" width="1200" height="952" data-path="images/tutorial/gettingstarted/result.png" />

For detailed text-to-image instructions, see our comprehensive guide:

<Card title="ComfyUI Text-to-Image Workflow Guide" icon="link" href="/tutorials/basic/text-to-image">
  Click here for detailed text-to-image workflow instructions
</Card>

## Troubleshooting

### Model Loading Issues

If the `Load Checkpoint` node shows no models or displays "null", verify your model installation location and try refreshing or restarting ComfyUI.