> ## Documentation Index
> Fetch the complete documentation index at: https://docs.comfy.org/llms.txt
> Use this file to discover all available pages before exploring further.
# ComfyUI(portable) Windows — Local Self-Hosted
> This tutorial will guide you on how to download and start using ComfyUI Portable and run the corresponding programs
**ComfyUI Portable** is a standalone packaged complete ComfyUI Windows version that has integrated an independent **Python (python\_embeded)** required for ComfyUI to run. You only need to extract it to use it.
This guide section will walk you through installing ComfyUI Portable.
## Download ComfyUI Portable
Choose the download package that matches your GPU type. ComfyUI Portable provides separate packages for different GPU hardware.
### Standard portable for Nvidia GPUs
For modern Nvidia GPUs (RTX series)
For Nvidia 10 series and older GPUs
Download the file and extract it with [7-ZIP](https://7-zip.org/). The extracted folder structure:
```
ComfyUI_windows_portable
├── 📂ComfyUI // ComfyUI main program
├── 📂python_embeded // Independent Python environment
├── 📂update // Batch scripts for upgrading portable version
├── README_VERY_IMPORTANT.txt // ComfyUI Portable usage instructions in English
├── run_cpu.bat // Double click to start ComfyUI (CPU only)
└── run_nvidia_gpu.bat // Double click to start ComfyUI (Nvidia GPU)
```
Double click `run_nvidia_gpu.bat` to launch ComfyUI.
### Portable for AMD GPUs
Download for AMD GPUs (ROCm)
Download the file and extract it with [7-ZIP](https://7-zip.org/). The extracted folder structure:
```
ComfyUI_windows_portable_amd
├── 📂ComfyUI // ComfyUI main program
├── 📂python_embeded // Independent Python environment
├── 📂update // Batch scripts for upgrading portable version
├── README_VERY_IMPORTANT.txt // ComfyUI Portable usage instructions in English
├── run_cpu.bat // Double click to start ComfyUI (CPU only)
└── run_amd_gpu.bat // Double click to start ComfyUI (AMD GPU)
```
Double click `run_amd_gpu.bat` to launch ComfyUI.
### Portable for Intel GPUs
Download for Intel GPUs
Download the file and extract it with [7-ZIP](https://7-zip.org/). The extracted folder structure:
```
ComfyUI_windows_portable_intel
├── 📂ComfyUI // ComfyUI main program
├── 📂python_embeded // Independent Python environment
├── 📂update // Batch scripts for upgrading portable version
├── README_VERY_IMPORTANT.txt // ComfyUI Portable usage instructions in English
├── run_cpu.bat // Double click to start ComfyUI (CPU only)
└── run_intel_gpu.bat // Double click to start ComfyUI (Intel GPU)
```
Double click `run_intel_gpu.bat` to launch ComfyUI.
After downloading and extracting, you will see the command running as shown in the image below
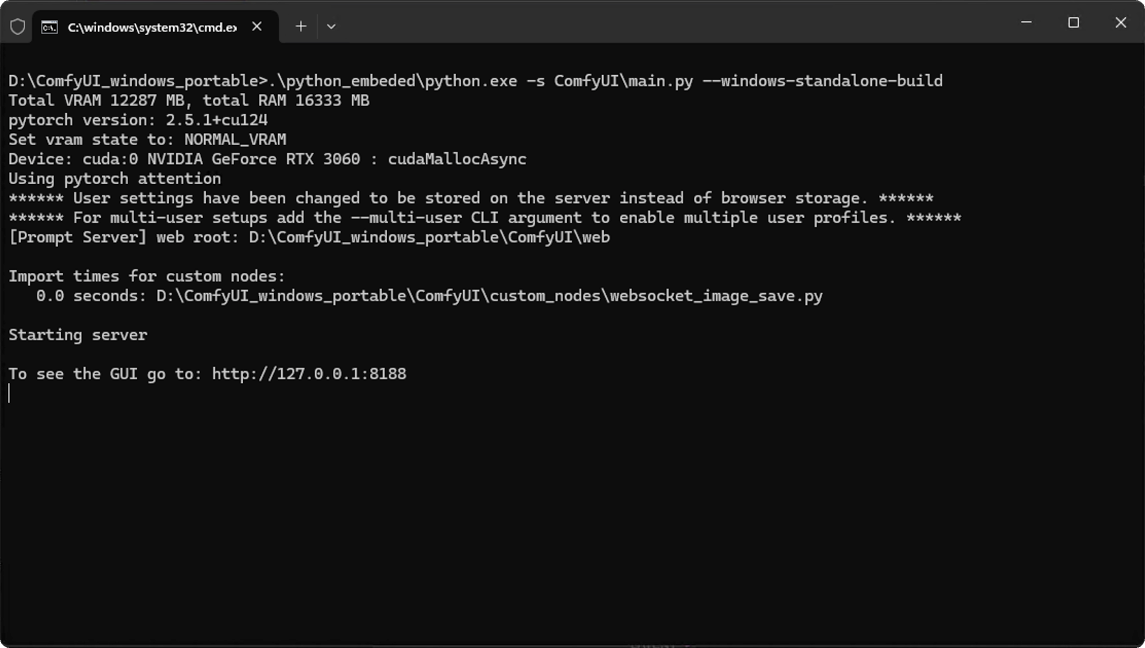 When you see something similar to the image
```
To see the GUI go to: http://127.0.0.1:8188
```
At this point, your ComfyUI service has started. Normally, ComfyUI will automatically open your default browser and navigate to `http://127.0.0.1:8188`. If it doesn't open automatically, please manually open your browser and visit this address.
During use, please do not close the corresponding command line window, otherwise ComfyUI will stop running
## Adding Extra Model Paths
If you want to manage your model files outside of `ComfyUI/models`, you may have the following reasons:
* You have multiple ComfyUI instances and want them to share model files to save disk space
* You have different types of GUI programs (such as WebUI) and want them to use the same model files
* Model files cannot be recognized or found
We provide a way to add extra model search paths via the `extra_model_paths.yaml` configuration file
### Open Config File
For the ComfyUI version such as [portable](/installation/comfyui_portable_windows) and [manual](/installation/manual_install), you can find an example file named `extra_model_paths.yaml.example` in the root directory of ComfyUI:
```
ComfyUI/extra_model_paths.yaml.example
```
Copy and rename it to `extra_model_paths.yaml` for use. Keep it in ComfyUI's root directory at `ComfyUI/extra_model_paths.yaml`.
You can also find the config example file [here](https://github.com/Comfy-Org/ComfyUI/blob/master/extra_model_paths.yaml.example)
If you are using the [Comfy Desktop](/installation/desktop/windows) application, you can follow the image below to open the extra model config file:
When you see something similar to the image
```
To see the GUI go to: http://127.0.0.1:8188
```
At this point, your ComfyUI service has started. Normally, ComfyUI will automatically open your default browser and navigate to `http://127.0.0.1:8188`. If it doesn't open automatically, please manually open your browser and visit this address.
During use, please do not close the corresponding command line window, otherwise ComfyUI will stop running
## Adding Extra Model Paths
If you want to manage your model files outside of `ComfyUI/models`, you may have the following reasons:
* You have multiple ComfyUI instances and want them to share model files to save disk space
* You have different types of GUI programs (such as WebUI) and want them to use the same model files
* Model files cannot be recognized or found
We provide a way to add extra model search paths via the `extra_model_paths.yaml` configuration file
### Open Config File
For the ComfyUI version such as [portable](/installation/comfyui_portable_windows) and [manual](/installation/manual_install), you can find an example file named `extra_model_paths.yaml.example` in the root directory of ComfyUI:
```
ComfyUI/extra_model_paths.yaml.example
```
Copy and rename it to `extra_model_paths.yaml` for use. Keep it in ComfyUI's root directory at `ComfyUI/extra_model_paths.yaml`.
You can also find the config example file [here](https://github.com/Comfy-Org/ComfyUI/blob/master/extra_model_paths.yaml.example)
If you are using the [Comfy Desktop](/installation/desktop/windows) application, you can follow the image below to open the extra model config file:
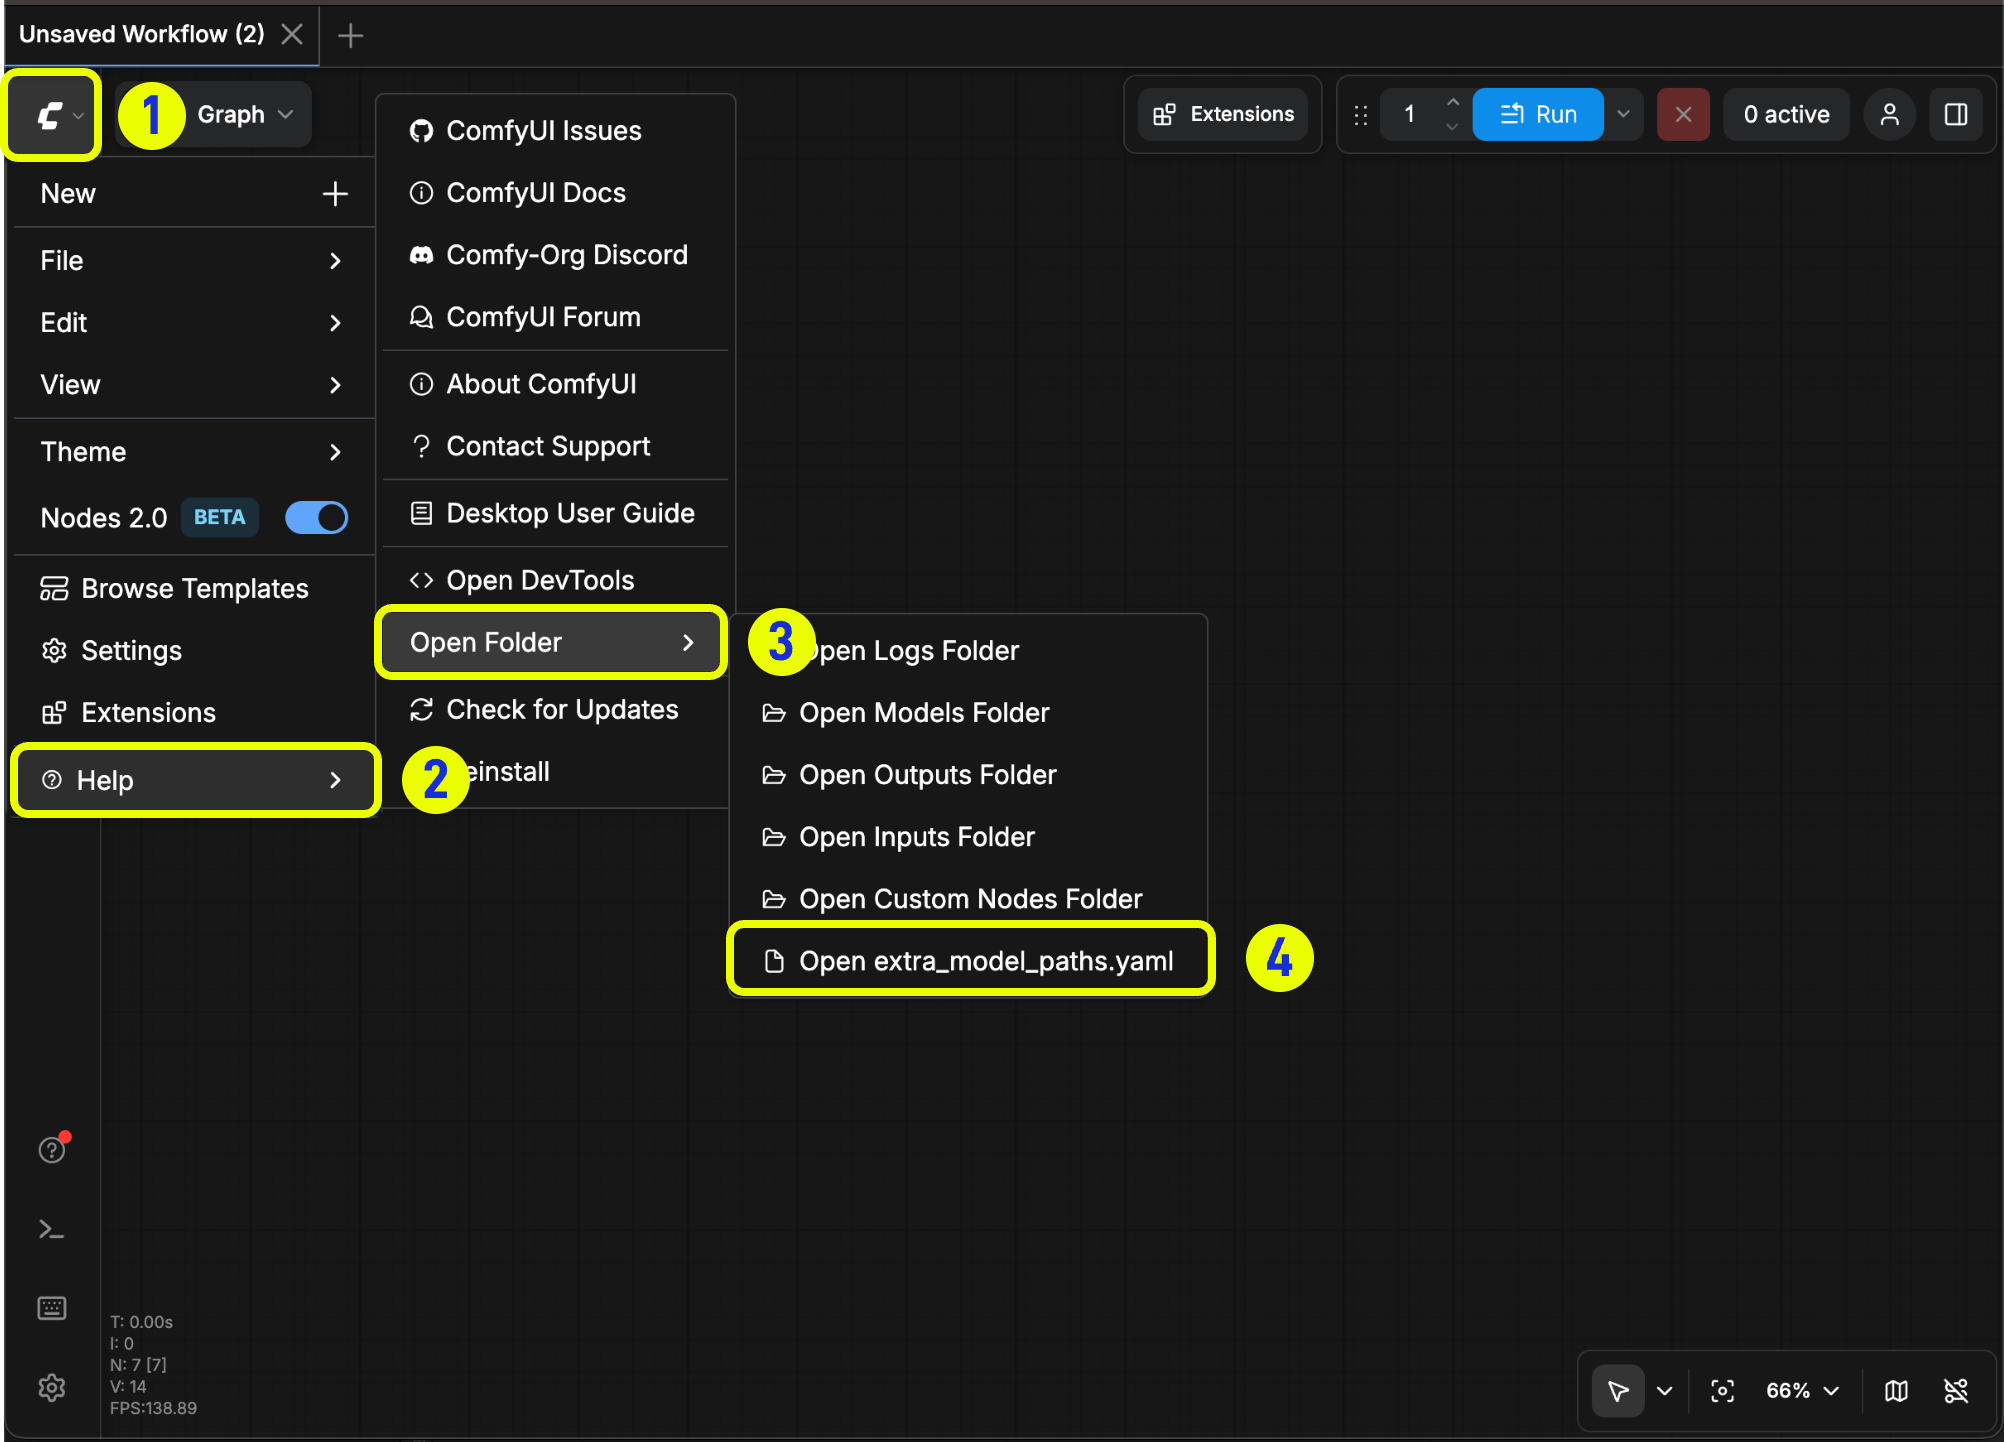 Or open it directly at:
```
C:\Users\YourUsername\AppData\Roaming\ComfyUI\extra_models_config.yaml
```
```
~/Library/Application Support/ComfyUI/extra_models_config.yaml
```
You should keep the file in the same directory, should not move these files to other places.
If the file does not exist, you can create it yourself with any text editor.
### Example Structure
Suppose you want to add the following model paths to ComfyUI:
```
📁 YOUR_PATH/
├── 📁models/
| ├── 📁 loras/
| │ └── xxxxx.safetensors
| ├── 📁 checkpoints/
| │ └── xxxxx.safetensors
| ├── 📁 vae/
| │ └── xxxxx.safetensors
| └── 📁 controlnet/
| └── xxxxx.safetensors
```
Then you can configure the `extra_model_paths.yaml` file like below to let ComfyUI recognize the model paths on your device:
```
my_custom_config:
base_path: YOUR_PATH
loras: models/loras/
checkpoints: models/checkpoints/
vae: models/vae/
controlnet: models/controlnet/
```
or
```
my_custom_config:
base_path: YOUR_PATH/models/
loras: loras
checkpoints: checkpoints
vae: vae
controlnet: controlnet
```
For the desktop version, please add the configuration to the existing configuration path without overwriting the path configuration generated during installation. Please back up the corresponding file before modification, so that you can restore it when you make a mistake.
Or you can refer to the default [extra\_model\_paths.yaml.example](https://github.com/Comfy-Org/ComfyUI/blob/master/extra_model_paths.yaml.example) for more configuration options. After saving, you need to **restart ComfyUI** for the changes to take effect.
Below is the original config example:
```yaml theme={null}
#Rename this to extra_model_paths.yaml and ComfyUI will load it
#config for a1111 ui
#all you have to do is change the base_path to where yours is installed
a111:
base_path: path/to/stable-diffusion-webui/
checkpoints: models/Stable-diffusion
configs: models/Stable-diffusion
vae: models/VAE
loras: |
models/Lora
models/LyCORIS
upscale_models: |
models/ESRGAN
models/RealESRGAN
models/SwinIR
embeddings: embeddings
hypernetworks: models/hypernetworks
controlnet: models/ControlNet
#config for comfyui
#your base path should be either an existing comfy install or a central folder where you store all of your models, loras, etc.
#comfyui:
# base_path: path/to/comfyui/
# # You can use is_default to mark that these folders should be listed first, and used as the default dirs for eg downloads
# #is_default: true
# checkpoints: models/checkpoints/
# clip: models/clip/
# clip_vision: models/clip_vision/
# configs: models/configs/
# controlnet: models/controlnet/
# diffusion_models: |
# models/diffusion_models
# models/unet
# embeddings: models/embeddings/
# loras: models/loras/
# upscale_models: models/upscale_models/
# vae: models/vae/
#other_ui:
# base_path: path/to/ui
# checkpoints: models/checkpoints
# gligen: models/gligen
# custom_nodes: path/custom_nodes
```
For example, if your WebUI is located at `D:\stable-diffusion-webui\`, you can modify the corresponding configuration to
```yaml theme={null}
a111:
base_path: D:\stable-diffusion-webui\
checkpoints: models/Stable-diffusion
configs: models/Stable-diffusion
vae: models/VAE
loras: |
models/Lora
models/LyCORIS
upscale_models: |
models/ESRGAN
models/RealESRGAN
models/SwinIR
embeddings: embeddings
hypernetworks: models/hypernetworks
controlnet: models/ControlNet
```
### Add Extra Custom Nodes Path
Besides adding external models, you can also add custom nodes paths that are not in the default path of ComfyUI
Please note that this will not change the default installation path of custom nodes, but will add an extra path search when starting ComfyUI. You still need to complete the installation of custom node dependencies in the corresponding environment to ensure the integrity of the running environment.
Below is a simple configuration example (MacOS), please modify it according to your actual situation and add it to the corresponding configuration file, save it and restart ComfyUI for the changes to take effect:
```yaml theme={null}
my_custom_nodes:
custom_nodes: /Users/your_username/Documents/extra_custom_nodes
```
## First Image Generation
After successful installation, you can refer to the section below to start your ComfyUI journey\~
This tutorial will guide you through your first model installation and text-to-image generation
## Additional ComfyUI Portable Instructions
### 1. Upgrading ComfyUI Portable
You can use the batch commands in the update folder to upgrade your ComfyUI Portable version
```
ComfyUI_windows_portable
└─ 📂update
├── update.py
├── update_comfyui.bat // Update ComfyUI to the latest commit version
├── update_comfyui_and_python_dependencies.bat // Only use when you have issues with your runtime environment
└── update_comfyui_stable.bat // Update ComfyUI to the latest stable version
```
### 2. Setting Up LAN Access for ComfyUI Portable
If your ComfyUI is running on a local network and you want other devices to access ComfyUI, you can modify the corresponding `.bat` file (e.g. `run_nvidia_gpu.bat`, `run_amd_gpu.bat`, or `run_cpu.bat`) using Notepad to complete the configuration. This is mainly done by adding `--listen` to specify the listening address.
Below is an example of the `run_nvidia_gpu.bat` file command with the `--listen` parameter added
```bat theme={null}
.\python_embeded\python.exe -s ComfyUI\main.py --listen --windows-standalone-build
pause
```
After enabling ComfyUI, you will notice the final running address will become
```
Starting server
To see the GUI go to: http://0.0.0.0:8188
To see the GUI go to: http://[::]:8188
```
You can press `WIN + R` and type `cmd` to open the command prompt, then enter `ipconfig` to view your local IP address. Other devices can then access ComfyUI by entering `http://your-local-IP:8188` in their browser.
Or open it directly at:
```
C:\Users\YourUsername\AppData\Roaming\ComfyUI\extra_models_config.yaml
```
```
~/Library/Application Support/ComfyUI/extra_models_config.yaml
```
You should keep the file in the same directory, should not move these files to other places.
If the file does not exist, you can create it yourself with any text editor.
### Example Structure
Suppose you want to add the following model paths to ComfyUI:
```
📁 YOUR_PATH/
├── 📁models/
| ├── 📁 loras/
| │ └── xxxxx.safetensors
| ├── 📁 checkpoints/
| │ └── xxxxx.safetensors
| ├── 📁 vae/
| │ └── xxxxx.safetensors
| └── 📁 controlnet/
| └── xxxxx.safetensors
```
Then you can configure the `extra_model_paths.yaml` file like below to let ComfyUI recognize the model paths on your device:
```
my_custom_config:
base_path: YOUR_PATH
loras: models/loras/
checkpoints: models/checkpoints/
vae: models/vae/
controlnet: models/controlnet/
```
or
```
my_custom_config:
base_path: YOUR_PATH/models/
loras: loras
checkpoints: checkpoints
vae: vae
controlnet: controlnet
```
For the desktop version, please add the configuration to the existing configuration path without overwriting the path configuration generated during installation. Please back up the corresponding file before modification, so that you can restore it when you make a mistake.
Or you can refer to the default [extra\_model\_paths.yaml.example](https://github.com/Comfy-Org/ComfyUI/blob/master/extra_model_paths.yaml.example) for more configuration options. After saving, you need to **restart ComfyUI** for the changes to take effect.
Below is the original config example:
```yaml theme={null}
#Rename this to extra_model_paths.yaml and ComfyUI will load it
#config for a1111 ui
#all you have to do is change the base_path to where yours is installed
a111:
base_path: path/to/stable-diffusion-webui/
checkpoints: models/Stable-diffusion
configs: models/Stable-diffusion
vae: models/VAE
loras: |
models/Lora
models/LyCORIS
upscale_models: |
models/ESRGAN
models/RealESRGAN
models/SwinIR
embeddings: embeddings
hypernetworks: models/hypernetworks
controlnet: models/ControlNet
#config for comfyui
#your base path should be either an existing comfy install or a central folder where you store all of your models, loras, etc.
#comfyui:
# base_path: path/to/comfyui/
# # You can use is_default to mark that these folders should be listed first, and used as the default dirs for eg downloads
# #is_default: true
# checkpoints: models/checkpoints/
# clip: models/clip/
# clip_vision: models/clip_vision/
# configs: models/configs/
# controlnet: models/controlnet/
# diffusion_models: |
# models/diffusion_models
# models/unet
# embeddings: models/embeddings/
# loras: models/loras/
# upscale_models: models/upscale_models/
# vae: models/vae/
#other_ui:
# base_path: path/to/ui
# checkpoints: models/checkpoints
# gligen: models/gligen
# custom_nodes: path/custom_nodes
```
For example, if your WebUI is located at `D:\stable-diffusion-webui\`, you can modify the corresponding configuration to
```yaml theme={null}
a111:
base_path: D:\stable-diffusion-webui\
checkpoints: models/Stable-diffusion
configs: models/Stable-diffusion
vae: models/VAE
loras: |
models/Lora
models/LyCORIS
upscale_models: |
models/ESRGAN
models/RealESRGAN
models/SwinIR
embeddings: embeddings
hypernetworks: models/hypernetworks
controlnet: models/ControlNet
```
### Add Extra Custom Nodes Path
Besides adding external models, you can also add custom nodes paths that are not in the default path of ComfyUI
Please note that this will not change the default installation path of custom nodes, but will add an extra path search when starting ComfyUI. You still need to complete the installation of custom node dependencies in the corresponding environment to ensure the integrity of the running environment.
Below is a simple configuration example (MacOS), please modify it according to your actual situation and add it to the corresponding configuration file, save it and restart ComfyUI for the changes to take effect:
```yaml theme={null}
my_custom_nodes:
custom_nodes: /Users/your_username/Documents/extra_custom_nodes
```
## First Image Generation
After successful installation, you can refer to the section below to start your ComfyUI journey\~
This tutorial will guide you through your first model installation and text-to-image generation
## Additional ComfyUI Portable Instructions
### 1. Upgrading ComfyUI Portable
You can use the batch commands in the update folder to upgrade your ComfyUI Portable version
```
ComfyUI_windows_portable
└─ 📂update
├── update.py
├── update_comfyui.bat // Update ComfyUI to the latest commit version
├── update_comfyui_and_python_dependencies.bat // Only use when you have issues with your runtime environment
└── update_comfyui_stable.bat // Update ComfyUI to the latest stable version
```
### 2. Setting Up LAN Access for ComfyUI Portable
If your ComfyUI is running on a local network and you want other devices to access ComfyUI, you can modify the corresponding `.bat` file (e.g. `run_nvidia_gpu.bat`, `run_amd_gpu.bat`, or `run_cpu.bat`) using Notepad to complete the configuration. This is mainly done by adding `--listen` to specify the listening address.
Below is an example of the `run_nvidia_gpu.bat` file command with the `--listen` parameter added
```bat theme={null}
.\python_embeded\python.exe -s ComfyUI\main.py --listen --windows-standalone-build
pause
```
After enabling ComfyUI, you will notice the final running address will become
```
Starting server
To see the GUI go to: http://0.0.0.0:8188
To see the GUI go to: http://[::]:8188
```
You can press `WIN + R` and type `cmd` to open the command prompt, then enter `ipconfig` to view your local IP address. Other devices can then access ComfyUI by entering `http://your-local-IP:8188` in their browser.