> ## Documentation Index
> Fetch the complete documentation index at: https://docs.comfy.org/llms.txt
> Use this file to discover all available pages before exploring further.
# Instance Management
> Create, edit, rename, and delete ComfyUI instances in Comfy Desktop
Comfy Desktop lets you manage multiple ComfyUI instances from the Chooser view.
### Instance Types
Comfy Desktop supports four types of instances. Each type displays a distinct icon on its card and in the title bar.
| Type | Icon | Description |
| -------------- | ---- | ------------------------------------------------------------------------------------------------------------------------------------------------------------------------------------------------------------------------------------------------------------------ |
| **Standalone** | 💻 | A self-contained ComfyUI instance created by Comfy Desktop. Includes bundled Python, automatic updates, and full snapshot support. This is the default when you click **New Install**. |
| **Cloud** | ☁️ | A Comfy Cloud instance. Requires a Comfy Cloud account. Cloud instances run on Comfy's servers and are billed separately. |
| **Remote** | 🌐 | Connects to a ComfyUI instance running on another machine on your network. Configure the remote host and port during setup. |
| **Tracked** | — | Tracks an existing ComfyUI installation (Git clone or portable). Uses the same icon as **Standalone** — there is no separate icon for tracked instances. You manage updates manually. See [Tracking an Existing Installation](#tracking-an-existing-installation). |
The image below labels the key actions available for each instance card:
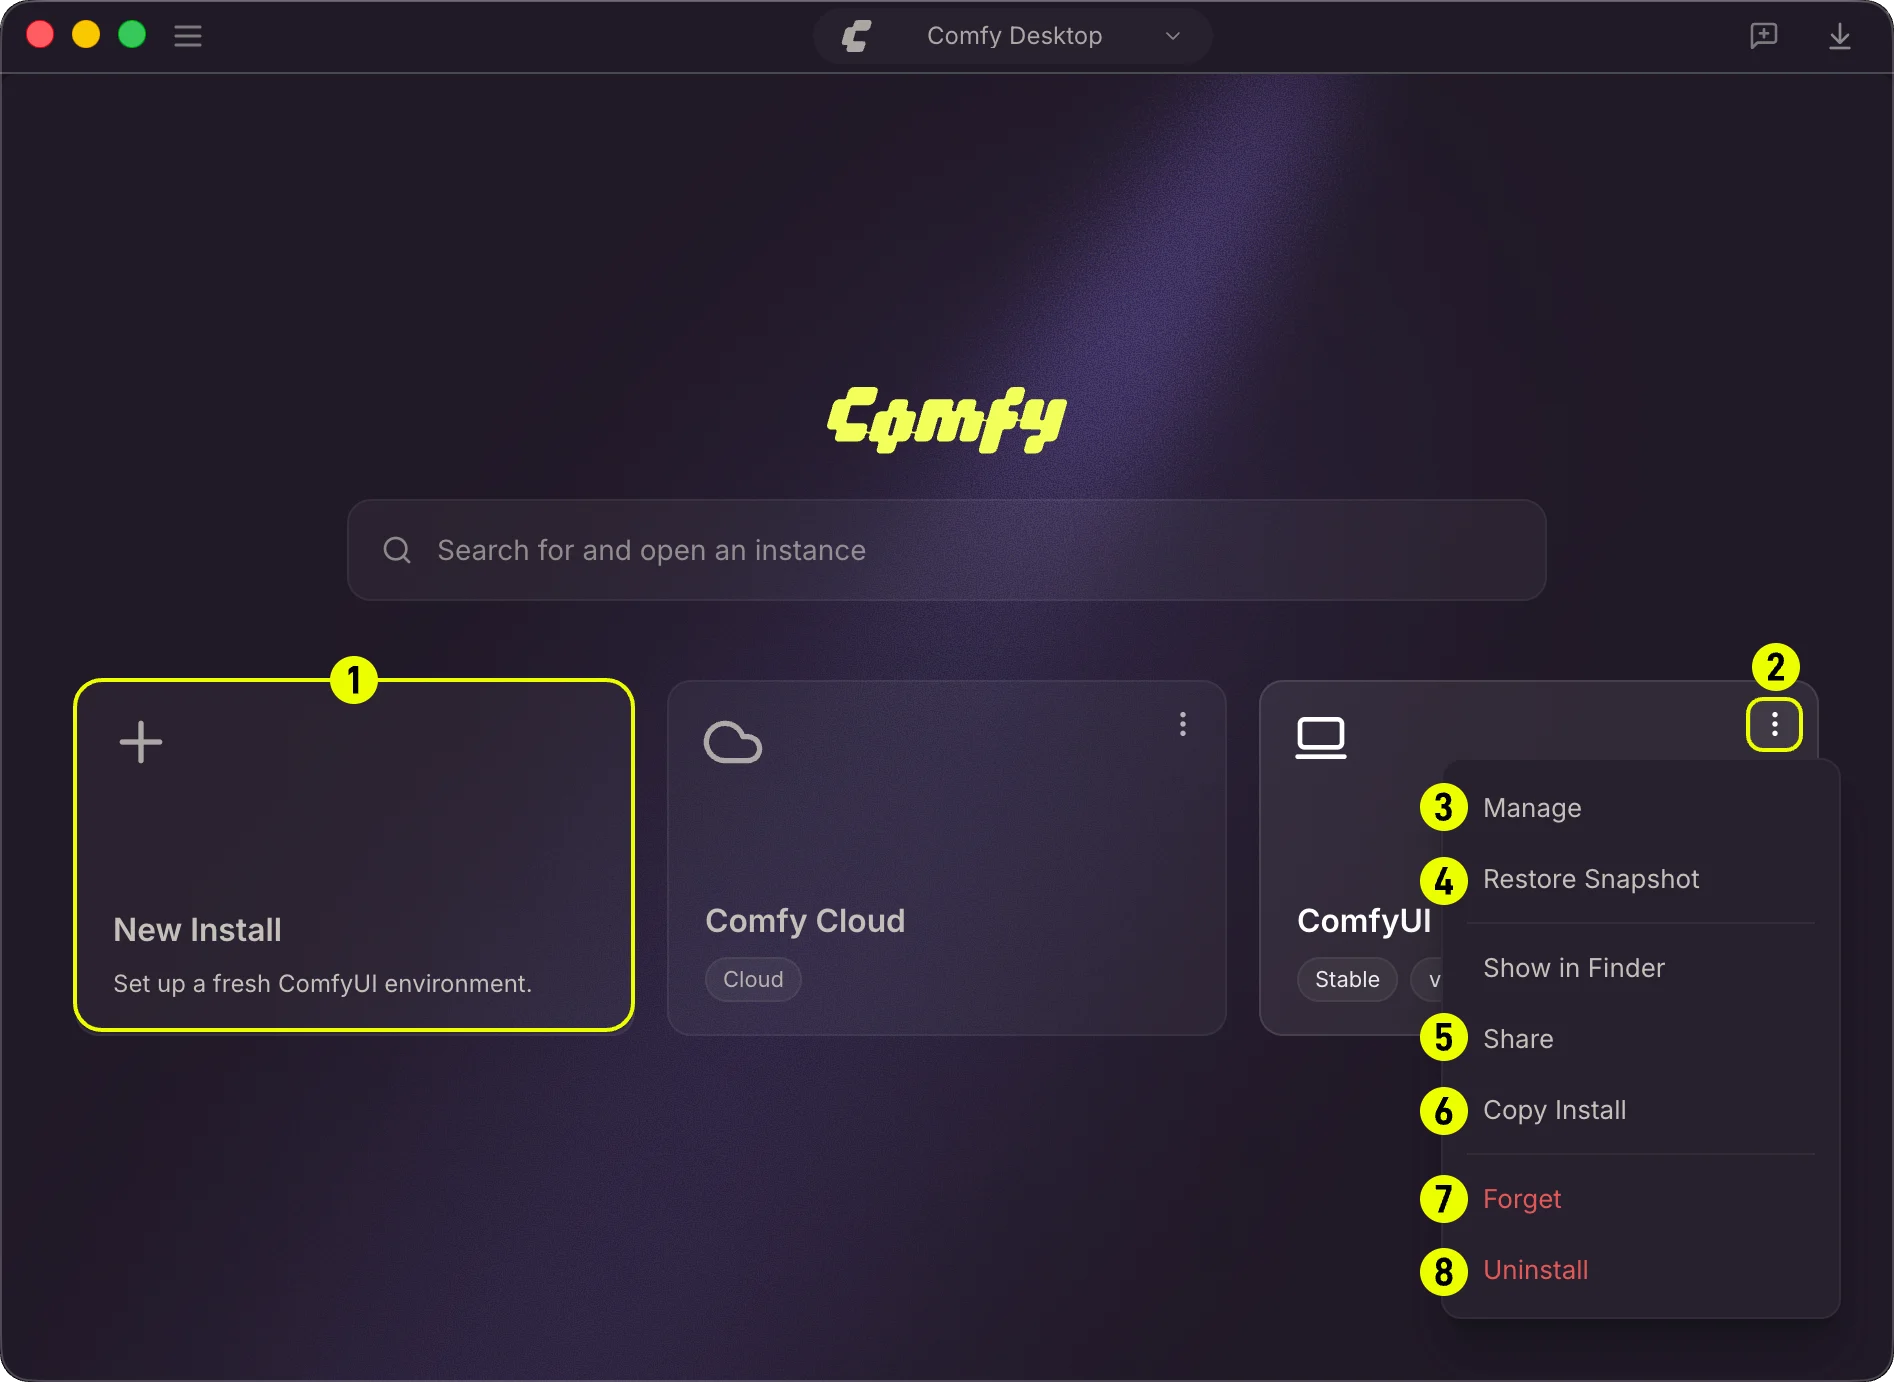 1. **New Install**: Create a brand new ComfyUI instance. See [Creating a New Instance](#creating-a-new-instance). You can also [create an instance from a snapshot file](/installation/desktop/usage/snapshots#create-an-instance-from-a-snapshot-file).
2. **⋮ Menu**: Click the three-dot icon to open the action menu for an instance.
3. **Manage**: Open the Manage panel to configure the instance (path, launch args, model directories, environment variables). See the [Manage](/installation/desktop/usage/manage) page.
4. **Restore Snapshot**: Revert the instance to a previous snapshot. See the [Snapshots](/installation/desktop/usage/snapshots) page.
5. **Share**: Export a snapshot of the instance to share with others.
6. **Copy Installation**: Duplicate an existing standalone installation with its own Python environment and custom nodes. See [Copying an Installation](#copying-an-installation).
7. **Forget**: Remove the instance from the Chooser without deleting its files (equivalent to Untrack).
8. **Uninstall**: Permanently delete the instance and all its files from disk.
See [Uninstalling an Instance](#uninstalling-an-instance) for details on Forget and Uninstall.
## Creating a New Instance
Click the **+** card (top-left) in the Chooser view to add a new ComfyUI instance.
1. **New Install**: Create a brand new ComfyUI instance. See [Creating a New Instance](#creating-a-new-instance). You can also [create an instance from a snapshot file](/installation/desktop/usage/snapshots#create-an-instance-from-a-snapshot-file).
2. **⋮ Menu**: Click the three-dot icon to open the action menu for an instance.
3. **Manage**: Open the Manage panel to configure the instance (path, launch args, model directories, environment variables). See the [Manage](/installation/desktop/usage/manage) page.
4. **Restore Snapshot**: Revert the instance to a previous snapshot. See the [Snapshots](/installation/desktop/usage/snapshots) page.
5. **Share**: Export a snapshot of the instance to share with others.
6. **Copy Installation**: Duplicate an existing standalone installation with its own Python environment and custom nodes. See [Copying an Installation](#copying-an-installation).
7. **Forget**: Remove the instance from the Chooser without deleting its files (equivalent to Untrack).
8. **Uninstall**: Permanently delete the instance and all its files from disk.
See [Uninstalling an Instance](#uninstalling-an-instance) for details on Forget and Uninstall.
## Creating a New Instance
Click the **+** card (top-left) in the Chooser view to add a new ComfyUI instance.
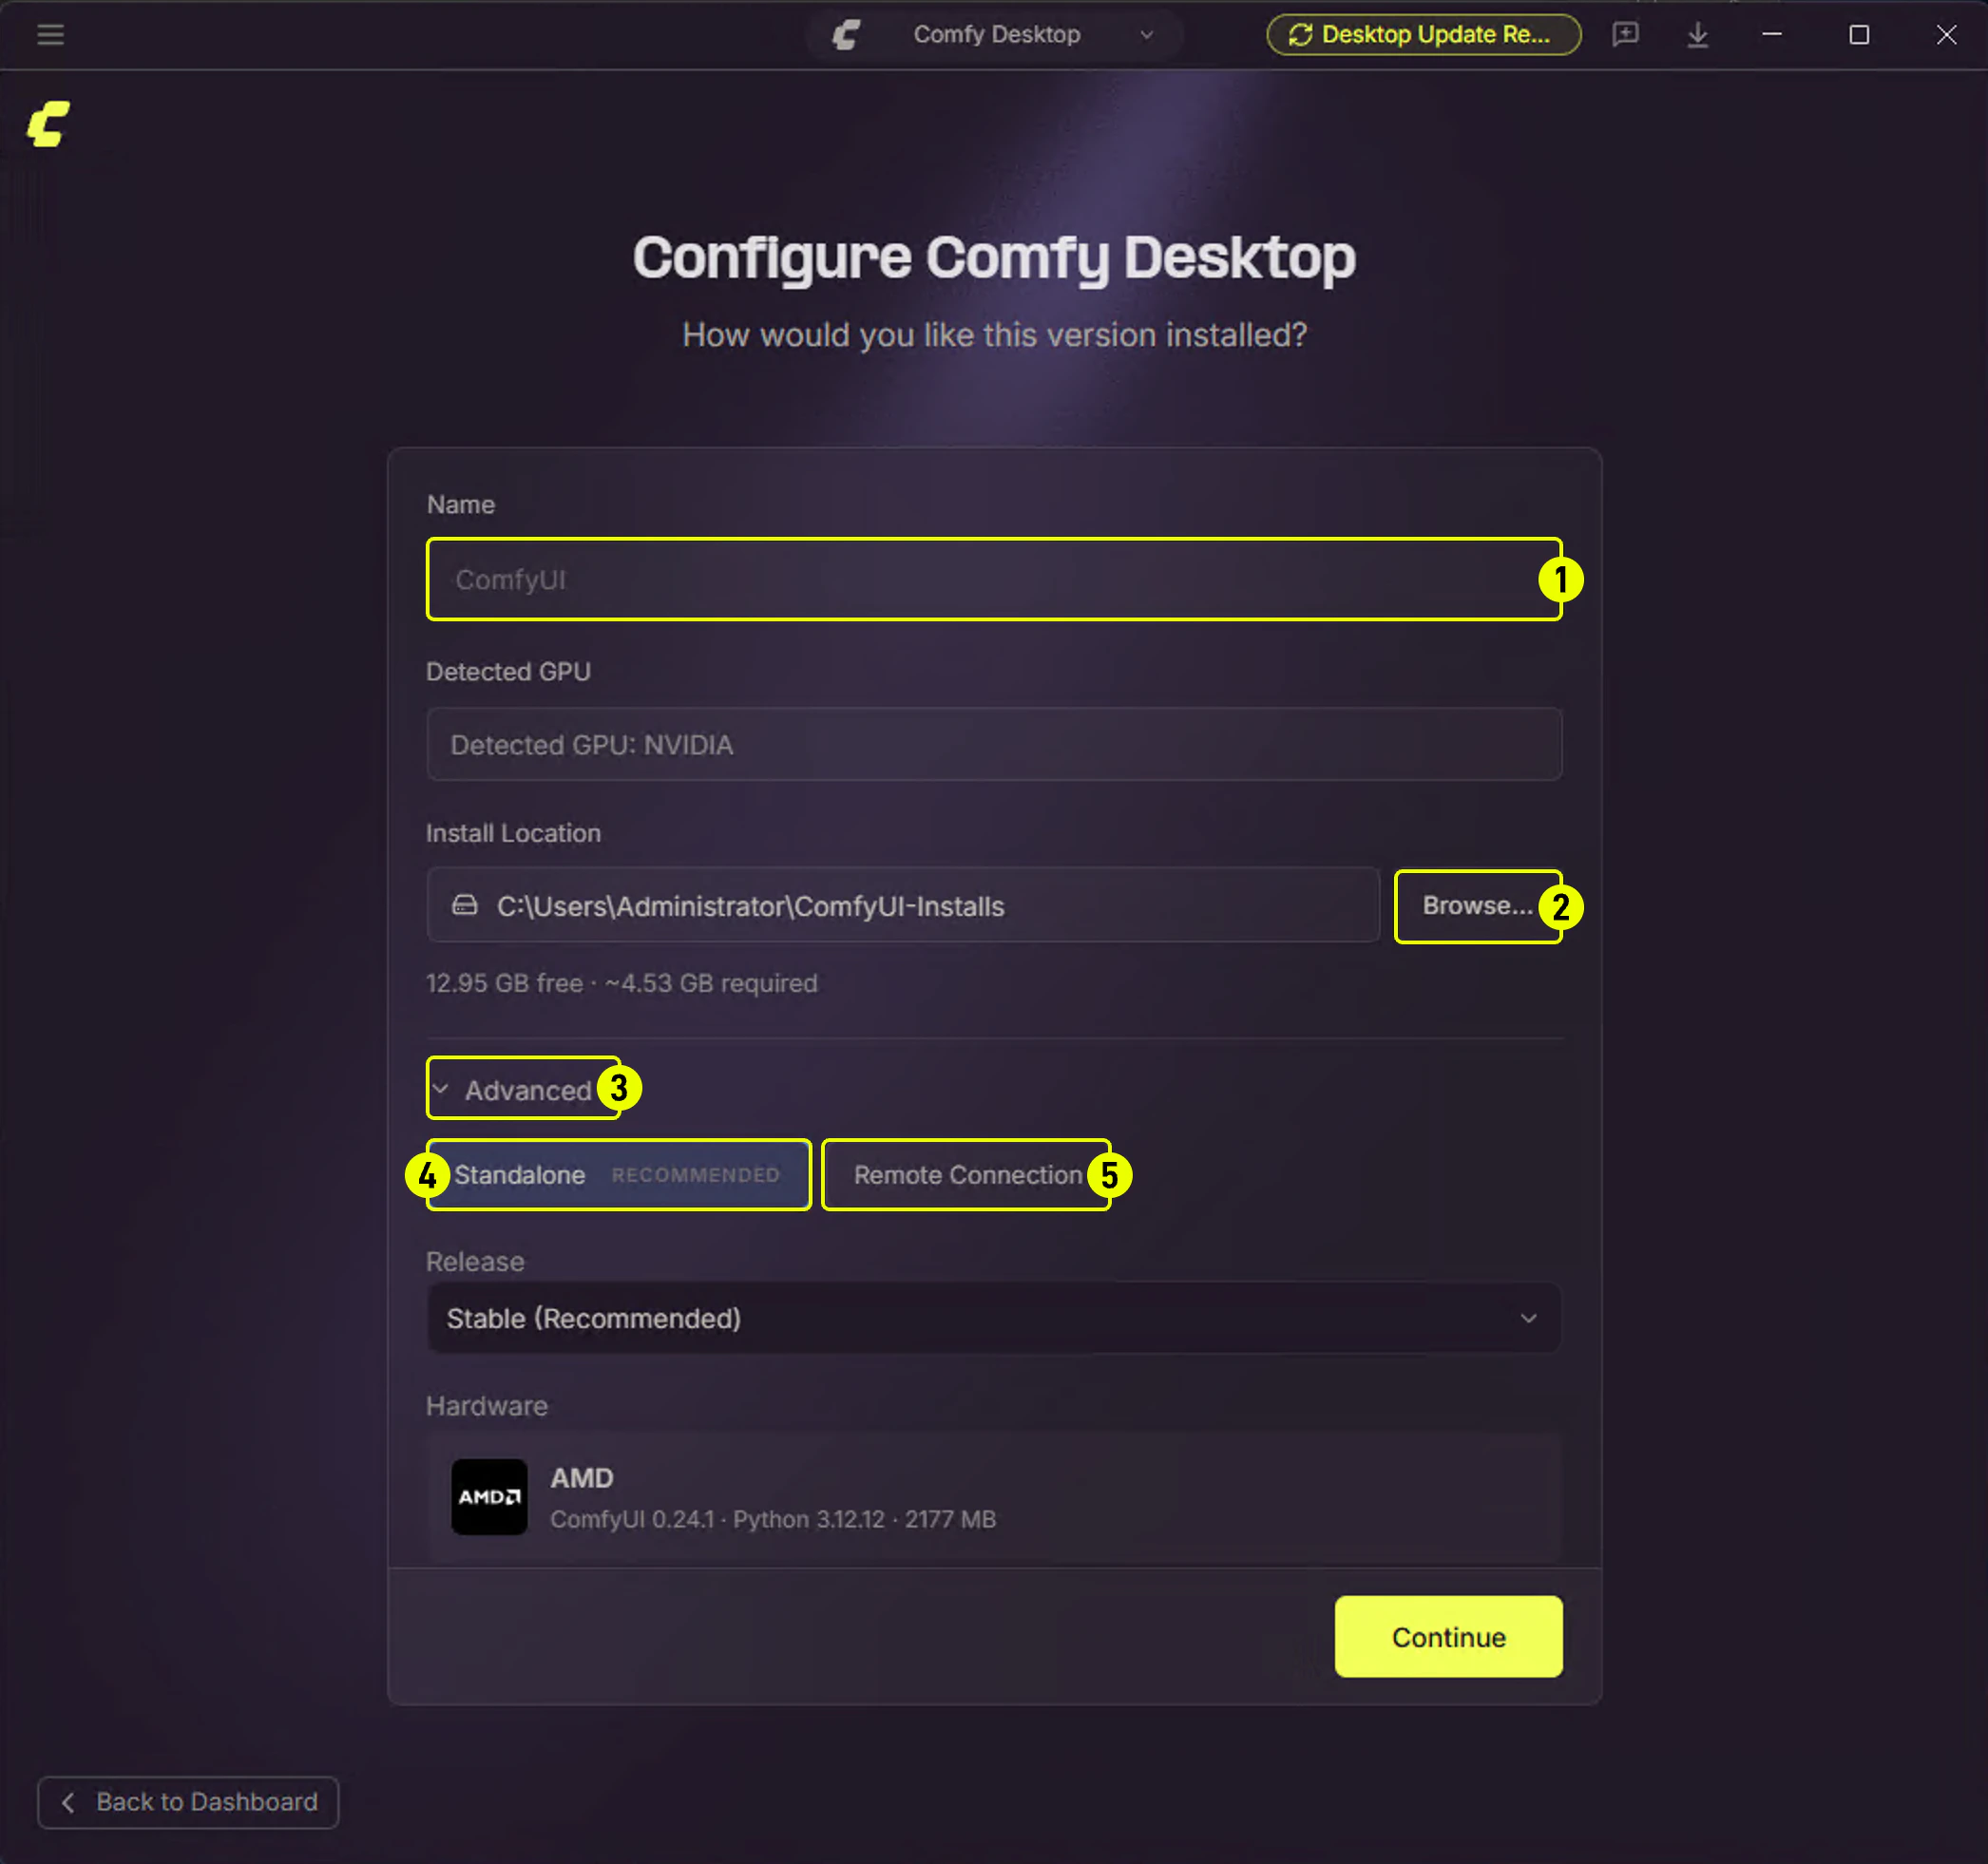
 1. **Installation Name**: The name of your instance. The default is "ComfyUI".
2. **Install Location**: Choose where to install ComfyUI. On Windows, it's strongly recommended to use an **SSD** and avoid the root of the C: drive.
3. **Advanced**: Click to expand to access additional options.
4. **Standalone**: The recommended option. A self-contained install with bundled Python, automatic updates, and snapshot support.
5. **Remote Connection**: Connect to a ComfyUI instance running on another machine.
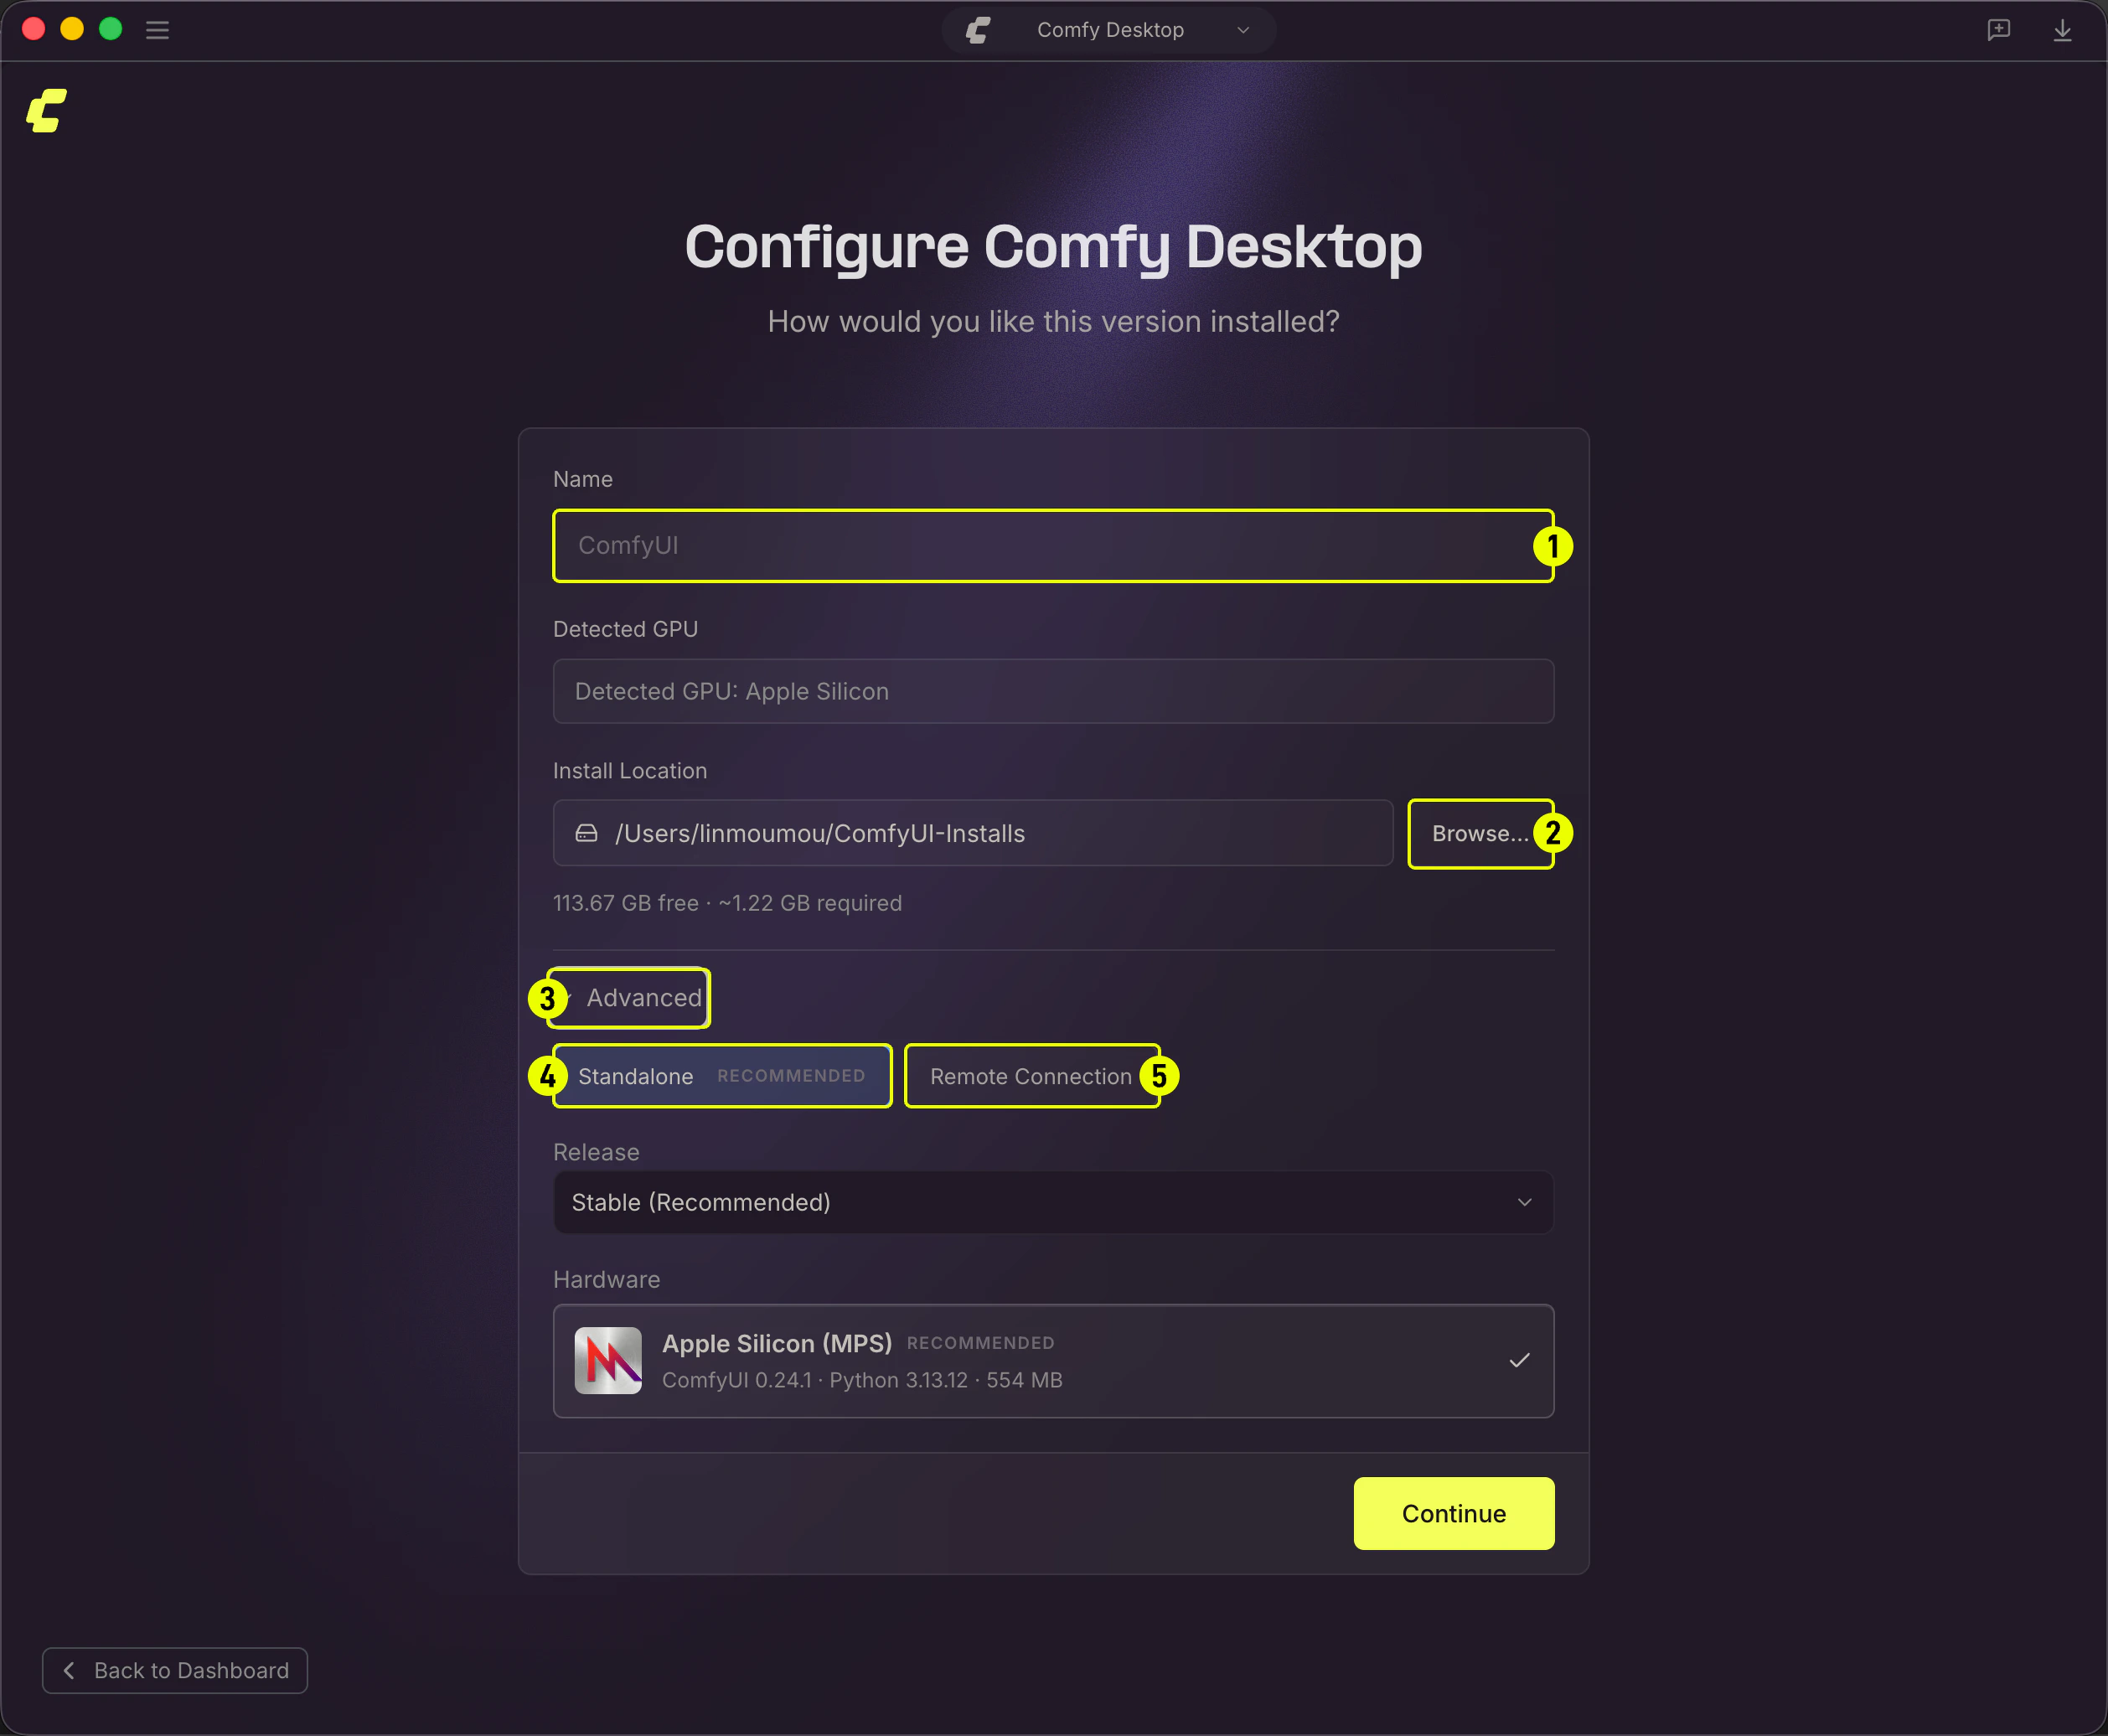
1. **Installation Name**: The name of your instance. The default is "ComfyUI".
2. **Install Location**: Choose where to install ComfyUI. On Windows, it's strongly recommended to use an **SSD** and avoid the root of the C: drive.
3. **Advanced**: Click to expand to access additional options.
4. **Standalone**: The recommended option. A self-contained install with bundled Python, automatic updates, and snapshot support.
5. **Remote Connection**: Connect to a ComfyUI instance running on another machine.
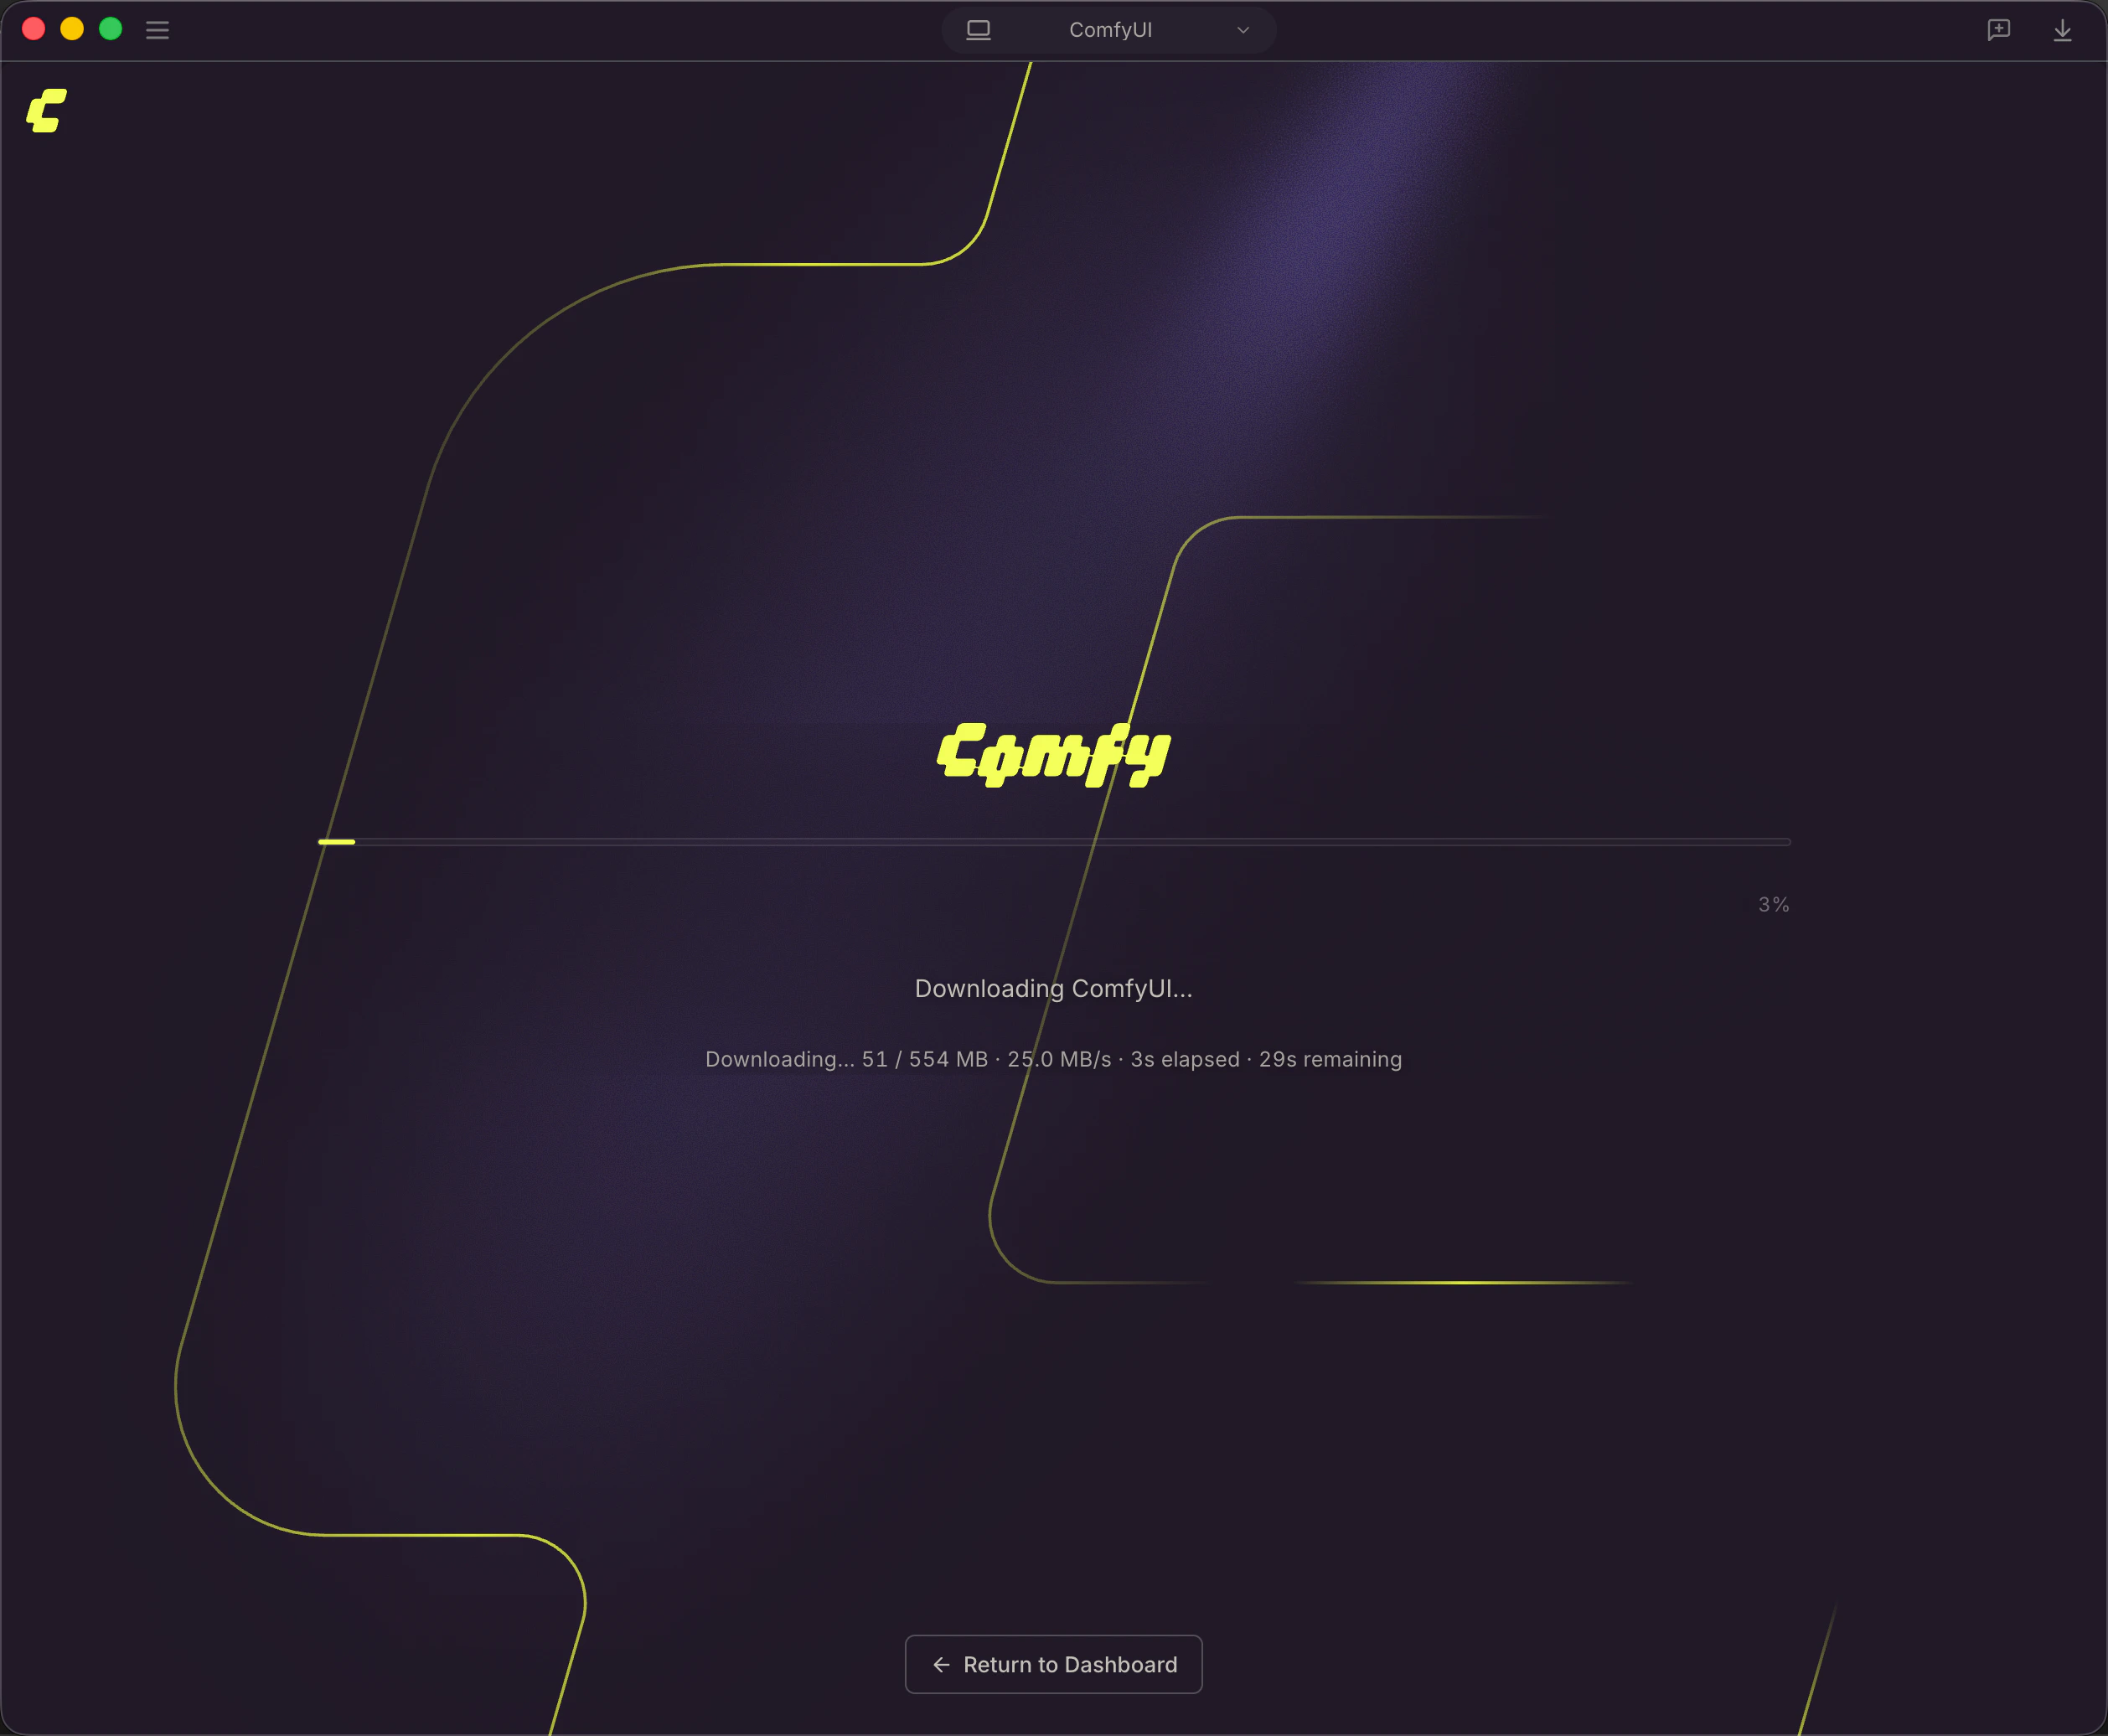 Comfy Desktop will handle the rest: downloading Python, setting up the environment, and installing ComfyUI. The progress screen shows the current step.
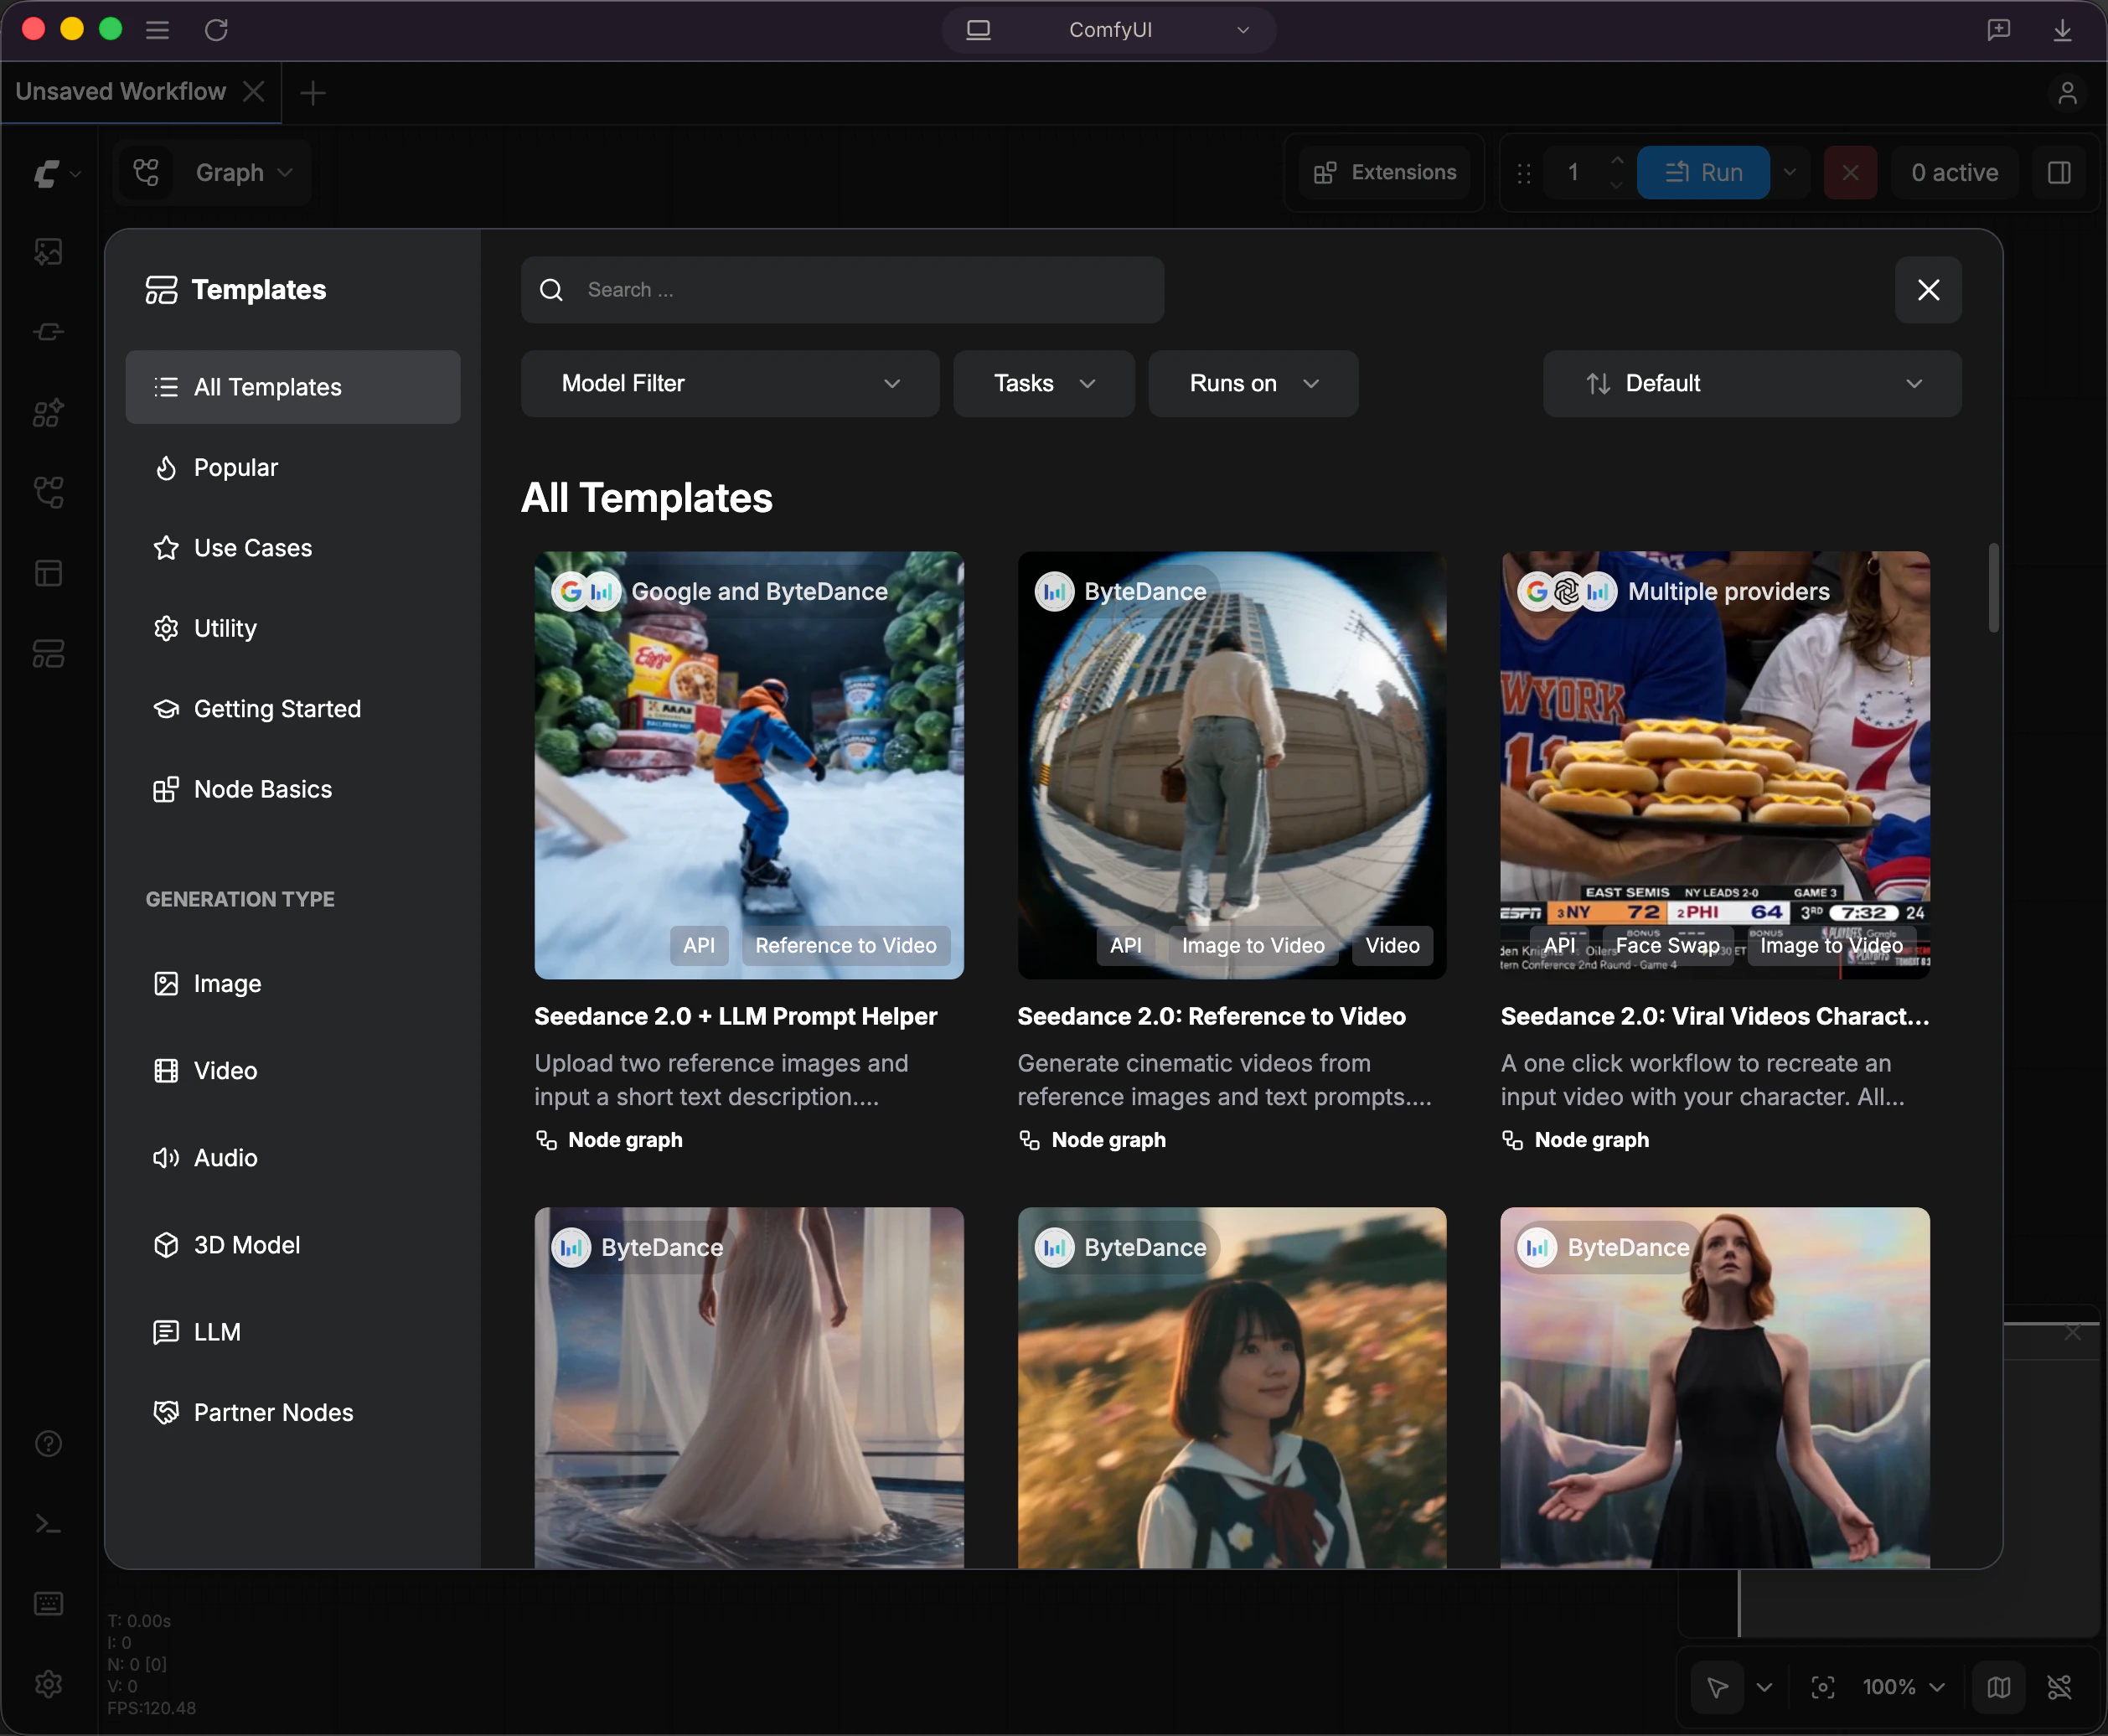 Once the installation is complete, Comfy Desktop opens the template library where you can pick a workflow template to get started.
## Tracking an Existing Installation
If you already have a ComfyUI installation (either manually set up from the Git repository or downloaded as a portable version), you can add it to Comfy Desktop without creating a new one.
Click **New Install** on the Dashboard to open the installation menu, then select **Add Existing Install**.
Once the installation is complete, Comfy Desktop opens the template library where you can pick a workflow template to get started.
## Tracking an Existing Installation
If you already have a ComfyUI installation (either manually set up from the Git repository or downloaded as a portable version), you can add it to Comfy Desktop without creating a new one.
Click **New Install** on the Dashboard to open the installation menu, then select **Add Existing Install**.
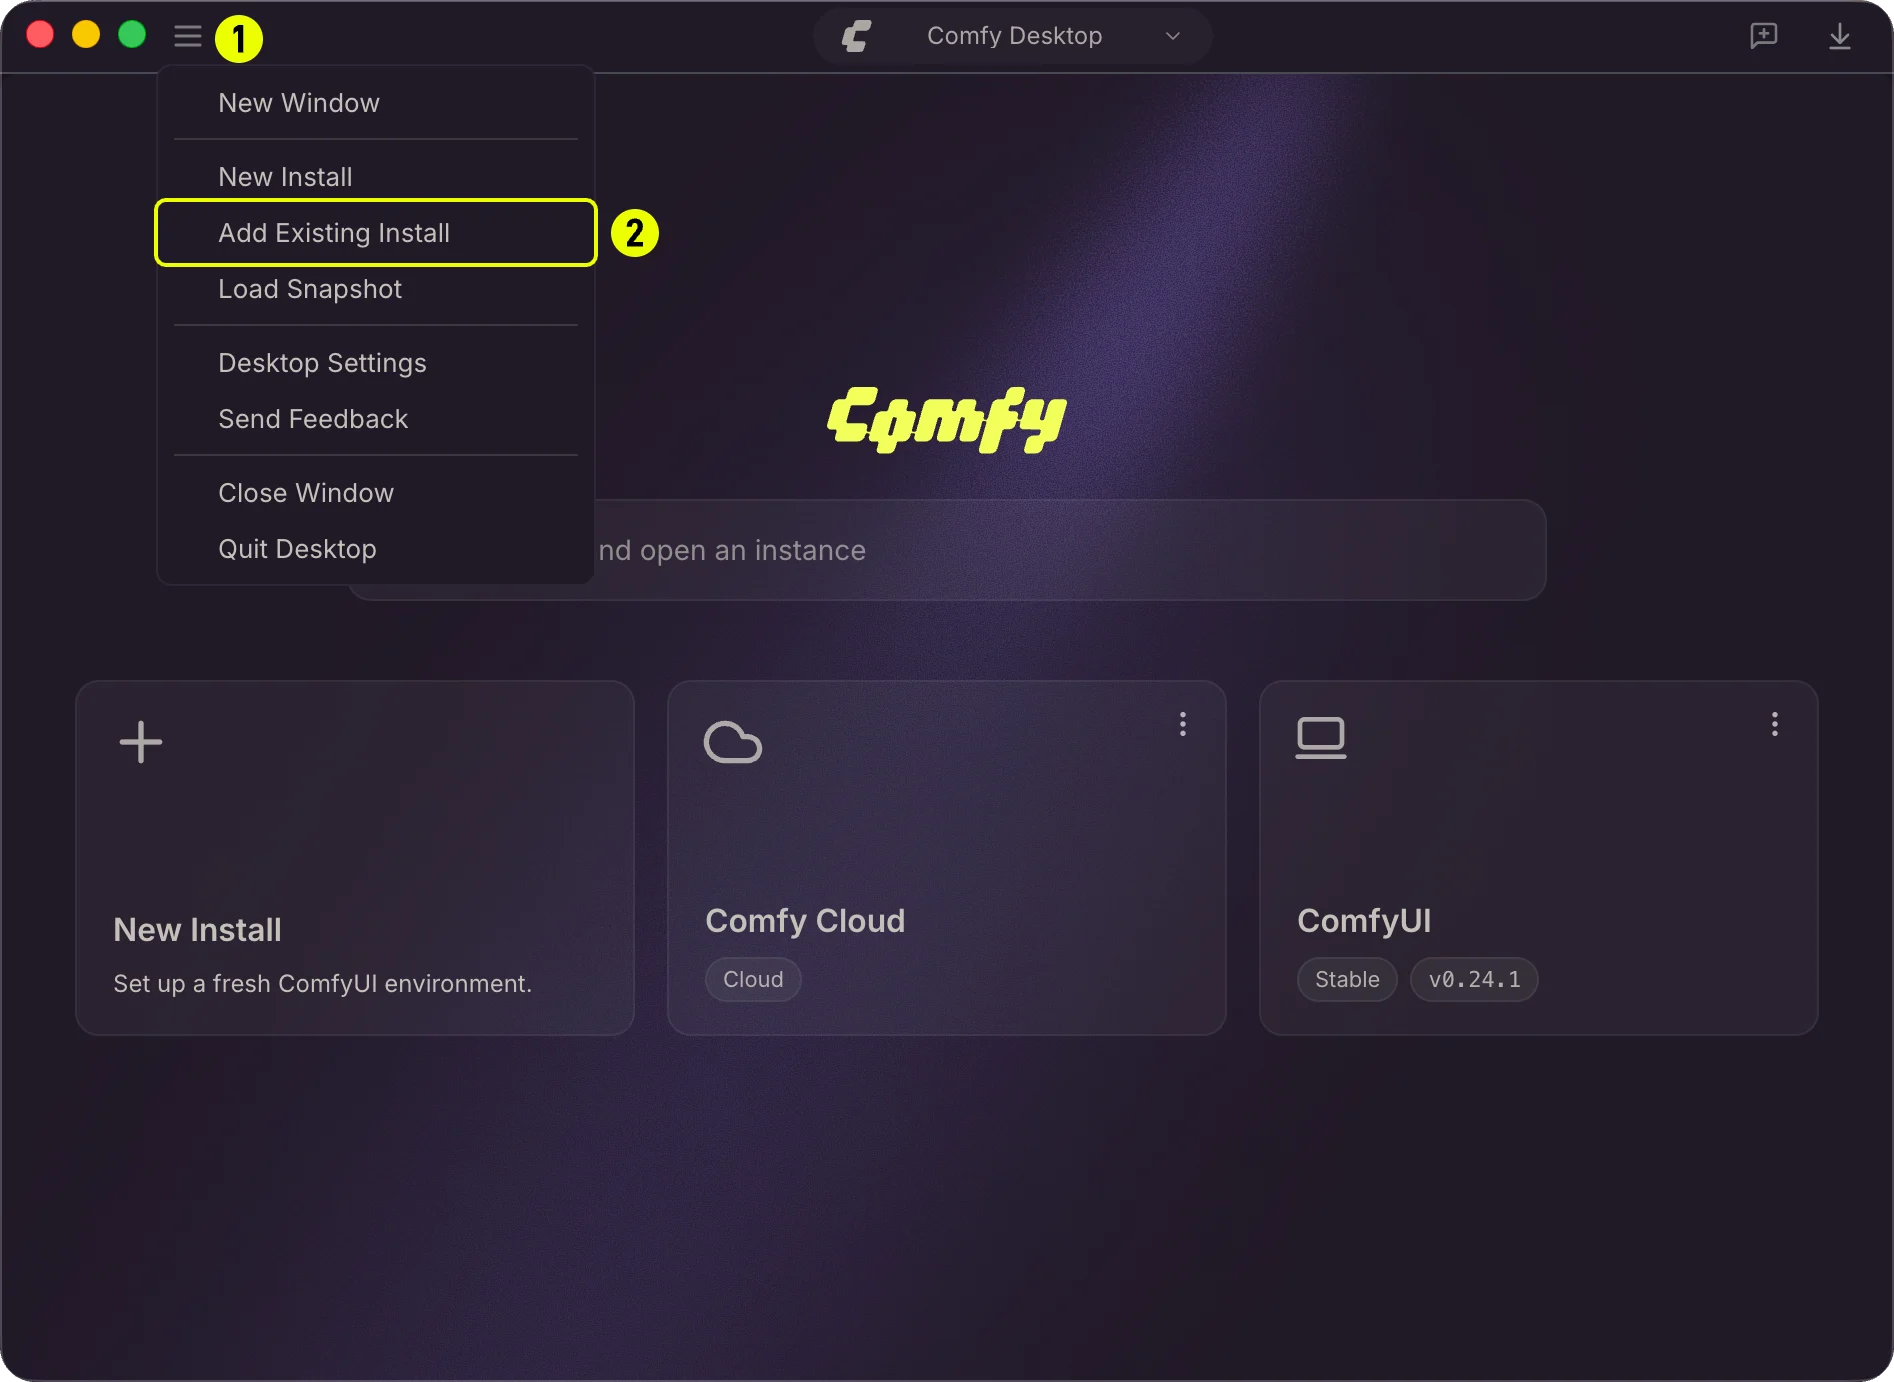 1. Click **New Install** to open the installation options.
2. Select **Add Existing Install** to open the tracking dialog.
### Detecting Your Installation
In the tracking dialog, click **Browse** to select a ComfyUI directory. Comfy Desktop probes the folder and automatically detects the installation type.
For a **Windows portable** install, the probe looks for:
* `standalone-env` directory — the bundled Python environment
* `ComfyUI/main.py` — the ComfyUI entry point
For a **manually cloned git repo**, the probe looks for:
* `models/` and `user/` directories — signs of a configured ComfyUI
* `.venv` directory — a Python virtual environment
### Setting Paths
After selecting the directory, the dialog shows the detected paths. You can adjust them if needed.
1. Click **New Install** to open the installation options.
2. Select **Add Existing Install** to open the tracking dialog.
### Detecting Your Installation
In the tracking dialog, click **Browse** to select a ComfyUI directory. Comfy Desktop probes the folder and automatically detects the installation type.
For a **Windows portable** install, the probe looks for:
* `standalone-env` directory — the bundled Python environment
* `ComfyUI/main.py` — the ComfyUI entry point
For a **manually cloned git repo**, the probe looks for:
* `models/` and `user/` directories — signs of a configured ComfyUI
* `.venv` directory — a Python virtual environment
### Setting Paths
After selecting the directory, the dialog shows the detected paths. You can adjust them if needed.
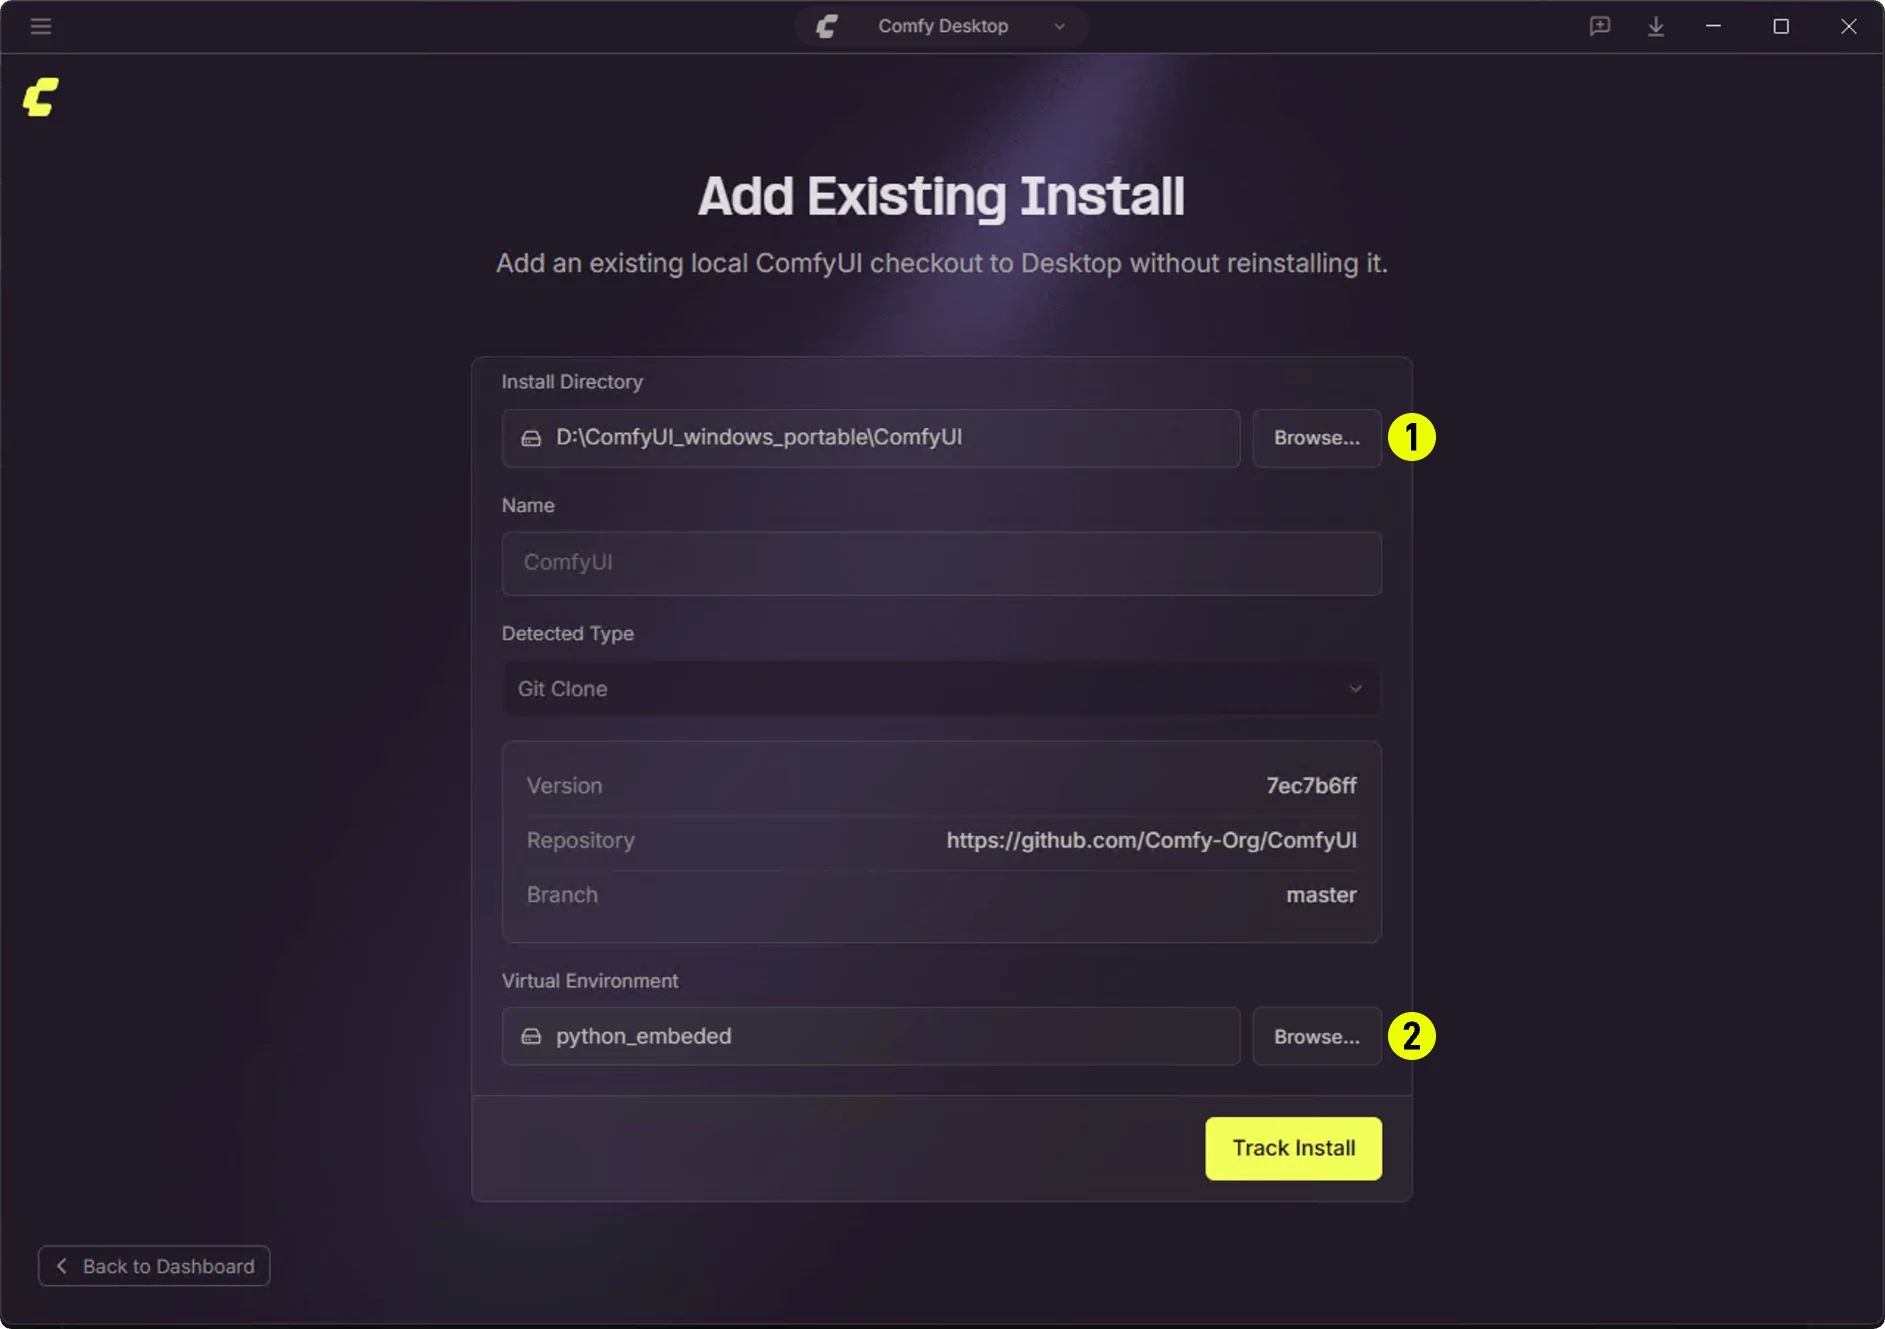 1. **ComfyUI Directory**: The path to the ComfyUI folder containing `main.py`. For portable installations, this is typically the folder *inside* the portable package.
* Portable example: `D:\ComfyUI_windows_portable\ComfyUI`
2. **Python Environment**: The path to the Python environment folder. Comfy Desktop detects this automatically and lets you override it if needed.
* Portable example: `D:\ComfyUI_windows_portable\python_embeded`
* Git repo example: `/.venv`
### Track vs Standalone
The key difference between a **Tracked** (Add Existing Install) installation and a **Standalone** installation is how updates are managed:
| Aspect | Tracked (Existing) | Standalone |
| ------------- | --------------------------------------------------------------------- | ----------------------------------------------- |
| **Updates** | No automatic updates — manage ComfyUI version manually via Git | Built-in automatic updates |
| **Python** | Uses an existing Python environment (`.venv`, `python_embeded`, etc.) | Bundled Python, automatic dependency management |
| **Isolation** | Shares the existing path and environment | Fully self-contained, isolated installation |
| **Snapshots** | Not supported | Snapshot support available |
| **Use case** | Already have ComfyUI set up and customized | Fresh install from scratch |
> **Note:** Tracked installations use `launchMode: 'external'` — Comfy Desktop launches the existing ComfyUI process without managing it internally. Snapshots are currently supported for Standalone instances only.
## Uninstalling an Instance
[↩ Back to overview](#overview)
When you want to remove an instance, the three-dot menu offers two options depending on whether you want to keep the files or delete everything.
1. **ComfyUI Directory**: The path to the ComfyUI folder containing `main.py`. For portable installations, this is typically the folder *inside* the portable package.
* Portable example: `D:\ComfyUI_windows_portable\ComfyUI`
2. **Python Environment**: The path to the Python environment folder. Comfy Desktop detects this automatically and lets you override it if needed.
* Portable example: `D:\ComfyUI_windows_portable\python_embeded`
* Git repo example: `/.venv`
### Track vs Standalone
The key difference between a **Tracked** (Add Existing Install) installation and a **Standalone** installation is how updates are managed:
| Aspect | Tracked (Existing) | Standalone |
| ------------- | --------------------------------------------------------------------- | ----------------------------------------------- |
| **Updates** | No automatic updates — manage ComfyUI version manually via Git | Built-in automatic updates |
| **Python** | Uses an existing Python environment (`.venv`, `python_embeded`, etc.) | Bundled Python, automatic dependency management |
| **Isolation** | Shares the existing path and environment | Fully self-contained, isolated installation |
| **Snapshots** | Not supported | Snapshot support available |
| **Use case** | Already have ComfyUI set up and customized | Fresh install from scratch |
> **Note:** Tracked installations use `launchMode: 'external'` — Comfy Desktop launches the existing ComfyUI process without managing it internally. Snapshots are currently supported for Standalone instances only.
## Uninstalling an Instance
[↩ Back to overview](#overview)
When you want to remove an instance, the three-dot menu offers two options depending on whether you want to keep the files or delete everything.
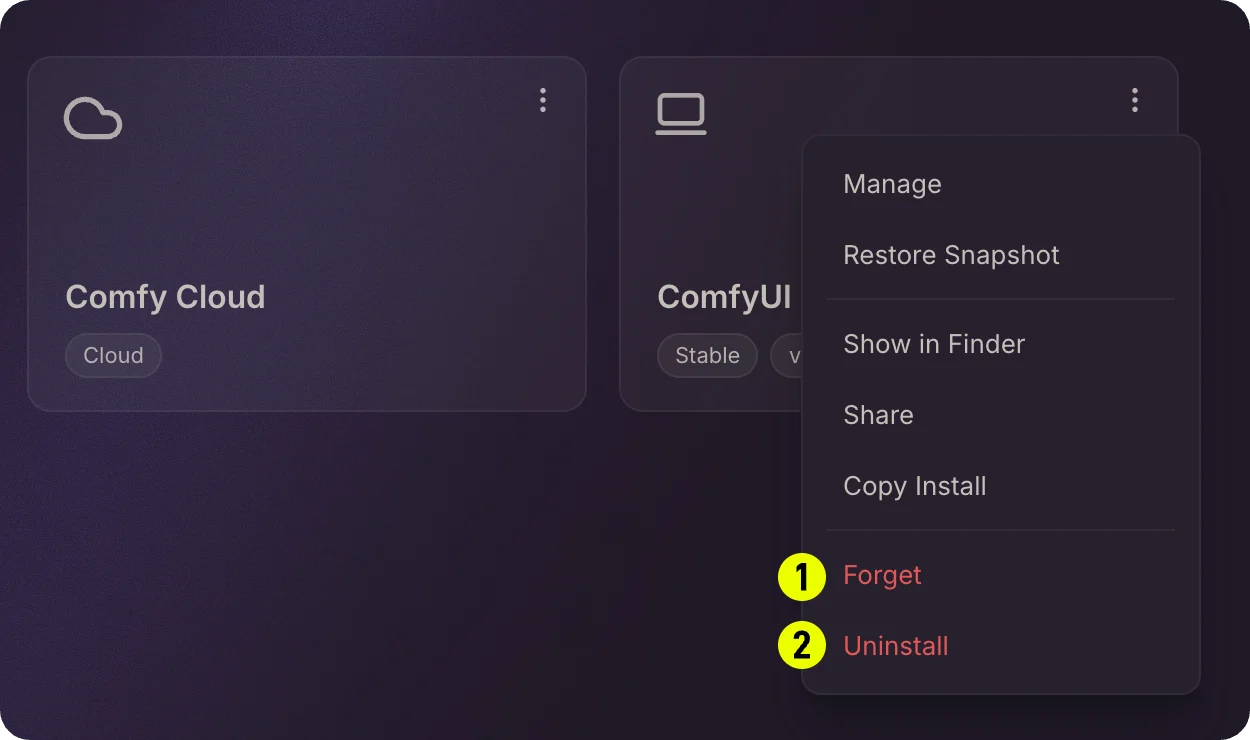 1. **Forget / Untrack**: Removes the instance from the Chooser list without deleting any files. The installation folder and all its data remain on disk. Use this when you just want to clean up the list but might need the instance again later.
2. **Uninstall / Delete**: Permanently removes the installation and all its files from disk. Model files in shared directories are not affected.
The name you see in the menu depends on the instance type: **Forget** appears for standalone installations (untrack doesn't apply because standalone installs are local), while **Untrack** appears for installations that were adopted or added manually. Both do the same thing: remove the instance from the list without deleting its files.
## Copying an Installation
[↩ Back to overview](#overview)
You can duplicate an existing standalone installation by right-clicking its card and selecting **Copy Installation**. This creates a copy with:
* A new Python environment
* The same ComfyUI version
* Its own custom node setup
You'll be prompted to enter a name for the new installation before the copy starts.
## Editing an Instance
[↩ Back to overview](#overview)
In the **Manage** panel for an instance, you can:
* Change the installation path
* Adjust launch arguments
* Modify model directories
* Update environment variables
Open the **Manage** panel by right-clicking the instance card and selecting **Manage**.
## Error State
If an installation encounters a problem, a warning indicator appears on its card. Right-click the card and select **Dismiss Error** to clear the error state. If the issue persists, check the logs at the [Data Locations](/installation/desktop/usage/settings#data-locations).
1. **Forget / Untrack**: Removes the instance from the Chooser list without deleting any files. The installation folder and all its data remain on disk. Use this when you just want to clean up the list but might need the instance again later.
2. **Uninstall / Delete**: Permanently removes the installation and all its files from disk. Model files in shared directories are not affected.
The name you see in the menu depends on the instance type: **Forget** appears for standalone installations (untrack doesn't apply because standalone installs are local), while **Untrack** appears for installations that were adopted or added manually. Both do the same thing: remove the instance from the list without deleting its files.
## Copying an Installation
[↩ Back to overview](#overview)
You can duplicate an existing standalone installation by right-clicking its card and selecting **Copy Installation**. This creates a copy with:
* A new Python environment
* The same ComfyUI version
* Its own custom node setup
You'll be prompted to enter a name for the new installation before the copy starts.
## Editing an Instance
[↩ Back to overview](#overview)
In the **Manage** panel for an instance, you can:
* Change the installation path
* Adjust launch arguments
* Modify model directories
* Update environment variables
Open the **Manage** panel by right-clicking the instance card and selecting **Manage**.
## Error State
If an installation encounters a problem, a warning indicator appears on its card. Right-click the card and select **Dismiss Error** to clear the error state. If the issue persists, check the logs at the [Data Locations](/installation/desktop/usage/settings#data-locations).