> ## Documentation Index
> Fetch the complete documentation index at: https://docs.comfy.org/llms.txt
> Use this file to discover all available pages before exploring further.
# Snapshots
> Back up, restore, and share ComfyUI instance configurations in Comfy Desktop
A snapshot records your instance's current state, including:
* **ComfyUI version**:which build of ComfyUI is installed
* **Custom nodes**:every custom node with its version or commit hash
* **pip packages**:all Python packages installed in the environment
Snapshots serve as restore points: roll back after a broken update, clone an installation, or share a working configuration with a teammate.
Comfy Desktop automatically creates snapshots on key events: every boot, restart, before/after an update, and after a restore. You can also manually create snapshots at any time (up to 200 auto-snapshots per install).
## Accessing Snapshots
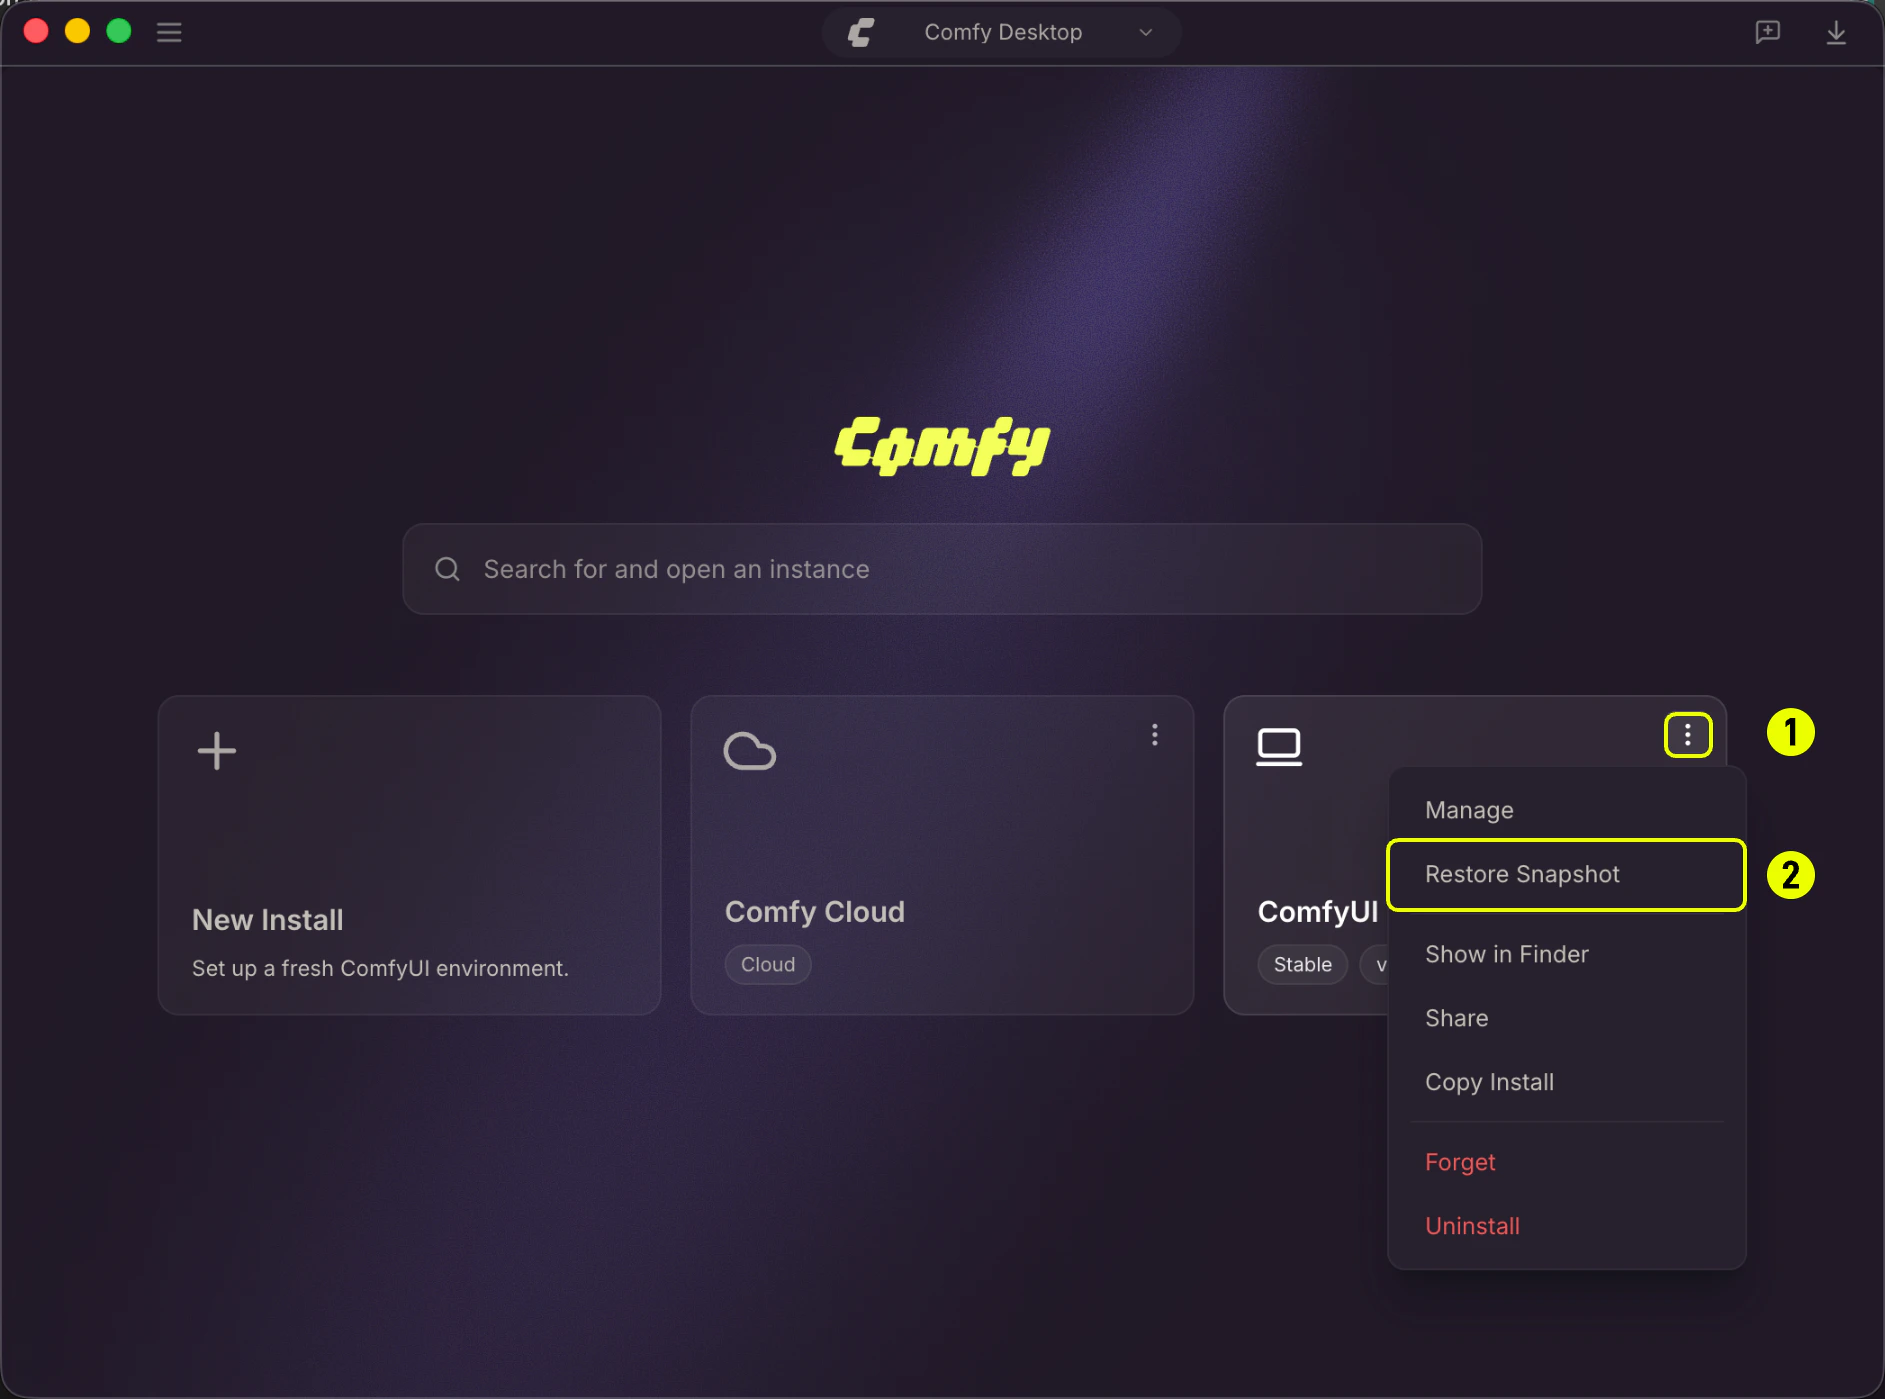
From any instance card, click the **⋮ menu** (1) and select **Restore Snapshot** (2) to open the Snapshots tab directly.
 Alternatively, open the **Manage** panel on any instance card and navigate to the **Snapshots** tab.
## Snapshots Tab Overview
The Snapshots tab is your hub for managing all snapshot actions. The timeline shows snapshots for the instance, newest first. Key actions available:
Alternatively, open the **Manage** panel on any instance card and navigate to the **Snapshots** tab.
## Snapshots Tab Overview
The Snapshots tab is your hub for managing all snapshot actions. The timeline shows snapshots for the instance, newest first. Key actions available:
 1. **Selected instance**: The instance whose snapshots are shown in the timeline.
2. **Snapshots tab**: Currently active tab in the Manage panel.
3. **Import**: Import a snapshot file exported by another user or instance.
4. **Export All**: Export all snapshots for this instance as a single `.json` file.
5. **Create Snapshot**: Create a manual snapshot of the current instance state.
6. **Export**: Export a single snapshot from the timeline.
7. **Delete**: Delete a manual snapshot from the timeline.
**Restore**: Restore the instance to a specific snapshot's state.
### Create a Manual Snapshot
Click **Create Snapshot** (5) in the Snapshots tab header. You can optionally add a label (e.g. "Before adding LCM LoRA") to identify it later. The snapshot will capture:
* Current ComfyUI Git commit
* All enabled custom nodes (git clone URL + commit, or CNR ID + version)
* All pip packages from `pip freeze`
Manual snapshots don't count toward the auto-snapshot limit and can be deleted individually.
### View Snapshot Details
Click on any snapshot card to expand its details. The inspector shows:
* **ComfyUI**:Commit hash, base tag, and how many commits ahead of the release tag
* **Custom Nodes**:All recorded nodes with their type (git / CNR), URL, version/commit, and enabled status
* **Pip Packages**:Full list of recorded pip packages with pinned versions
Use the diff buttons to see what changed:
* **Diff vs Previous**:Compare with the snapshot right before this one
* **Diff vs Current**:Compare with the instance's current state
### Restore from a Snapshot
1. In the Snapshots tab, find the snapshot you want to restore.
2. Click **Restore**:a preview shows the diff (what will change).
3. Review the changes and click **Confirm** to begin the restore process.
During restoration, Comfy Desktop will:
1. **Check out the recorded ComfyUI version** (Git commit)
2. **Install missing custom nodes**, switch versions, and enable/disable nodes as needed
3. **Restore pip packages**: install missing packages, upgrade/downgrade to the recorded version, and remove extras
4. **Run post-install scripts** for any newly installed or version-switched custom nodes
The process can be cancelled at any time. If cancelled or if a package install fails, the system automatically rolls back to the pre-restore state using a built-in backup.
After a successful restore, Comfy Desktop automatically creates a `post-restore` snapshot so you can undo the restoration if needed.
### Delete a Snapshot
Manual snapshots can be deleted individually. Click the **✕** button on any manual snapshot card. Auto-snapshots (boot, update, etc.) cannot be deleted individually; use **Prune** to clean them up in bulk.
## Create an Instance from a Snapshot File
If someone shares a snapshot file with you, you can use it to spin up a new ComfyUI instance with the exact same configuration.
1. Click the **☰ menu** (1) in the top-left corner of the Chooser view and select **Load Snapshot** (2).
1. **Selected instance**: The instance whose snapshots are shown in the timeline.
2. **Snapshots tab**: Currently active tab in the Manage panel.
3. **Import**: Import a snapshot file exported by another user or instance.
4. **Export All**: Export all snapshots for this instance as a single `.json` file.
5. **Create Snapshot**: Create a manual snapshot of the current instance state.
6. **Export**: Export a single snapshot from the timeline.
7. **Delete**: Delete a manual snapshot from the timeline.
**Restore**: Restore the instance to a specific snapshot's state.
### Create a Manual Snapshot
Click **Create Snapshot** (5) in the Snapshots tab header. You can optionally add a label (e.g. "Before adding LCM LoRA") to identify it later. The snapshot will capture:
* Current ComfyUI Git commit
* All enabled custom nodes (git clone URL + commit, or CNR ID + version)
* All pip packages from `pip freeze`
Manual snapshots don't count toward the auto-snapshot limit and can be deleted individually.
### View Snapshot Details
Click on any snapshot card to expand its details. The inspector shows:
* **ComfyUI**:Commit hash, base tag, and how many commits ahead of the release tag
* **Custom Nodes**:All recorded nodes with their type (git / CNR), URL, version/commit, and enabled status
* **Pip Packages**:Full list of recorded pip packages with pinned versions
Use the diff buttons to see what changed:
* **Diff vs Previous**:Compare with the snapshot right before this one
* **Diff vs Current**:Compare with the instance's current state
### Restore from a Snapshot
1. In the Snapshots tab, find the snapshot you want to restore.
2. Click **Restore**:a preview shows the diff (what will change).
3. Review the changes and click **Confirm** to begin the restore process.
During restoration, Comfy Desktop will:
1. **Check out the recorded ComfyUI version** (Git commit)
2. **Install missing custom nodes**, switch versions, and enable/disable nodes as needed
3. **Restore pip packages**: install missing packages, upgrade/downgrade to the recorded version, and remove extras
4. **Run post-install scripts** for any newly installed or version-switched custom nodes
The process can be cancelled at any time. If cancelled or if a package install fails, the system automatically rolls back to the pre-restore state using a built-in backup.
After a successful restore, Comfy Desktop automatically creates a `post-restore` snapshot so you can undo the restoration if needed.
### Delete a Snapshot
Manual snapshots can be deleted individually. Click the **✕** button on any manual snapshot card. Auto-snapshots (boot, update, etc.) cannot be deleted individually; use **Prune** to clean them up in bulk.
## Create an Instance from a Snapshot File
If someone shares a snapshot file with you, you can use it to spin up a new ComfyUI instance with the exact same configuration.
1. Click the **☰ menu** (1) in the top-left corner of the Chooser view and select **Load Snapshot** (2).
 2. Browse your file system and select the `.json` snapshot file.
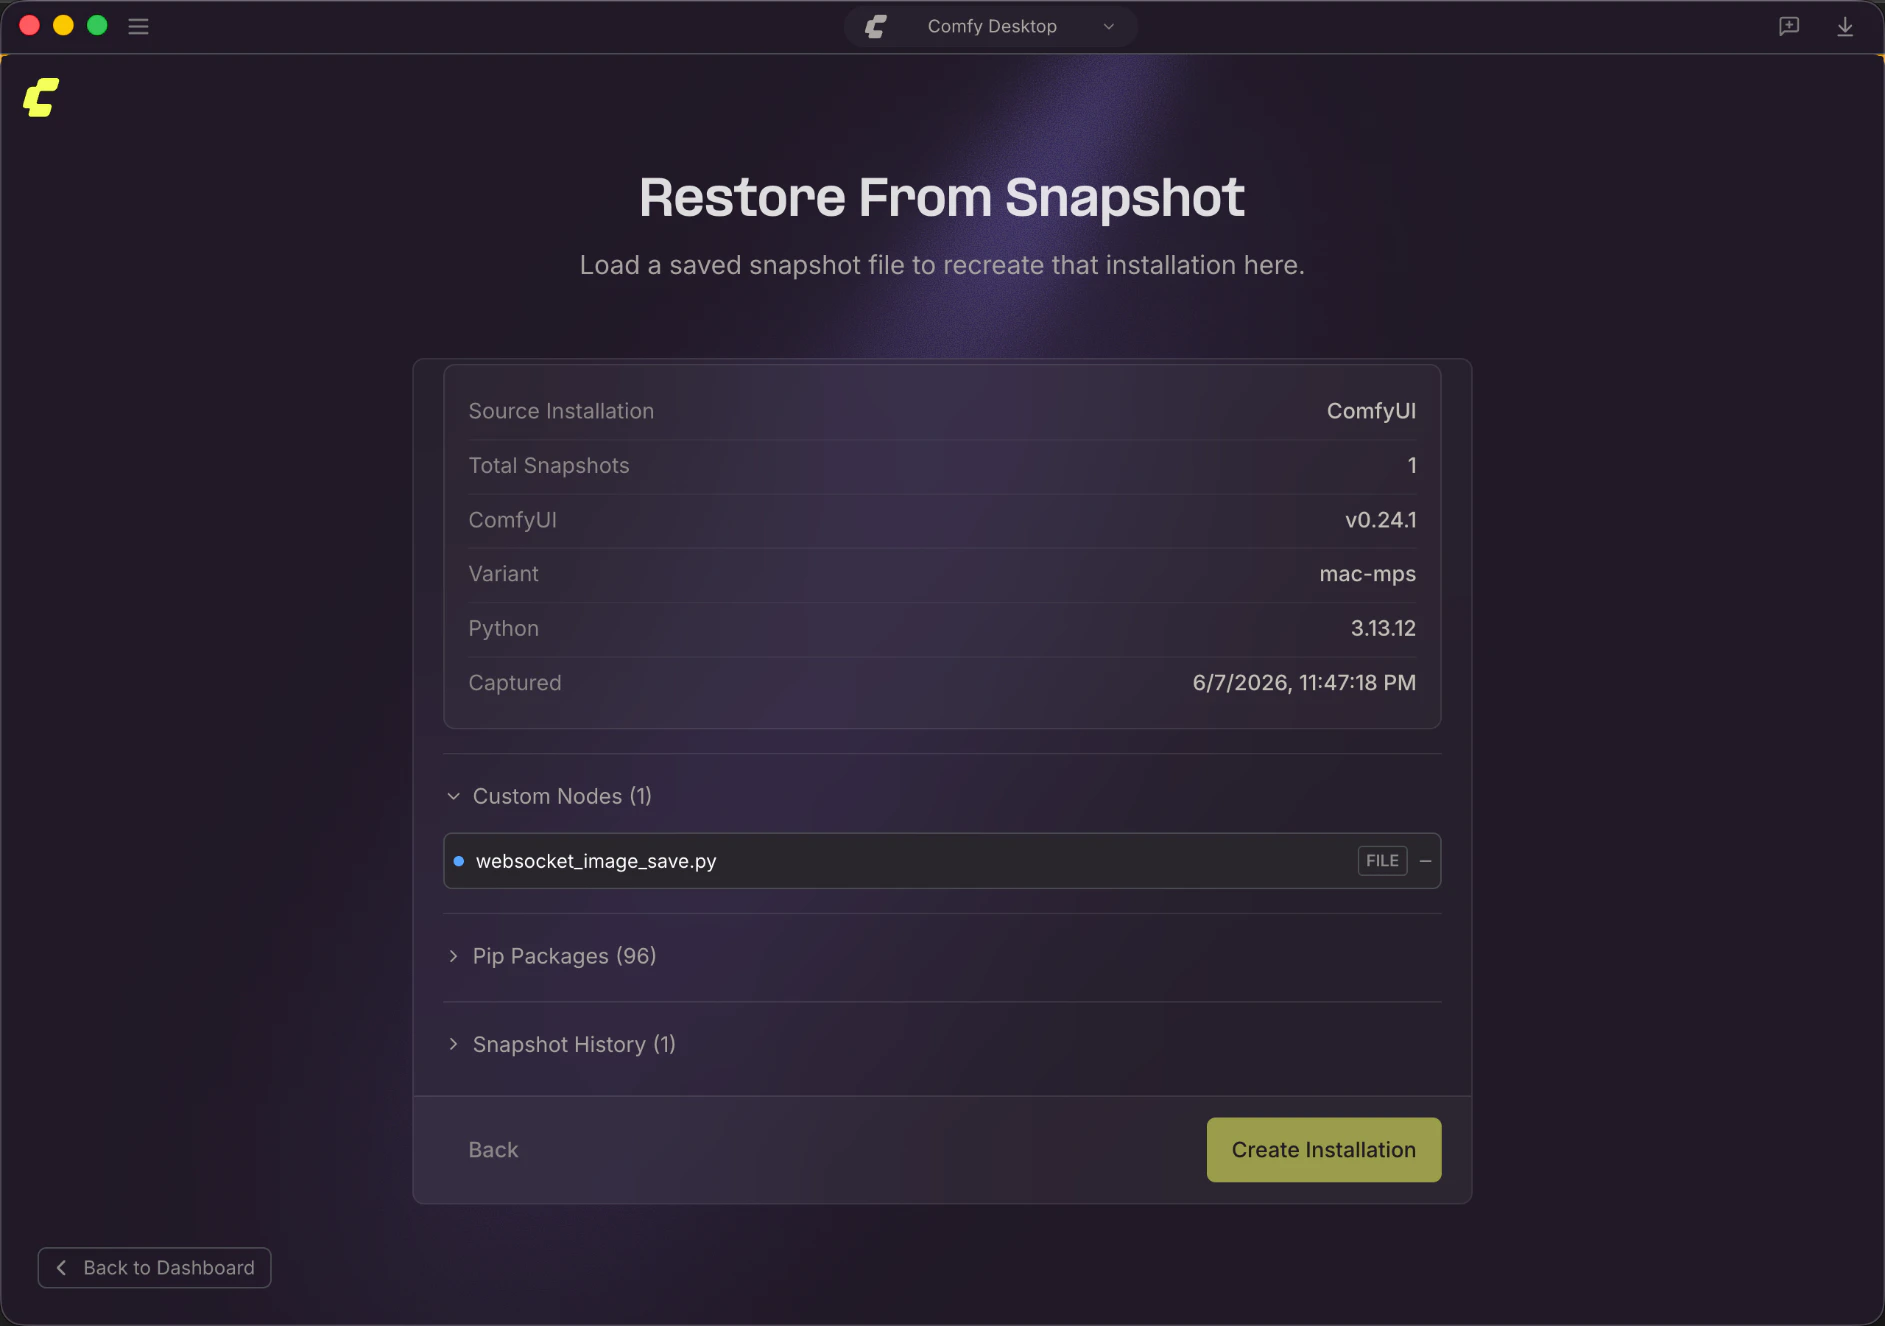
 3. A preview shows the snapshot contents: source instance name, ComfyUI version, custom nodes, and pip packages. Review the details, then click **Create Installation** to build a new instance from the snapshot.
 This creates a brand new standalone instance, and the original instance is untouched. You'll see it appear in the Chooser view alongside your other instances.