> ## Documentation Index
> Fetch the complete documentation index at: https://docs.comfy.org/llms.txt
> Use this file to discover all available pages before exploring further.
# How to Install Custom Nodes in ComfyUI
> This guide will show you different methods to install custom nodes in ComfyUI
## What are Custom Nodes ?
Custom nodes are extensions for ComfyUI that add new functionality like advanced image processing, machine learning fine-tuning, color adjustments, and more. These community-developed nodes can significantly expand ComfyUI's core capabilities.
Before installing custom nodes, it's important to review them carefully. Since ComfyUI is an open-source project, malicious plugins could potentially exploit custom nodes:
1. Only install custom nodes from trusted authors and those commonly used by the community
2. Understand the plugin's functionality before installing and avoid unknown sources to ensure system security
3. Avoid installing obscure or suspicious plugins - unverified plugins may pose security risks that could lead to system compromise
All custom node installations require completing these two steps:
1. Clone the node code to the `ComfyUI/custom_nodes` directory
2. Install the required Python dependencies
This guide compares three installation approaches. **ComfyUI Manager** is built into current ComfyUI releases for most setups—start from the [ComfyUI Manager overview](/manager/overview) for what it does and how to enable it. Use **Git clone** or **ZIP** when a node is not on the registry or you need a specific revision.
| Method | Advantages | Disadvantages |
| --------------------------------- | --------------------------------------------------------------------------- | --------------------------------------------------------------------------------------- |
| **ComfyUI Manager** (Recommended) | 1. Automated installation
2. Dependency handling
3. GUI interface | Cannot directly search for nodes not registered in the registry |
| **Git Clone** | Can install nodes not registered in the registry | 1. Requires Git knowledge
2. Manual dependency handling
3. Installation risks |
| **Repository ZIP Download** | 1. No Git required
2. Manual control | 1. Manual dependency handling
2. No version control
3. Installation risks |
Tip: Before installing custom nodes, check the plugin's README file to understand installation methods, usage, and requirements like specific models, dependency versions, and common issue solutions.
## Method 1: ComfyUI Manager (Recommended)
You need ComfyUI Manager available in your environment before using this method. If it is missing or disabled, see the [ComfyUI Manager overview](/manager/overview) and [installation guide](/manager/install).
ComfyUI Manager provides two UI versions for managing custom nodes. Choose the guide that matches your interface:
The new node management interface, enabled by default for Desktop users.
The classic Manager interface for custom node installation.
## Method 2: Manual Installation Using Git
Suitable for new nodes not found in Manager or when specific versions are needed. Requires [Git](https://git-scm.com/) installed on your system.
Click the "Code" button on GitHub and copy the HTTPS link
```bash theme={null}
cd /path/to/ComfyUI/custom_nodes
```
```bash theme={null}
git clone [repository URL]
```
Dependencies must be installed in your ComfyUI environment - be careful not to mix with your system environment to avoid contamination
For Windows portable version, install dependencies in the embedded Python environment
```bash theme={null}
python_embeded\python.exe -m pip install -r ComfyUI\custom_nodes\[node directory]\requirements.txt
```
Install dependencies in your ComfyUI environment
```bash theme={null}
cd [node directory]
pip install -r requirements.txt
```
Restart ComfyUI and refresh your browser. Check startup logs for any `import failed` errors
## Method 3: ZIP Download Installation
Suitable for users who cannot use Git or Manager
We don't recommend this installation method as it loses version control capabilities
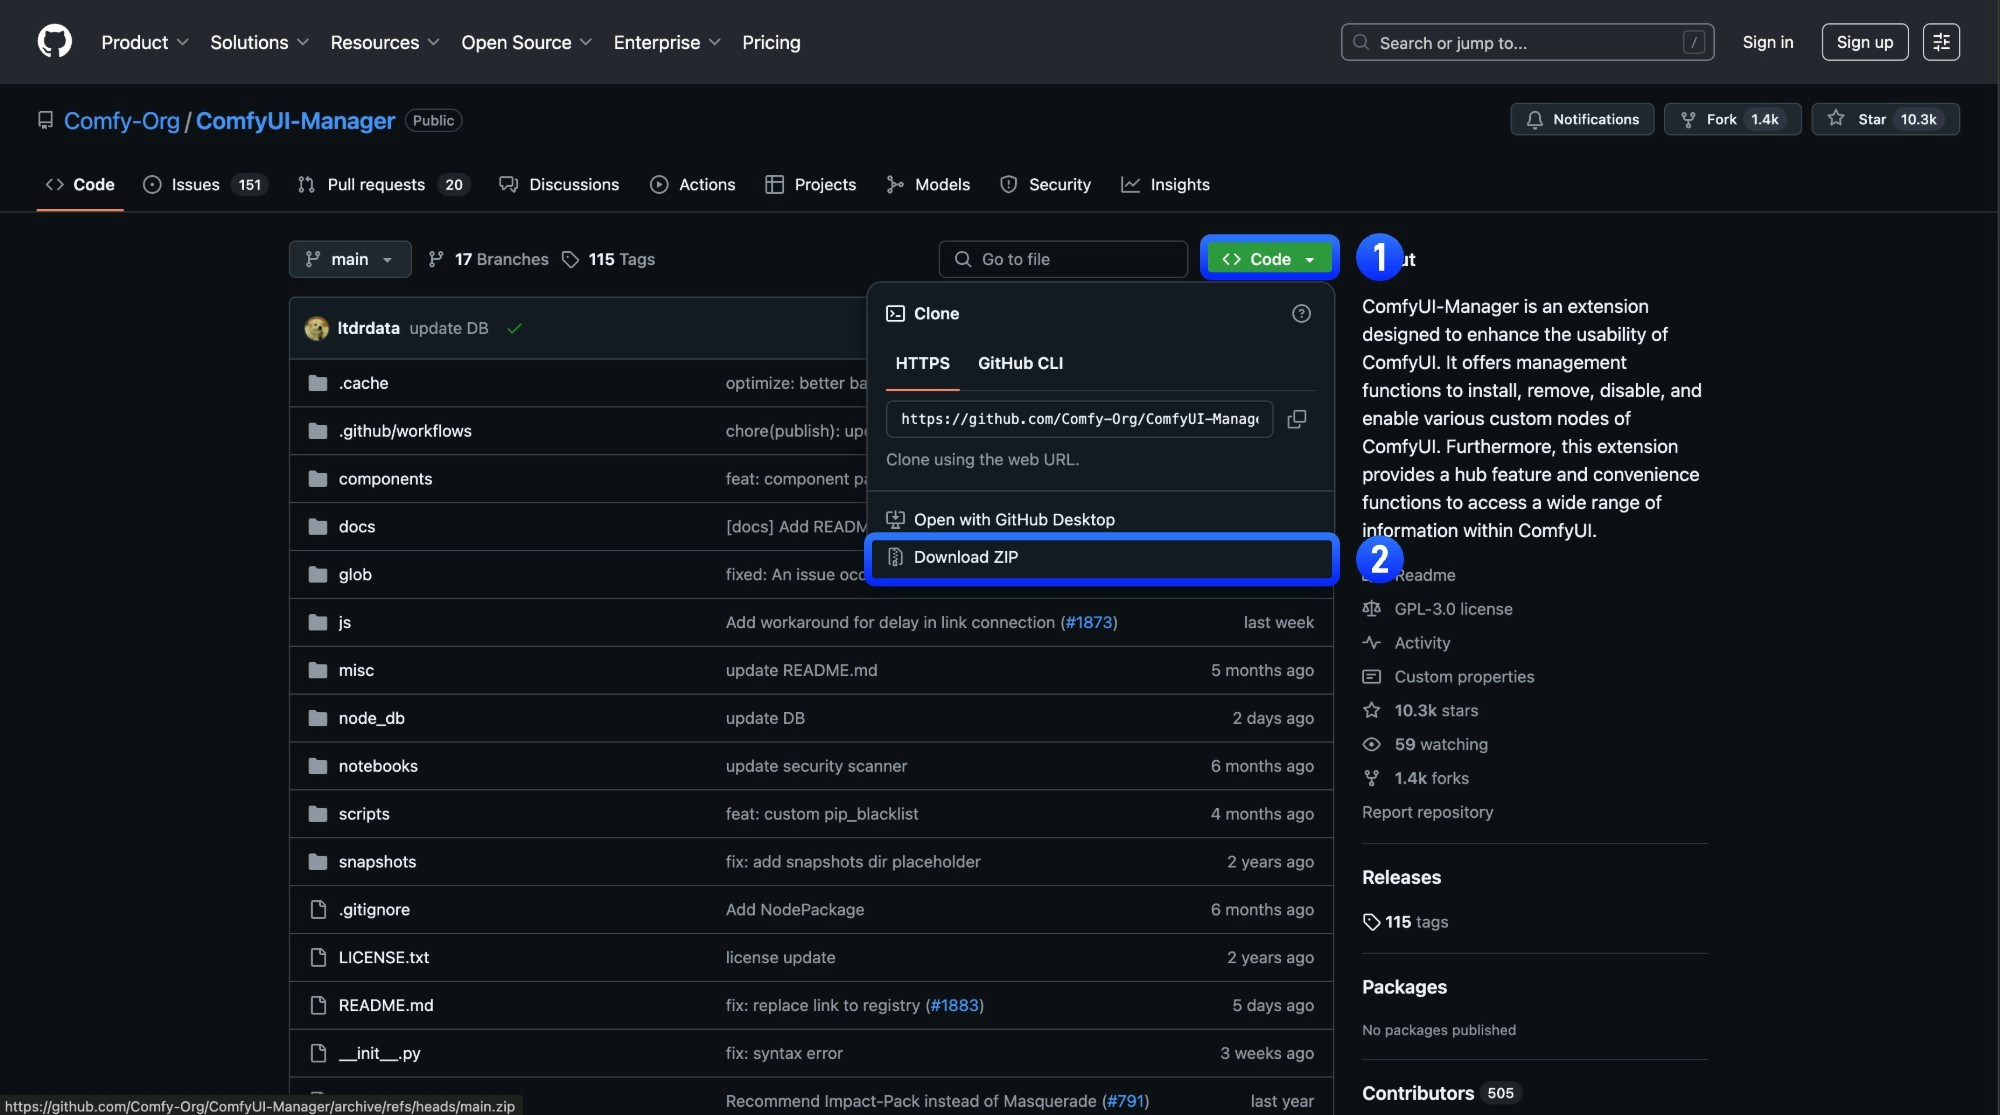
Click `Code` → `Download ZIP` on the GitHub page
 Extract the downloaded ZIP file
Copy the extracted folder to `ComfyUI/custom_nodes/` directory
Restart ComfyUI and refresh browser
Check ComfyUI Manager after restart to confirm the plugin installed successfully and there are no `import failed` errors
## Custom Node Resources
In ComfyUI, besides the basic node extension functionality, custom nodes can also include the following additional resources:
* [Node Documentation](/custom-nodes/help_page): This feature supports all custom and basic nodes. You can use it to view node documentation, understand the purpose and usage of nodes, and contribute documentation via PRs to the author.
* [Custom Node Workflow Templates](/custom-nodes/workflow_templates): Workflow templates provided by node authors as example workflows, which can be browsed and loaded from the ComfyUI templates.
* [Multi-language Support](/custom-nodes/i18n)
If you are a custom node developer, you can add these resources to make your custom node more user-friendly.
Extract the downloaded ZIP file
Copy the extracted folder to `ComfyUI/custom_nodes/` directory
Restart ComfyUI and refresh browser
Check ComfyUI Manager after restart to confirm the plugin installed successfully and there are no `import failed` errors
## Custom Node Resources
In ComfyUI, besides the basic node extension functionality, custom nodes can also include the following additional resources:
* [Node Documentation](/custom-nodes/help_page): This feature supports all custom and basic nodes. You can use it to view node documentation, understand the purpose and usage of nodes, and contribute documentation via PRs to the author.
* [Custom Node Workflow Templates](/custom-nodes/workflow_templates): Workflow templates provided by node authors as example workflows, which can be browsed and loaded from the ComfyUI templates.
* [Multi-language Support](/custom-nodes/i18n)
If you are a custom node developer, you can add these resources to make your custom node more user-friendly.