> ## Documentation Index
> Fetch the complete documentation index at: https://docs.comfy.org/llms.txt
> Use this file to discover all available pages before exploring further.
# ComfyUI APP mode guide
> Learn how to build and use APP mode in ComfyUI to simplify workflow interaction by defining custom input/output interfaces.
APP mode simplifies workflow interaction by allowing you to define custom input/output interfaces, making it easier to share and use workflows without editing nodes.
APP mode is officially supported from ComfyUI front-end version 1.41.13. Earlier versions are in early test phase.
## Enter APP mode
There are two ways to enter APP mode: click the top-left icon (**1**) and select **Enter app mode** from the dropdown, or use the breadcrumb navigation dropdown (**2**) at the top of the interface.
1. Click the top-left icon (marked **1**) to open the dropdown menu and select **Enter app mode**.
2. Alternatively, use the breadcrumb navigation dropdown (marked **2**) at the top to enter APP mode.
## Build an APP mode workflow
If the workflow has never been configured for APP mode, entering APP mode will automatically open the APP mode builder.
1. If the workflow has no existing APP mode configuration, the APP mode builder opens by default.
2. Click **Build app** to enter the APP builder and start configuring.
### Step 1: Select inputs
The builder interface displays four guided steps (marked **1**, **2**, **3**, **4**) at the top. The bottom bar lets you exit the builder or navigate between steps.
1. The numbers **1 2 3 4** at the top correspond to the four build steps: selecting inputs, selecting outputs, previewing, and setting the default view.
2. The buttons at the bottom let you exit the builder or move between steps.
3. Areas marked in the canvas are selectable input/output parameters.
4. The right panel shows a live preview of the current configuration.
Click the **Inputs** step at the top. The canvas highlights selectable input nodes. Click a node to select it as an input parameter — options include image uploads, text prompt inputs, and model selection. Selected parameters appear in the right sidebar.
### Step 2: Select outputs
Click the **Outputs** step. Choose which output nodes to display in the APP, such as a Preview node or Save Image node.
1. Select the output nodes to display in the APP.
2. Similar to inputs, the right sidebar displays a live preview of the selected output nodes.
### Step 3: Preview
Click the **Preview** step to review the final APP layout. The selected inputs appear on the right panel, and the output area is shown in the canvas.
1. This is the preview mode — check that all input and output configurations appear as expected.
2. If any adjustments are needed, click **Back** to return to the previous step.
### Step 4: Set a default view
Click the **Set a default view** step. Choose whether the workflow should open in **App** mode or **Node Graph** mode by default. Click **Apply** to confirm.
1. Choose whether the workflow defaults to **App** mode or **Node Graph** mode when opened.
2. Select **App** and click **Apply** to confirm. The workflow will then open in APP mode by default.
After applying, a confirmation prompt will appear.
Click **View app** to enter APP mode and start using the workflow.
## Use APP mode
In APP mode, the right panel shows all configured input options. Adjust the inputs as needed, then click **Run** to execute the workflow.
1. The right **Input** panel lets you adjust input parameters before running.
2. Click **Run** to execute the workflow.
3. The left sidebar provides additional controls, such as rebuilding the APP, viewing assets, and opening the workflow panel.
APP mode is also optimized for mobile and narrow-screen layouts. The interface adapts into a tab-based view, letting you switch between the input panel, output view, and Media Assets panel.
While running, a **Cancel this run** button appears at the top to stop the current execution.
1. Click **Cancel this run** at the top to stop the current run.
2. Switch between the queue view and the results view in the bottom panel.
3. Click the relevant area to open the assets panel.
## Save and share the workflow
### Save workflow
Use `Ctrl + S` (or `Cmd + S` on Mac) to save the workflow for future use.
Click the left sidebar button to open the saved workflows panel.
1. Click the left sidebar button to open the panel, which displays all saved APP workflows.
2. Switch between saved APP workflows from this panel.
### Share workflow
In APP mode, click the **Share** button in the left sidebar. If the workflow has not been saved yet, a dialog will prompt you to save it first before a link can be created.
1. Click the Share button in the left sidebar to open the Share dialog.
2. If the workflow is unsaved, enter a workflow name and click **Save workflow** to continue.
Once saved, the Share dialog shows the option to generate a link.
Click **Create a link** to generate a shareable URL for the workflow.
Click **Copy** to copy the link. Recipients can open it and run the workflow directly — the full workflow configuration is included in the link.
Share links are only supported on Comfy Cloud.
 1. Click the top-left icon (marked **1**) to open the dropdown menu and select **Enter app mode**.
2. Alternatively, use the breadcrumb navigation dropdown (marked **2**) at the top to enter APP mode.
## Build an APP mode workflow
If the workflow has never been configured for APP mode, entering APP mode will automatically open the APP mode builder.
1. Click the top-left icon (marked **1**) to open the dropdown menu and select **Enter app mode**.
2. Alternatively, use the breadcrumb navigation dropdown (marked **2**) at the top to enter APP mode.
## Build an APP mode workflow
If the workflow has never been configured for APP mode, entering APP mode will automatically open the APP mode builder.
 1. If the workflow has no existing APP mode configuration, the APP mode builder opens by default.
2. Click **Build app** to enter the APP builder and start configuring.
### Step 1: Select inputs
The builder interface displays four guided steps (marked **1**, **2**, **3**, **4**) at the top. The bottom bar lets you exit the builder or navigate between steps.
1. If the workflow has no existing APP mode configuration, the APP mode builder opens by default.
2. Click **Build app** to enter the APP builder and start configuring.
### Step 1: Select inputs
The builder interface displays four guided steps (marked **1**, **2**, **3**, **4**) at the top. The bottom bar lets you exit the builder or navigate between steps.
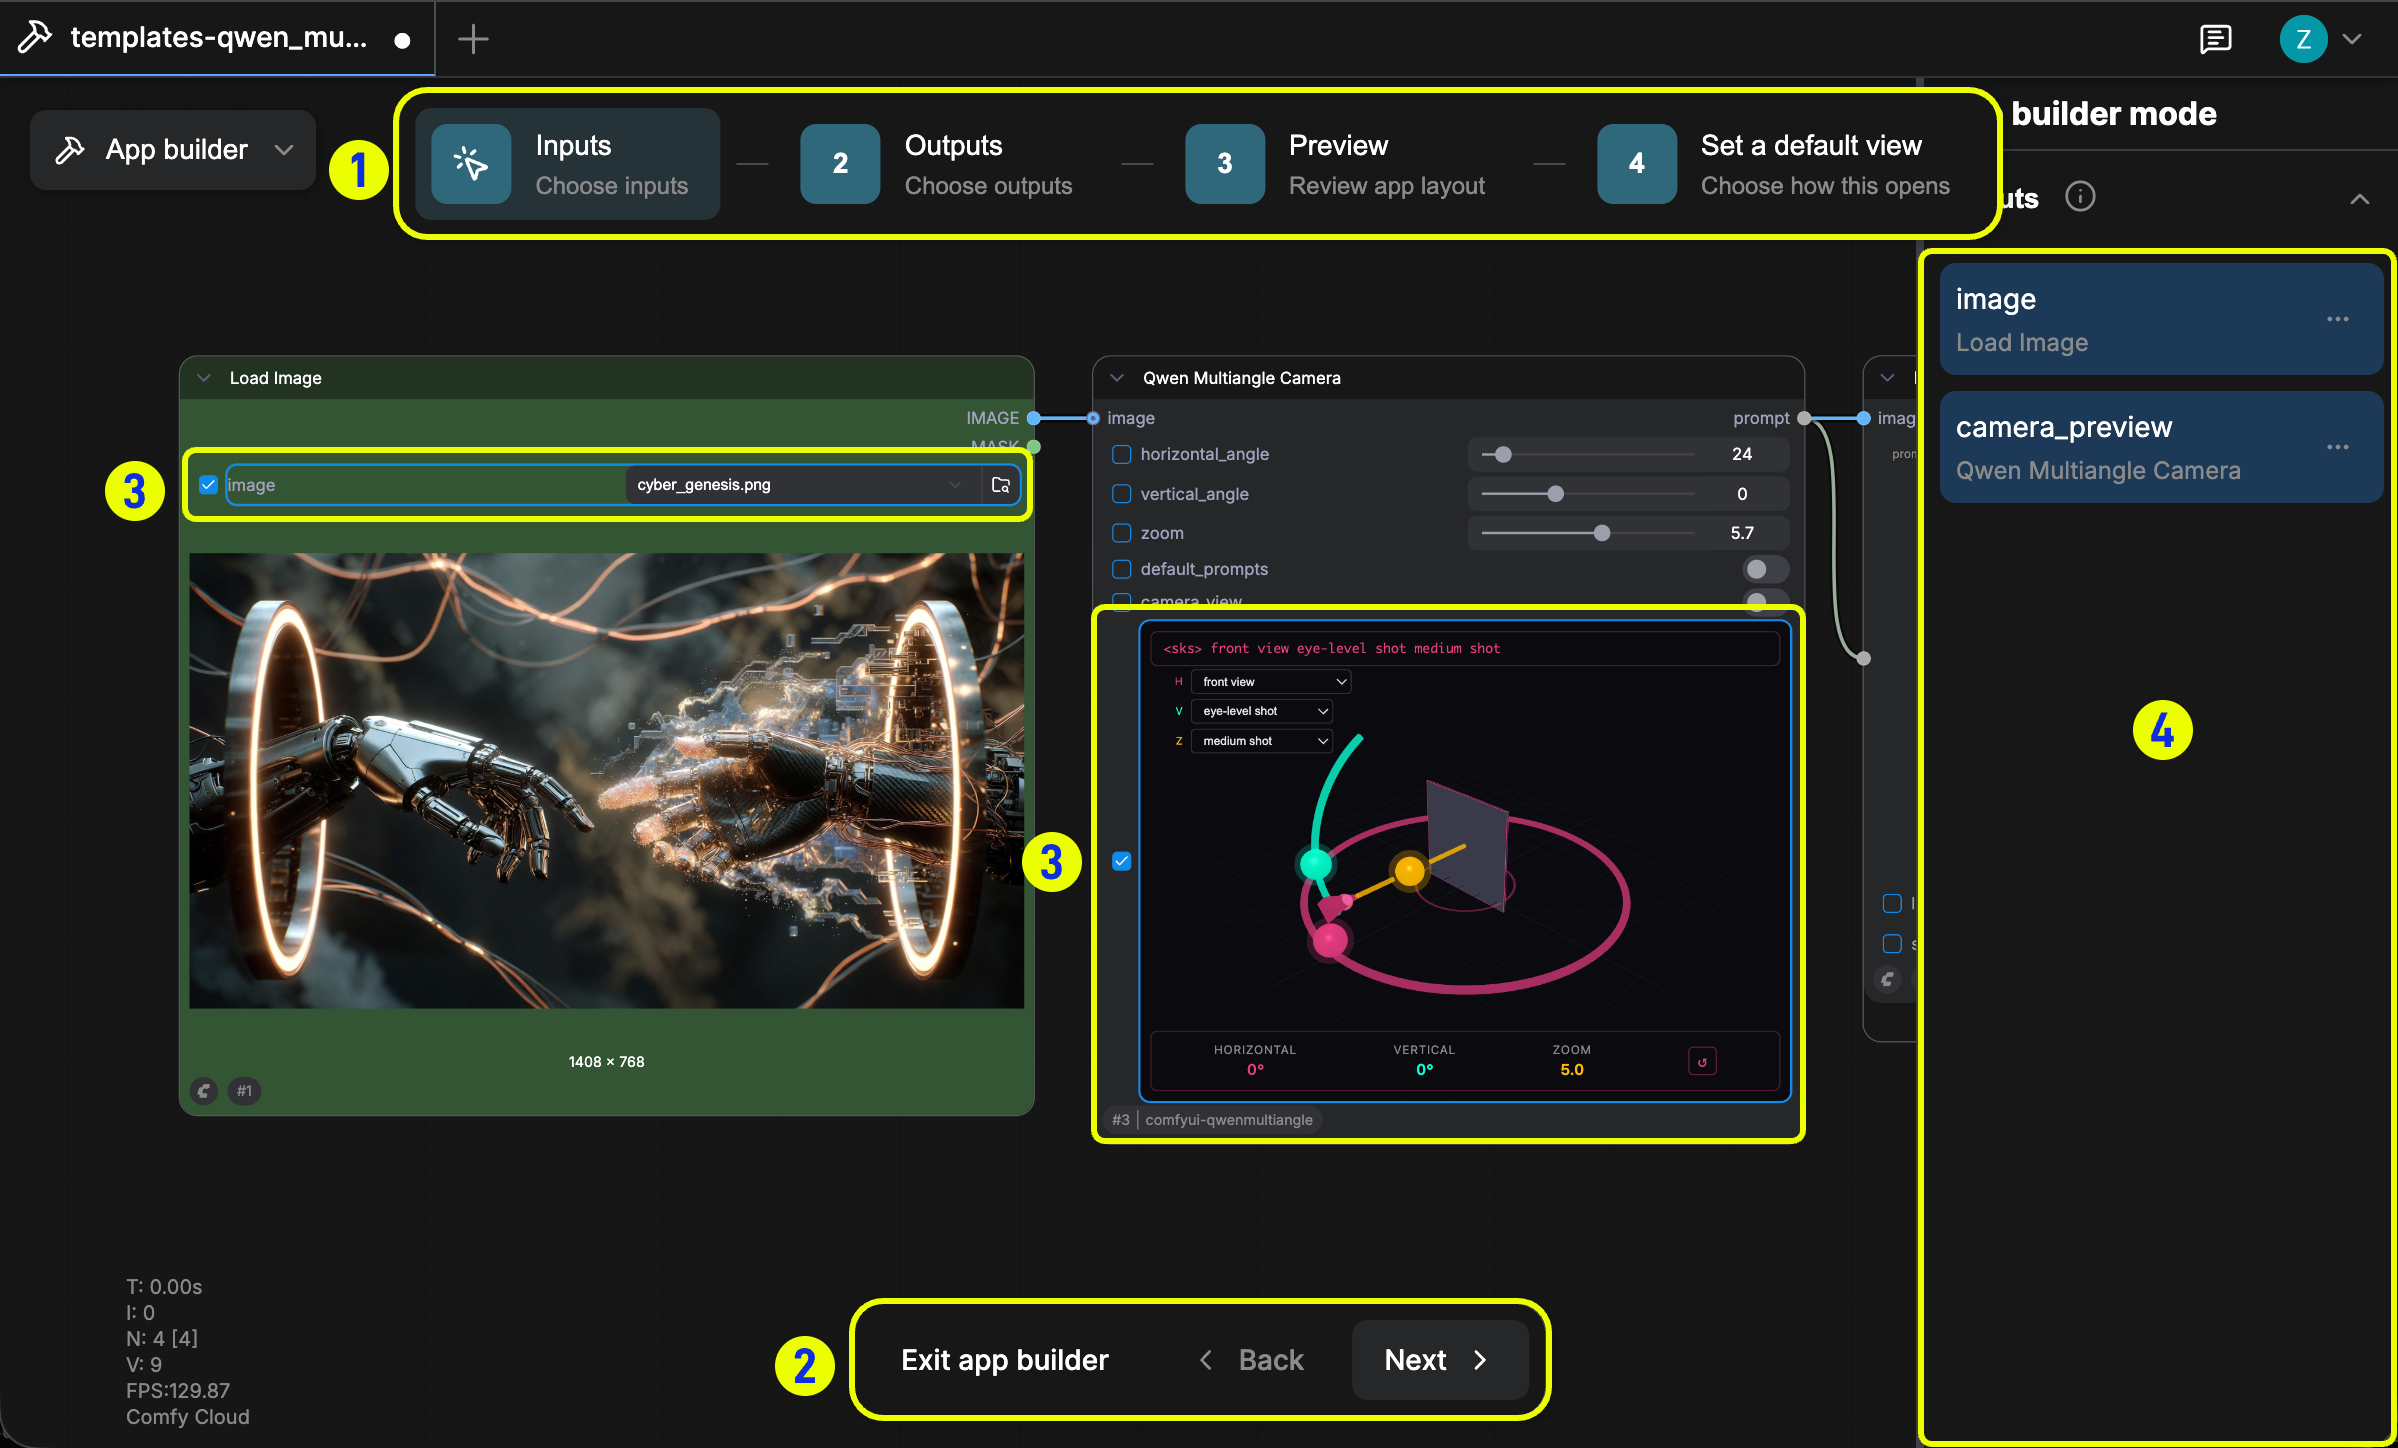 1. The numbers **1 2 3 4** at the top correspond to the four build steps: selecting inputs, selecting outputs, previewing, and setting the default view.
2. The buttons at the bottom let you exit the builder or move between steps.
3. Areas marked in the canvas are selectable input/output parameters.
4. The right panel shows a live preview of the current configuration.
Click the **Inputs** step at the top. The canvas highlights selectable input nodes. Click a node to select it as an input parameter — options include image uploads, text prompt inputs, and model selection. Selected parameters appear in the right sidebar.
### Step 2: Select outputs
Click the **Outputs** step. Choose which output nodes to display in the APP, such as a Preview node or Save Image node.
1. The numbers **1 2 3 4** at the top correspond to the four build steps: selecting inputs, selecting outputs, previewing, and setting the default view.
2. The buttons at the bottom let you exit the builder or move between steps.
3. Areas marked in the canvas are selectable input/output parameters.
4. The right panel shows a live preview of the current configuration.
Click the **Inputs** step at the top. The canvas highlights selectable input nodes. Click a node to select it as an input parameter — options include image uploads, text prompt inputs, and model selection. Selected parameters appear in the right sidebar.
### Step 2: Select outputs
Click the **Outputs** step. Choose which output nodes to display in the APP, such as a Preview node or Save Image node.
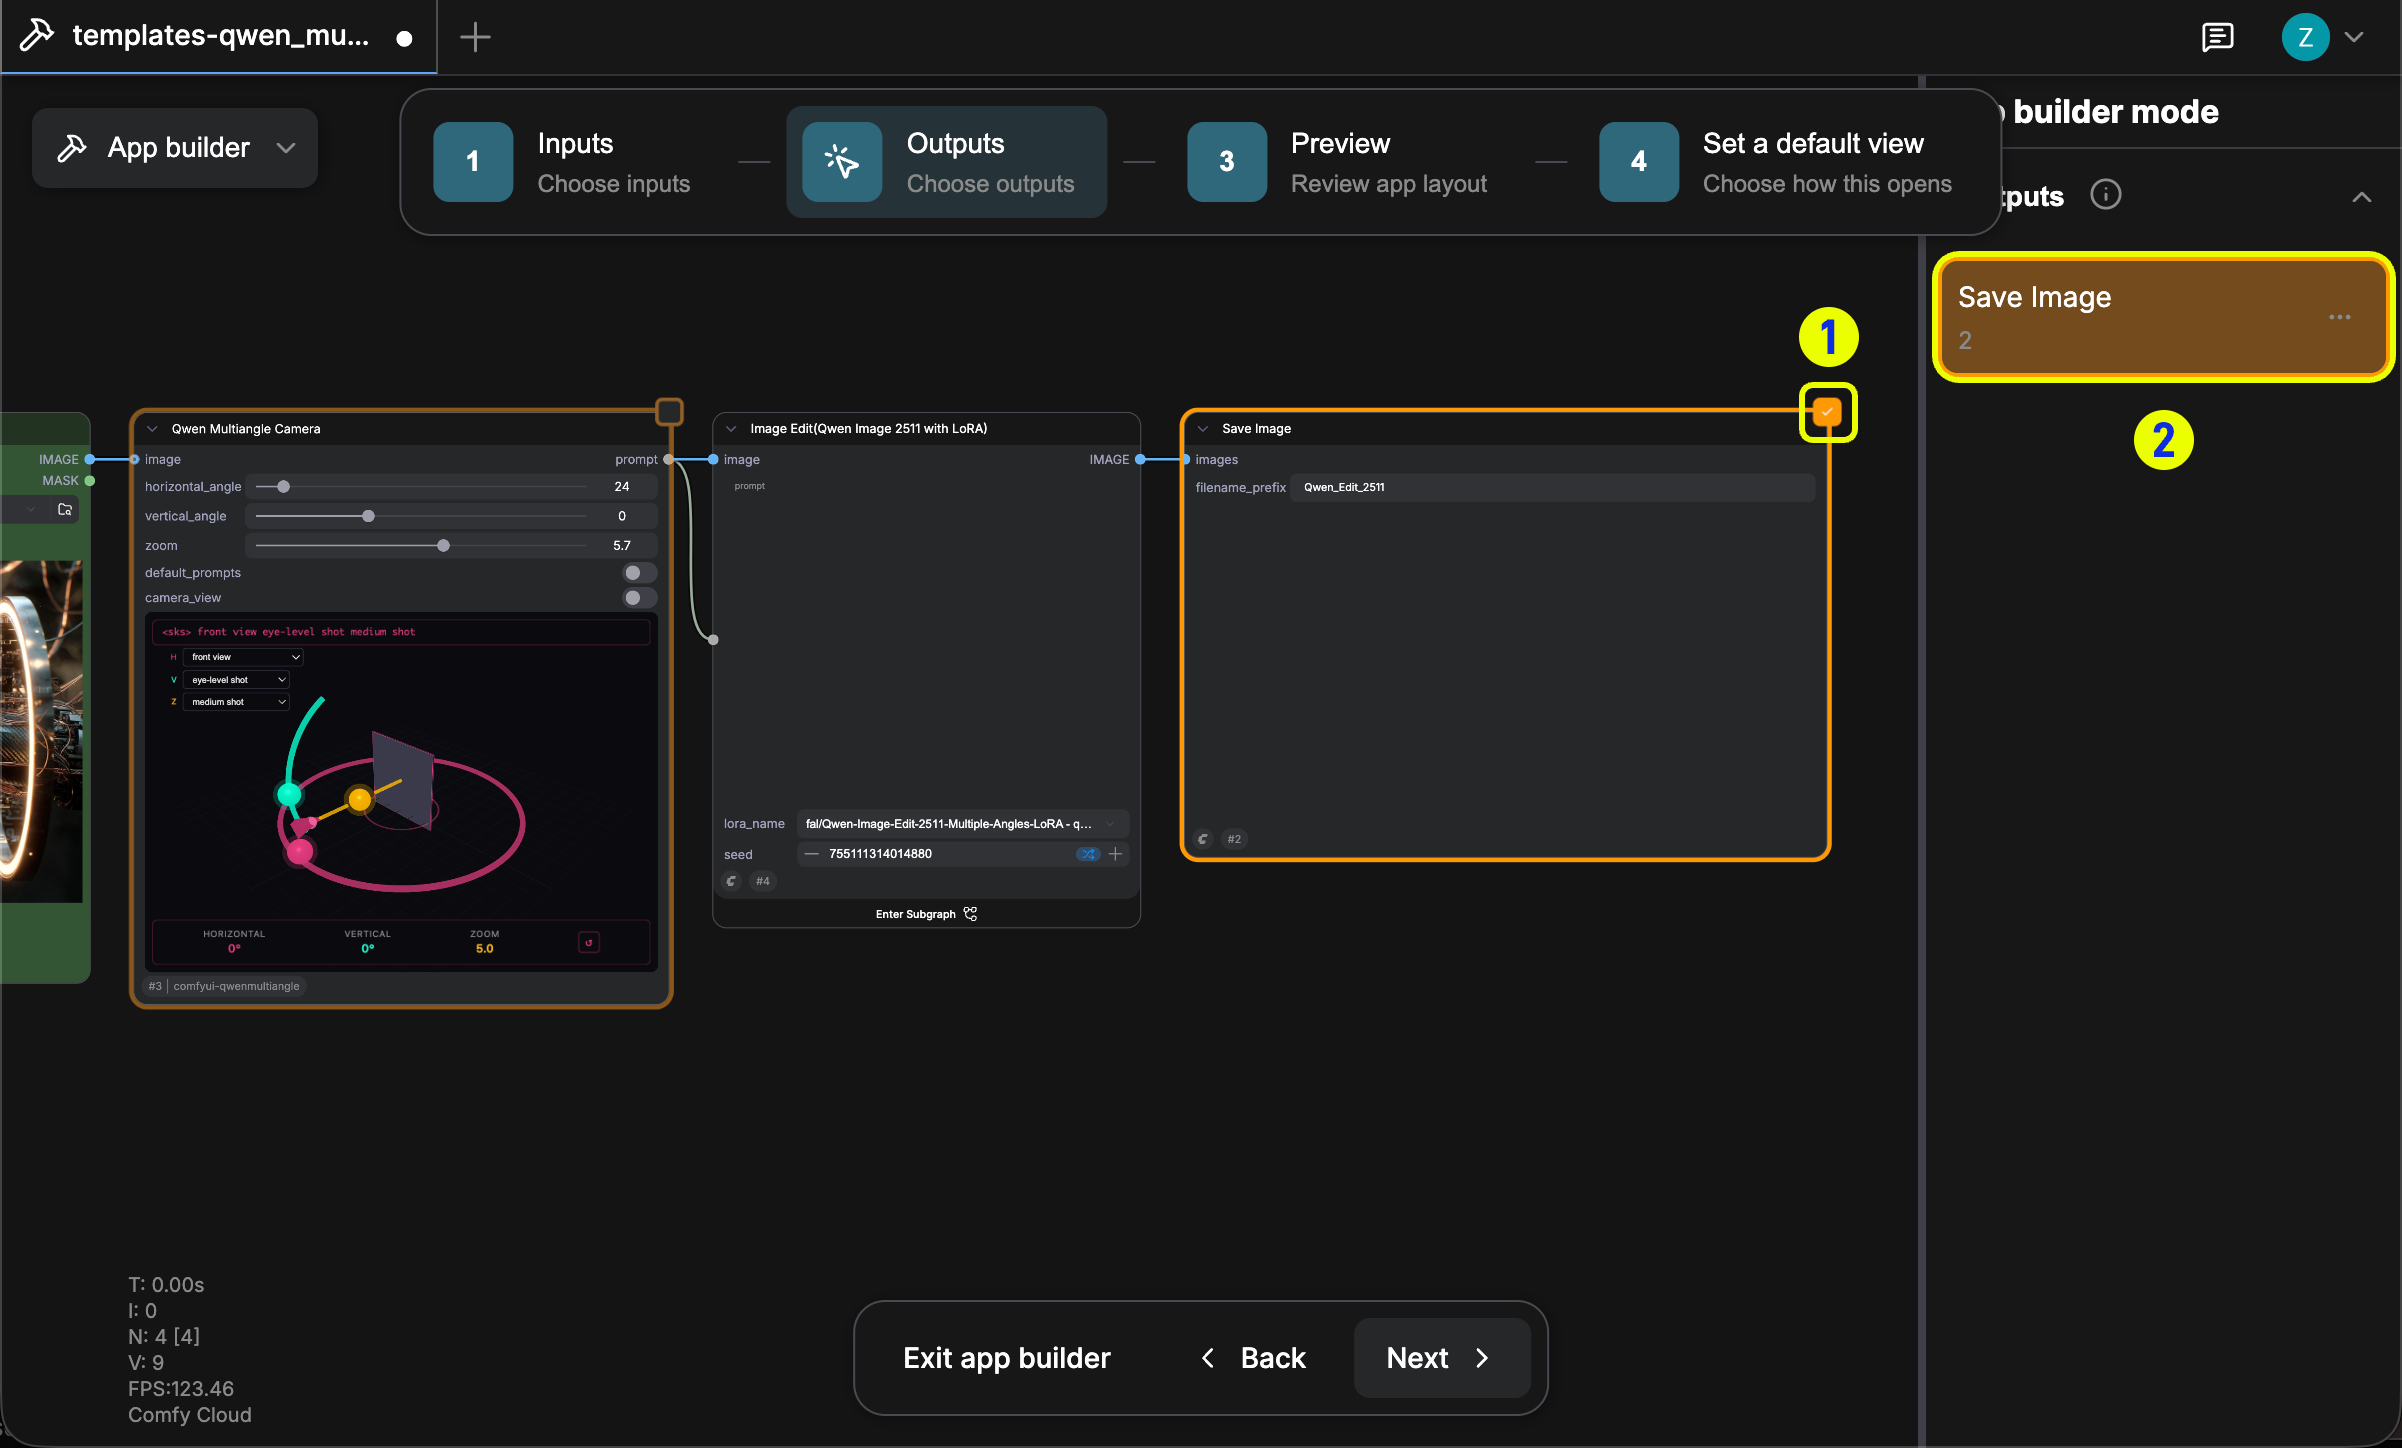 1. Select the output nodes to display in the APP.
2. Similar to inputs, the right sidebar displays a live preview of the selected output nodes.
### Step 3: Preview
Click the **Preview** step to review the final APP layout. The selected inputs appear on the right panel, and the output area is shown in the canvas.
1. Select the output nodes to display in the APP.
2. Similar to inputs, the right sidebar displays a live preview of the selected output nodes.
### Step 3: Preview
Click the **Preview** step to review the final APP layout. The selected inputs appear on the right panel, and the output area is shown in the canvas.
 1. This is the preview mode — check that all input and output configurations appear as expected.
2. If any adjustments are needed, click **Back** to return to the previous step.
### Step 4: Set a default view
Click the **Set a default view** step. Choose whether the workflow should open in **App** mode or **Node Graph** mode by default. Click **Apply** to confirm.
1. This is the preview mode — check that all input and output configurations appear as expected.
2. If any adjustments are needed, click **Back** to return to the previous step.
### Step 4: Set a default view
Click the **Set a default view** step. Choose whether the workflow should open in **App** mode or **Node Graph** mode by default. Click **Apply** to confirm.
 1. Choose whether the workflow defaults to **App** mode or **Node Graph** mode when opened.
2. Select **App** and click **Apply** to confirm. The workflow will then open in APP mode by default.
After applying, a confirmation prompt will appear.
1. Choose whether the workflow defaults to **App** mode or **Node Graph** mode when opened.
2. Select **App** and click **Apply** to confirm. The workflow will then open in APP mode by default.
After applying, a confirmation prompt will appear.
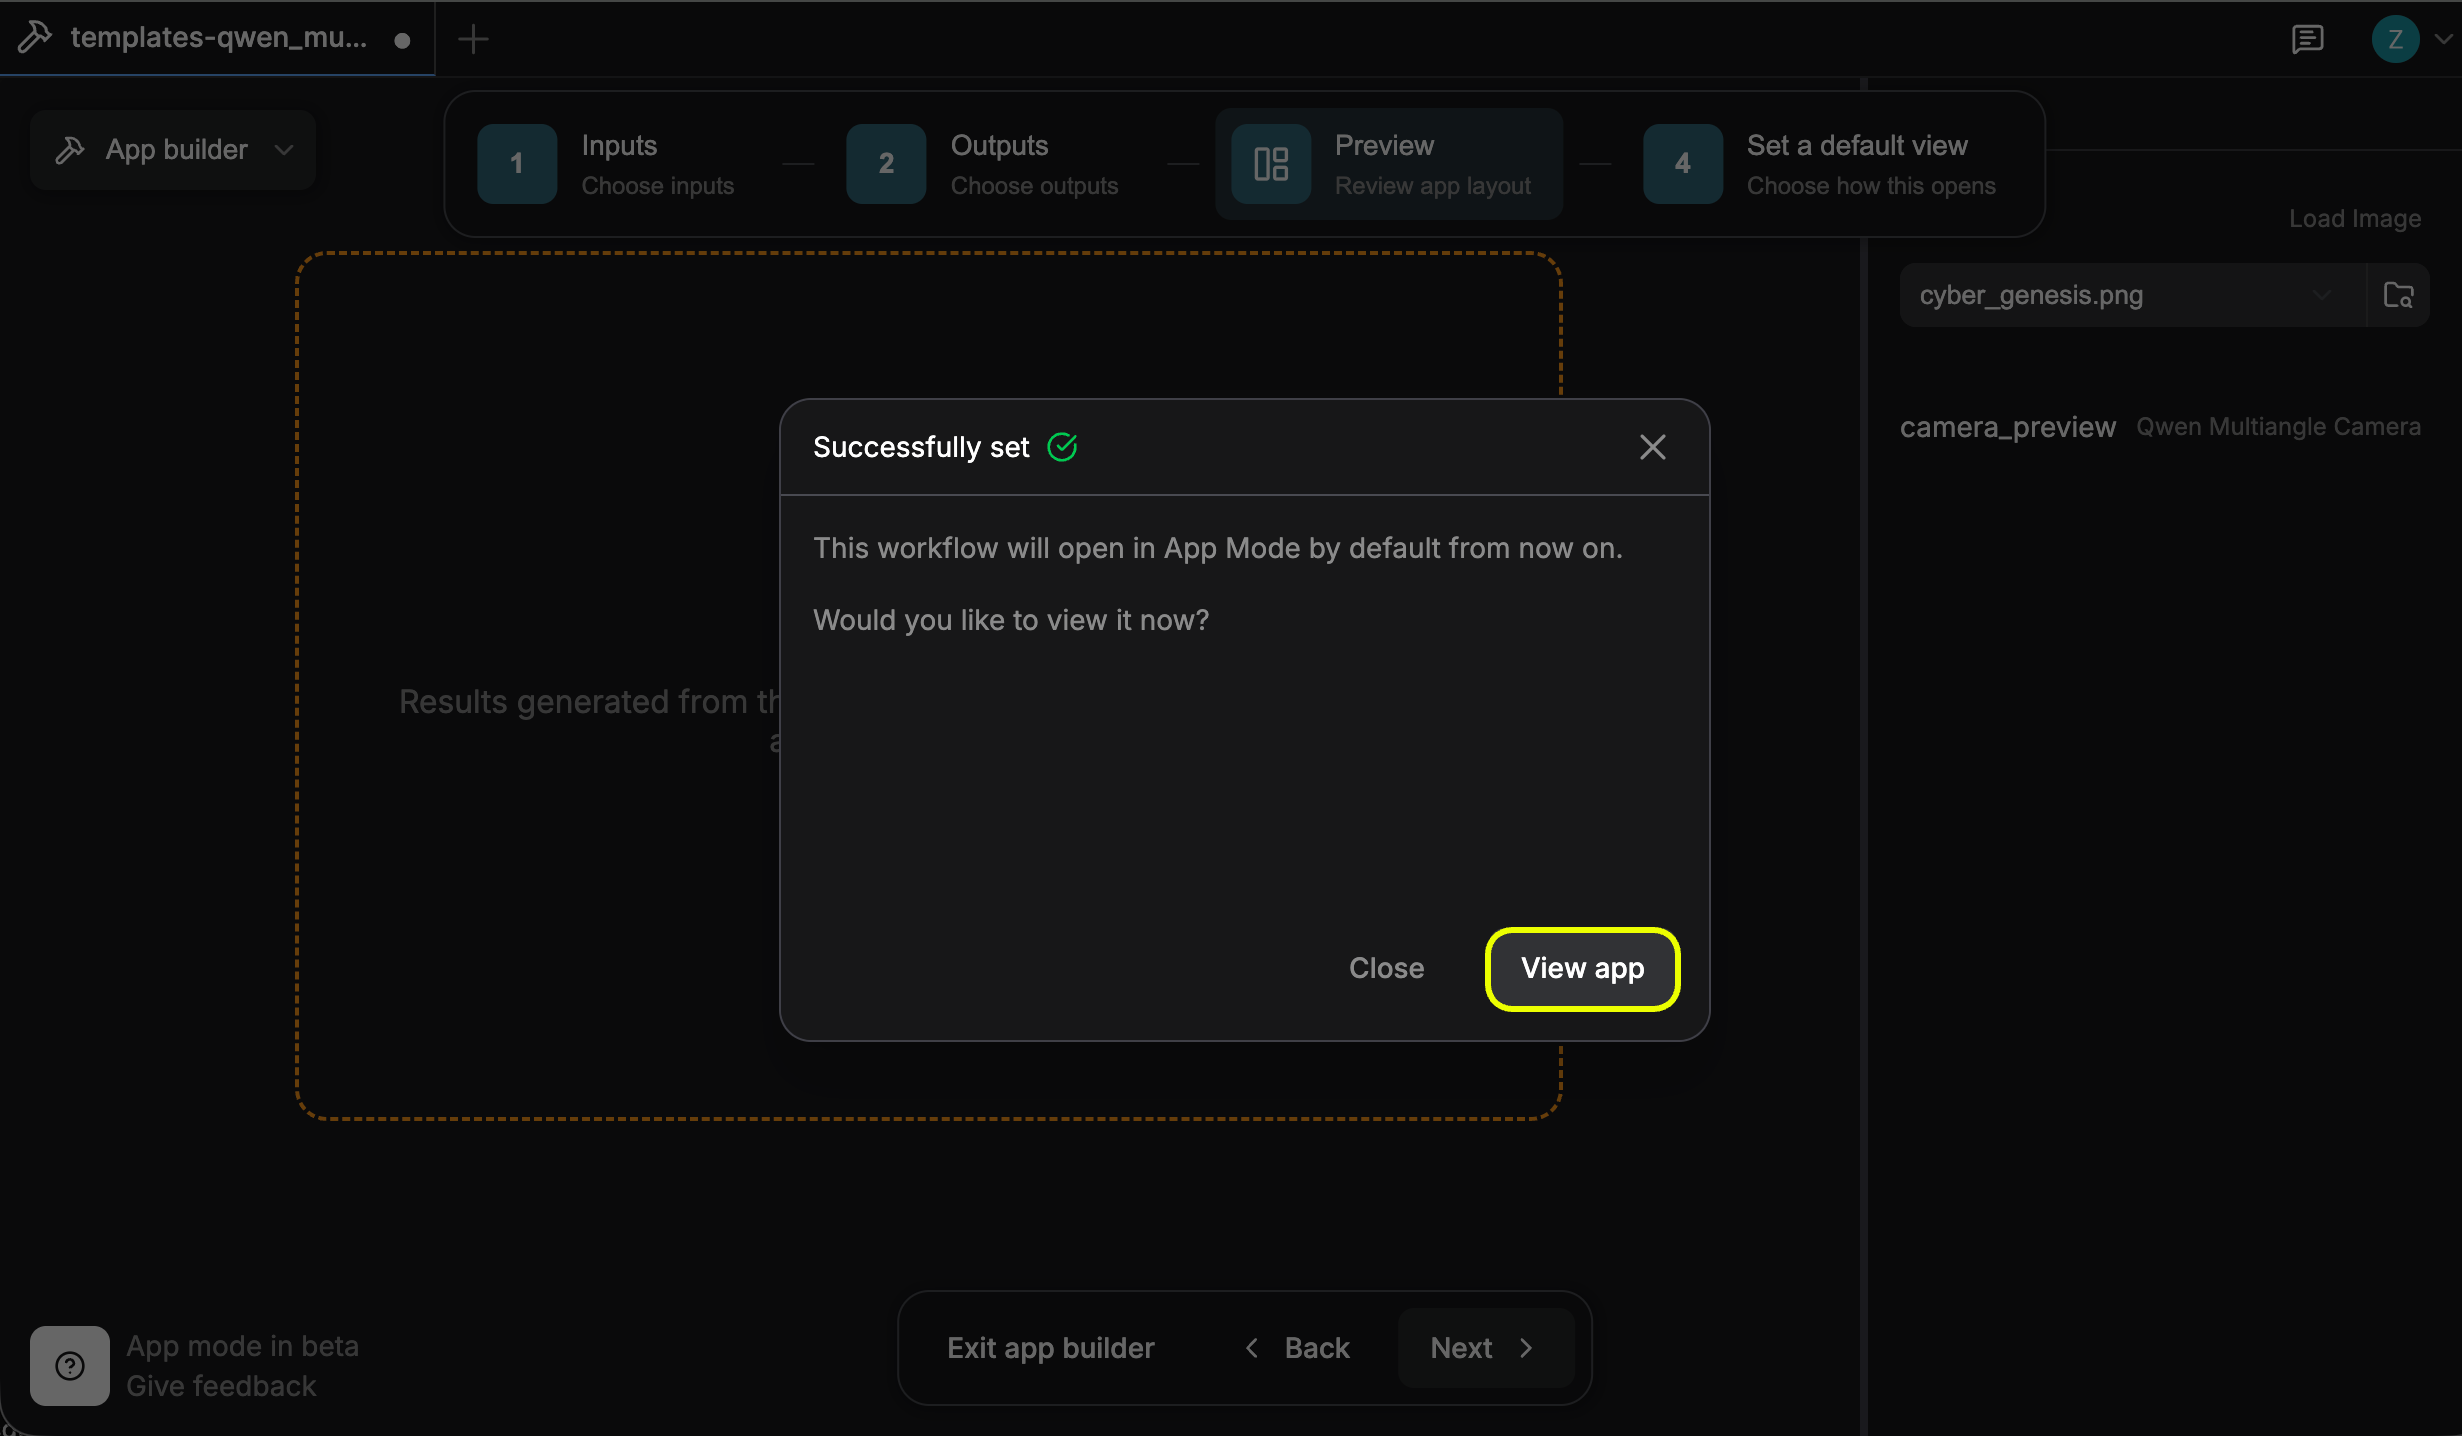 Click **View app** to enter APP mode and start using the workflow.
## Use APP mode
In APP mode, the right panel shows all configured input options. Adjust the inputs as needed, then click **Run** to execute the workflow.
Click **View app** to enter APP mode and start using the workflow.
## Use APP mode
In APP mode, the right panel shows all configured input options. Adjust the inputs as needed, then click **Run** to execute the workflow.
 1. The right **Input** panel lets you adjust input parameters before running.
2. Click **Run** to execute the workflow.
3. The left sidebar provides additional controls, such as rebuilding the APP, viewing assets, and opening the workflow panel.
APP mode is also optimized for mobile and narrow-screen layouts. The interface adapts into a tab-based view, letting you switch between the input panel, output view, and Media Assets panel.
1. The right **Input** panel lets you adjust input parameters before running.
2. Click **Run** to execute the workflow.
3. The left sidebar provides additional controls, such as rebuilding the APP, viewing assets, and opening the workflow panel.
APP mode is also optimized for mobile and narrow-screen layouts. The interface adapts into a tab-based view, letting you switch between the input panel, output view, and Media Assets panel.
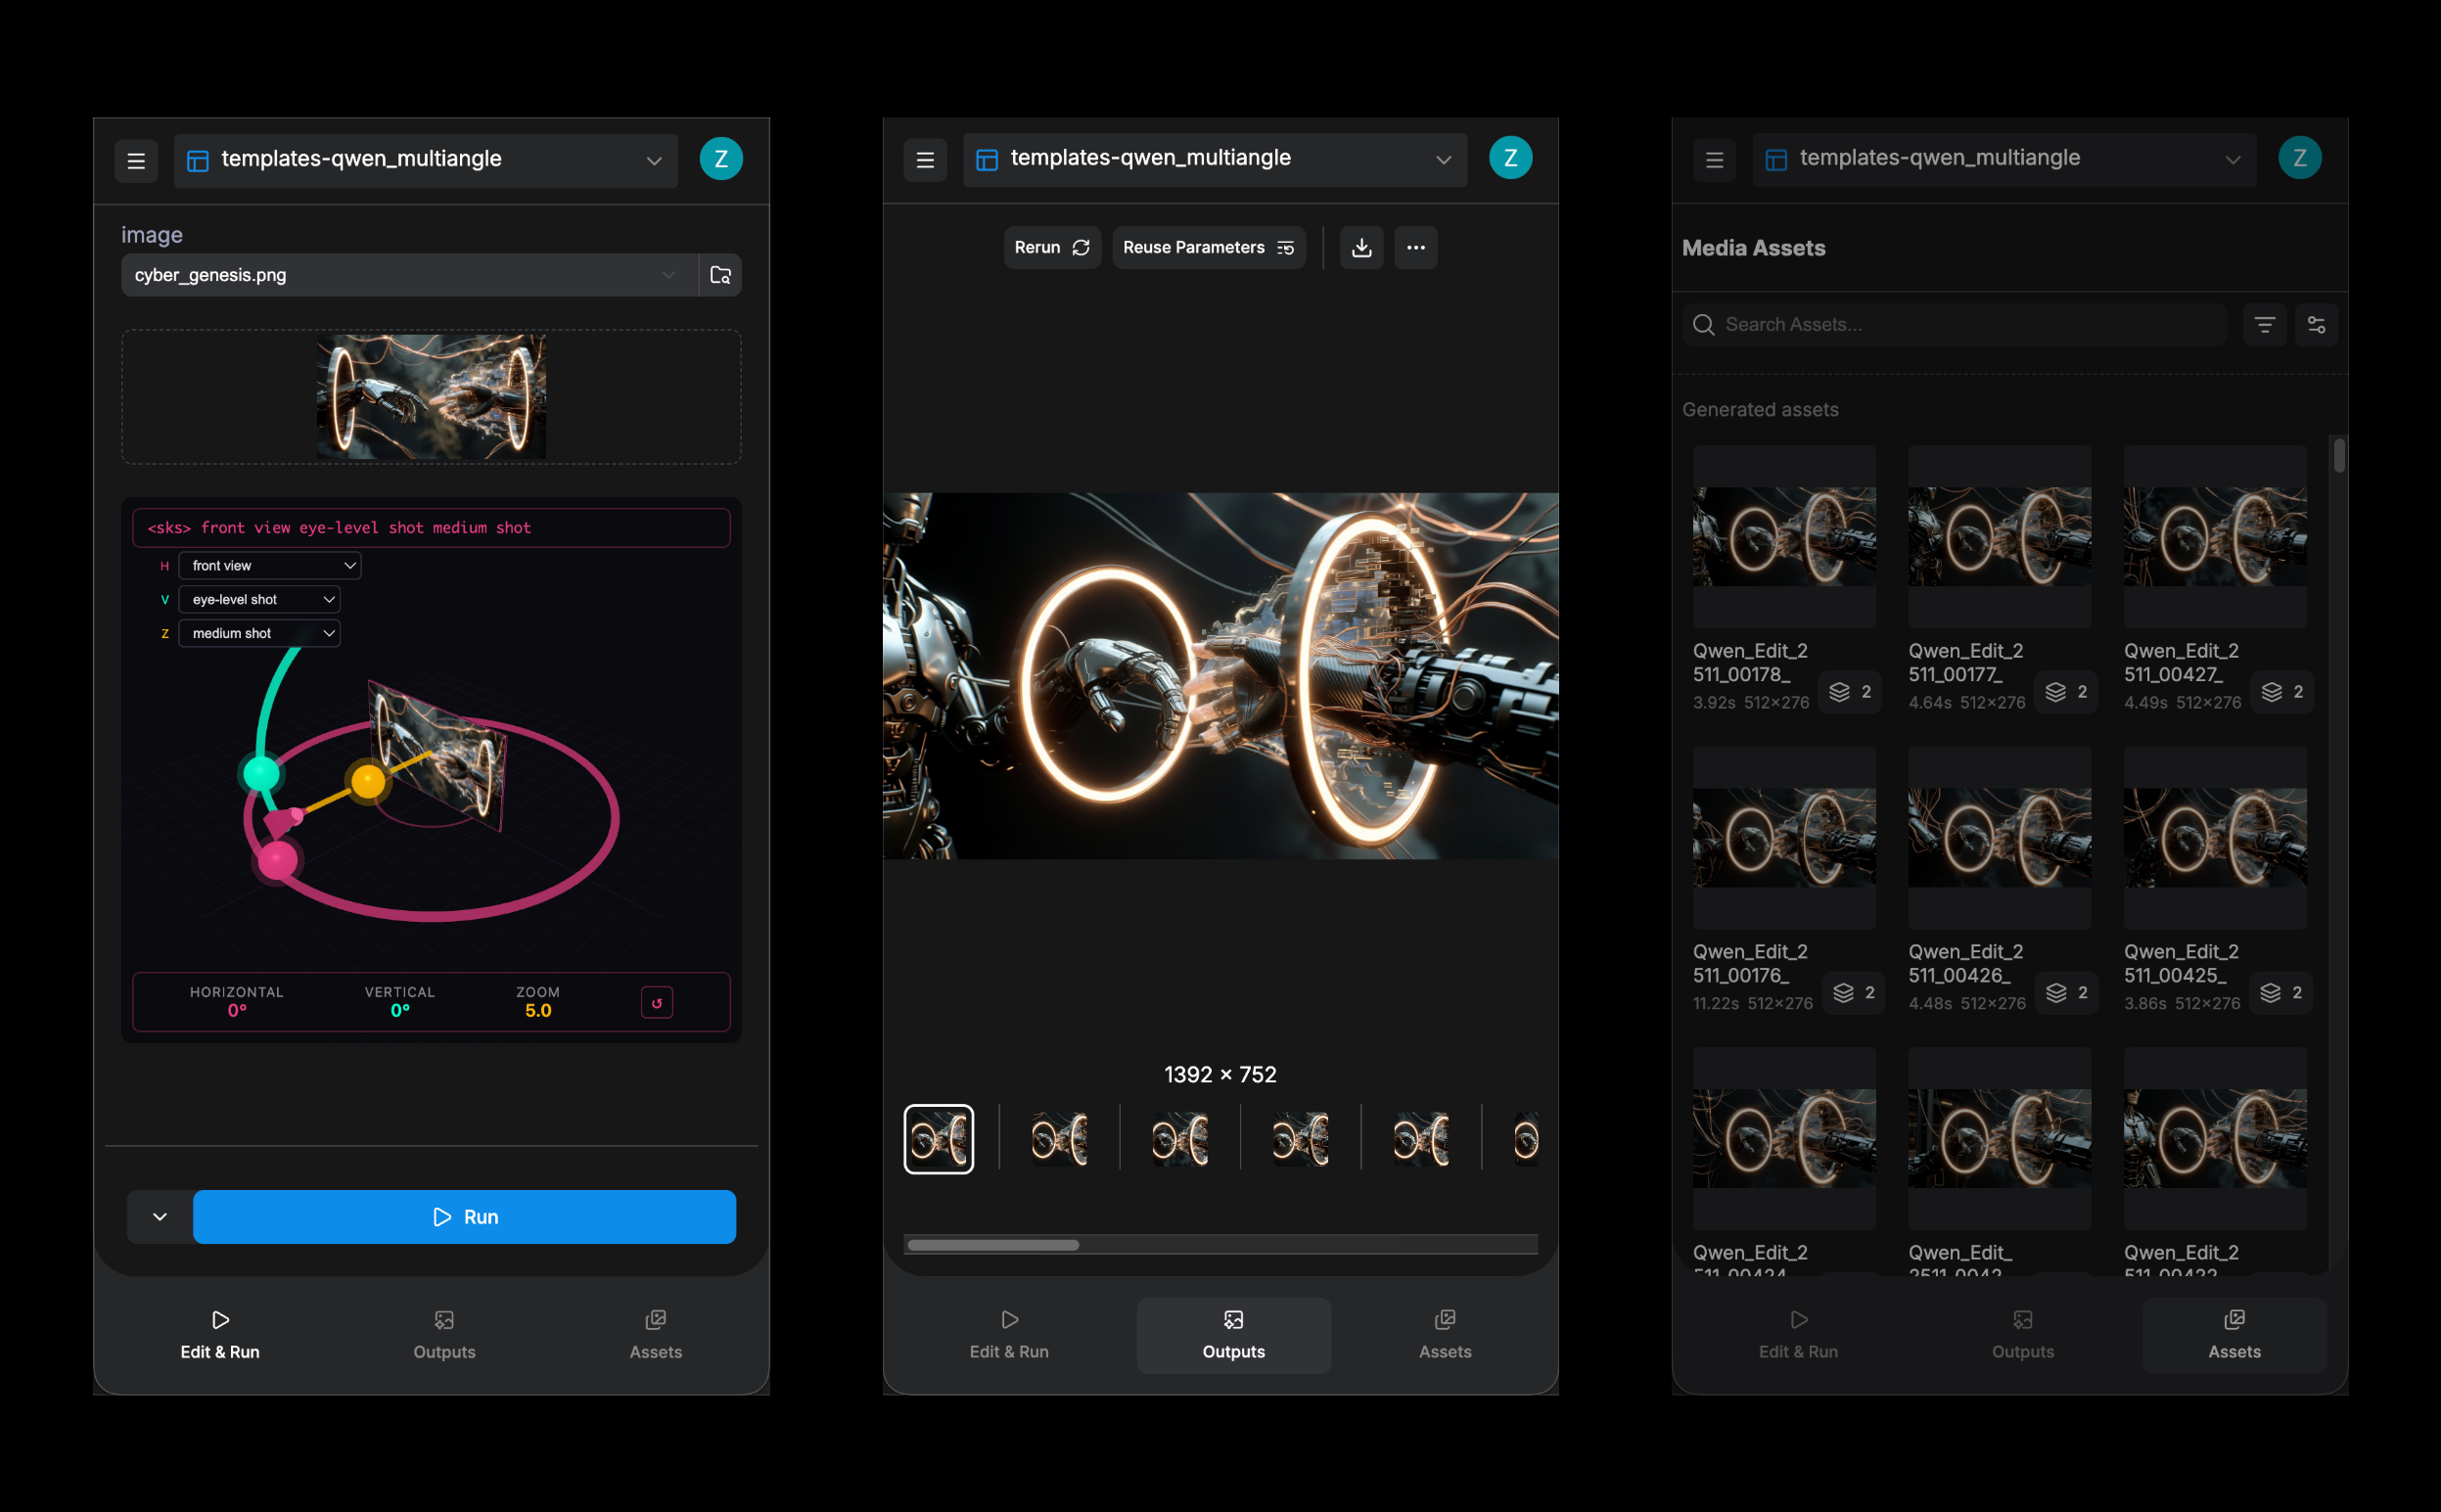 While running, a **Cancel this run** button appears at the top to stop the current execution.
 1. Click **Cancel this run** at the top to stop the current run.
2. Switch between the queue view and the results view in the bottom panel.
3. Click the relevant area to open the assets panel.
## Save and share the workflow
### Save workflow
Use `Ctrl + S` (or `Cmd + S` on Mac) to save the workflow for future use.
Click the left sidebar button to open the saved workflows panel.
1. Click **Cancel this run** at the top to stop the current run.
2. Switch between the queue view and the results view in the bottom panel.
3. Click the relevant area to open the assets panel.
## Save and share the workflow
### Save workflow
Use `Ctrl + S` (or `Cmd + S` on Mac) to save the workflow for future use.
Click the left sidebar button to open the saved workflows panel.
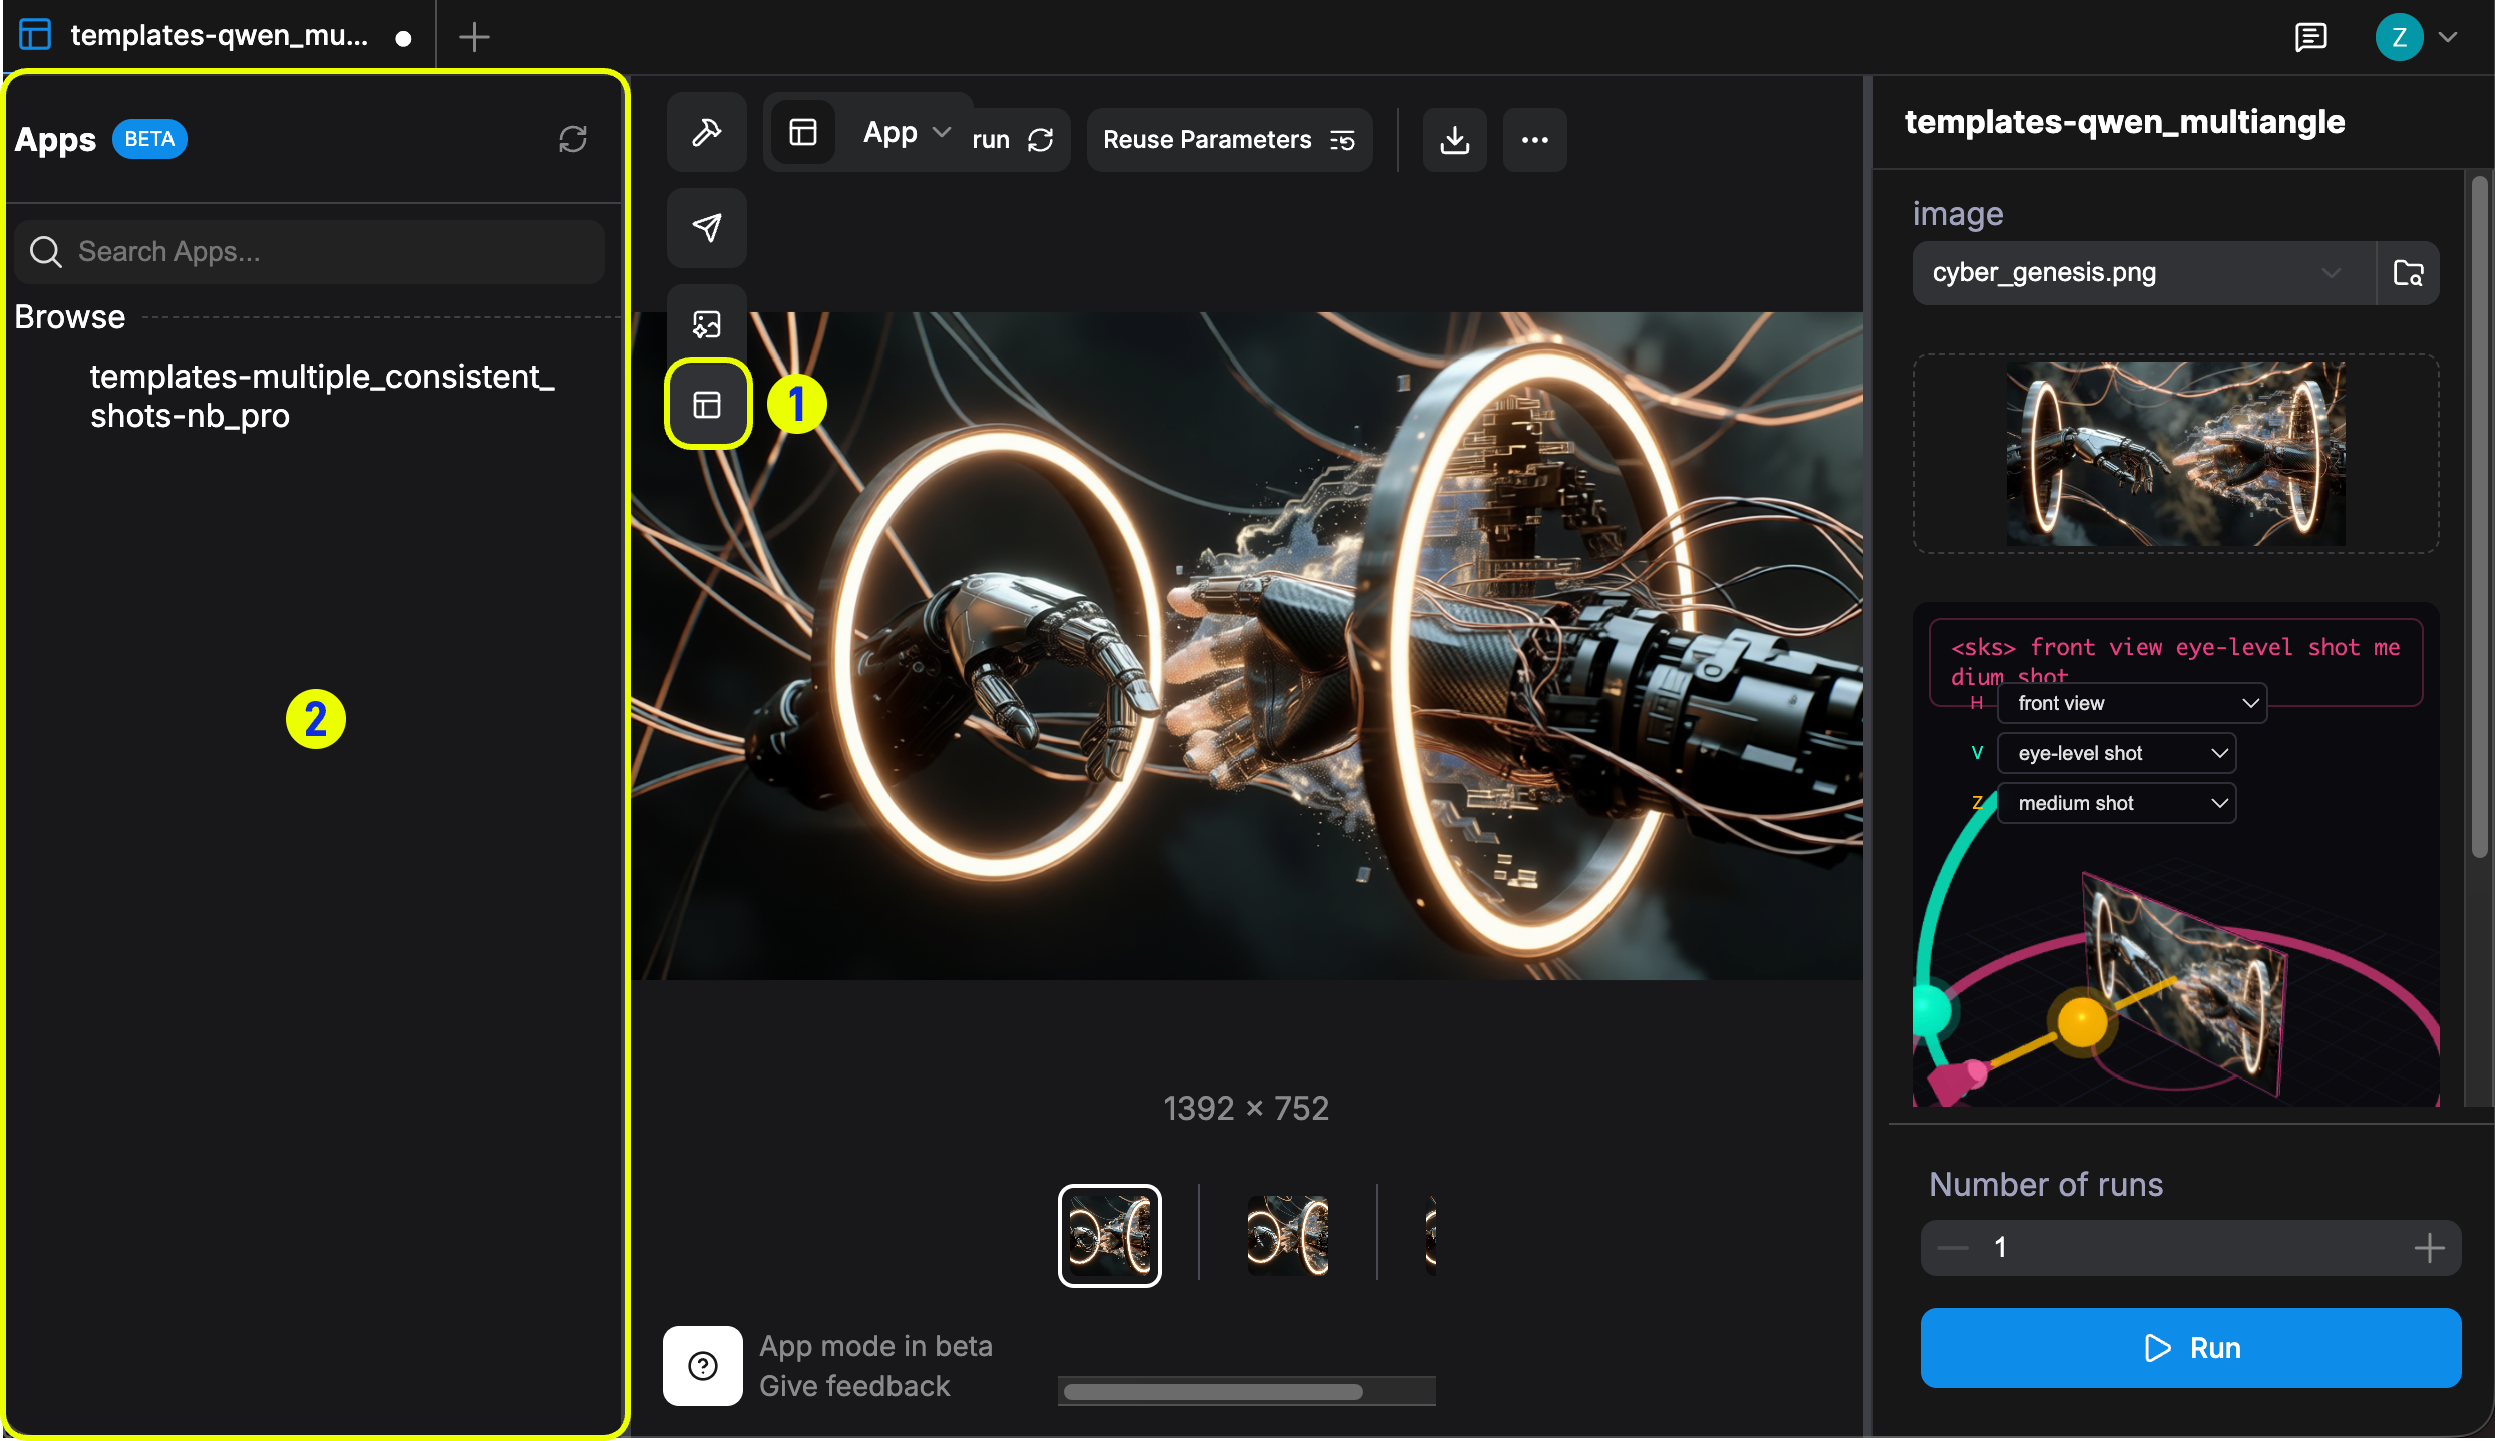 1. Click the left sidebar button to open the panel, which displays all saved APP workflows.
2. Switch between saved APP workflows from this panel.
### Share workflow
In APP mode, click the **Share** button in the left sidebar. If the workflow has not been saved yet, a dialog will prompt you to save it first before a link can be created.
1. Click the left sidebar button to open the panel, which displays all saved APP workflows.
2. Switch between saved APP workflows from this panel.
### Share workflow
In APP mode, click the **Share** button in the left sidebar. If the workflow has not been saved yet, a dialog will prompt you to save it first before a link can be created.
 1. Click the Share button in the left sidebar to open the Share dialog.
2. If the workflow is unsaved, enter a workflow name and click **Save workflow** to continue.
Once saved, the Share dialog shows the option to generate a link.
1. Click the Share button in the left sidebar to open the Share dialog.
2. If the workflow is unsaved, enter a workflow name and click **Save workflow** to continue.
Once saved, the Share dialog shows the option to generate a link.
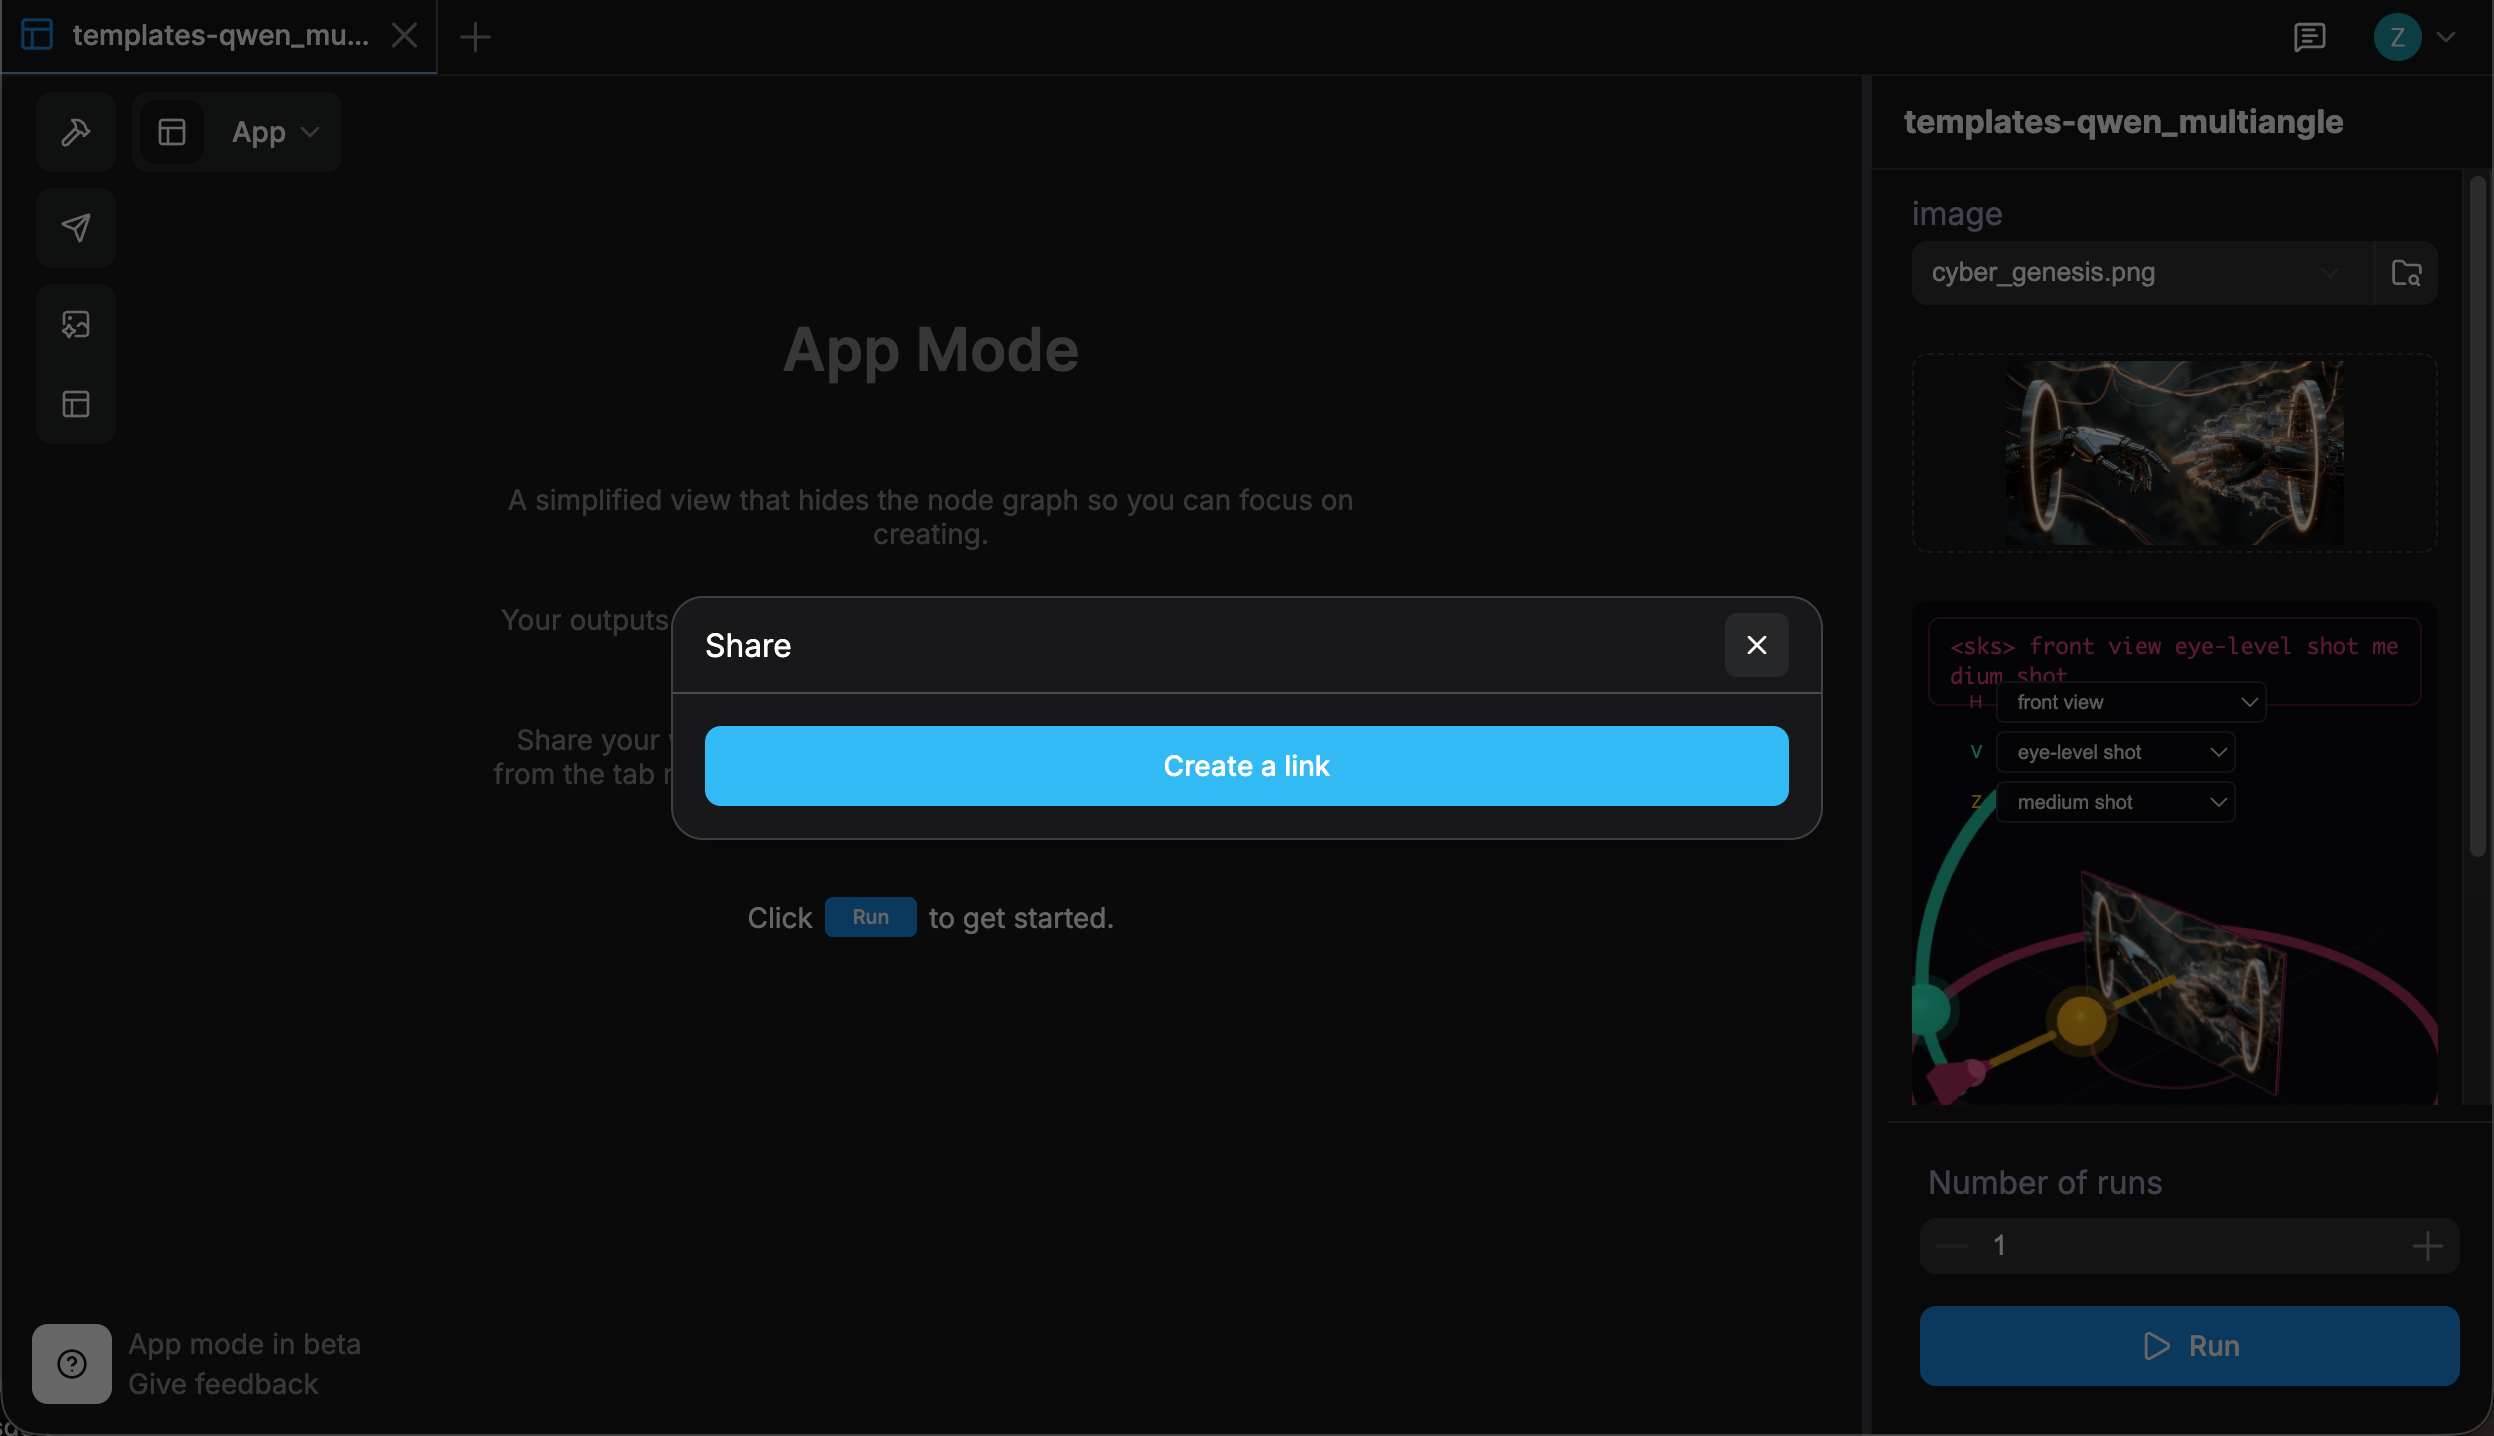 Click **Create a link** to generate a shareable URL for the workflow.
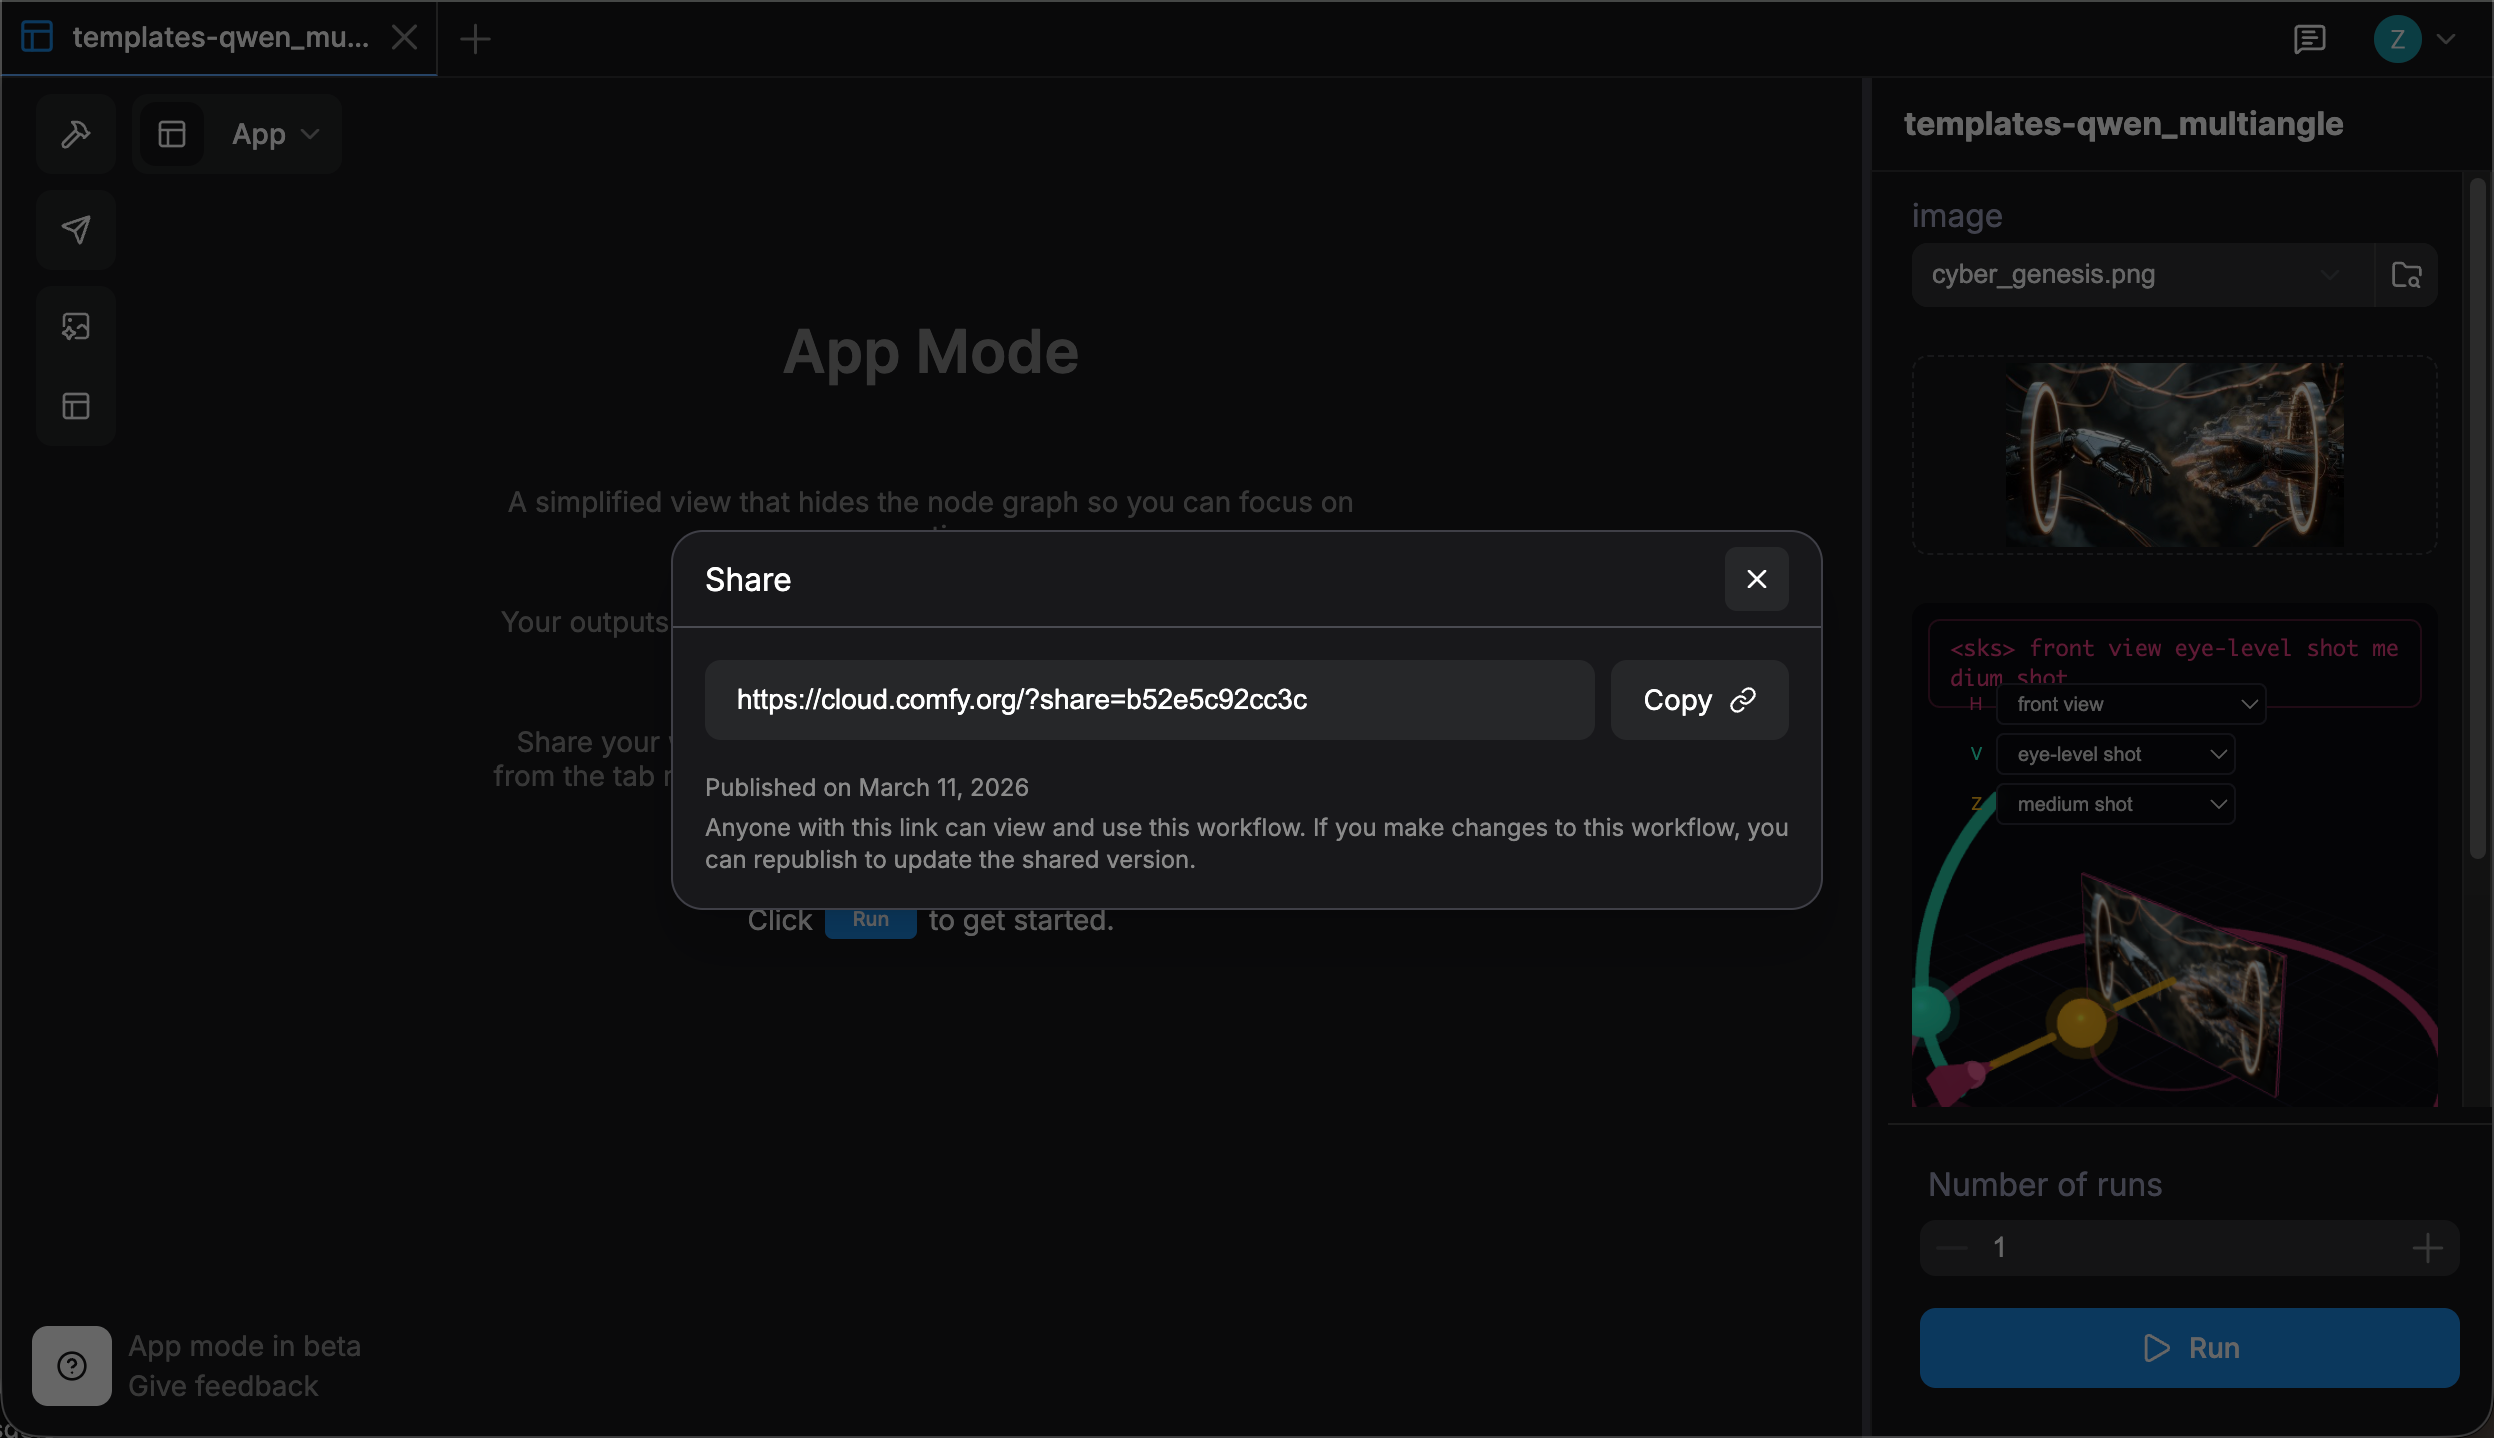 Click **Copy** to copy the link. Recipients can open it and run the workflow directly — the full workflow configuration is included in the link.