> ## Documentation Index
> Fetch the complete documentation index at: https://docs.comfy.org/llms.txt
> Use this file to discover all available pages before exploring further.
# 수동 설치 — 로컬 자체 호스팅
> 이 섹션에서는 Windows, MacOS 및 Linux에서의 수동 설치 과정을 안내합니다.
ComfyUI를 설치하려면 주로 다음 몇 가지 단계로 나뉩니다:
1. 가상 환경 생성하기(시스템 레벨 파이썬 환경 오염 피하기)
2. ComfyUI 코드 저장소 복제하기
3. 의존성 설치하기
4. ComfyUI 시작하기
[ComfyUI CLI](/ko/comfy-cli/getting-started)를 참고해 ComfyUI를 설치할 수도 있습니다. 이는 명령줄 도구로, ComfyUI를 쉽게 설치하고 의존성을 관리할 수 있습니다.
## 가상 환경 생성하기
독립적인 가상 환경은 ComfyUI의 의존성이 시스템의 다른 의존성과 충돌할 수 있기 때문에 반드시 필요하며, 시스템 레벨 파이썬 환경을 오염시키는 것도 피할 수 있습니다.
[Miniconda 설치](https://docs.anaconda.com/free/miniconda/index.html#latest-miniconda-installer-links). 이는 ComfyUI에서 필요한 Python 및 기타 라이브러리의 올바른 버전을 설치하는 데 도움이 됩니다.
Conda를 사용해 환경을 생성하세요.
```
conda create -n comfyenv
conda activate comfyenv
```
## ComfyUI 코드 저장소 복제하기
시스템에 [Git](https://git-scm.com/downloads)가 설치되어 있는지 확인해야 합니다. 먼저 터미널(명령줄)을 열고 코드 저장소를 복제하세요.
Microsoft Visual C++ 재배포 가능 패키지를 설치하지 않았다면 [여기](https://learn.microsoft.com/en-us/cpp/windows/latest-supported-vc-redist?view=msvc-170)에서 설치해주세요.
터미널 애플리케이션을 엽니다.
[터미널 애플리케이션](https://support.apple.com/guide/terminal/open-or-quit-terminal-apd5265185d-f365-44cb-8b09-71a064a42125/mac)을 엽니다.
```bash theme={null}
git clone https://github.com/Comfy-Org/ComfyUI.git
```
## GPU 및 ComfyUI 의존성 설치하기
GPU 종속성 설치
```
pip install torch torchvision torchaudio --extra-index-url https://download.pytorch.org/whl/cu130
```
또는 PyTorch의 Nightly 버전을 설치할 수도 있습니다.
Nightly 버전 설치 (더 위험할 수 있음)
```
pip install --pre torch torchvision torchaudio --index-url https://download.pytorch.org/whl/nightly/cu132
```
```
pip3 install torch torchvision torchaudio --index-url https://download.pytorch.org/whl/rocm7.2
```
또는 PyTorch의 Nightly 버전(ROCm 7.2)을 설치할 수도 있습니다.
Nightly 버전 설치 (더 위험할 수 있음)
```
pip3 install --pre torch torchvision torchaudio --index-url https://download.pytorch.org/whl/nightly/rocm7.2
```
```bash theme={null}
conda install pytorch-nightly::pytorch torchvision torchaudio -c pytorch-nightly
```
```bash theme={null}
cd ComfyUI
pip install -r requirements.txt
```
애플리케이션을 시작하세요
```
cd ComfyUI
python main.py
```
고급 서버 구성(사용자 지정 포트, LAN 액세스, VRAM 모드 등)에 대한 자세한 내용은 [시작 플래그 참조](/ko/development/comfyui-server/startup-flags)를 참조하세요.
## ComfyUI 업데이트 방법
명령줄을 사용해 ComfyUI의 설치 경로로 이동한 후 최신 코드를 가져옵니다.
```bash theme={null}
cd <설치 경로>/ComfyUI
git pull
```
명령줄을 사용해 ComfyUI의 설치 경로로 이동한 후 의존성을 설치합니다.
현재 파이썬 환경이 ComfyUI 가상 환경인지 확인해야 합니다. 그렇지 않으면 의존성이 시스템 레벨 파이썬 환경에 설치되어 시스템 레벨 파이썬 환경을 오염시킬 수 있습니다.
```bash theme={null}
pip install -r requirements.txt
```
## 추가 모델 경로 추가하기
`ComfyUI/models` 외부에서 모델 파일을 관리하고 싶다면 다음과 같은 이유가 있을 수 있습니다:
* 여러 개의 ComfyUI 인스턴스를 사용하고 있으며 디스크 공간을 절약하기 위해 모델 파일을 공유하고 싶습니다.
* 서로 다른 유형의 GUI 프로그램(예: WebUI)을 사용하고 있으며 동일한 모델 파일을 사용하고 싶습니다.
* 모델 파일이 인식되지 않거나 찾을 수 없습니다.
우리는 `extra_model_paths.yaml` 구성 파일을 통해 추가 모델 검색 경로를 추가할 수 있는 방법을 제공합니다.
### 구성 파일 열기
[휴대용](/ko/installation/comfyui_portable_windows) 및 [수동](/ko/installation/manual_install) 버전의 ComfyUI에서는 ComfyUI 루트 디렉터리에 `extra_model_paths.yaml.example`라는 예제 파일을 찾을 수 있습니다:
```
ComfyUI/extra_model_paths.yaml.example
```
이를 복사하여 `extra_model_paths.yaml`로 이름을 변경해 사용하세요. 이 파일은 ComfyUI의 루트 디렉터리인 `ComfyUI/extra_model_paths.yaml`에 유지하십시오. 또한, 구성 예제 파일은 [여기](https://github.com/Comfy-Org/ComfyUI/blob/master/extra_model_paths.yaml.example)에서도 확인할 수 있습니다.
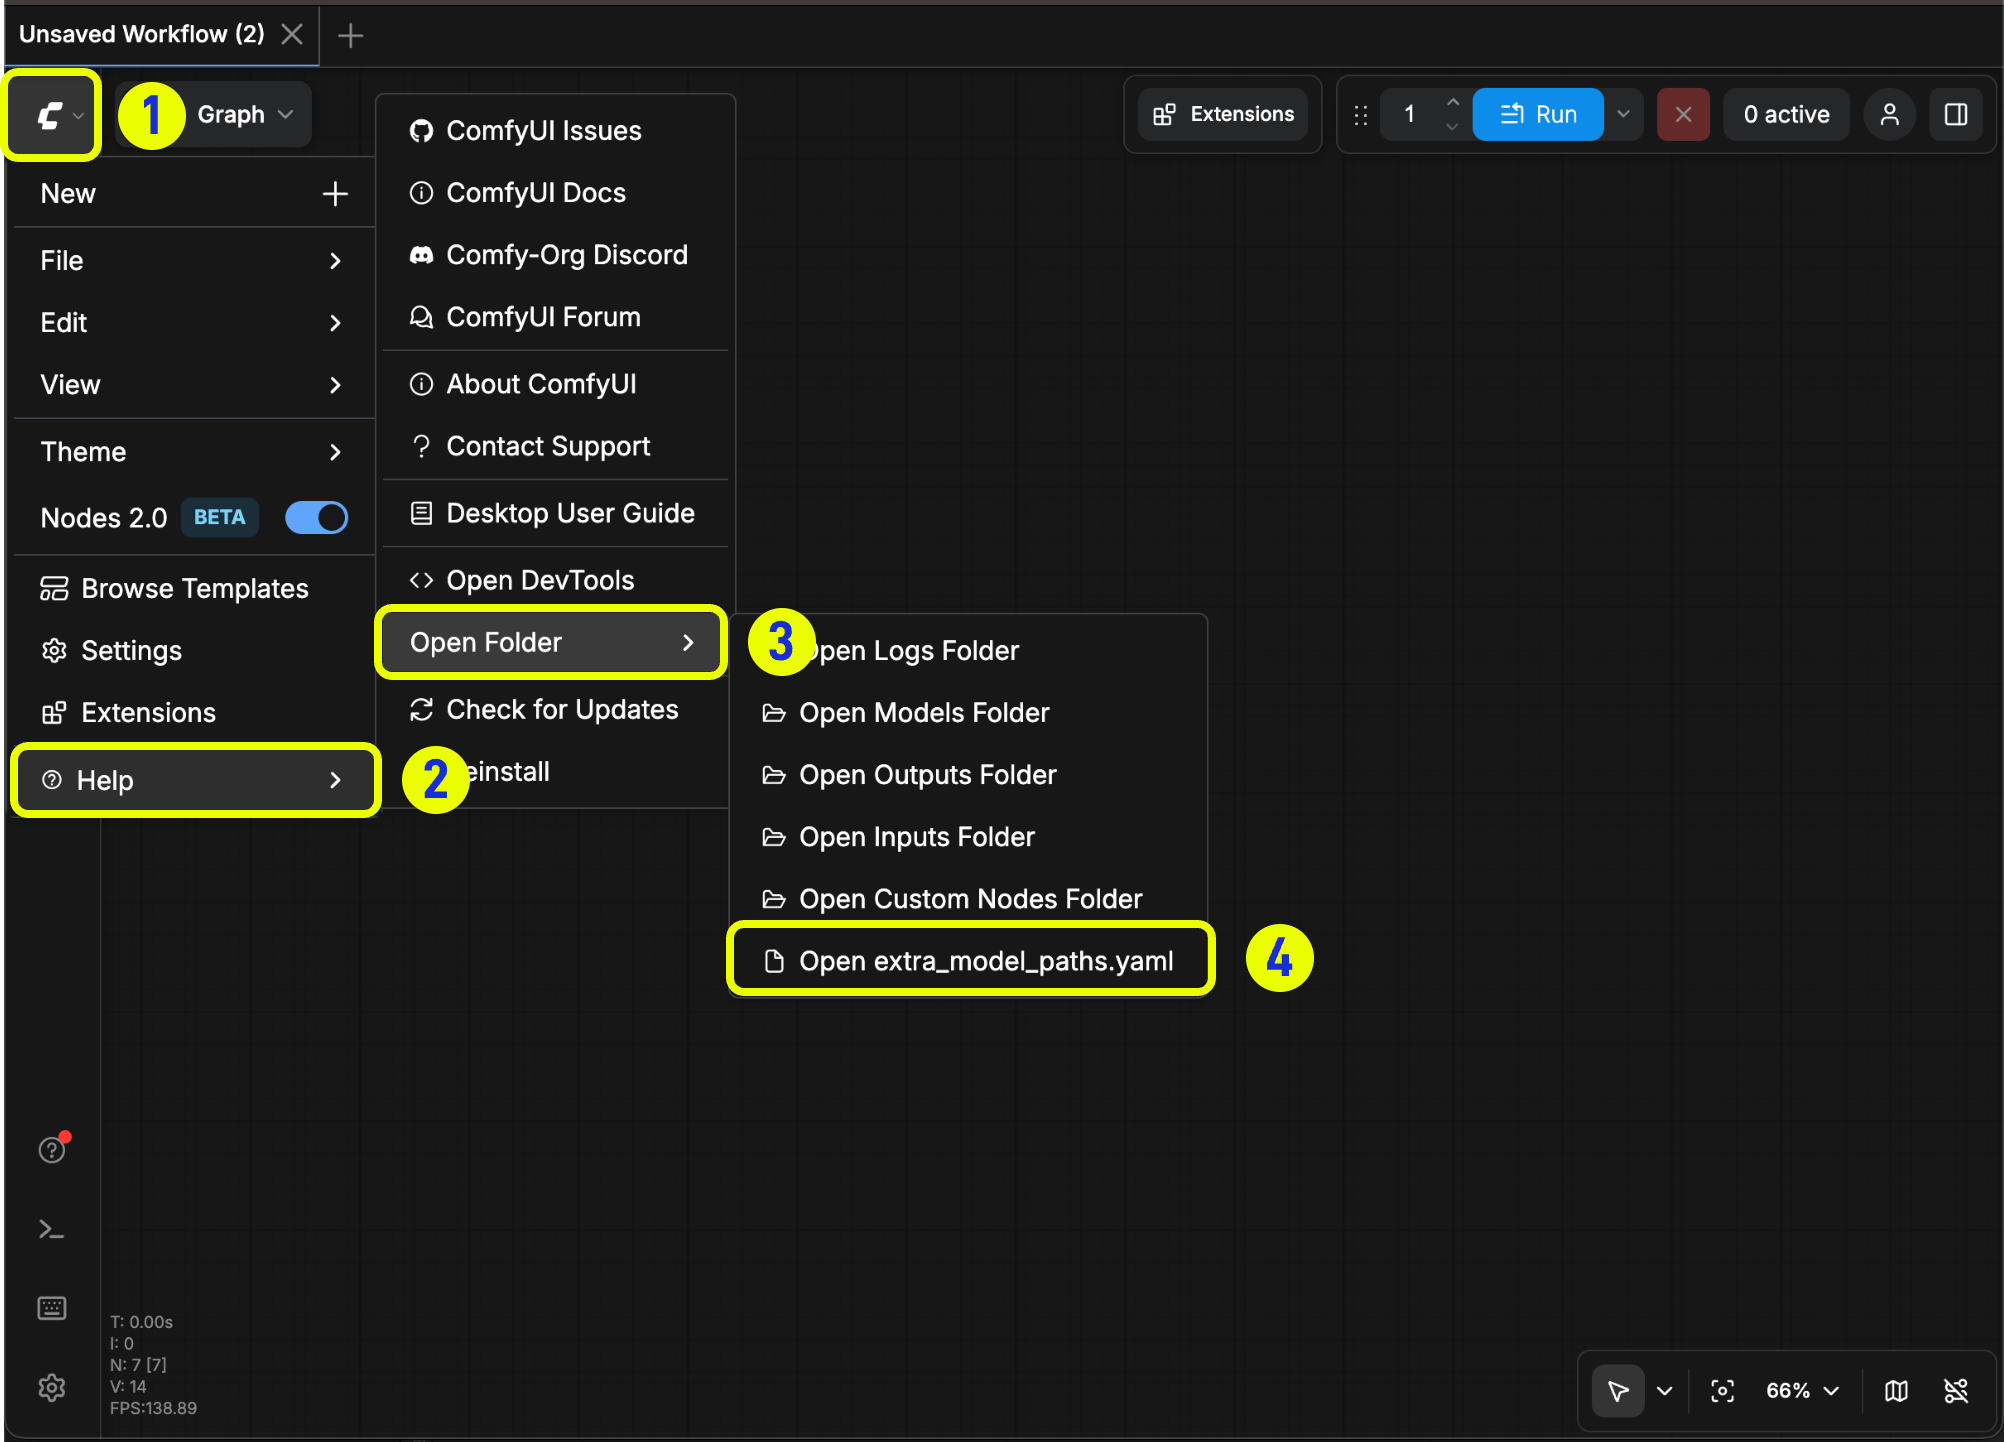
[Comfy 데스크톱](/ko/installation/desktop/windows) 애플리케이션을 사용하는 경우, 아래 이미지를 따라 추가 모델 구성 파일을 열 수 있습니다:
 또는 다음 경로에서 직접 열 수도 있습니다:
```
C:\Users\YourUsername\AppData\Roaming\ComfyUI\extra_models_config.yaml
```
```
~/Library/Application Support/ComfyUI/extra_models_config.yaml
```
해당 파일을 동일한 디렉터리에 유지해야 하며, 다른 곳으로 이동해서는 안 됩니다.
파일이 존재하지 않는 경우, 아무 텍스트 편집기로 직접 생성할 수 있습니다.
### 예제 구조
다음과 같은 모델 경로를 ComfyUI에 추가하고 싶다고 가정해 보겠습니다:
```
📁 YOUR_PATH/
├── 📁models/
| ├── 📁 loras/
| │ └── xxxxx.safetensors
| ├── 📁 checkpoints/
| │ └── xxxxx.safetensors
| ├── 📁 vae/
| │ └── xxxxx.safetensors
| └── 📁 controlnet/
| └── xxxxx.safetensors
```
그러면 `extra_model_paths.yaml` 파일을 아래와 같이 설정하여 ComfyUI가 기기의 모델 경로를 인식하도록 할 수 있습니다:
```
my_custom_config:
base_path: YOUR_PATH
loras: models/loras/
checkpoints: models/checkpoints/
vae: models/vae/
controlnet: models/controlnet/
```
또는
```
my_custom_config:
base_path: YOUR_PATH/models/
loras: loras
checkpoints: checkpoints
vae: vae
controlnet: controlnet
```
데스크톱 버전의 경우, 설치 시 생성된 경로 설정을 덮어쓰지 않고 기존 구성 경로에 설정을 추가하십시오. 수정 전에 해당 파일을 백업해 두어 실수했을 때 복구할 수 있도록 하십시오.
또는 기본 제공되는 [extra\_model\_paths.yaml.example](https://github.com/Comfy-Org/ComfyUI/blob/master/extra_model_paths.yaml.example)를 참고해 더 많은 구성 옵션을 확인할 수 있습니다. 저장 후에는 **ComfyUI를 다시 시작**해야 변경 사항이 적용됩니다.
아래는 원본 구성 예제입니다:
```yaml theme={null}
#이름을 extra_model_paths.yaml로 변경하면 ComfyUI가 로드합니다
#a1111 ui용 구성
#base_path만 귀하의 설치 경로로 변경하면 됩니다
a111:
base_path: path/to/stable-diffusion-webui/
checkpoints: models/Stable-diffusion
configs: models/Stable-diffusion
vae: models/VAE
loras: |
models/Lora
models/LyCORIS
upscale_models: |
models/ESRGAN
models/RealESRGAN
models/SwinIR
embeddings: embeddings
hypernetworks: models/hypernetworks
controlnet: models/ControlNet
#comfyui용 구성
#귀하의 base_path는 기존 ComfyUI 설치 경로이거나 모든 모델, Lora 등을 저장하는 중앙 폴더여야 합니다.
#comfyui:
# base_path: path/to/comfyui/
# # is_default를 사용해 해당 폴더를 먼저 나열하고 다운로드 등 기본 디렉터리로 지정할 수 있습니다
# #is_default: true
# checkpoints: models/checkpoints/
# clip: models/clip/
# clip_vision: models/clip_vision/
# configs: models/configs/
# controlnet: models/controlnet/
# diffusion_models: |
# models/diffusion_models
# models/unet
# embeddings: models/embeddings/
# loras: models/loras/
# upscale_models: models/upscale_models/
# vae: models/vae/
#other_ui:
# base_path: path/to/ui
# checkpoints: models/checkpoints
# gligen: models/gligen
# custom_nodes: path/custom_nodes
```
예를 들어, 귀하의 WebUI가 `D:\stable-diffusion-webui\`에 위치한다면, 해당 구성은 아래와 같이 수정할 수 있습니다:
```yaml theme={null}
a111:
base_path: D:\stable-diffusion-webui\
checkpoints: models/Stable-diffusion
configs: models/Stable-diffusion
vae: models/VAE
loras: |
models/Lora
models/LyCORIS
upscale_models: |
models/ESRGAN
models/RealESRGAN
models/SwinIR
embeddings: embeddings
hypernetworks: models/hypernetworks
controlnet: models/ControlNet
```
### 추가 커스텀 노드 경로 추가하기
외부 모델을 추가하는 것 외에도, ComfyUI의 기본 경로에 없는 커스텀 노드 경로를 추가할 수도 있습니다.
이렇게 하면 커스텀 노드의 기본 설치 경로는 변경되지 않으며, ComfyUI를 시작할 때 추가 경로 검색이 이루어집니다. 여전히 해당 환경에서 커스텀 노드 종속성을 설치해 실행 환경의 무결성을 보장해야 합니다.
아래는 간단한 구성 예제입니다(맥OS), 실제 상황에 맞게 수정해 해당 구성 파일에 추가하고 저장한 후 ComfyUI를 다시 시작해 변경 사항이 적용되도록 하십시오:
```yaml theme={null}
my_custom_nodes:
custom_nodes: /Users/your_username/Documents/extra_custom_nodes
```
또는 다음 경로에서 직접 열 수도 있습니다:
```
C:\Users\YourUsername\AppData\Roaming\ComfyUI\extra_models_config.yaml
```
```
~/Library/Application Support/ComfyUI/extra_models_config.yaml
```
해당 파일을 동일한 디렉터리에 유지해야 하며, 다른 곳으로 이동해서는 안 됩니다.
파일이 존재하지 않는 경우, 아무 텍스트 편집기로 직접 생성할 수 있습니다.
### 예제 구조
다음과 같은 모델 경로를 ComfyUI에 추가하고 싶다고 가정해 보겠습니다:
```
📁 YOUR_PATH/
├── 📁models/
| ├── 📁 loras/
| │ └── xxxxx.safetensors
| ├── 📁 checkpoints/
| │ └── xxxxx.safetensors
| ├── 📁 vae/
| │ └── xxxxx.safetensors
| └── 📁 controlnet/
| └── xxxxx.safetensors
```
그러면 `extra_model_paths.yaml` 파일을 아래와 같이 설정하여 ComfyUI가 기기의 모델 경로를 인식하도록 할 수 있습니다:
```
my_custom_config:
base_path: YOUR_PATH
loras: models/loras/
checkpoints: models/checkpoints/
vae: models/vae/
controlnet: models/controlnet/
```
또는
```
my_custom_config:
base_path: YOUR_PATH/models/
loras: loras
checkpoints: checkpoints
vae: vae
controlnet: controlnet
```
데스크톱 버전의 경우, 설치 시 생성된 경로 설정을 덮어쓰지 않고 기존 구성 경로에 설정을 추가하십시오. 수정 전에 해당 파일을 백업해 두어 실수했을 때 복구할 수 있도록 하십시오.
또는 기본 제공되는 [extra\_model\_paths.yaml.example](https://github.com/Comfy-Org/ComfyUI/blob/master/extra_model_paths.yaml.example)를 참고해 더 많은 구성 옵션을 확인할 수 있습니다. 저장 후에는 **ComfyUI를 다시 시작**해야 변경 사항이 적용됩니다.
아래는 원본 구성 예제입니다:
```yaml theme={null}
#이름을 extra_model_paths.yaml로 변경하면 ComfyUI가 로드합니다
#a1111 ui용 구성
#base_path만 귀하의 설치 경로로 변경하면 됩니다
a111:
base_path: path/to/stable-diffusion-webui/
checkpoints: models/Stable-diffusion
configs: models/Stable-diffusion
vae: models/VAE
loras: |
models/Lora
models/LyCORIS
upscale_models: |
models/ESRGAN
models/RealESRGAN
models/SwinIR
embeddings: embeddings
hypernetworks: models/hypernetworks
controlnet: models/ControlNet
#comfyui용 구성
#귀하의 base_path는 기존 ComfyUI 설치 경로이거나 모든 모델, Lora 등을 저장하는 중앙 폴더여야 합니다.
#comfyui:
# base_path: path/to/comfyui/
# # is_default를 사용해 해당 폴더를 먼저 나열하고 다운로드 등 기본 디렉터리로 지정할 수 있습니다
# #is_default: true
# checkpoints: models/checkpoints/
# clip: models/clip/
# clip_vision: models/clip_vision/
# configs: models/configs/
# controlnet: models/controlnet/
# diffusion_models: |
# models/diffusion_models
# models/unet
# embeddings: models/embeddings/
# loras: models/loras/
# upscale_models: models/upscale_models/
# vae: models/vae/
#other_ui:
# base_path: path/to/ui
# checkpoints: models/checkpoints
# gligen: models/gligen
# custom_nodes: path/custom_nodes
```
예를 들어, 귀하의 WebUI가 `D:\stable-diffusion-webui\`에 위치한다면, 해당 구성은 아래와 같이 수정할 수 있습니다:
```yaml theme={null}
a111:
base_path: D:\stable-diffusion-webui\
checkpoints: models/Stable-diffusion
configs: models/Stable-diffusion
vae: models/VAE
loras: |
models/Lora
models/LyCORIS
upscale_models: |
models/ESRGAN
models/RealESRGAN
models/SwinIR
embeddings: embeddings
hypernetworks: models/hypernetworks
controlnet: models/ControlNet
```
### 추가 커스텀 노드 경로 추가하기
외부 모델을 추가하는 것 외에도, ComfyUI의 기본 경로에 없는 커스텀 노드 경로를 추가할 수도 있습니다.
이렇게 하면 커스텀 노드의 기본 설치 경로는 변경되지 않으며, ComfyUI를 시작할 때 추가 경로 검색이 이루어집니다. 여전히 해당 환경에서 커스텀 노드 종속성을 설치해 실행 환경의 무결성을 보장해야 합니다.
아래는 간단한 구성 예제입니다(맥OS), 실제 상황에 맞게 수정해 해당 구성 파일에 추가하고 저장한 후 ComfyUI를 다시 시작해 변경 사항이 적용되도록 하십시오:
```yaml theme={null}
my_custom_nodes:
custom_nodes: /Users/your_username/Documents/extra_custom_nodes
```