> ## Documentation Index
> Fetch the complete documentation index at: https://docs.comfy.org/llms.txt
> Use this file to discover all available pages before exploring further.
# ComfyUI 다중 LoRA 예제
> 이 가이드에서는 ComfyUI에서 여러 LoRA 모델을 동시에 적용하는 방법을 보여줍니다.
우리의 [ComfyUI LoRA 예제](/ko/tutorials/basic/lora)에서는 단일 LoRA 모델을 로드하고 사용하는 방법을 소개하며, 노드의 체인 연결 기능에 대해 언급했습니다.
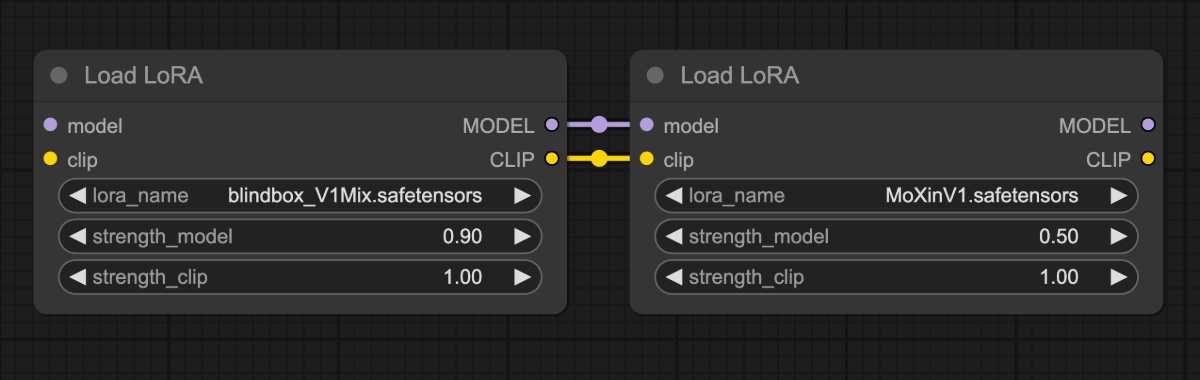 이 튜토리얼에서는 여러 개의 `Load LoRA` 노드를 체인으로 연결해 두 개의 LoRA 모델을 동시에 적용하는 방법을 보여줍니다: [blindbox\_V1Mix](https://civitai.com/models/25995?modelVersionId=32988)와 [MoXinV1](https://civitai.com/models/12597?modelVersionId=14856).
아래 비교는 동일한 파라미터를 사용해 각 LoRA가 미치는 효과를 보여줍니다:
이 튜토리얼에서는 여러 개의 `Load LoRA` 노드를 체인으로 연결해 두 개의 LoRA 모델을 동시에 적용하는 방법을 보여줍니다: [blindbox\_V1Mix](https://civitai.com/models/25995?modelVersionId=32988)와 [MoXinV1](https://civitai.com/models/12597?modelVersionId=14856).
아래 비교는 동일한 파라미터를 사용해 각 LoRA가 미치는 효과를 보여줍니다:
 여러 LoRA 모델을 체인으로 연결함으로써 최종 출력물에서 블렌디드 스타일을 구현할 수 있습니다:
 ## 모델 설치
[dreamshaper\_8.safetensors](https://civitai.com/api/download/models/128713?type=Model\&format=SafeTensor\&size=pruned\&fp=fp16) 파일을 다운로드하여 `ComfyUI/models/checkpoints` 폴더에 넣으세요.
[blindbox\_V1Mix.safetensors](https://civitai.com/api/download/models/32988?type=Model\&format=SafeTensor\&size=full\&fp=fp16) 파일을 다운로드하여 `ComfyUI/models/loras` 폴더에 넣으세요.
[MoXinV1.safetensors](https://civitai.com/api/download/models/14856?type=Model\&format=SafeTensor\&size=full\&fp=fp16) 파일을 다운로드하여 `ComfyUI/models/loras` 폴더에 넣으세요.
## 다중 LoRA 워크플로우
아래 이미지를 다운로드한 후 **ComfyUI로 드래그**하여 워크플로우를 로드하세요:

워크플로우 JSON이 메타데이터에 포함된 이미지는 바로 ComfyUI로 드래그하거나, 메뉴 `Workflows` -> `Open (ctrl+o)`를 통해 로드할 수 있습니다.
## 워크플로우를 차례대로 완료하세요
아래 다이어그램의 단계를 따라 워크플로우가 올바르게 실행되도록 하세요.
## 모델 설치
[dreamshaper\_8.safetensors](https://civitai.com/api/download/models/128713?type=Model\&format=SafeTensor\&size=pruned\&fp=fp16) 파일을 다운로드하여 `ComfyUI/models/checkpoints` 폴더에 넣으세요.
[blindbox\_V1Mix.safetensors](https://civitai.com/api/download/models/32988?type=Model\&format=SafeTensor\&size=full\&fp=fp16) 파일을 다운로드하여 `ComfyUI/models/loras` 폴더에 넣으세요.
[MoXinV1.safetensors](https://civitai.com/api/download/models/14856?type=Model\&format=SafeTensor\&size=full\&fp=fp16) 파일을 다운로드하여 `ComfyUI/models/loras` 폴더에 넣으세요.
## 다중 LoRA 워크플로우
아래 이미지를 다운로드한 후 **ComfyUI로 드래그**하여 워크플로우를 로드하세요:

워크플로우 JSON이 메타데이터에 포함된 이미지는 바로 ComfyUI로 드래그하거나, 메뉴 `Workflows` -> `Open (ctrl+o)`를 통해 로드할 수 있습니다.
## 워크플로우를 차례대로 완료하세요
아래 다이어그램의 단계를 따라 워크플로우가 올바르게 실행되도록 하세요.
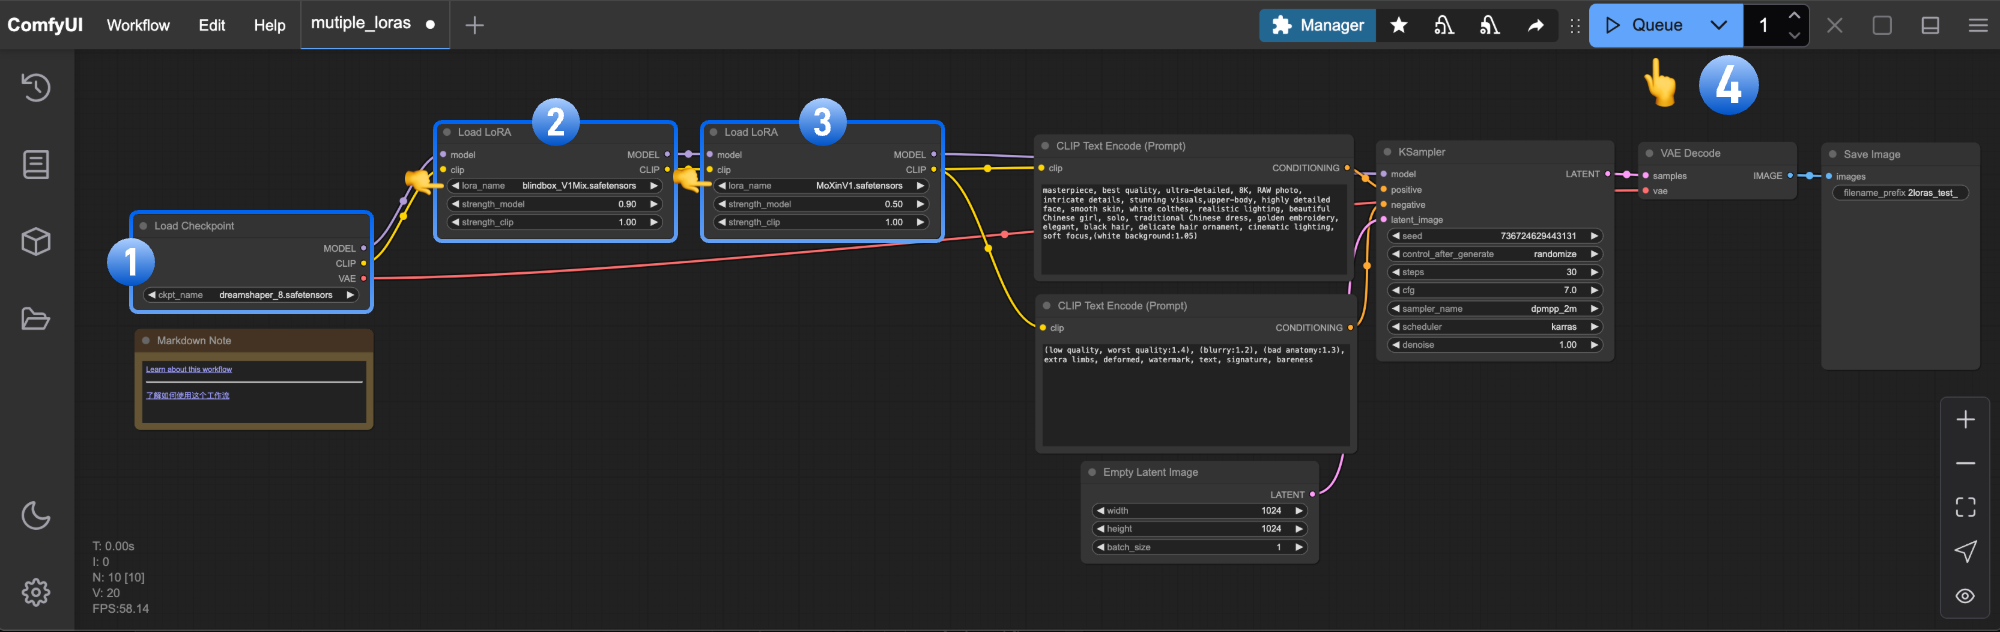 1. `Load Checkpoint`가 **dreamshaper\_8.safetensors**를 로드하도록 확인하세요.
2. 첫 번째 `Load LoRA`가 **blindbox\_V1Mix.safetensors**를 로드하도록 확인하세요.
3. 두 번째 `Load LoRA`가 **MoXinV1.safetensors**를 로드하도록 확인하세요.
4. `Queue`를 클릭하거나 `Ctrl/Cmd + Enter`를 눌러 생성하세요.
## 직접 해보세요
1. 두 `Load LoRA` 노드의 `strength_model` 값을 조정해 각 LoRA의 영향력을 조절하세요.
2. 추가적인 LoRA를 위해 [CivitAI](https://civitai.com/models)를 탐색하고 맞춤형 조합을 만들어 보세요.
1. `Load Checkpoint`가 **dreamshaper\_8.safetensors**를 로드하도록 확인하세요.
2. 첫 번째 `Load LoRA`가 **blindbox\_V1Mix.safetensors**를 로드하도록 확인하세요.
3. 두 번째 `Load LoRA`가 **MoXinV1.safetensors**를 로드하도록 확인하세요.
4. `Queue`를 클릭하거나 `Ctrl/Cmd + Enter`를 눌러 생성하세요.
## 직접 해보세요
1. 두 `Load LoRA` 노드의 `strength_model` 값을 조정해 각 LoRA의 영향력을 조절하세요.
2. 추가적인 LoRA를 위해 [CivitAI](https://civitai.com/models)를 탐색하고 맞춤형 조합을 만들어 보세요.