> ## Documentation Index
> Fetch the complete documentation index at: https://docs.comfy.org/llms.txt
> Use this file to discover all available pages before exploring further.
# ComfyUI Inpainting Workflow
> This guide will introduce you to the inpainting workflow in ComfyUI, walk you through an inpainting example, and cover topics like using the mask editor
This article will introduce the concept of inpainting in AI image generation and guide you through creating an inpainting workflow in ComfyUI. We'll cover:
* Using inpainting workflows to modify images
* Using the ComfyUI mask editor to draw masks
* `VAE Encoder (for Inpainting)` node
## About Inpainting
In AI image generation, we often encounter situations where we're satisfied with the overall image but there are elements we don't want or that contain errors. Simply regenerating might produce a completely different image, so using inpainting to fix specific parts becomes very useful.
It's like having an **artist (AI model)** paint a picture, but we're still not satisfied with the specific details. We need to tell the artist **which areas to adjust (mask)**, and then let them **repaint (inpaint)** according to our requirements.
Common inpainting scenarios include:
* **Defect Repair:** Removing unwanted objects, fixing incorrect AI-generated body parts, etc.
* **Detail Optimization:** Precisely adjusting local elements (like modifying clothing textures, adjusting facial expressions)
* And other scenarios
## ComfyUI Inpainting Workflow Example
### Model and Resource Preparation
#### 1. Model Installation
Download the [512-inpainting-ema.safetensors](https://huggingface.co/Comfy-Org/stable_diffusion_2.1_repackaged/resolve/main/512-inpainting-ema.safetensors) file and put it in your `ComfyUI/models/checkpoints` folder:
#### 2. Inpainting Asset
Please download the following image which we'll use as input:
 This image already contains an alpha channel (transparency mask), so you don't need to manually draw a mask. This tutorial will also cover how to use the mask editor to draw masks.
#### 3. Inpainting Workflow
Download the image below and **drag it into ComfyUI** to load the workflow:

Images containing workflow JSON in their metadata can be directly dragged into ComfyUI or loaded using the menu `Workflows` -> `Open (ctrl+o)`.
### ComfyUI Inpainting Workflow Example Explanation
Follow the steps in the diagram below to ensure the workflow runs correctly.
This image already contains an alpha channel (transparency mask), so you don't need to manually draw a mask. This tutorial will also cover how to use the mask editor to draw masks.
#### 3. Inpainting Workflow
Download the image below and **drag it into ComfyUI** to load the workflow:

Images containing workflow JSON in their metadata can be directly dragged into ComfyUI or loaded using the menu `Workflows` -> `Open (ctrl+o)`.
### ComfyUI Inpainting Workflow Example Explanation
Follow the steps in the diagram below to ensure the workflow runs correctly.
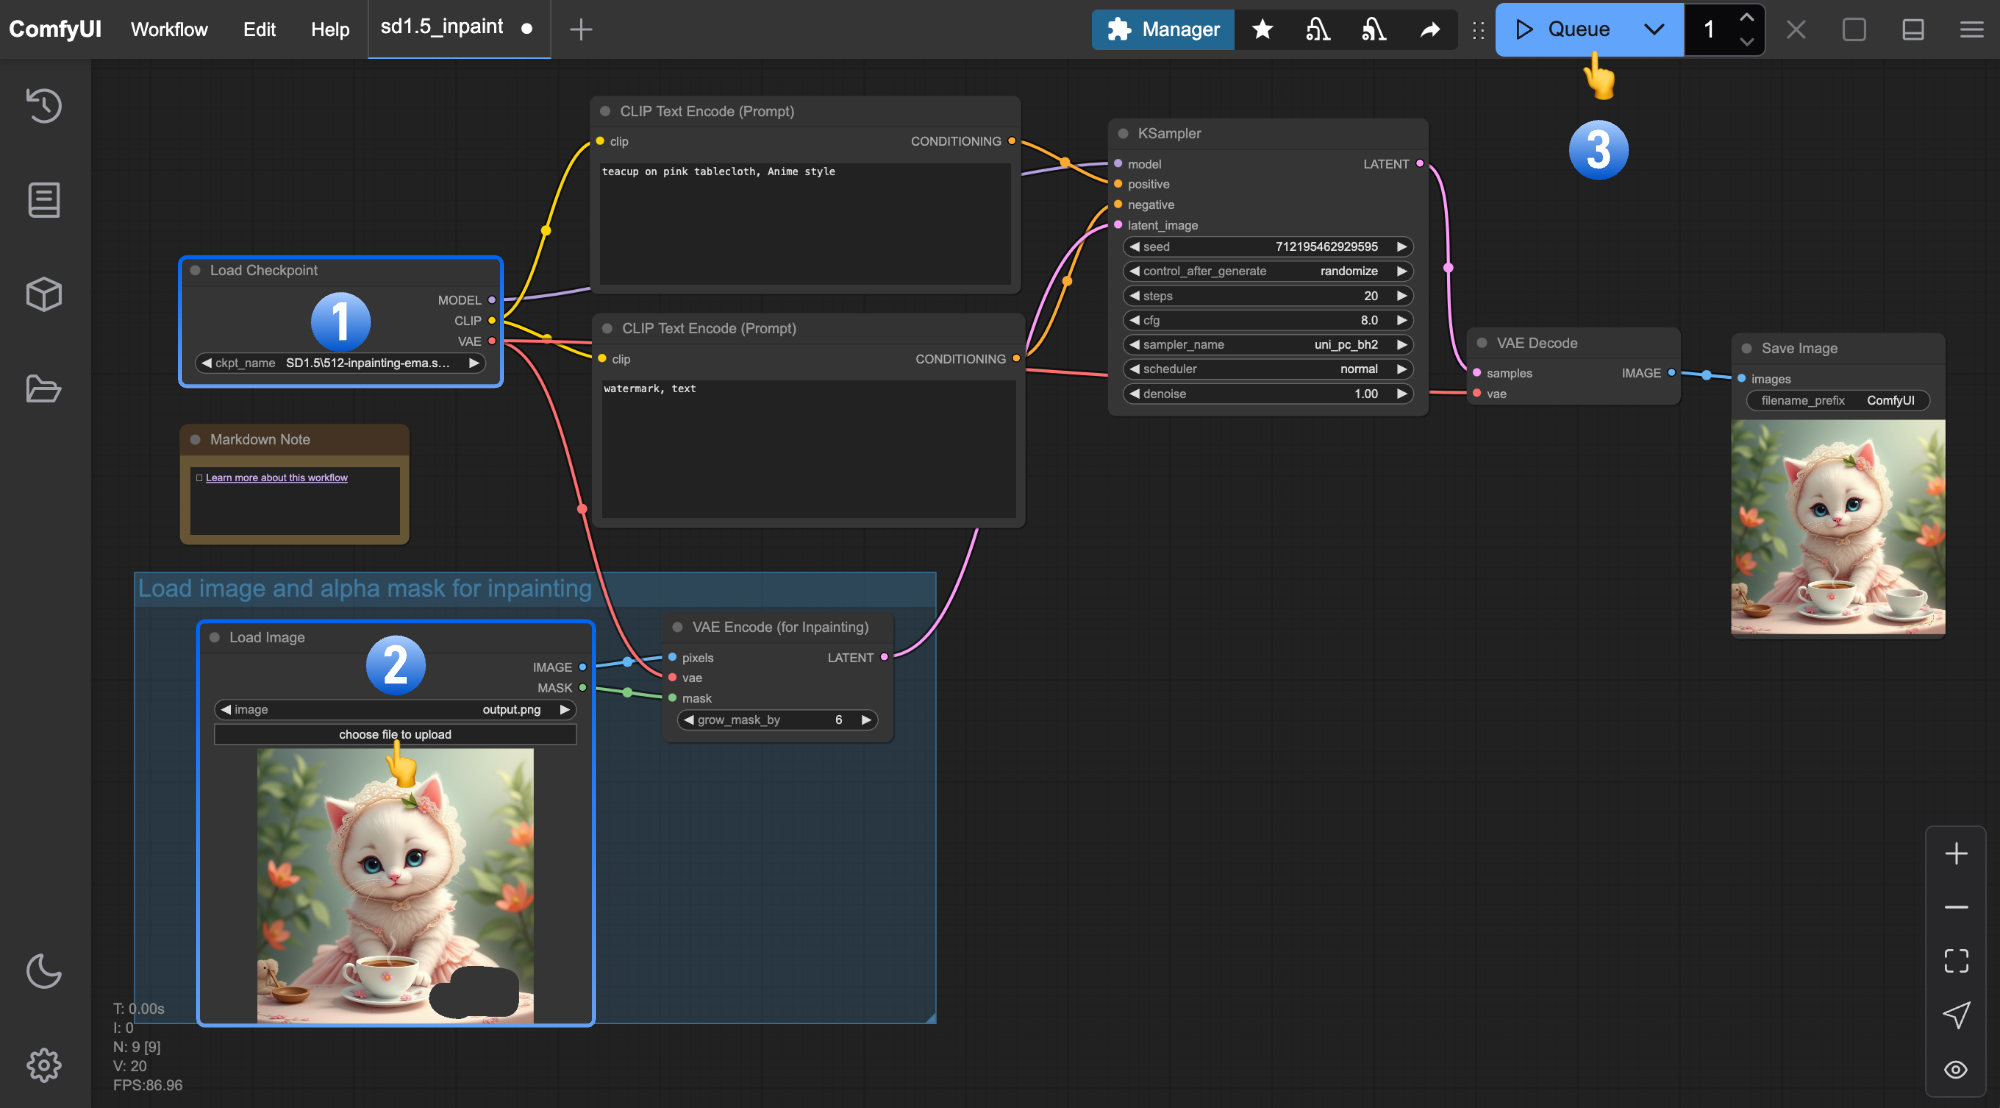 1. Ensure `Load Checkpoint` loads `512-inpainting-ema.safetensors`
2. Upload the input image to the `Load Image` node
3. Click `Queue` or use `Ctrl + Enter` to generate
For comparison, here's the result using the [v1-5-pruned-emaonly-fp16.safetensors](https://huggingface.co/Comfy-Org/stable-diffusion-v1-5-archive/blob/main/v1-5-pruned-emaonly-fp16.safetensors) model:
1. Ensure `Load Checkpoint` loads `512-inpainting-ema.safetensors`
2. Upload the input image to the `Load Image` node
3. Click `Queue` or use `Ctrl + Enter` to generate
For comparison, here's the result using the [v1-5-pruned-emaonly-fp16.safetensors](https://huggingface.co/Comfy-Org/stable-diffusion-v1-5-archive/blob/main/v1-5-pruned-emaonly-fp16.safetensors) model:
 You will find that the results generated by the [512-inpainting-ema.safetensors](https://huggingface.co/Comfy-Org/stable_diffusion_2.1_repackaged/resolve/main/512-inpainting-ema.safetensors) model have better inpainting effects and more natural transitions.
This is because this model is specifically designed for inpainting, which helps us better control the generation area, resulting in improved inpainting effects.
Do you remember the analogy we've been using? Different models are like artists with varying abilities, but each artist has their own limits. Choosing the right model can help you achieve better generation results.
You can try these approaches to achieve better results:
1. Modify positive and negative prompts with more specific descriptions
2. Try multiple runs using different seeds in the `KSampler` for different generation results
3. After learning about the mask editor in this tutorial, you can re-inpaint the generated results to achieve satisfactory outcomes.
Next, we'll learn about using the **Mask Editor**. While our input image already includes an `alpha` transparency channel (the area we want to edit),
so manual mask drawing isn't necessary, you'll often use the Mask Editor to create masks in practical applications.
### Using the Mask Editor
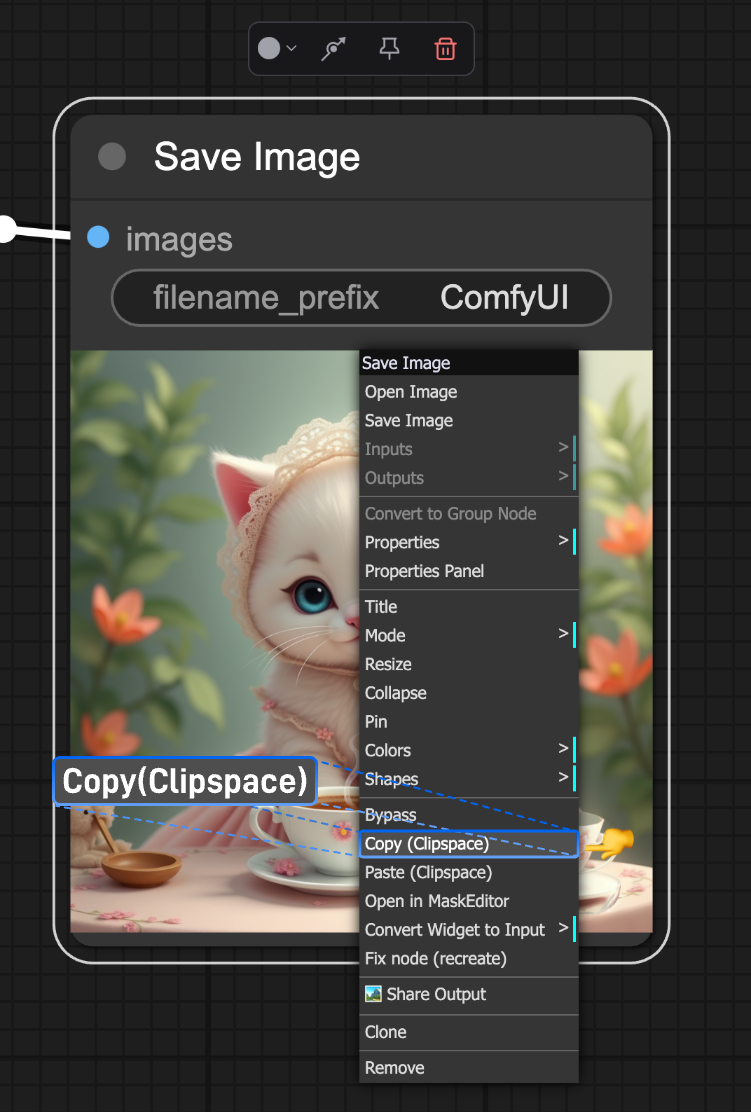
First right-click the `Save Image` node and select `Copy(Clipspace)`:
You will find that the results generated by the [512-inpainting-ema.safetensors](https://huggingface.co/Comfy-Org/stable_diffusion_2.1_repackaged/resolve/main/512-inpainting-ema.safetensors) model have better inpainting effects and more natural transitions.
This is because this model is specifically designed for inpainting, which helps us better control the generation area, resulting in improved inpainting effects.
Do you remember the analogy we've been using? Different models are like artists with varying abilities, but each artist has their own limits. Choosing the right model can help you achieve better generation results.
You can try these approaches to achieve better results:
1. Modify positive and negative prompts with more specific descriptions
2. Try multiple runs using different seeds in the `KSampler` for different generation results
3. After learning about the mask editor in this tutorial, you can re-inpaint the generated results to achieve satisfactory outcomes.
Next, we'll learn about using the **Mask Editor**. While our input image already includes an `alpha` transparency channel (the area we want to edit),
so manual mask drawing isn't necessary, you'll often use the Mask Editor to create masks in practical applications.
### Using the Mask Editor
First right-click the `Save Image` node and select `Copy(Clipspace)`:
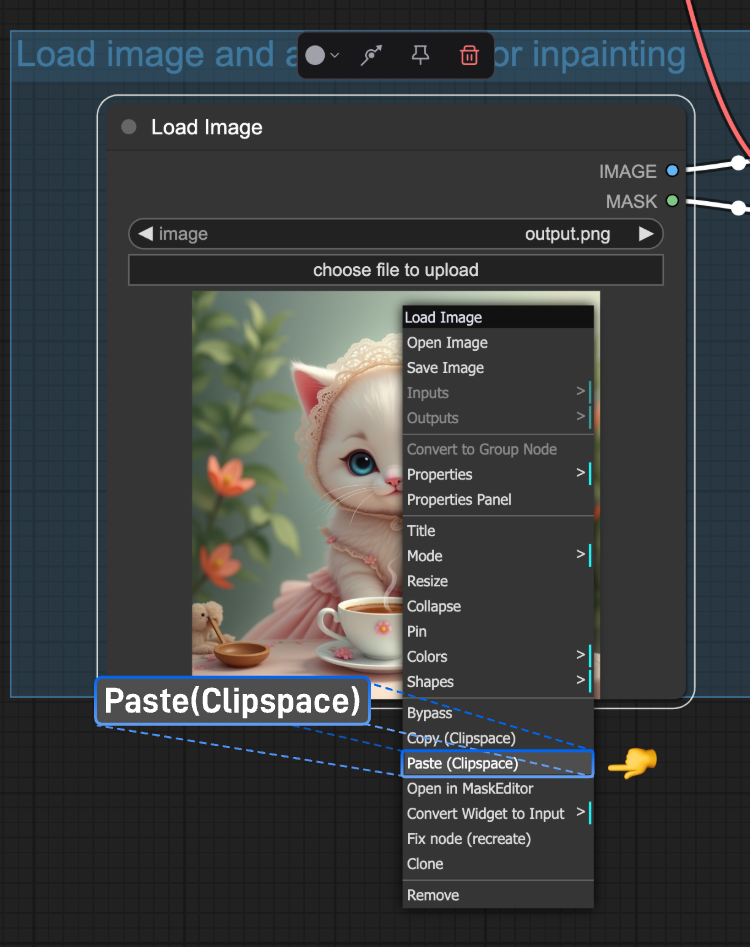
 Then right-click the **Load Image** node and select `Paste(Clipspace)`:
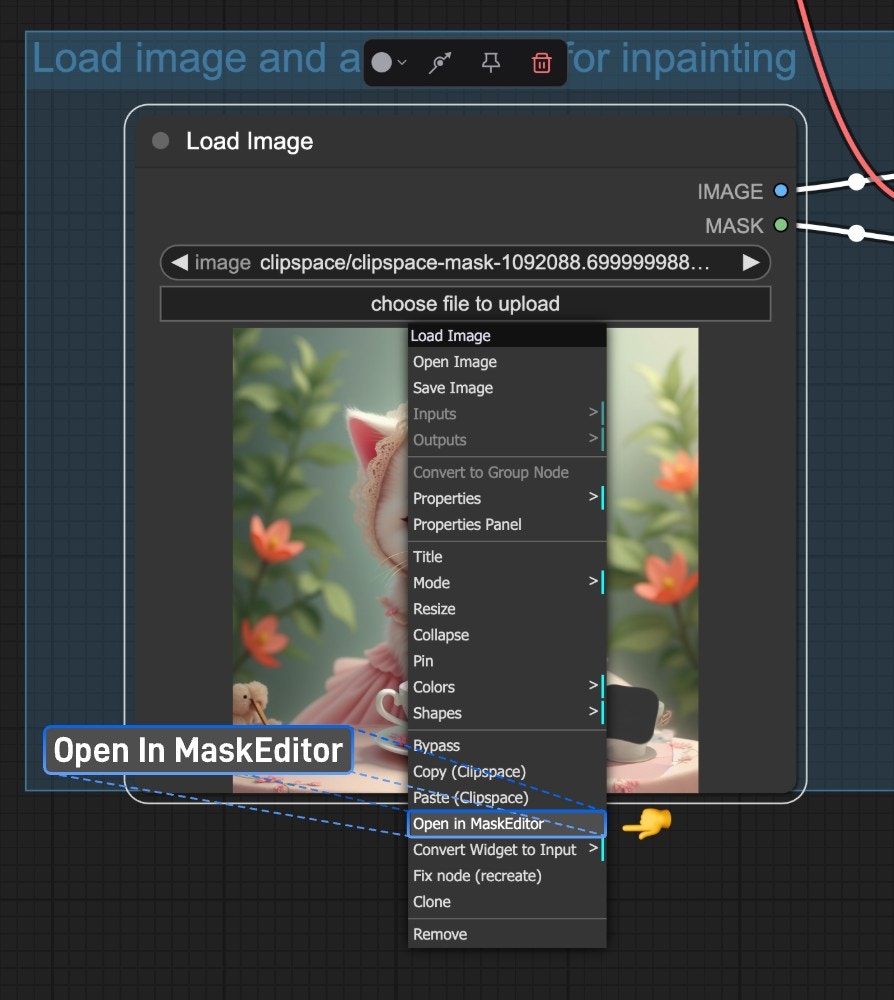
 Right-click the **Load Image** node again and select `Open in MaskEditor`:
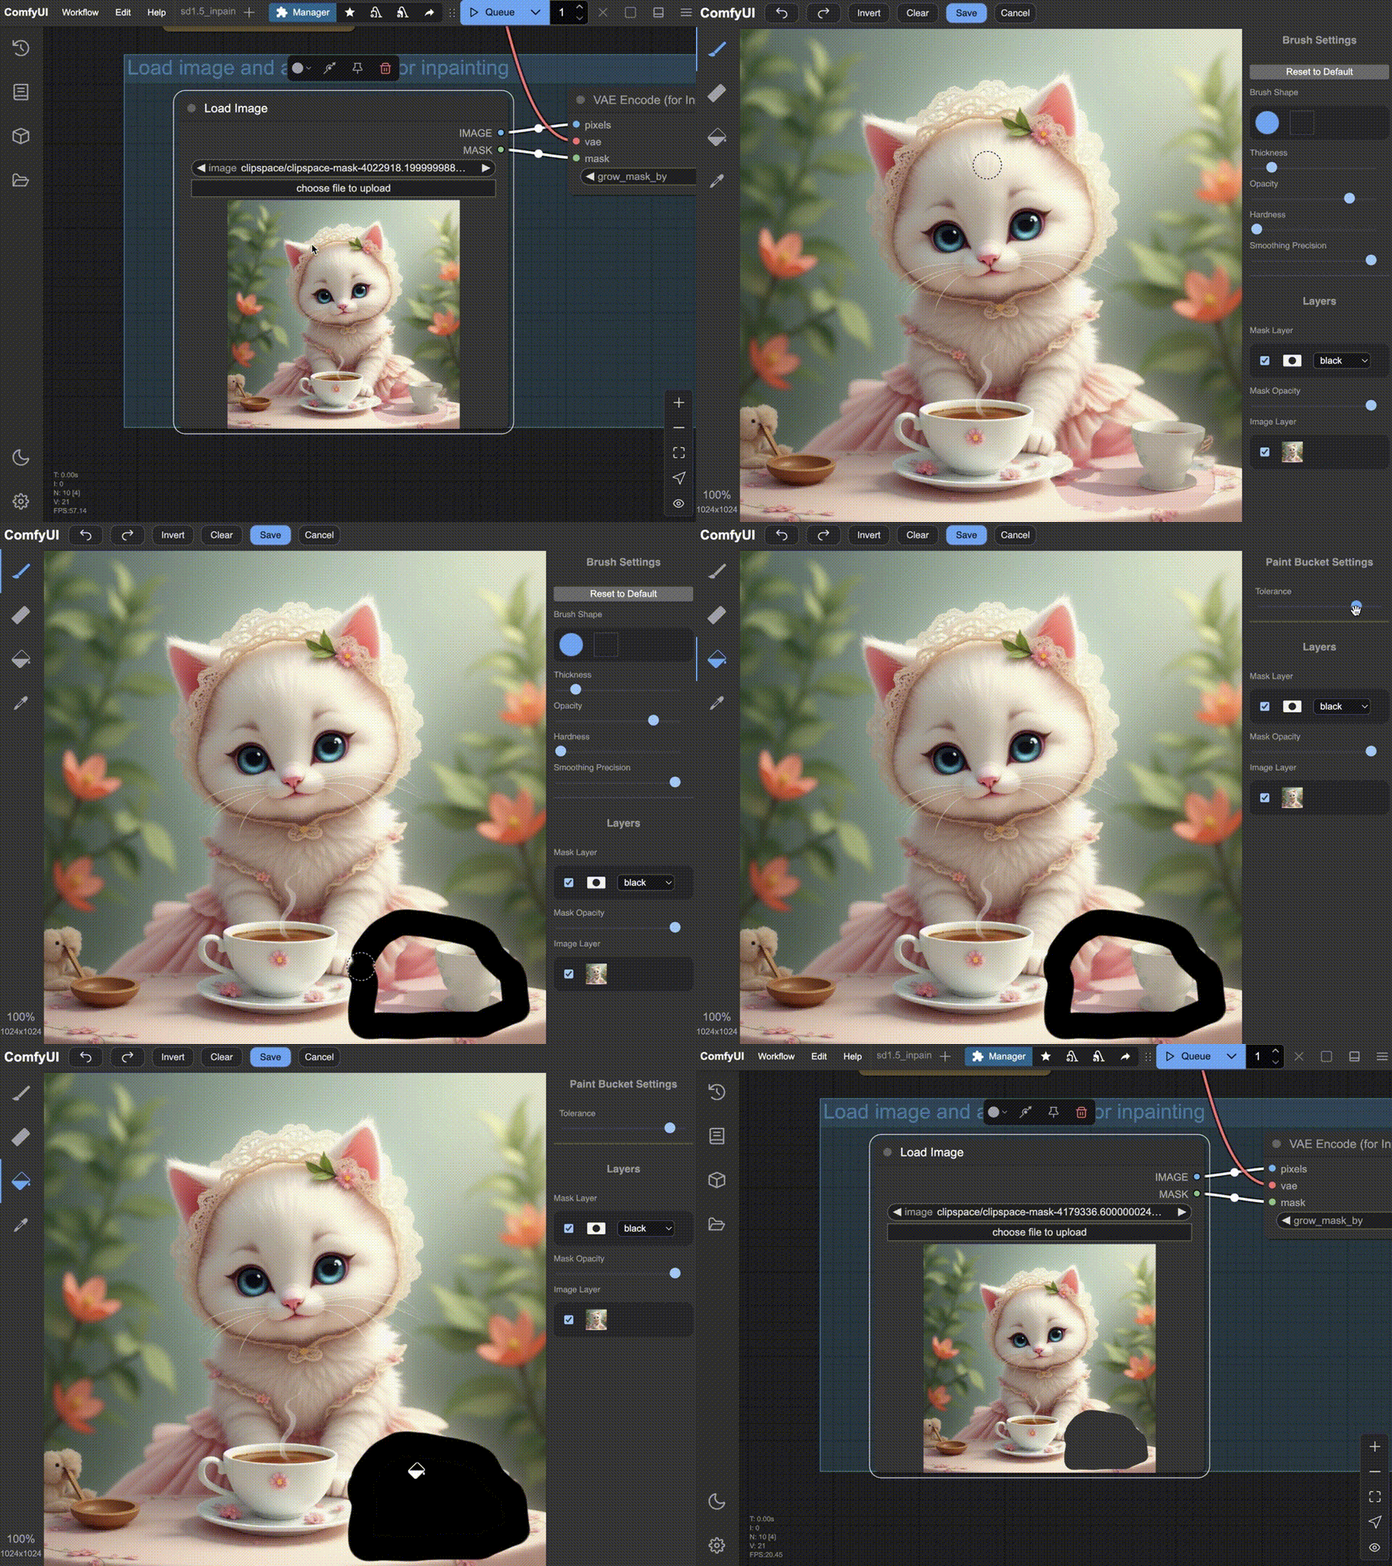 1. Adjust brush parameters on the right panel
2. Use eraser to correct mistakes
3. Click `Save` when finished
The drawn content will be used as a Mask input to the VAE Encoder (for Inpainting) node for encoding
Then try adjusting your prompts and generating again until you achieve satisfactory results.
## VAE Encoder (for Inpainting) Node
Comparing this workflow with [Text-to-Image](/tutorials/basic/text-to-image) and [Image-to-Image](/tutorials/basic/image-to-image), you'll notice the main differences are in the VAE section's conditional inputs.
In this workflow, we use the **VAE Encoder (for Inpainting)** node, specifically designed for inpainting to help us better control the generation area and achieve better results.
1. Adjust brush parameters on the right panel
2. Use eraser to correct mistakes
3. Click `Save` when finished
The drawn content will be used as a Mask input to the VAE Encoder (for Inpainting) node for encoding
Then try adjusting your prompts and generating again until you achieve satisfactory results.
## VAE Encoder (for Inpainting) Node
Comparing this workflow with [Text-to-Image](/tutorials/basic/text-to-image) and [Image-to-Image](/tutorials/basic/image-to-image), you'll notice the main differences are in the VAE section's conditional inputs.
In this workflow, we use the **VAE Encoder (for Inpainting)** node, specifically designed for inpainting to help us better control the generation area and achieve better results.
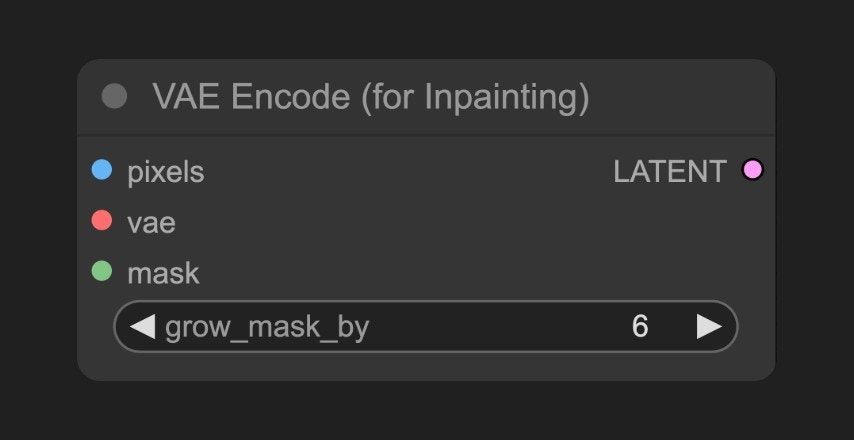 **Input Types**
| Parameter Name | Function |
| -------------- | ----------------------------------------------------------------------------------------------------------------------------------------------------- |
| `pixels` | Input image to be encoded into latent space. |
| `vae` | VAE model used to encode the image from pixel space to latent space. |
| `mask` | Image mask specifying which areas need modification. |
| `grow_mask_by` | Pixel value to expand the original mask outward, ensuring a transition area around the mask to avoid hard edges between inpainted and original areas. |
**Output Types**
| Parameter Name | Function |
| -------------- | ------------------------------------------- |
| `latent` | Image encoded into latent space by the VAE. |
**Input Types**
| Parameter Name | Function |
| -------------- | ----------------------------------------------------------------------------------------------------------------------------------------------------- |
| `pixels` | Input image to be encoded into latent space. |
| `vae` | VAE model used to encode the image from pixel space to latent space. |
| `mask` | Image mask specifying which areas need modification. |
| `grow_mask_by` | Pixel value to expand the original mask outward, ensuring a transition area around the mask to avoid hard edges between inpainted and original areas. |
**Output Types**
| Parameter Name | Function |
| -------------- | ------------------------------------------- |
| `latent` | Image encoded into latent space by the VAE. |