> ## Documentation Index
> Fetch the complete documentation index at: https://docs.comfy.org/llms.txt
> Use this file to discover all available pages before exploring further.
# ComfyUI Image Upscale Workflow
> This guide explains the concept of image upscaling in AI drawing and demonstrates how to implement an image upscaling workflow in ComfyUI
## What is Image Upscaling?
Image Upscaling is the process of converting low-resolution images to high-resolution using algorithms.
Unlike traditional interpolation methods, AI upscaling models (like ESRGAN) can intelligently reconstruct details while maintaining image quality.
For instance, the default SD1.5 model often struggles with large-size image generation.
To achieve high-resolution results,we typically generate smaller images first and then use upscaling techniques.
This article covers one of many upscaling methods in ComfyUI. In this tutorial, we'll guide you through:
1. Downloading and installing upscaling models
2. Performing basic image upscaling
3. Combining text-to-image workflows with upscaling
Looking for more advanced upscaling options? Check out our comprehensive [Image Upscaling Guide](/tutorials/utility/image-upscale) which covers various models and use cases including portrait enhancement, product photography, and more.
## Upscaling Workflow
### Model Installation
Required ESRGAN models download:
Visit [OpenModelDB](https://openmodeldb.info/) to search and download upscaling models (e.g., RealESRGAN)
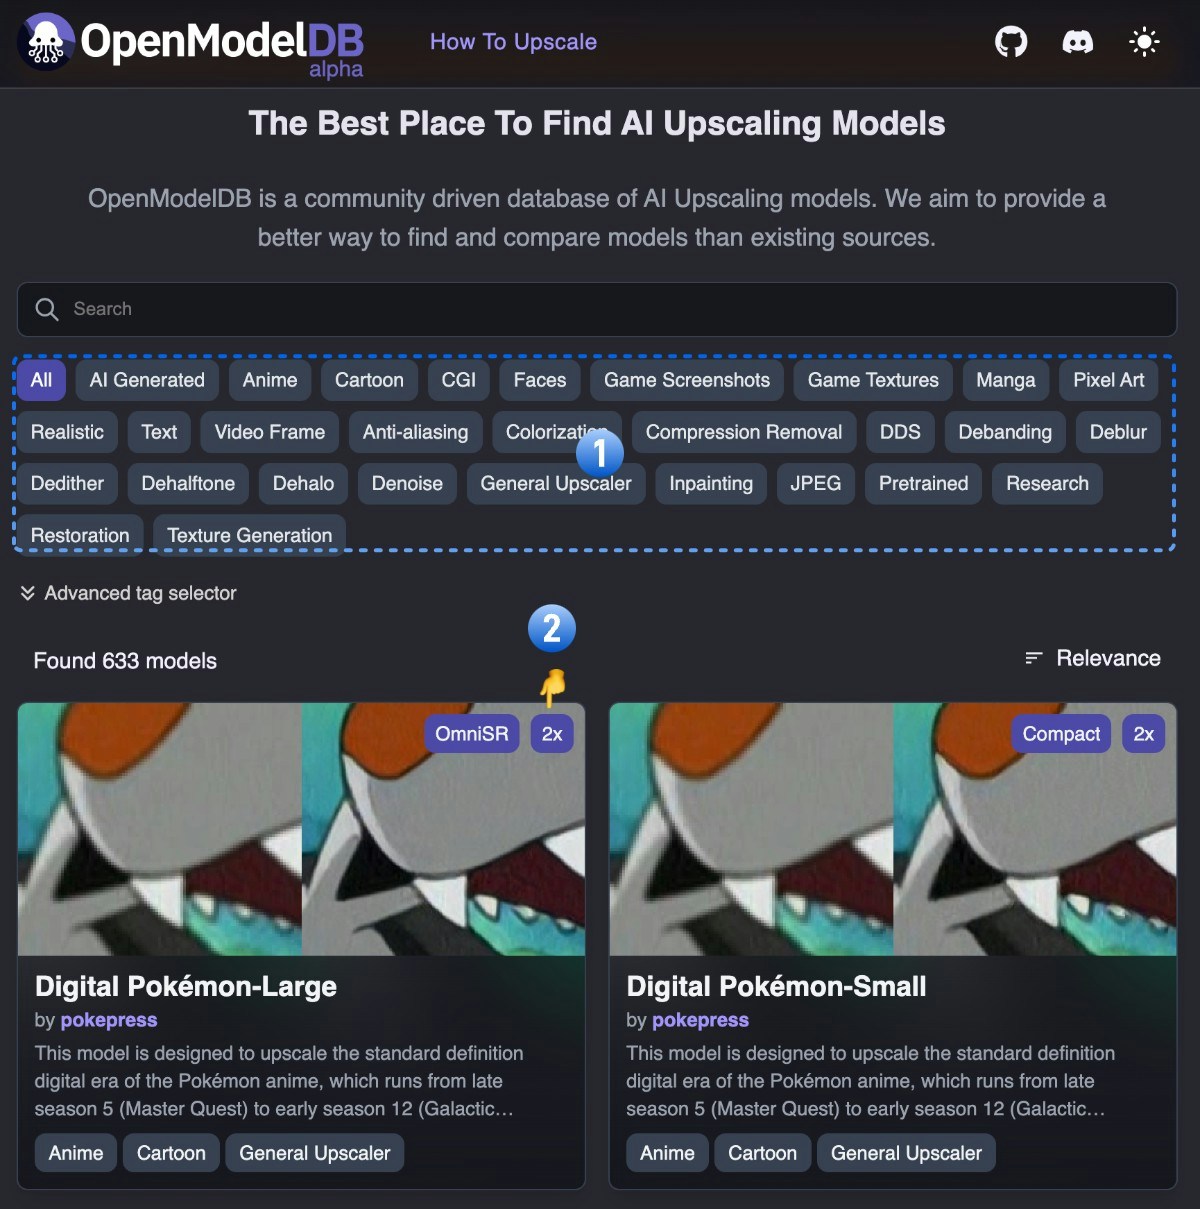 As shown:
1. Filter models by image type using the category selector
2. The model's magnification factor is indicated in the top-right corner (e.g., 2x in the screenshot)
We'll use the [4x-ESRGAN](https://openmodeldb.info/models/4x-ESRGAN) model for this tutorial. Click the `Download` button on the model detail page.
As shown:
1. Filter models by image type using the category selector
2. The model's magnification factor is indicated in the top-right corner (e.g., 2x in the screenshot)
We'll use the [4x-ESRGAN](https://openmodeldb.info/models/4x-ESRGAN) model for this tutorial. Click the `Download` button on the model detail page.
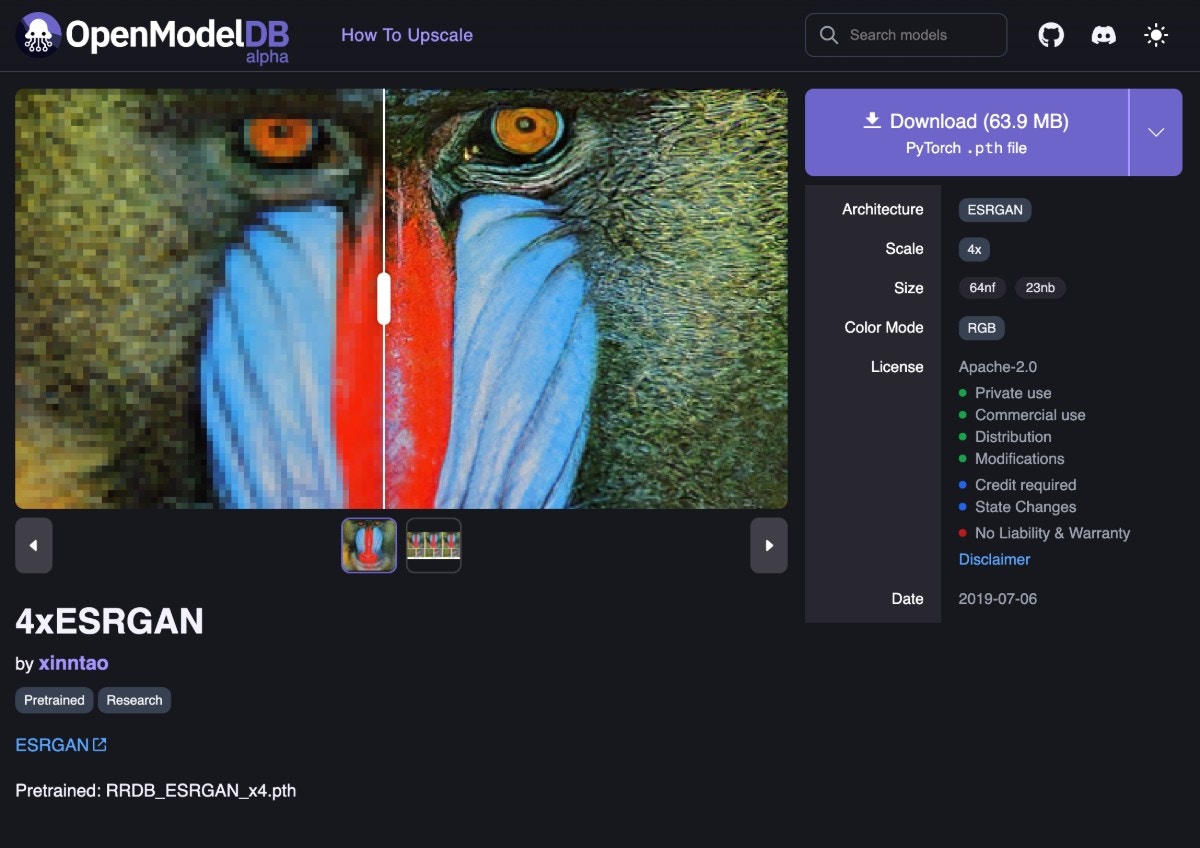 Save the model file (.pth) in `ComfyUI/models/upscale_models` directory
### Workflow and Assets
Download and drag the following image into ComfyUI to load the basic upscaling workflow:

Images containing workflow JSON in their metadata can be directly dragged into ComfyUI or loaded using the menu `Workflows` -> `Open (ctrl+o)`.
Use this image in smaller size as input:
Save the model file (.pth) in `ComfyUI/models/upscale_models` directory
### Workflow and Assets
Download and drag the following image into ComfyUI to load the basic upscaling workflow:

Images containing workflow JSON in their metadata can be directly dragged into ComfyUI or loaded using the menu `Workflows` -> `Open (ctrl+o)`.
Use this image in smaller size as input:
 ### Complete the Workflow Step by Step
Follow the steps in the diagram below to ensure the workflow runs correctly.
### Complete the Workflow Step by Step
Follow the steps in the diagram below to ensure the workflow runs correctly.
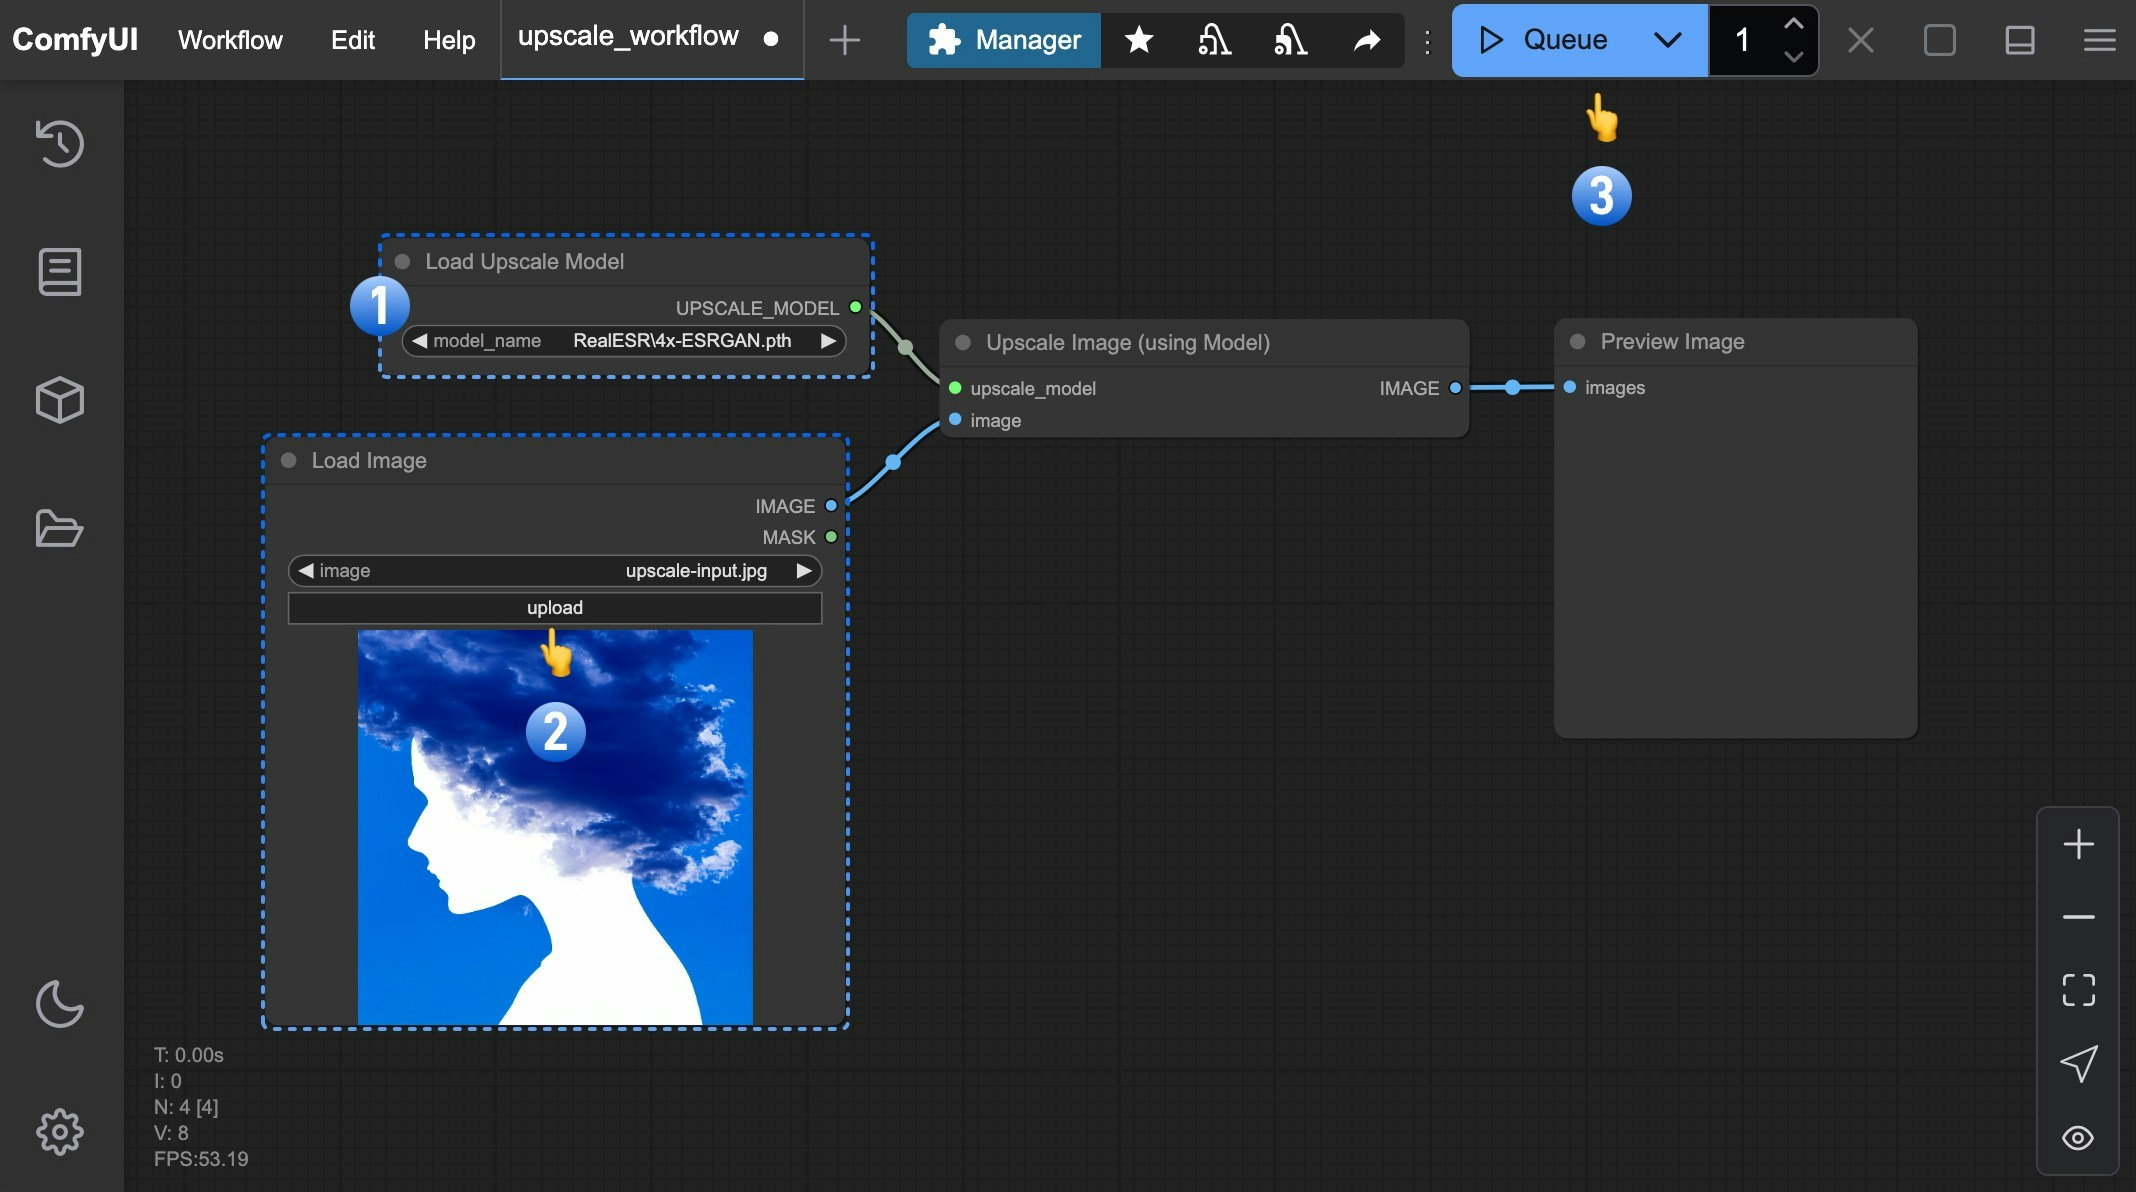 1. Ensure `Load Upscale Model` loads `4x-ESRGAN.pth`
2. Upload the input image to the `Load Image` node
3. Click the `Queue` button, or use the shortcut `Ctrl(cmd) + Enter` to generate the image
The core components are the `Load Upscale Model` and `Upscale Image (Using Model)` nodes, which receive an image input and upscale it using the selected model.
## Text-to-Image Combined Workflow
After mastering basic upscaling, we can combine it with the [text-to-image](/tutorials/basic/text-to-image) workflow. For text-to-image basics, refer to the [text-to-image tutorial](/tutorials/basic/text-to-image).
Download and drag this image into ComfyUI to load the combined workflow:
1. Ensure `Load Upscale Model` loads `4x-ESRGAN.pth`
2. Upload the input image to the `Load Image` node
3. Click the `Queue` button, or use the shortcut `Ctrl(cmd) + Enter` to generate the image
The core components are the `Load Upscale Model` and `Upscale Image (Using Model)` nodes, which receive an image input and upscale it using the selected model.
## Text-to-Image Combined Workflow
After mastering basic upscaling, we can combine it with the [text-to-image](/tutorials/basic/text-to-image) workflow. For text-to-image basics, refer to the [text-to-image tutorial](/tutorials/basic/text-to-image).
Download and drag this image into ComfyUI to load the combined workflow:
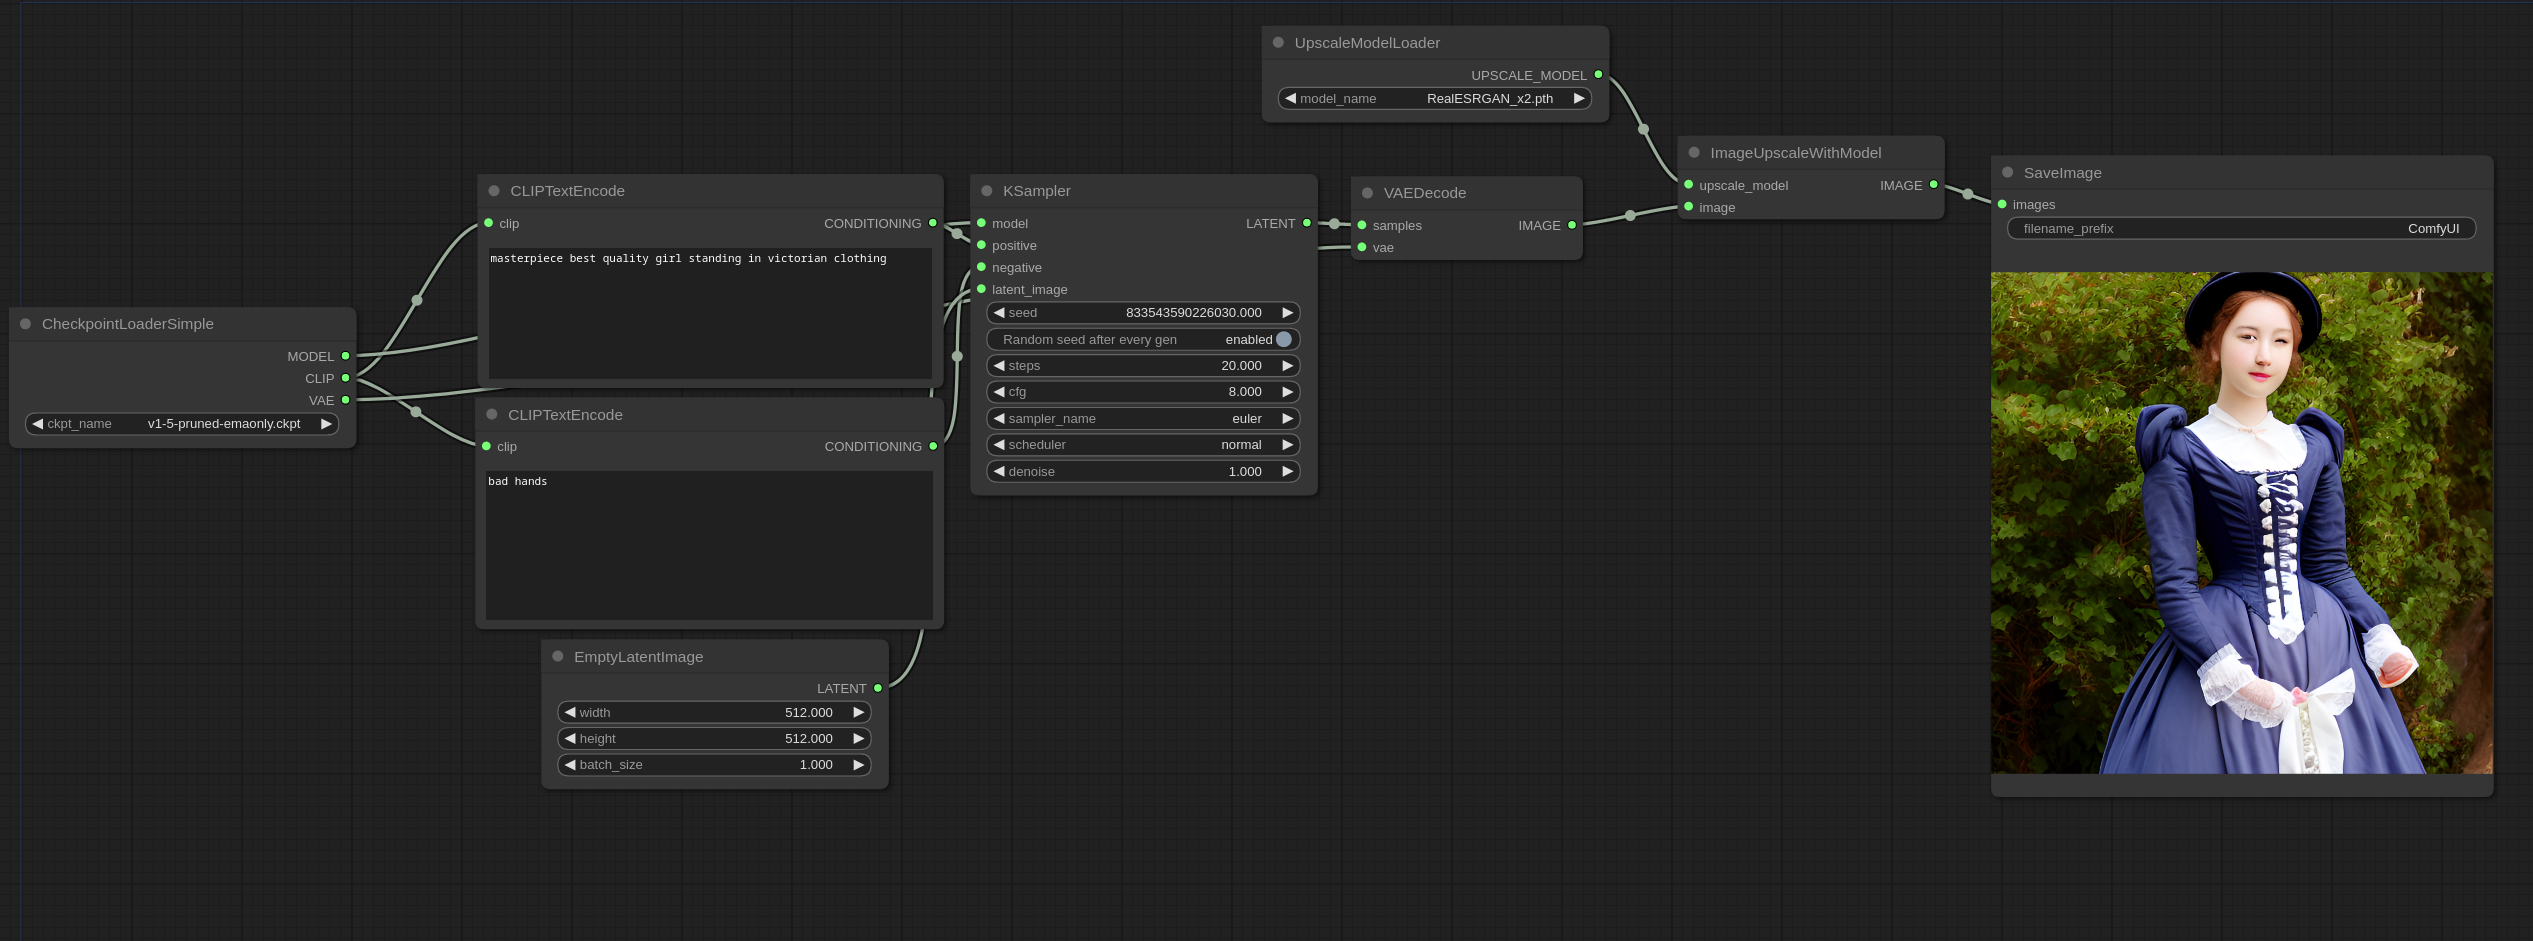 This workflow connects the text-to-image output image directly to the upscaling nodes for final processing.
## Additional Tips
Model characteristics:
* **RealESRGAN**: General-purpose upscaling
* **BSRGAN**: Excels with text and sharp edges
* **SwinIR**: Preserves natural textures, ideal for landscapes
1. **Chained Upscaling**: Combine multiple upscale nodes (e.g., 2x → 4x) for ultra-high magnification
2. **Hybrid Workflow**: Connect upscale nodes after generation for "generate+enhance" pipelines
3. **Comparative Testing**: Different models perform better on specific image types - test multiple options
This workflow connects the text-to-image output image directly to the upscaling nodes for final processing.
## Additional Tips
Model characteristics:
* **RealESRGAN**: General-purpose upscaling
* **BSRGAN**: Excels with text and sharp edges
* **SwinIR**: Preserves natural textures, ideal for landscapes
1. **Chained Upscaling**: Combine multiple upscale nodes (e.g., 2x → 4x) for ultra-high magnification
2. **Hybrid Workflow**: Connect upscale nodes after generation for "generate+enhance" pipelines
3. **Comparative Testing**: Different models perform better on specific image types - test multiple options