> ## Documentation Index
> Fetch the complete documentation index at: https://docs.comfy.org/llms.txt
> Use this file to discover all available pages before exploring further.
# ComfyUI Pose ControlNet Usage Example
> This guide will introduce you to the basic concepts of Pose ControlNet, and demonstrate how to generate large-sized images in ComfyUI using a two-pass generation approach
## Introduction to OpenPose
[OpenPose](https://github.com/CMU-Perceptual-Computing-Lab/openpose) is an open-source real-time multi-person pose estimation system developed by Carnegie Mellon University (CMU), representing a significant breakthrough in the field of computer vision. The system can simultaneously detect multiple people in an image, capturing:
* **Body skeleton**: 18 keypoints, including head, shoulders, elbows, wrists, hips, knees, and ankles
* **Facial expressions**: 70 facial keypoints for capturing micro-expressions and facial contours
* **Hand details**: 21 hand keypoints for precisely expressing finger positions and gestures
* **Foot posture**: 6 foot keypoints, recording standing postures and movement details
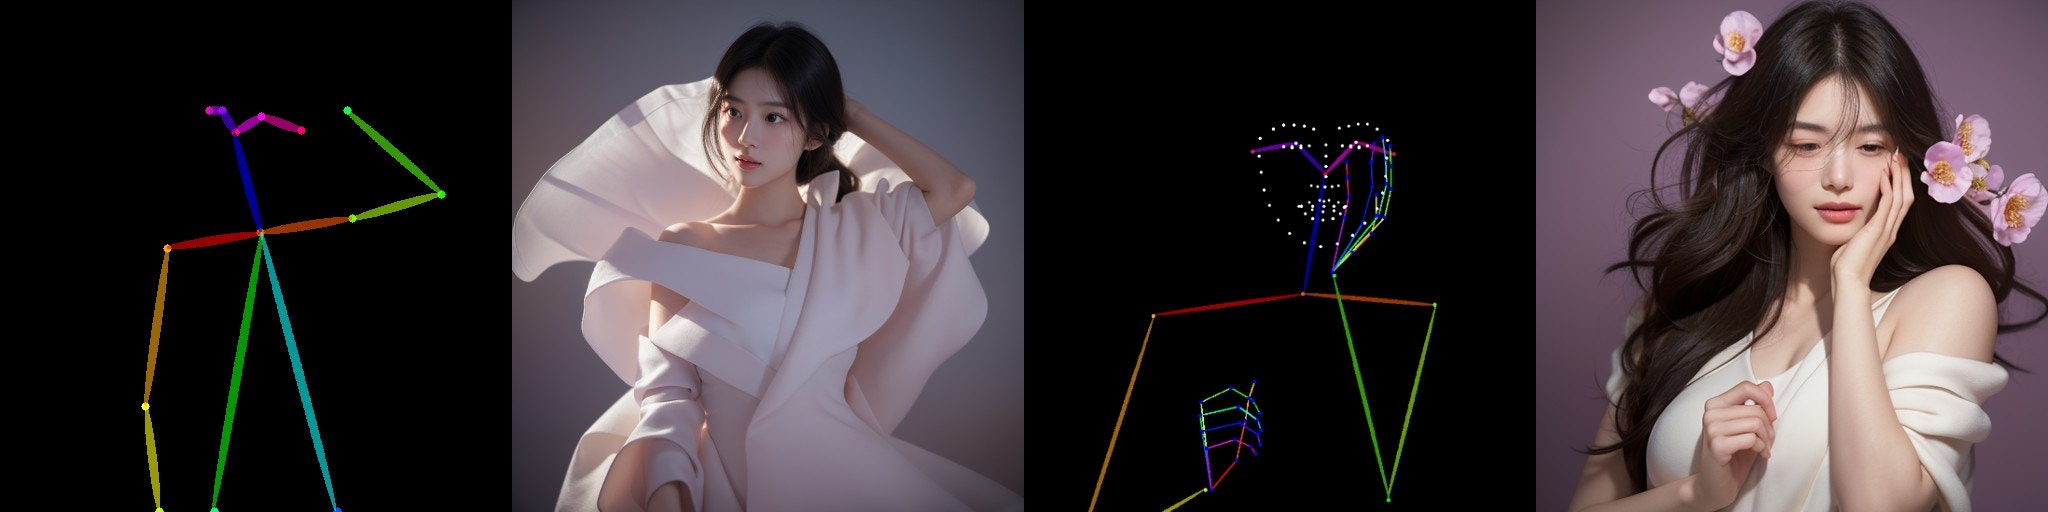 In AI image generation, skeleton structure maps generated by OpenPose serve as conditional inputs for ControlNet, enabling precise control over the posture, actions, and expressions of generated characters. This allows us to generate realistic human figures with expected poses and actions, greatly improving the controllability and practical value of AI-generated content.
Particularly for early Stable Diffusion 1.5 series models, skeletal maps generated by OpenPose can effectively prevent issues with distorted character actions, limbs, and expressions.
## ComfyUI 2-Pass Pose ControlNet Usage Example
### 1. Pose ControlNet Workflow Assets
Please download the workflow image below and drag it into ComfyUI to load the workflow:

Images with workflow JSON in their metadata can be directly dragged into ComfyUI or loaded using the menu `Workflows` -> `Open (ctrl+o)`.
This image already includes download links for the corresponding models, and dragging it into ComfyUI will automatically prompt for downloads.
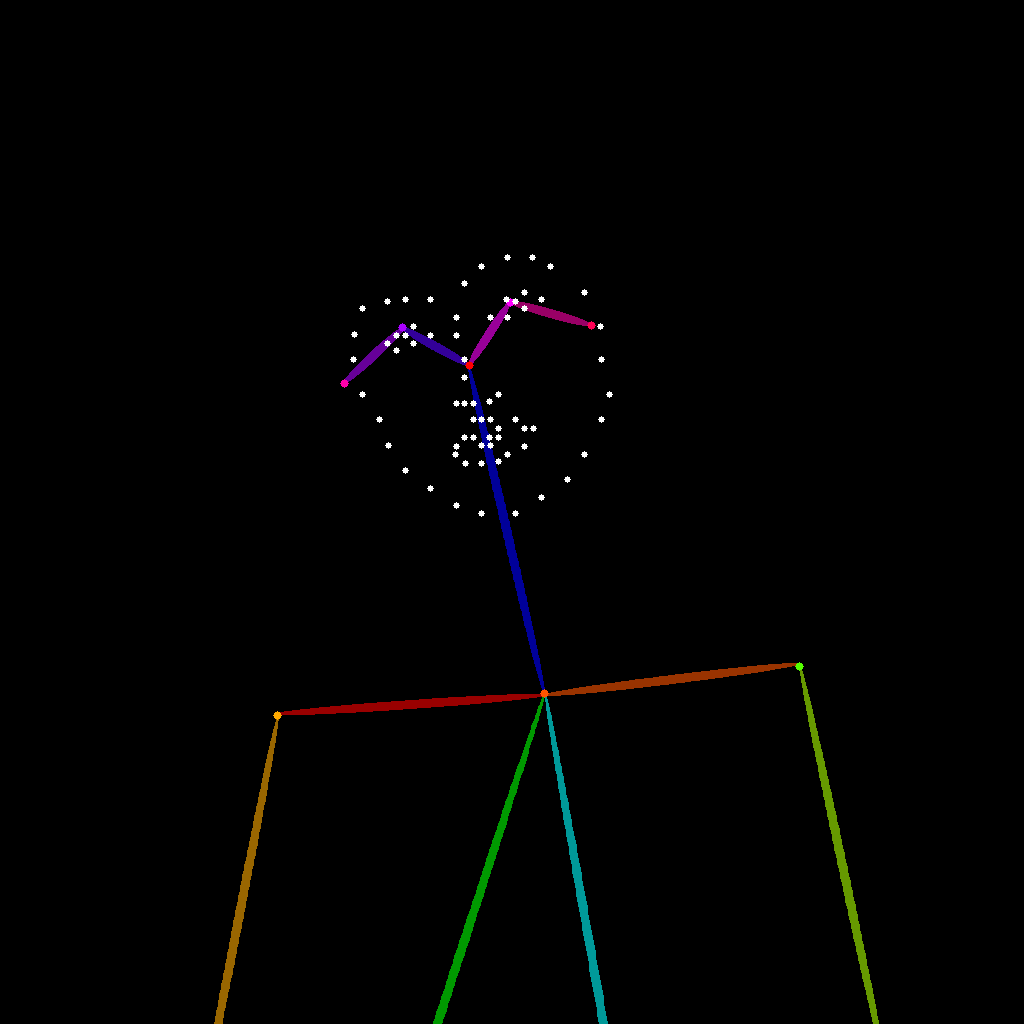
Please download the image below, which we will use as input:
### 2. Manual Model Installation
If your network cannot successfully complete the automatic download of the corresponding models, please try manually downloading the models below and placing them in the specified directories:
* [control\_v11p\_sd15\_openpose\_fp16.safetensors](https://huggingface.co/comfyanonymous/ControlNet-v1-1_fp16_safetensors/resolve/main/control_v11p_sd15_openpose_fp16.safetensors?download=true)
* [majicmixRealistic\_v7.safetensors](https://civitai.com/api/download/models/176425?type=Model\&format=SafeTensor\&size=pruned\&fp=fp16)
* [japaneseStyleRealistic\_v20.safetensors](https://civitai.com/api/download/models/85426?type=Model\&format=SafeTensor\&size=pruned\&fp=fp16)
* [vae-ft-mse-840000-ema-pruned.safetensors](https://huggingface.co/stabilityai/sd-vae-ft-mse-original/resolve/main/vae-ft-mse-840000-ema-pruned.safetensors?download=true)
```
ComfyUI/
├── models/
│ ├── checkpoints/
│ │ └── majicmixRealistic_v7.safetensors
│ │ └── japaneseStyleRealistic_v20.safetensors
│ ├── vae/
│ │ └── vae-ft-mse-840000-ema-pruned.safetensors
│ └── controlnet/
│ └── control_v11p_sd15_openpose_fp16.safetensors
```
### 3. Step-by-Step Workflow Execution
In AI image generation, skeleton structure maps generated by OpenPose serve as conditional inputs for ControlNet, enabling precise control over the posture, actions, and expressions of generated characters. This allows us to generate realistic human figures with expected poses and actions, greatly improving the controllability and practical value of AI-generated content.
Particularly for early Stable Diffusion 1.5 series models, skeletal maps generated by OpenPose can effectively prevent issues with distorted character actions, limbs, and expressions.
## ComfyUI 2-Pass Pose ControlNet Usage Example
### 1. Pose ControlNet Workflow Assets
Please download the workflow image below and drag it into ComfyUI to load the workflow:

Images with workflow JSON in their metadata can be directly dragged into ComfyUI or loaded using the menu `Workflows` -> `Open (ctrl+o)`.
This image already includes download links for the corresponding models, and dragging it into ComfyUI will automatically prompt for downloads.
Please download the image below, which we will use as input:

### 2. Manual Model Installation
If your network cannot successfully complete the automatic download of the corresponding models, please try manually downloading the models below and placing them in the specified directories:
* [control\_v11p\_sd15\_openpose\_fp16.safetensors](https://huggingface.co/comfyanonymous/ControlNet-v1-1_fp16_safetensors/resolve/main/control_v11p_sd15_openpose_fp16.safetensors?download=true)
* [majicmixRealistic\_v7.safetensors](https://civitai.com/api/download/models/176425?type=Model\&format=SafeTensor\&size=pruned\&fp=fp16)
* [japaneseStyleRealistic\_v20.safetensors](https://civitai.com/api/download/models/85426?type=Model\&format=SafeTensor\&size=pruned\&fp=fp16)
* [vae-ft-mse-840000-ema-pruned.safetensors](https://huggingface.co/stabilityai/sd-vae-ft-mse-original/resolve/main/vae-ft-mse-840000-ema-pruned.safetensors?download=true)
```
ComfyUI/
├── models/
│ ├── checkpoints/
│ │ └── majicmixRealistic_v7.safetensors
│ │ └── japaneseStyleRealistic_v20.safetensors
│ ├── vae/
│ │ └── vae-ft-mse-840000-ema-pruned.safetensors
│ └── controlnet/
│ └── control_v11p_sd15_openpose_fp16.safetensors
```
### 3. Step-by-Step Workflow Execution
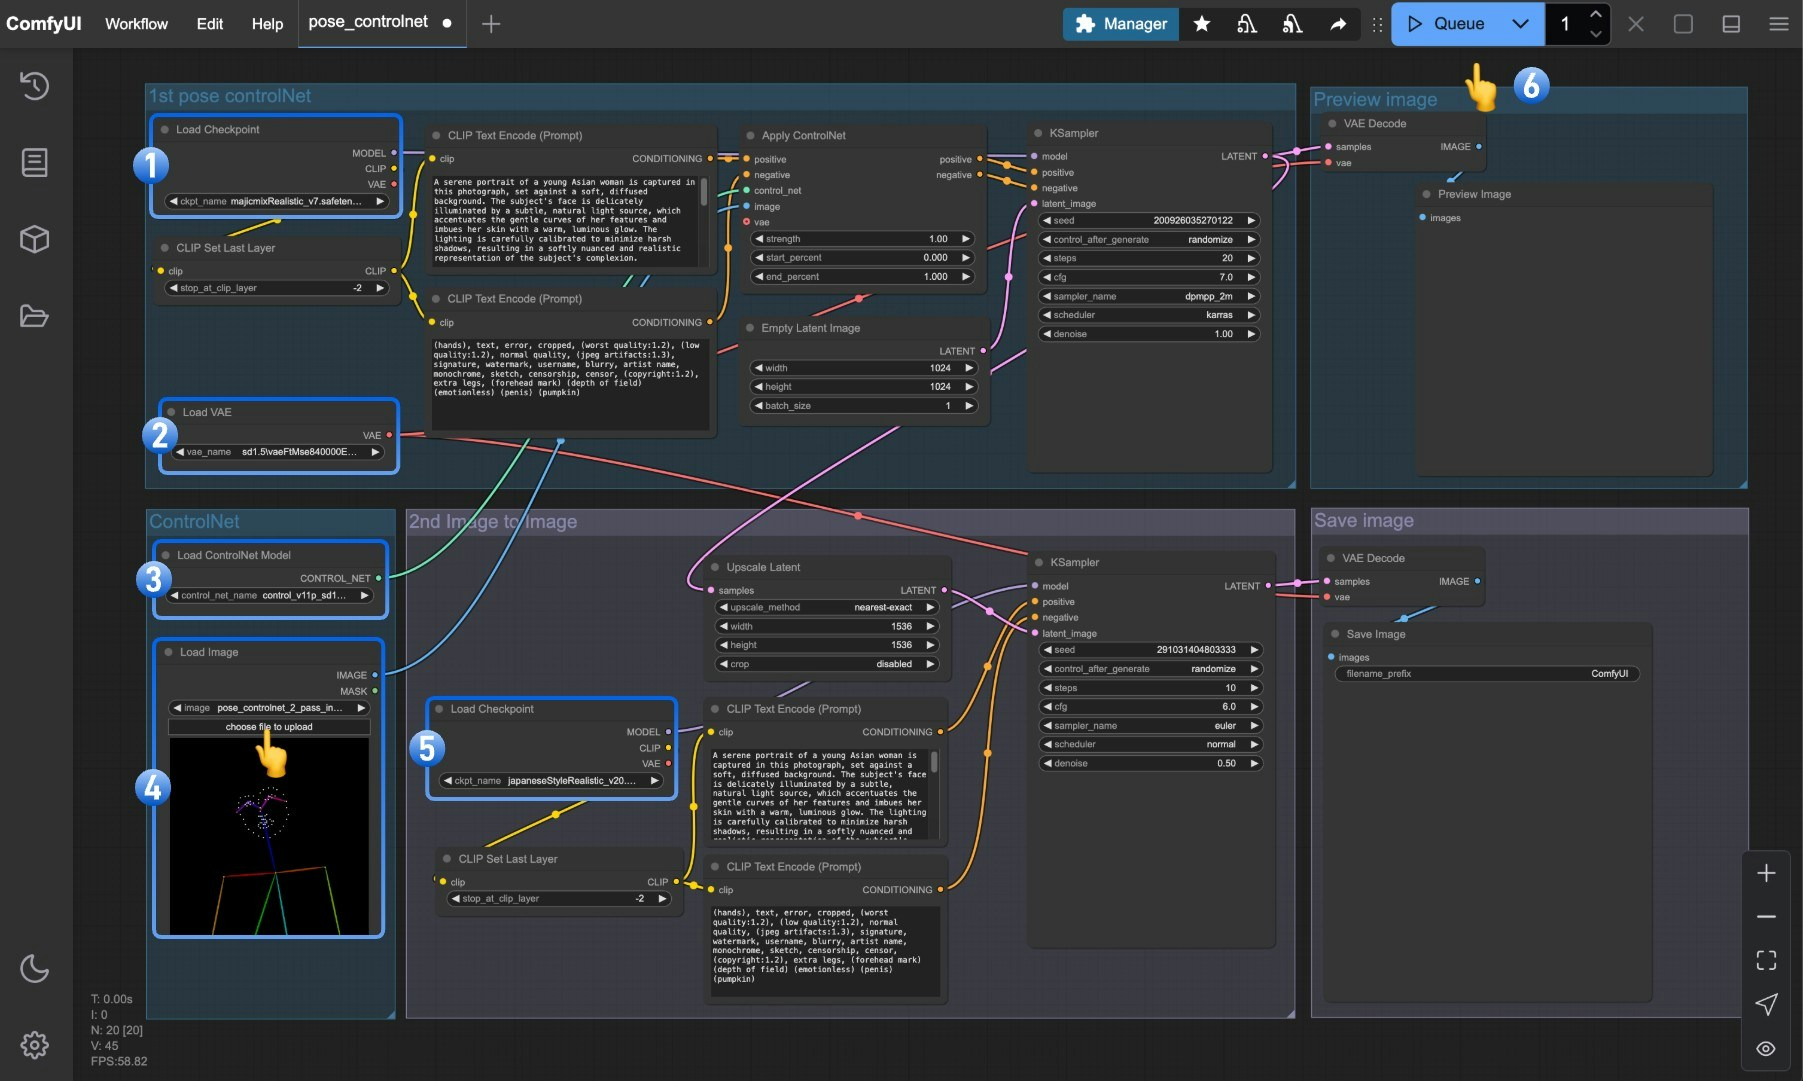 Follow these steps according to the numbered markers in the image:
1. Ensure that `Load Checkpoint` can load **majicmixRealistic\_v7.safetensors**
2. Ensure that `Load VAE` can load **vae-ft-mse-840000-ema-pruned.safetensors**
3. Ensure that `Load ControlNet Model` can load **control\_v11p\_sd15\_openpose\_fp16.safetensors**
4. Click the select button in the `Load Image` node to upload the pose input image provided earlier, or use your own OpenPose skeleton map
5. Ensure that `Load Checkpoint` can load **japaneseStyleRealistic\_v20.safetensors**
6. Click the `Queue` button or use the shortcut `Ctrl(cmd) + Enter` to execute the image generation
## Explanation of the Pose ControlNet 2-Pass Workflow
This workflow uses a two-pass image generation approach, dividing the image creation process into two phases:
### First Phase: Basic Pose Image Generation
In the first phase, the **majicmixRealistic\_v7** model is combined with Pose ControlNet to generate an initial character pose image:
1. First, load the majicmixRealistic\_v7 model via the `Load Checkpoint` node
2. Load the pose control model through the `Load ControlNet Model` node
3. The input pose image is fed into the `Apply ControlNet` node and combined with positive and negative prompt conditions
4. The first `KSampler` node (typically using 20-30 steps) generates a basic character pose image
5. The pixel-space image for the first phase is obtained through `VAE Decode`
This phase primarily focuses on correct character posture, pose, and basic structure, ensuring that the generated character conforms to the input skeletal pose.
### Second Phase: Style Optimization and Detail Enhancement
In the second phase, the output image from the first phase is used as a reference, with the **japaneseStyleRealistic\_v20** model performing stylization and detail enhancement:
1. The image generated in the first phase creates a larger resolution latent space through the `Upscale latent` node
2. The second `Load Checkpoint` loads the japaneseStyleRealistic\_v20 model, which focuses on details and style
3. The second `KSampler` node uses a lower `denoise` strength (typically 0.4-0.6) for refinement, preserving the basic structure from the first phase
4. Finally, a higher quality, larger resolution image is output through the second `VAE Decode` and `Save Image` nodes
This phase primarily focuses on style consistency, detail richness, and enhancing overall image quality.
## Advantages of 2-Pass Image Generation
Compared to single-pass generation, the two-pass image generation method offers the following advantages:
1. **Higher Resolution**: Two-pass processing can generate high-resolution images beyond the capabilities of single-pass generation
2. **Style Blending**: Can combine advantages of different models, such as using a realistic model in the first phase and a stylized model in the second phase
3. **Better Details**: The second phase can focus on optimizing details without having to worry about overall structure
4. **Precise Control**: Once pose control is completed in the first phase, the second phase can focus on refining style and details
5. **Reduced GPU Load**: Generating in two passes allows for high-quality large images with limited GPU resources
To learn more about techniques for mixing multiple ControlNets, please refer to the [Mixing ControlNet Models](/tutorials/controlnet/mixing-controlnets) tutorial.
Follow these steps according to the numbered markers in the image:
1. Ensure that `Load Checkpoint` can load **majicmixRealistic\_v7.safetensors**
2. Ensure that `Load VAE` can load **vae-ft-mse-840000-ema-pruned.safetensors**
3. Ensure that `Load ControlNet Model` can load **control\_v11p\_sd15\_openpose\_fp16.safetensors**
4. Click the select button in the `Load Image` node to upload the pose input image provided earlier, or use your own OpenPose skeleton map
5. Ensure that `Load Checkpoint` can load **japaneseStyleRealistic\_v20.safetensors**
6. Click the `Queue` button or use the shortcut `Ctrl(cmd) + Enter` to execute the image generation
## Explanation of the Pose ControlNet 2-Pass Workflow
This workflow uses a two-pass image generation approach, dividing the image creation process into two phases:
### First Phase: Basic Pose Image Generation
In the first phase, the **majicmixRealistic\_v7** model is combined with Pose ControlNet to generate an initial character pose image:
1. First, load the majicmixRealistic\_v7 model via the `Load Checkpoint` node
2. Load the pose control model through the `Load ControlNet Model` node
3. The input pose image is fed into the `Apply ControlNet` node and combined with positive and negative prompt conditions
4. The first `KSampler` node (typically using 20-30 steps) generates a basic character pose image
5. The pixel-space image for the first phase is obtained through `VAE Decode`
This phase primarily focuses on correct character posture, pose, and basic structure, ensuring that the generated character conforms to the input skeletal pose.
### Second Phase: Style Optimization and Detail Enhancement
In the second phase, the output image from the first phase is used as a reference, with the **japaneseStyleRealistic\_v20** model performing stylization and detail enhancement:
1. The image generated in the first phase creates a larger resolution latent space through the `Upscale latent` node
2. The second `Load Checkpoint` loads the japaneseStyleRealistic\_v20 model, which focuses on details and style
3. The second `KSampler` node uses a lower `denoise` strength (typically 0.4-0.6) for refinement, preserving the basic structure from the first phase
4. Finally, a higher quality, larger resolution image is output through the second `VAE Decode` and `Save Image` nodes
This phase primarily focuses on style consistency, detail richness, and enhancing overall image quality.
## Advantages of 2-Pass Image Generation
Compared to single-pass generation, the two-pass image generation method offers the following advantages:
1. **Higher Resolution**: Two-pass processing can generate high-resolution images beyond the capabilities of single-pass generation
2. **Style Blending**: Can combine advantages of different models, such as using a realistic model in the first phase and a stylized model in the second phase
3. **Better Details**: The second phase can focus on optimizing details without having to worry about overall structure
4. **Precise Control**: Once pose control is completed in the first phase, the second phase can focus on refining style and details
5. **Reduced GPU Load**: Generating in two passes allows for high-quality large images with limited GPU resources
To learn more about techniques for mixing multiple ControlNets, please refer to the [Mixing ControlNet Models](/tutorials/controlnet/mixing-controlnets) tutorial.