 ## FLUX.1 ControlNet Model Introduction
FLUX.1 Canny and Depth are two powerful models from the [FLUX.1 Tools](https://blackforestlabs.ai/flux-1-tools/) launched by [Black Forest Labs](https://blackforestlabs.ai/). This toolkit is designed to add control and guidance capabilities to FLUX.1, enabling users to modify and recreate real or generated images.
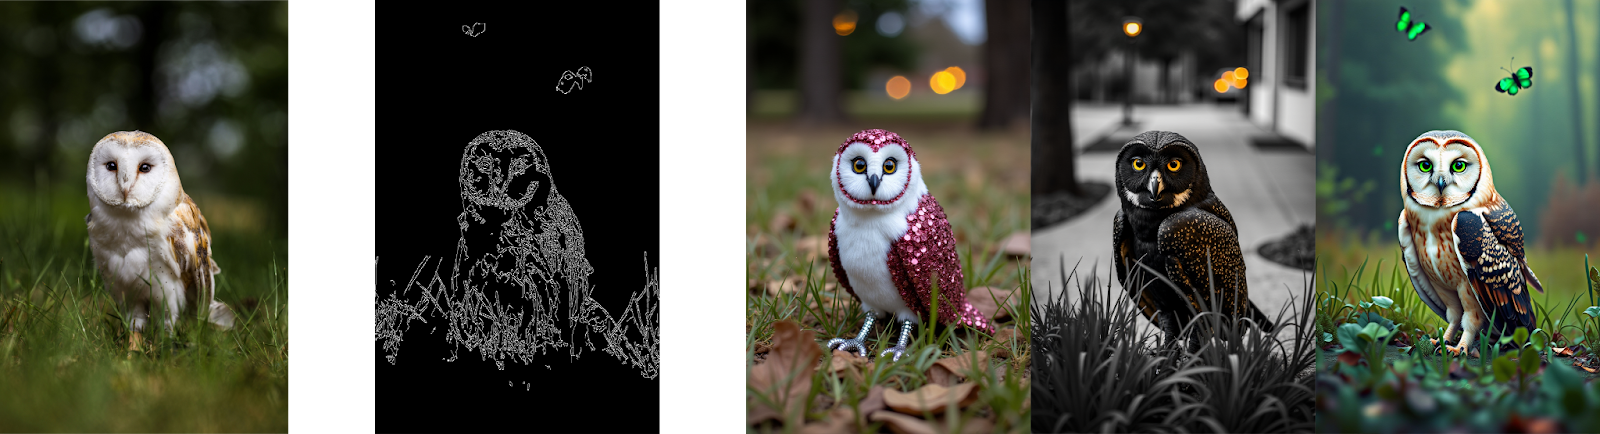
**FLUX.1-Depth-dev** and **FLUX.1-Canny-dev** are both 12B parameter Rectified Flow Transformer models that can generate images based on text descriptions while maintaining the structural features of the input image.
The Depth version maintains the spatial structure of the source image through depth map extraction techniques, while the Canny version uses edge detection techniques to preserve the structural features of the source image, allowing users to choose the appropriate control method based on different needs.
Both models have the following features:
* Top-tier output quality and detail representation
* Excellent prompt following ability while maintaining consistency with the original image
* Trained using guided distillation techniques for improved efficiency
* Open weights for the research community
* API interfaces (pro version) and open-source weights (dev version)
Additionally, Black Forest Labs also provides **FLUX.1-Depth-dev-lora** and **FLUX.1-Canny-dev-lora** adapter versions extracted from the complete models.
These can be applied to the FLUX.1 \[dev] base model to provide similar functionality with smaller file size, especially suitable for resource-constrained environments.
We will use the full version of **FLUX.1-Canny-dev** and **FLUX.1-Depth-dev-lora** to complete the workflow examples.
## FLUX.1 ControlNet Model Introduction
FLUX.1 Canny and Depth are two powerful models from the [FLUX.1 Tools](https://blackforestlabs.ai/flux-1-tools/) launched by [Black Forest Labs](https://blackforestlabs.ai/). This toolkit is designed to add control and guidance capabilities to FLUX.1, enabling users to modify and recreate real or generated images.
**FLUX.1-Depth-dev** and **FLUX.1-Canny-dev** are both 12B parameter Rectified Flow Transformer models that can generate images based on text descriptions while maintaining the structural features of the input image.
The Depth version maintains the spatial structure of the source image through depth map extraction techniques, while the Canny version uses edge detection techniques to preserve the structural features of the source image, allowing users to choose the appropriate control method based on different needs.
Both models have the following features:
* Top-tier output quality and detail representation
* Excellent prompt following ability while maintaining consistency with the original image
* Trained using guided distillation techniques for improved efficiency
* Open weights for the research community
* API interfaces (pro version) and open-source weights (dev version)
Additionally, Black Forest Labs also provides **FLUX.1-Depth-dev-lora** and **FLUX.1-Canny-dev-lora** adapter versions extracted from the complete models.
These can be applied to the FLUX.1 \[dev] base model to provide similar functionality with smaller file size, especially suitable for resource-constrained environments.
We will use the full version of **FLUX.1-Canny-dev** and **FLUX.1-Depth-dev-lora** to complete the workflow examples.
Run on Comfy Cloud
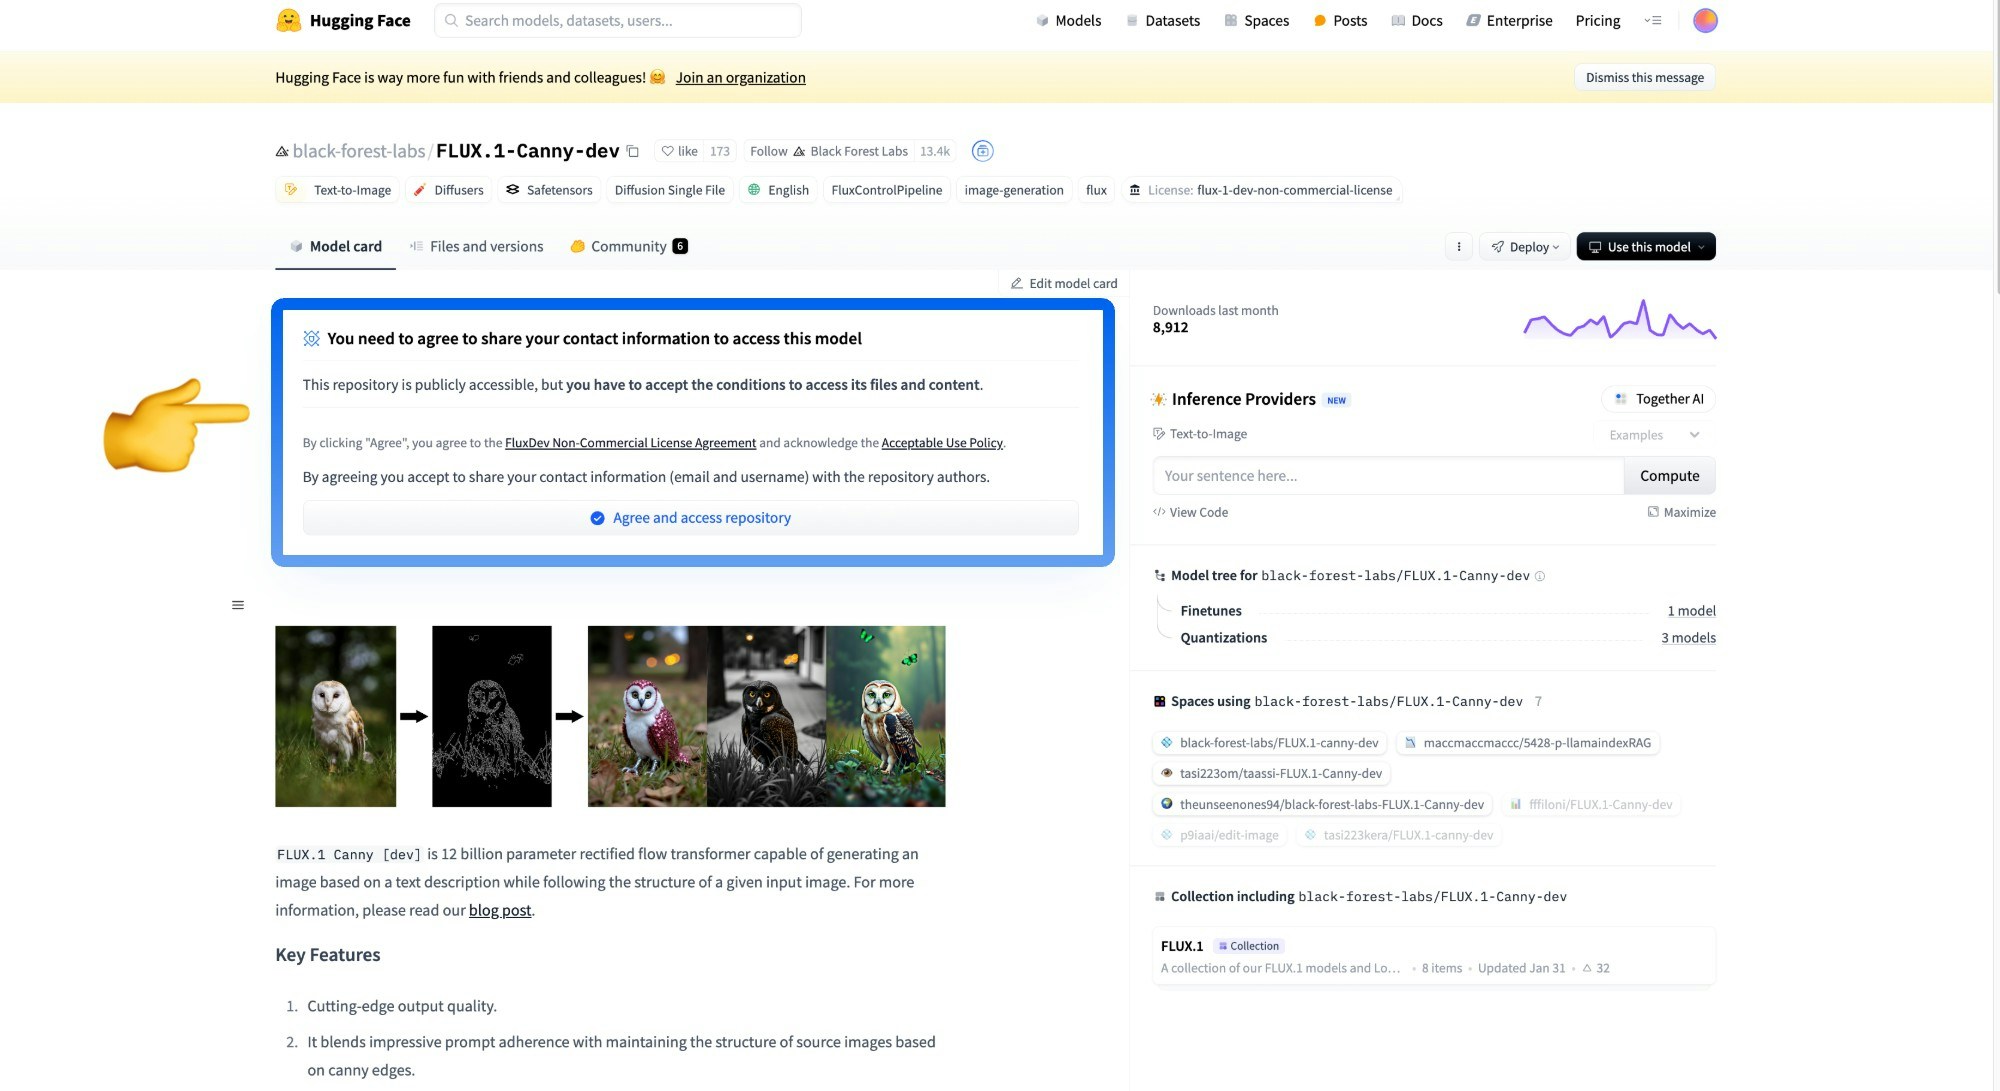
### 1. Workflow and Asset Please download the workflow image below and drag it into ComfyUI to load the workflow  Please download the image below, which we will use as the input image 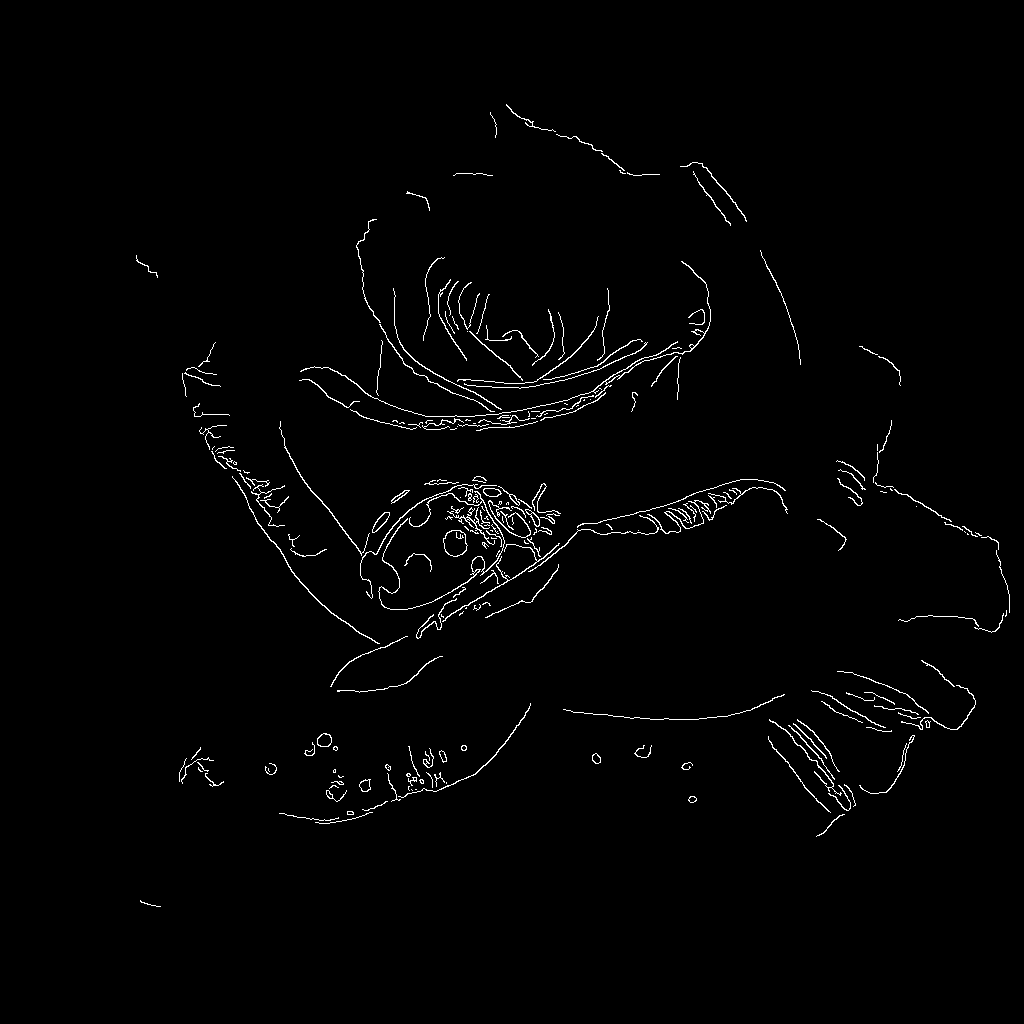 ### 2. Manual Models Installation
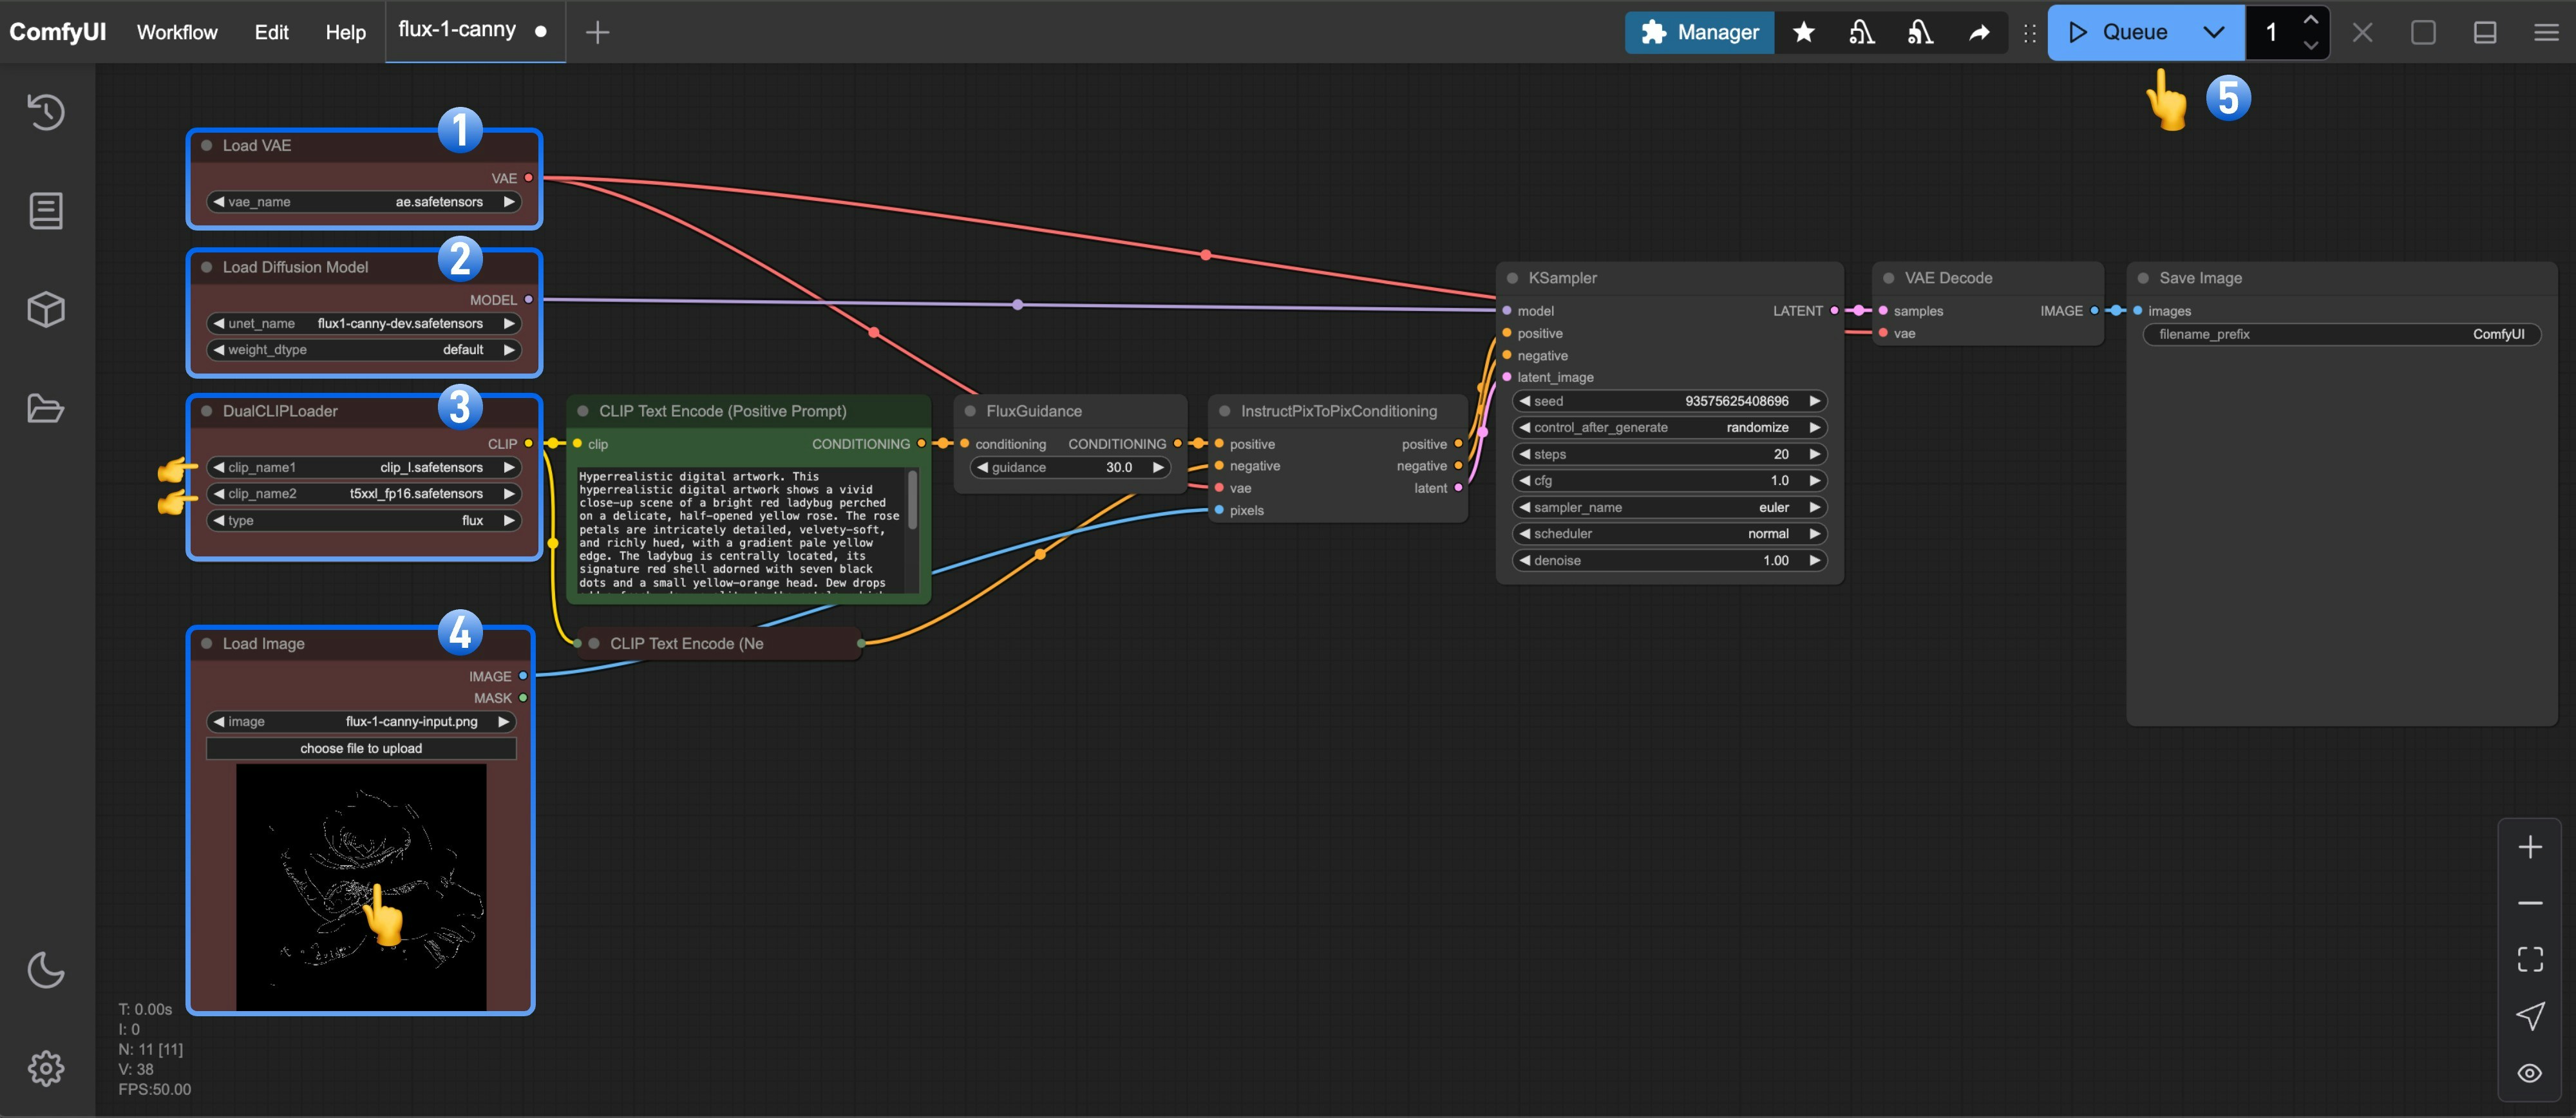 1. Make sure `ae.safetensors` is loaded in the `Load VAE` node
2. Make sure `flux1-canny-dev.safetensors` is loaded in the `Load Diffusion Model` node
3. Make sure the following models are loaded in the `DualCLIPLoader` node:
* clip\_name1: t5xxl\_fp16.safetensors
* clip\_name2: clip\_l.safetensors
4. Upload the provided input image in the `Load Image` node
5. Click the `Queue` button, or use the shortcut `Ctrl(cmd) + Enter` to run the workflow
### 4. Start Your Experimentation
Try using the [FLUX.1-Depth-dev](https://huggingface.co/black-forest-labs/FLUX.1-Depth-dev) model to complete the Depth version of the workflow
You can use the image below as input
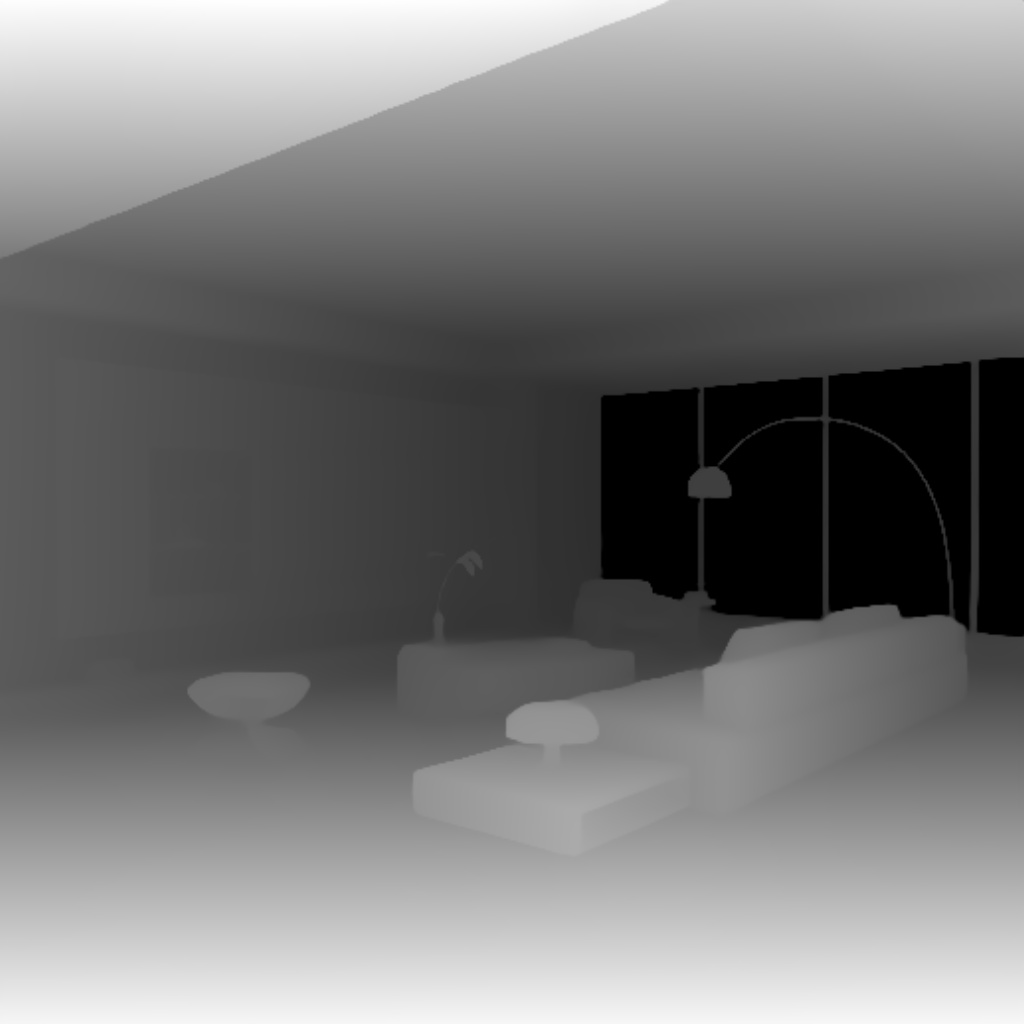
Or use the following custom nodes to complete image preprocessing:
* [ComfyUI-Advanced-ControlNet](https://github.com/Kosinkadink/ComfyUI-Advanced-ControlNet)
* [ComfyUI ControlNet aux](https://github.com/Fannovel16/comfyui_controlnet_aux)
## FLUX.1-Depth-dev-lora Workflow
1. Make sure `ae.safetensors` is loaded in the `Load VAE` node
2. Make sure `flux1-canny-dev.safetensors` is loaded in the `Load Diffusion Model` node
3. Make sure the following models are loaded in the `DualCLIPLoader` node:
* clip\_name1: t5xxl\_fp16.safetensors
* clip\_name2: clip\_l.safetensors
4. Upload the provided input image in the `Load Image` node
5. Click the `Queue` button, or use the shortcut `Ctrl(cmd) + Enter` to run the workflow
### 4. Start Your Experimentation
Try using the [FLUX.1-Depth-dev](https://huggingface.co/black-forest-labs/FLUX.1-Depth-dev) model to complete the Depth version of the workflow
You can use the image below as input

Or use the following custom nodes to complete image preprocessing:
* [ComfyUI-Advanced-ControlNet](https://github.com/Kosinkadink/ComfyUI-Advanced-ControlNet)
* [ComfyUI ControlNet aux](https://github.com/Fannovel16/comfyui_controlnet_aux)
## FLUX.1-Depth-dev-lora Workflow
Run on Comfy Cloud
The LoRA version workflow builds on the complete version by adding the LoRA model. Compared to the [complete version of the Flux workflow](/tutorials/flux/flux-1-text-to-image), it adds nodes for loading and using the corresponding LoRA model. ### 1. Workflow and Asset Please download the workflow image below and drag it into ComfyUI to load the workflow  Please download the image below, which we will use as the input image  ### 2. Manual Model Download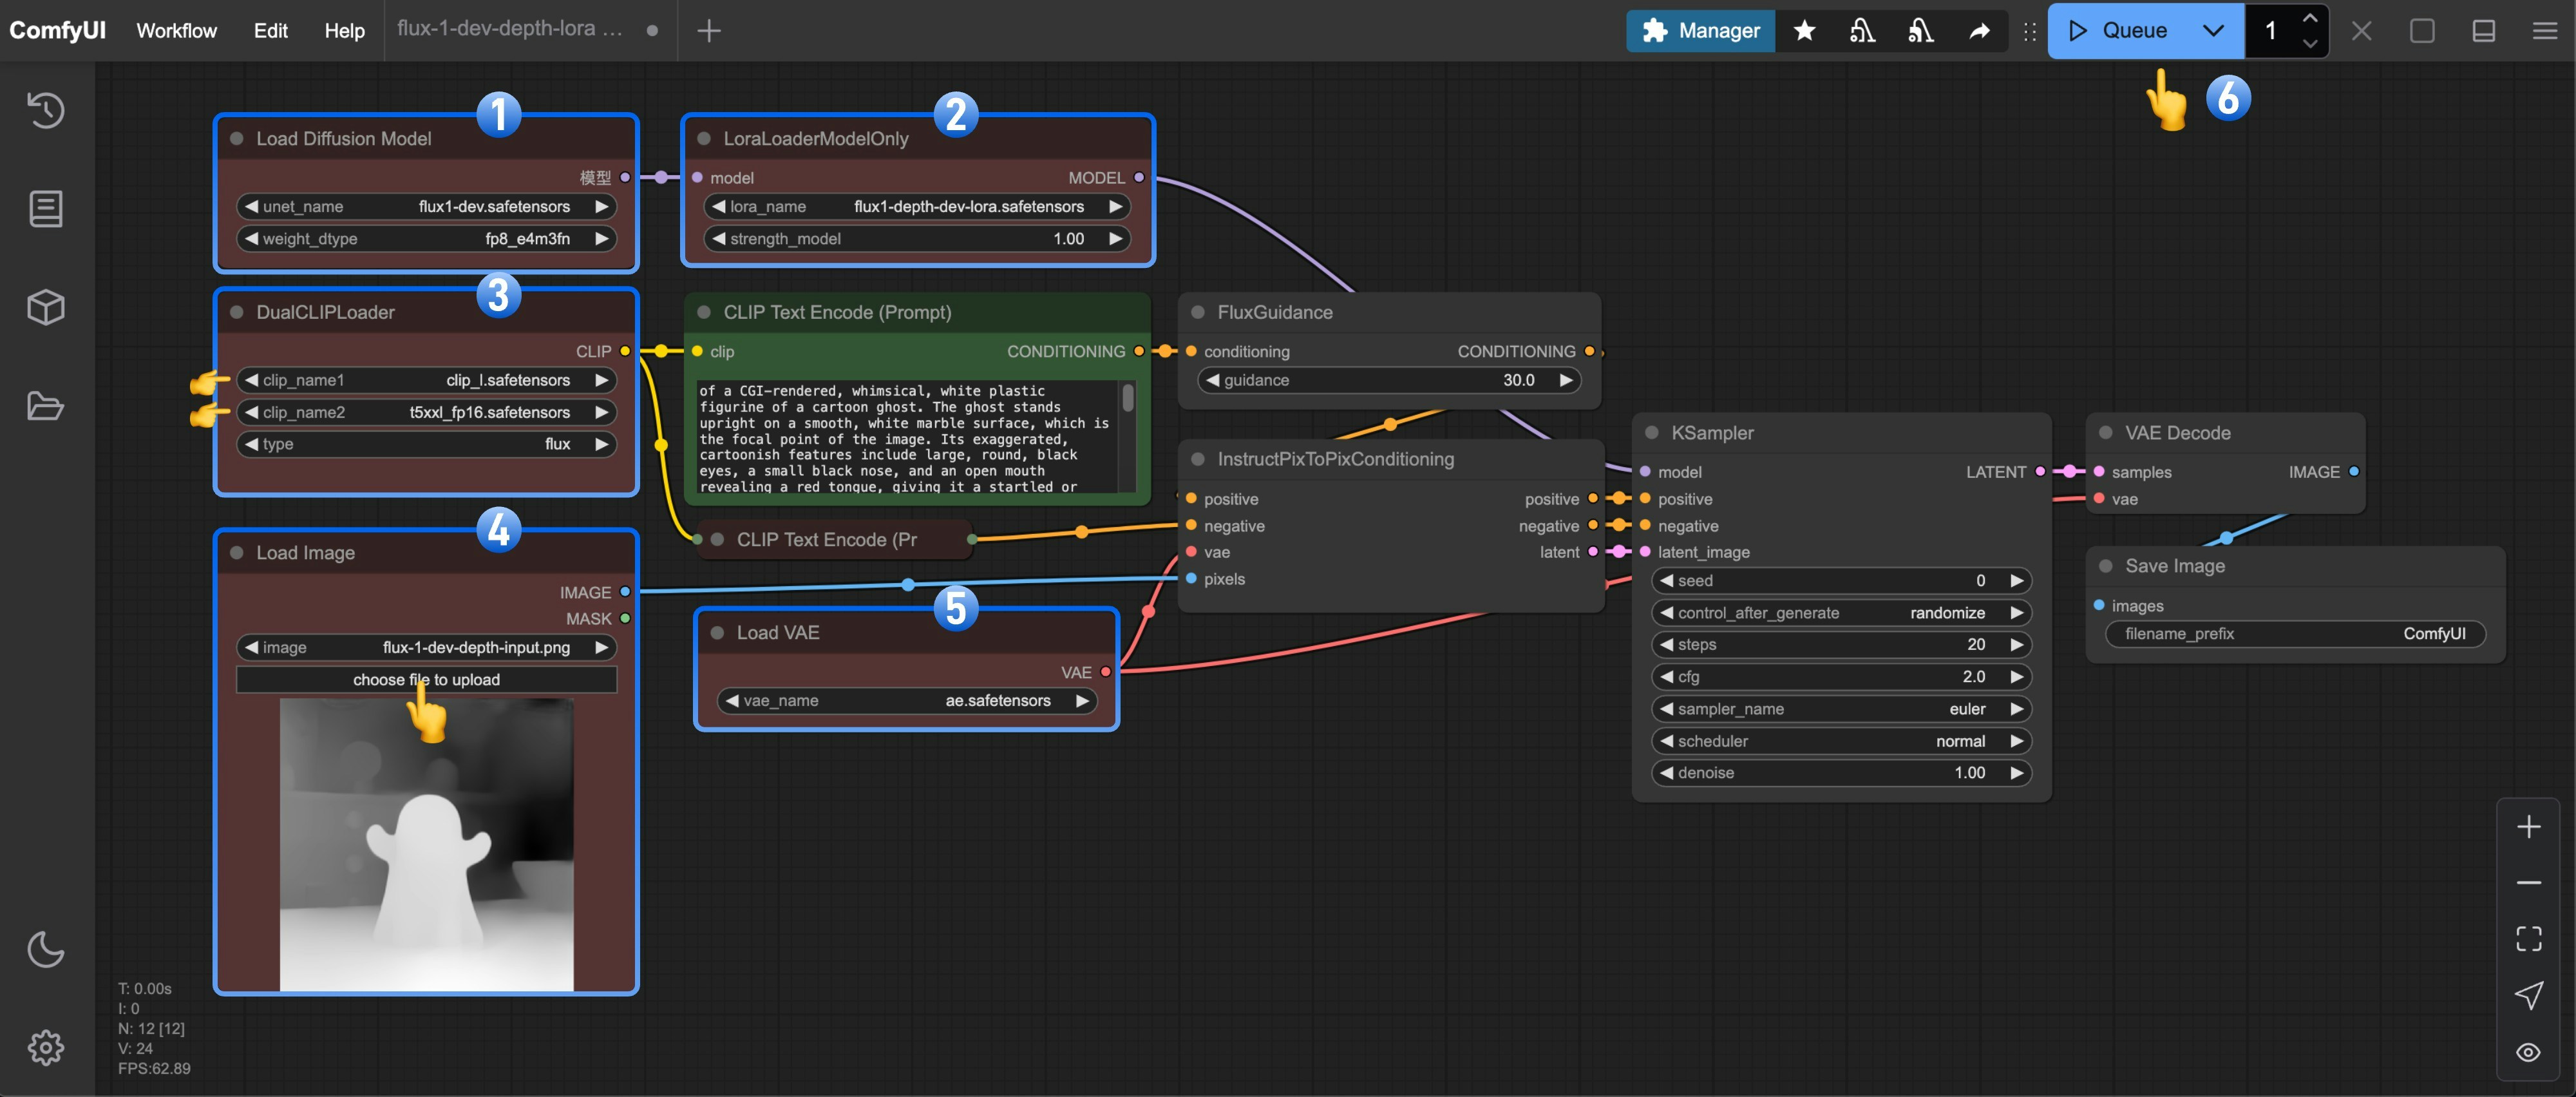 1. Make sure `flux1-dev.safetensors` is loaded in the `Load Diffusion Model` node
2. Make sure `flux1-depth-dev-lora.safetensors` is loaded in the `LoraLoaderModelOnly` node
3. Make sure the following models are loaded in the `DualCLIPLoader` node:
* clip\_name1: t5xxl\_fp16.safetensors
* clip\_name2: clip\_l.safetensors
4. Upload the provided input image in the `Load Image` node
5. Make sure `ae.safetensors` is loaded in the `Load VAE` node
6. Click the `Queue` button, or use the shortcut `Ctrl(cmd) + Enter` to run the workflow
### 4. Start Your Experimentation
Try using the [FLUX.1-Canny-dev-lora](https://huggingface.co/black-forest-labs/FLUX.1-Canny-dev-lora) model to complete the Canny version of the workflow
Use [ComfyUI-Advanced-ControlNet](https://github.com/Kosinkadink/ComfyUI-Advanced-ControlNet) or [ComfyUI ControlNet aux](https://github.com/Fannovel16/comfyui_controlnet_aux) to complete image preprocessing
## Community Versions of Flux Controlnets
XLab and InstantX + Shakker Labs have released Controlnets for Flux.
**InstantX:**
* [FLUX.1-dev-Controlnet-Canny](https://huggingface.co/InstantX/FLUX.1-dev-Controlnet-Canny/blob/main/diffusion_pytorch_model.safetensors)
* [FLUX.1-dev-ControlNet-Depth](https://huggingface.co/Shakker-Labs/FLUX.1-dev-ControlNet-Depth/blob/main/diffusion_pytorch_model.safetensors)
* [FLUX.1-dev-ControlNet-Union-Pro](https://huggingface.co/Shakker-Labs/FLUX.1-dev-ControlNet-Union-Pro/blob/main/diffusion_pytorch_model.safetensors)
**XLab**: [flux-controlnet-collections](https://huggingface.co/XLabs-AI/flux-controlnet-collections)
Place these files in the `ComfyUI/models/controlnet` directory.
You can visit [Flux Controlnet Example](https://raw.githubusercontent.com/comfyanonymous/ComfyUI_examples/refs/heads/master/flux/flux_controlnet_example.png) to get the corresponding workflow image, and use the image from [here](https://raw.githubusercontent.com/comfyanonymous/ComfyUI_examples/refs/heads/master/flux/girl_in_field.png) as the input image.
1. Make sure `flux1-dev.safetensors` is loaded in the `Load Diffusion Model` node
2. Make sure `flux1-depth-dev-lora.safetensors` is loaded in the `LoraLoaderModelOnly` node
3. Make sure the following models are loaded in the `DualCLIPLoader` node:
* clip\_name1: t5xxl\_fp16.safetensors
* clip\_name2: clip\_l.safetensors
4. Upload the provided input image in the `Load Image` node
5. Make sure `ae.safetensors` is loaded in the `Load VAE` node
6. Click the `Queue` button, or use the shortcut `Ctrl(cmd) + Enter` to run the workflow
### 4. Start Your Experimentation
Try using the [FLUX.1-Canny-dev-lora](https://huggingface.co/black-forest-labs/FLUX.1-Canny-dev-lora) model to complete the Canny version of the workflow
Use [ComfyUI-Advanced-ControlNet](https://github.com/Kosinkadink/ComfyUI-Advanced-ControlNet) or [ComfyUI ControlNet aux](https://github.com/Fannovel16/comfyui_controlnet_aux) to complete image preprocessing
## Community Versions of Flux Controlnets
XLab and InstantX + Shakker Labs have released Controlnets for Flux.
**InstantX:**
* [FLUX.1-dev-Controlnet-Canny](https://huggingface.co/InstantX/FLUX.1-dev-Controlnet-Canny/blob/main/diffusion_pytorch_model.safetensors)
* [FLUX.1-dev-ControlNet-Depth](https://huggingface.co/Shakker-Labs/FLUX.1-dev-ControlNet-Depth/blob/main/diffusion_pytorch_model.safetensors)
* [FLUX.1-dev-ControlNet-Union-Pro](https://huggingface.co/Shakker-Labs/FLUX.1-dev-ControlNet-Union-Pro/blob/main/diffusion_pytorch_model.safetensors)
**XLab**: [flux-controlnet-collections](https://huggingface.co/XLabs-AI/flux-controlnet-collections)
Place these files in the `ComfyUI/models/controlnet` directory.
You can visit [Flux Controlnet Example](https://raw.githubusercontent.com/comfyanonymous/ComfyUI_examples/refs/heads/master/flux/flux_controlnet_example.png) to get the corresponding workflow image, and use the image from [here](https://raw.githubusercontent.com/comfyanonymous/ComfyUI_examples/refs/heads/master/flux/girl_in_field.png) as the input image.