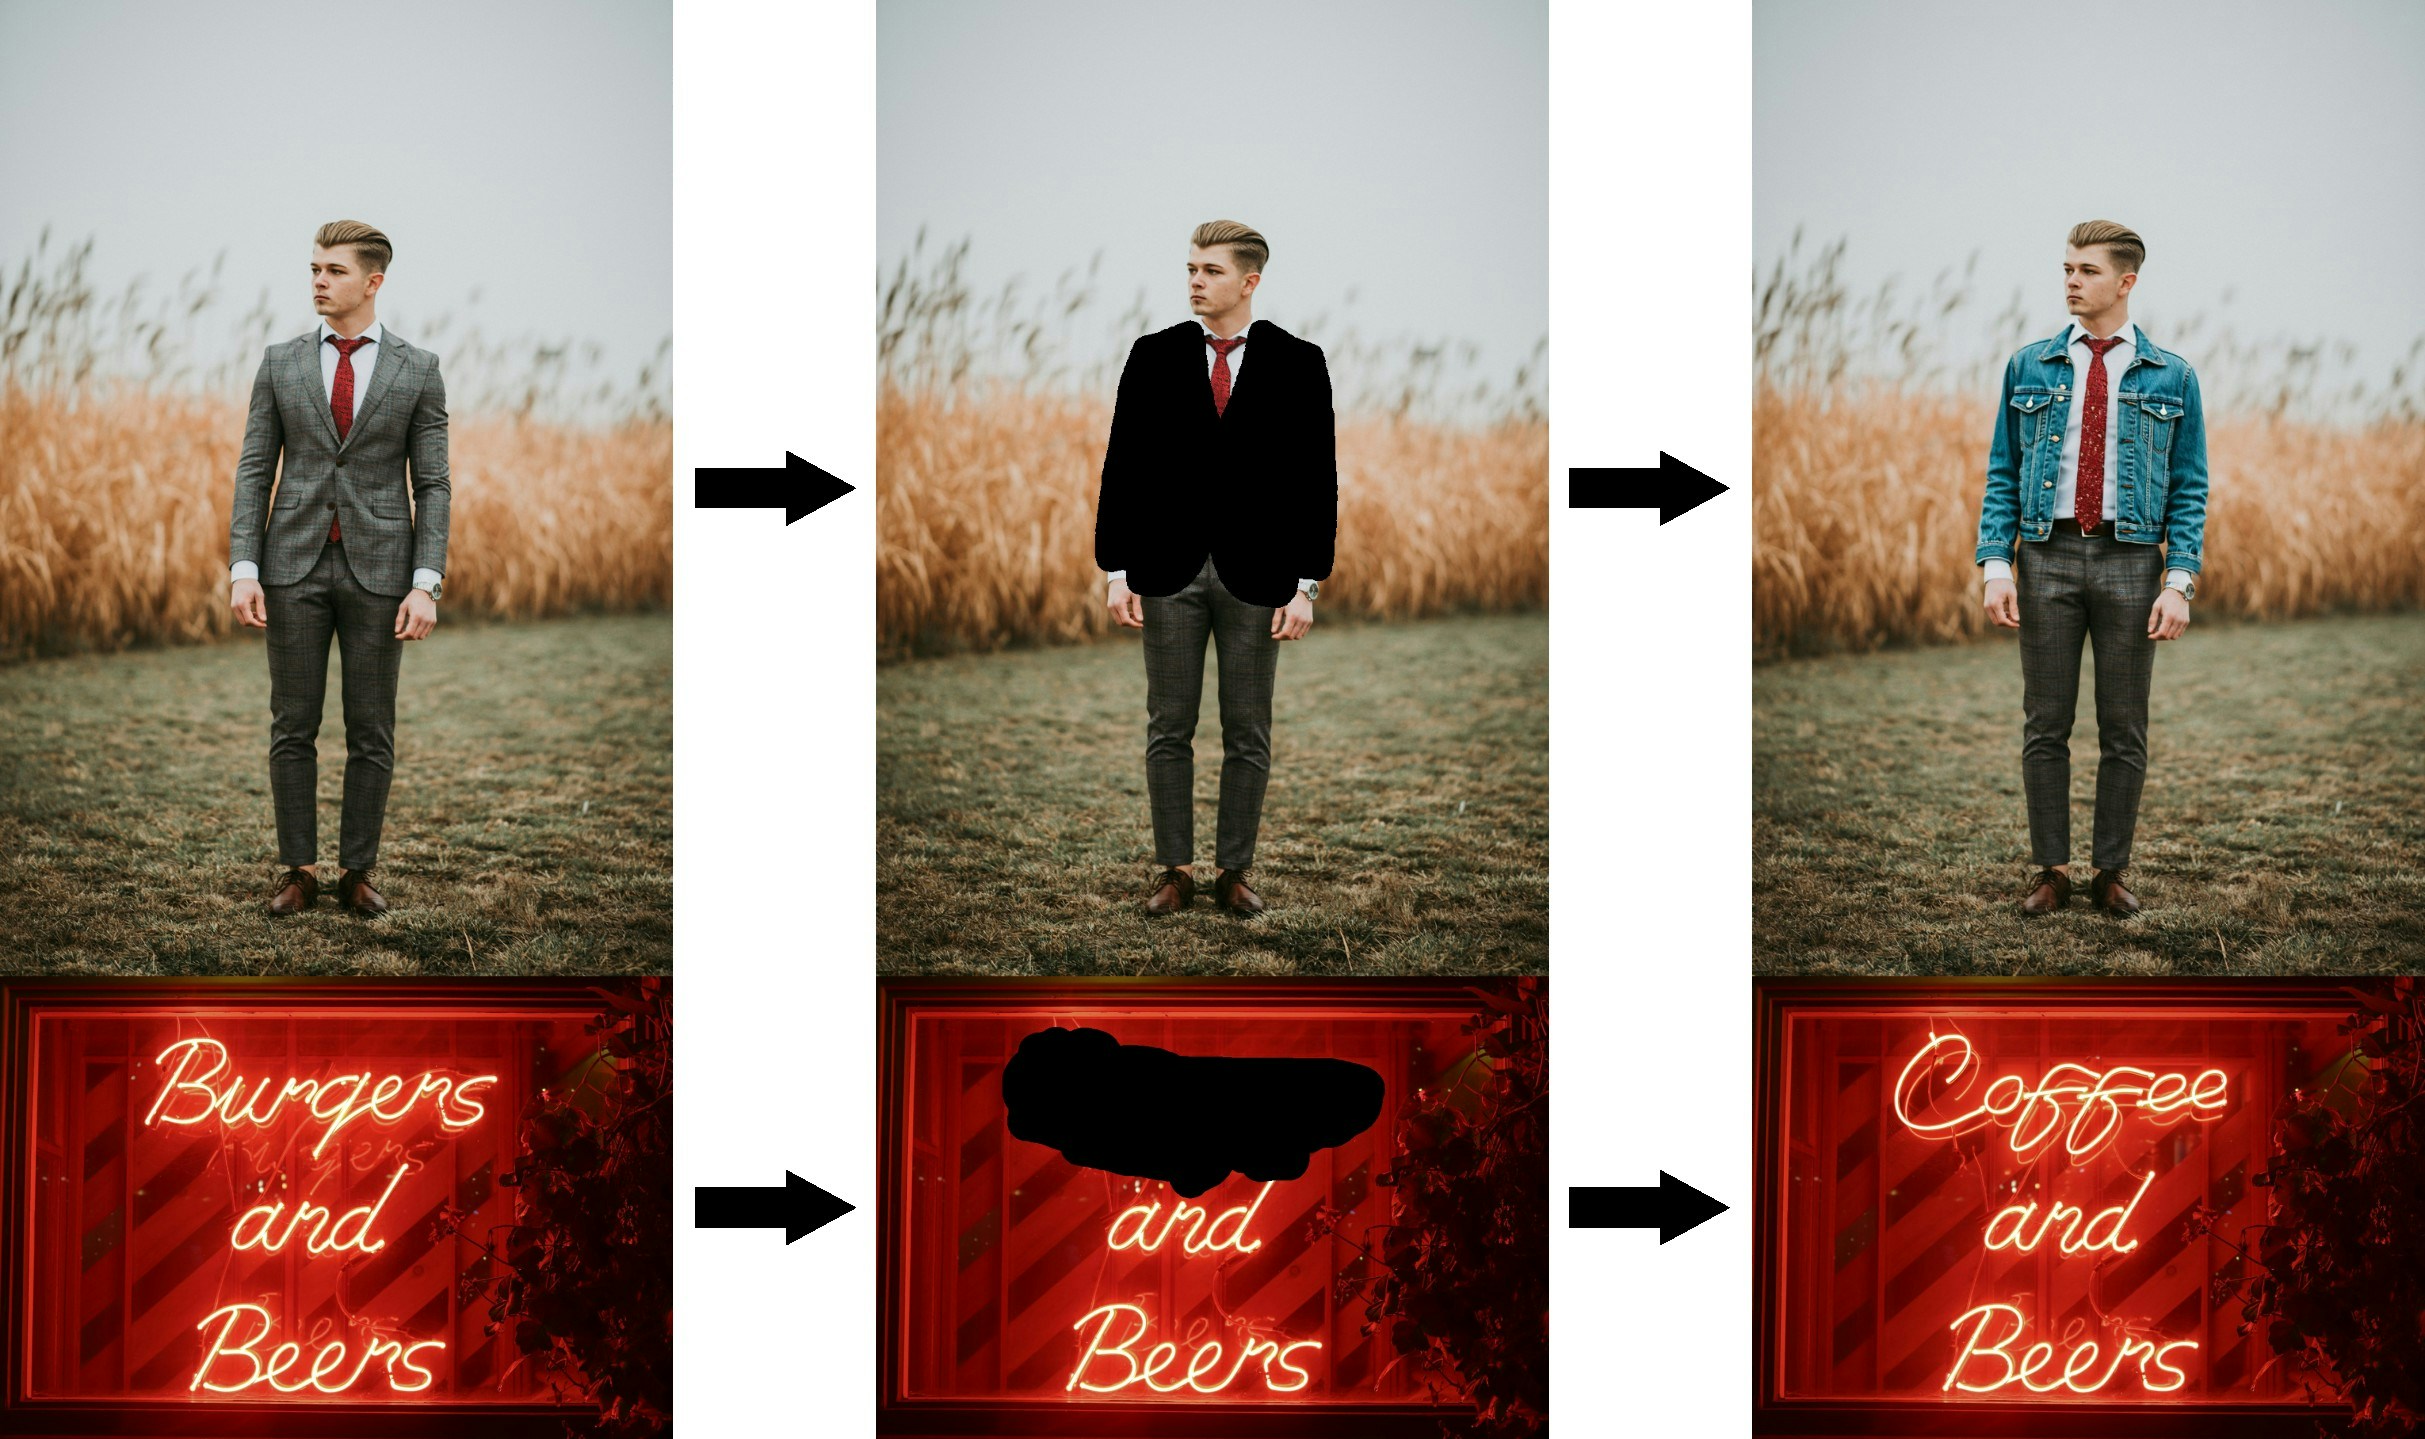
 ## Introduction to Flux.1 fill dev Model
Flux.1 fill dev is one of the core tools in the [FLUX.1 Tools suite](https://blackforestlabs.ai/flux-1-tools/) launched by [Black Forest Labs](https://blackforestlabs.ai/), specifically designed for image inpainting and outpainting.
Key features of Flux.1 fill dev:
* Powerful image inpainting and outpainting capabilities, with results second only to the commercial version FLUX.1 Fill \[pro].
* Excellent prompt understanding and following ability, precisely capturing user intent while maintaining high consistency with the original image.
* Advanced guided distillation training technology, making the model more efficient while maintaining high-quality output.
* Friendly licensing terms, with generated outputs usable for personal, scientific, and commercial purposes, please refer to the [FLUX.1 \[dev\] non-commercial license](https://huggingface.co/black-forest-labs/FLUX.1-dev/blob/main/LICENSE.md) for details.
Open Source Repository: [FLUX.1 \[dev\]](https://huggingface.co/black-forest-labs/FLUX.1-dev)
This guide will demonstrate inpainting and outpainting workflows based on the Flux.1 fill dev model.
If you're not familiar with inpainting and outpainting workflows, you can refer to [ComfyUI Layout Inpainting Example](/tutorials/basic/inpaint) and [ComfyUI Image Extension Example](/tutorials/basic/outpaint) for some related explanations.
## Flux.1 Fill dev and related models installation
Before we begin, let's complete the installation of the Flux.1 Fill dev model files. The inpainting and outpainting workflows will use exactly the same model files.
If you've previously used the full version of the [Flux.1 Text-to-Image workflow](/tutorials/flux/flux-1-text-to-image),
then you only need to download the **flux1-fill-dev.safetensors** model file in this section.
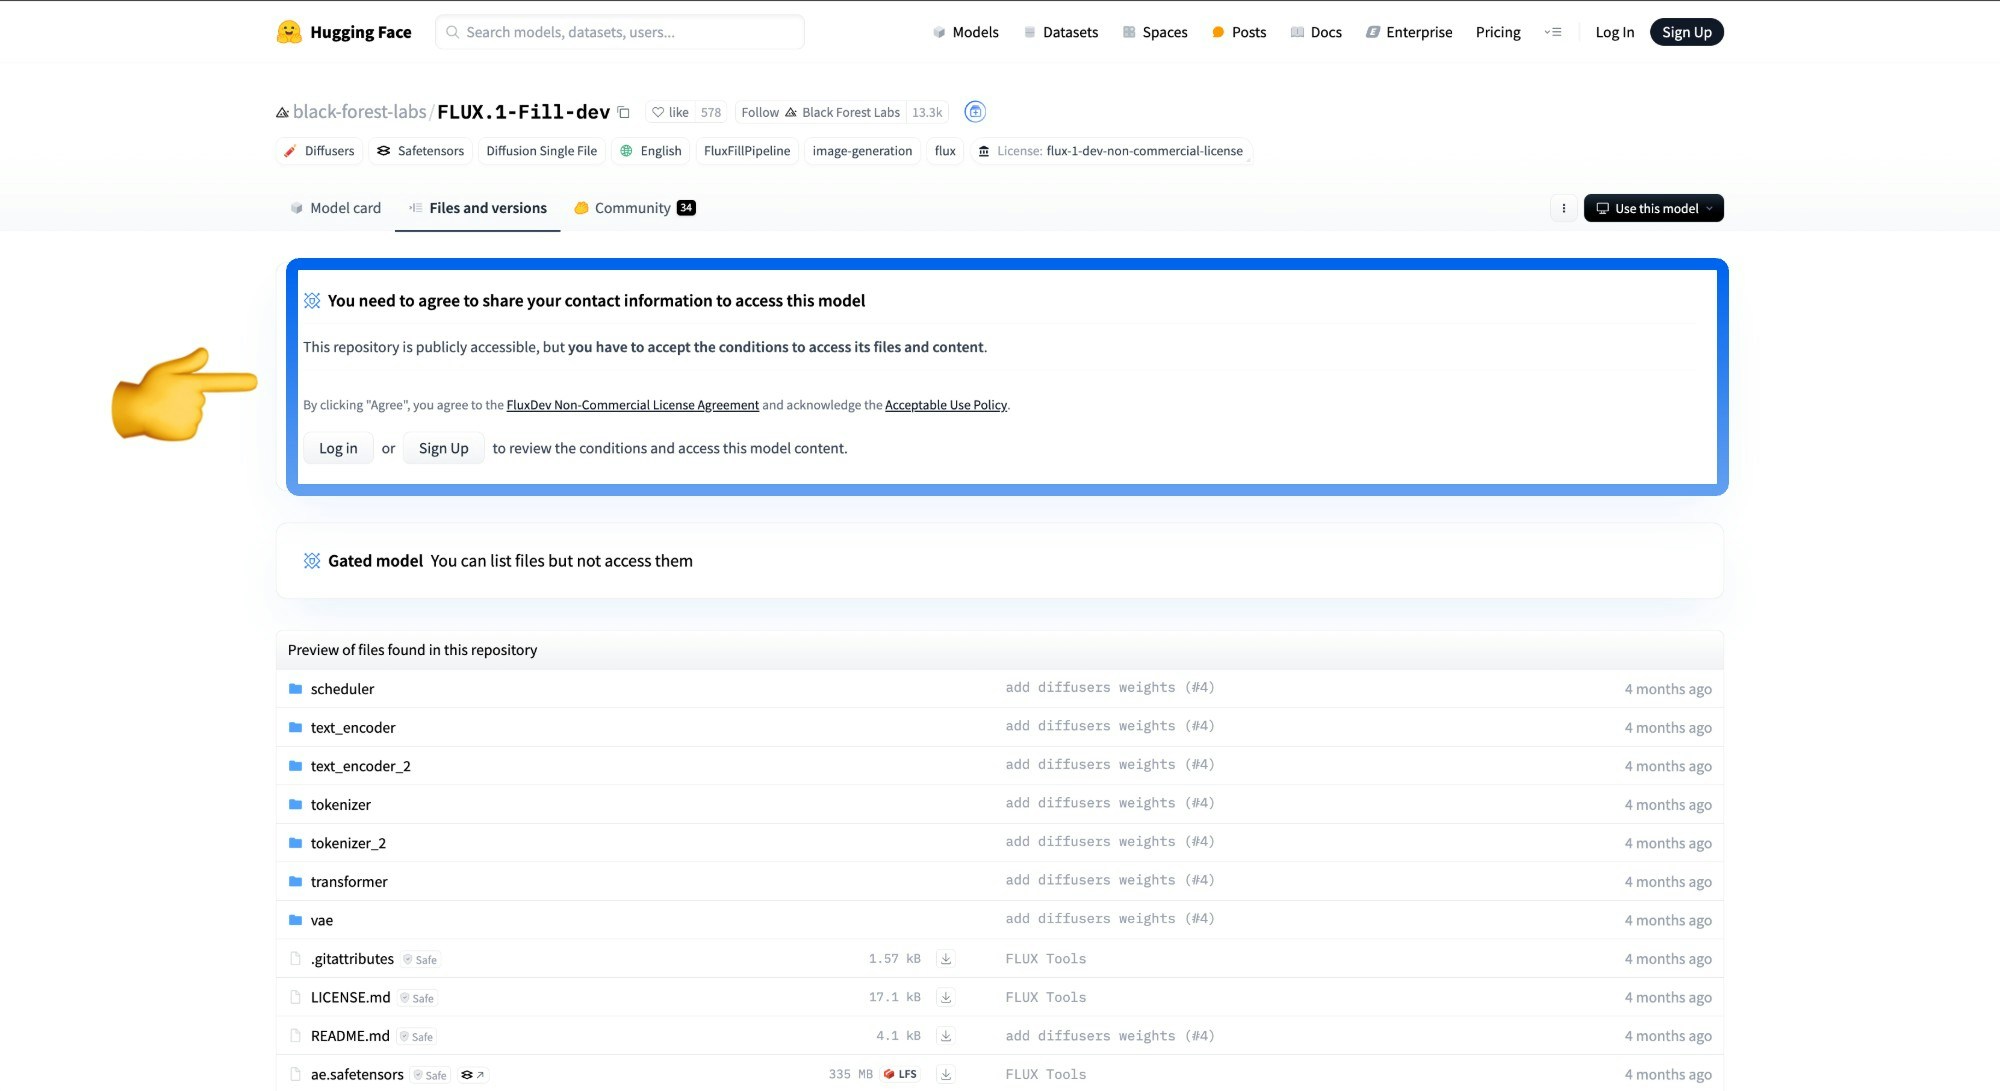
However, since downloading the corresponding model requires agreeing to the corresponding usage agreement, please visit the [black-forest-labs/FLUX.1-Fill-dev](https://huggingface.co/black-forest-labs/FLUX.1-Fill-dev) page and make sure you have agreed to the corresponding agreement as shown in the image below.
## Introduction to Flux.1 fill dev Model
Flux.1 fill dev is one of the core tools in the [FLUX.1 Tools suite](https://blackforestlabs.ai/flux-1-tools/) launched by [Black Forest Labs](https://blackforestlabs.ai/), specifically designed for image inpainting and outpainting.
Key features of Flux.1 fill dev:
* Powerful image inpainting and outpainting capabilities, with results second only to the commercial version FLUX.1 Fill \[pro].
* Excellent prompt understanding and following ability, precisely capturing user intent while maintaining high consistency with the original image.
* Advanced guided distillation training technology, making the model more efficient while maintaining high-quality output.
* Friendly licensing terms, with generated outputs usable for personal, scientific, and commercial purposes, please refer to the [FLUX.1 \[dev\] non-commercial license](https://huggingface.co/black-forest-labs/FLUX.1-dev/blob/main/LICENSE.md) for details.
Open Source Repository: [FLUX.1 \[dev\]](https://huggingface.co/black-forest-labs/FLUX.1-dev)
This guide will demonstrate inpainting and outpainting workflows based on the Flux.1 fill dev model.
If you're not familiar with inpainting and outpainting workflows, you can refer to [ComfyUI Layout Inpainting Example](/tutorials/basic/inpaint) and [ComfyUI Image Extension Example](/tutorials/basic/outpaint) for some related explanations.
## Flux.1 Fill dev and related models installation
Before we begin, let's complete the installation of the Flux.1 Fill dev model files. The inpainting and outpainting workflows will use exactly the same model files.
If you've previously used the full version of the [Flux.1 Text-to-Image workflow](/tutorials/flux/flux-1-text-to-image),
then you only need to download the **flux1-fill-dev.safetensors** model file in this section.
However, since downloading the corresponding model requires agreeing to the corresponding usage agreement, please visit the [black-forest-labs/FLUX.1-Fill-dev](https://huggingface.co/black-forest-labs/FLUX.1-Fill-dev) page and make sure you have agreed to the corresponding agreement as shown in the image below.
 Complete model list:
* [clip\_l.safetensors](https://huggingface.co/comfyanonymous/flux_text_encoders/resolve/main/clip_l.safetensors?download=true)
* [t5xxl\_fp16.safetensors](https://huggingface.co/comfyanonymous/flux_text_encoders/resolve/main/t5xxl_fp16.safetensors?download=true)
* [ae.safetensors](https://huggingface.co/black-forest-labs/FLUX.1-schnell/resolve/main/ae.safetensors?download=true)
* [flux1-fill-dev.safetensors](https://huggingface.co/black-forest-labs/FLUX.1-Fill-dev/resolve/main/flux1-fill-dev.safetensors?download=true)
File storage location:
```
ComfyUI/
├── models/
│ ├── text_encoders/
│ │ ├── clip_l.safetensors
│ │ └── t5xxl_fp16.safetensors
│ ├── vae/
│ │ └── ae.safetensors
│ └── diffusion_models/
│ └── flux1-fill-dev.safetensors
```
## Flux.1 Fill dev inpainting workflow
### 1. Inpainting workflow and asset
Complete model list:
* [clip\_l.safetensors](https://huggingface.co/comfyanonymous/flux_text_encoders/resolve/main/clip_l.safetensors?download=true)
* [t5xxl\_fp16.safetensors](https://huggingface.co/comfyanonymous/flux_text_encoders/resolve/main/t5xxl_fp16.safetensors?download=true)
* [ae.safetensors](https://huggingface.co/black-forest-labs/FLUX.1-schnell/resolve/main/ae.safetensors?download=true)
* [flux1-fill-dev.safetensors](https://huggingface.co/black-forest-labs/FLUX.1-Fill-dev/resolve/main/flux1-fill-dev.safetensors?download=true)
File storage location:
```
ComfyUI/
├── models/
│ ├── text_encoders/
│ │ ├── clip_l.safetensors
│ │ └── t5xxl_fp16.safetensors
│ ├── vae/
│ │ └── ae.safetensors
│ └── diffusion_models/
│ └── flux1-fill-dev.safetensors
```
## Flux.1 Fill dev inpainting workflow
### 1. Inpainting workflow and asset
Download Workflow Image
Run on Comfy Cloud
Please download the image below and drag it into ComfyUI to load the corresponding workflow  Please download the image below, we will use it as the input image 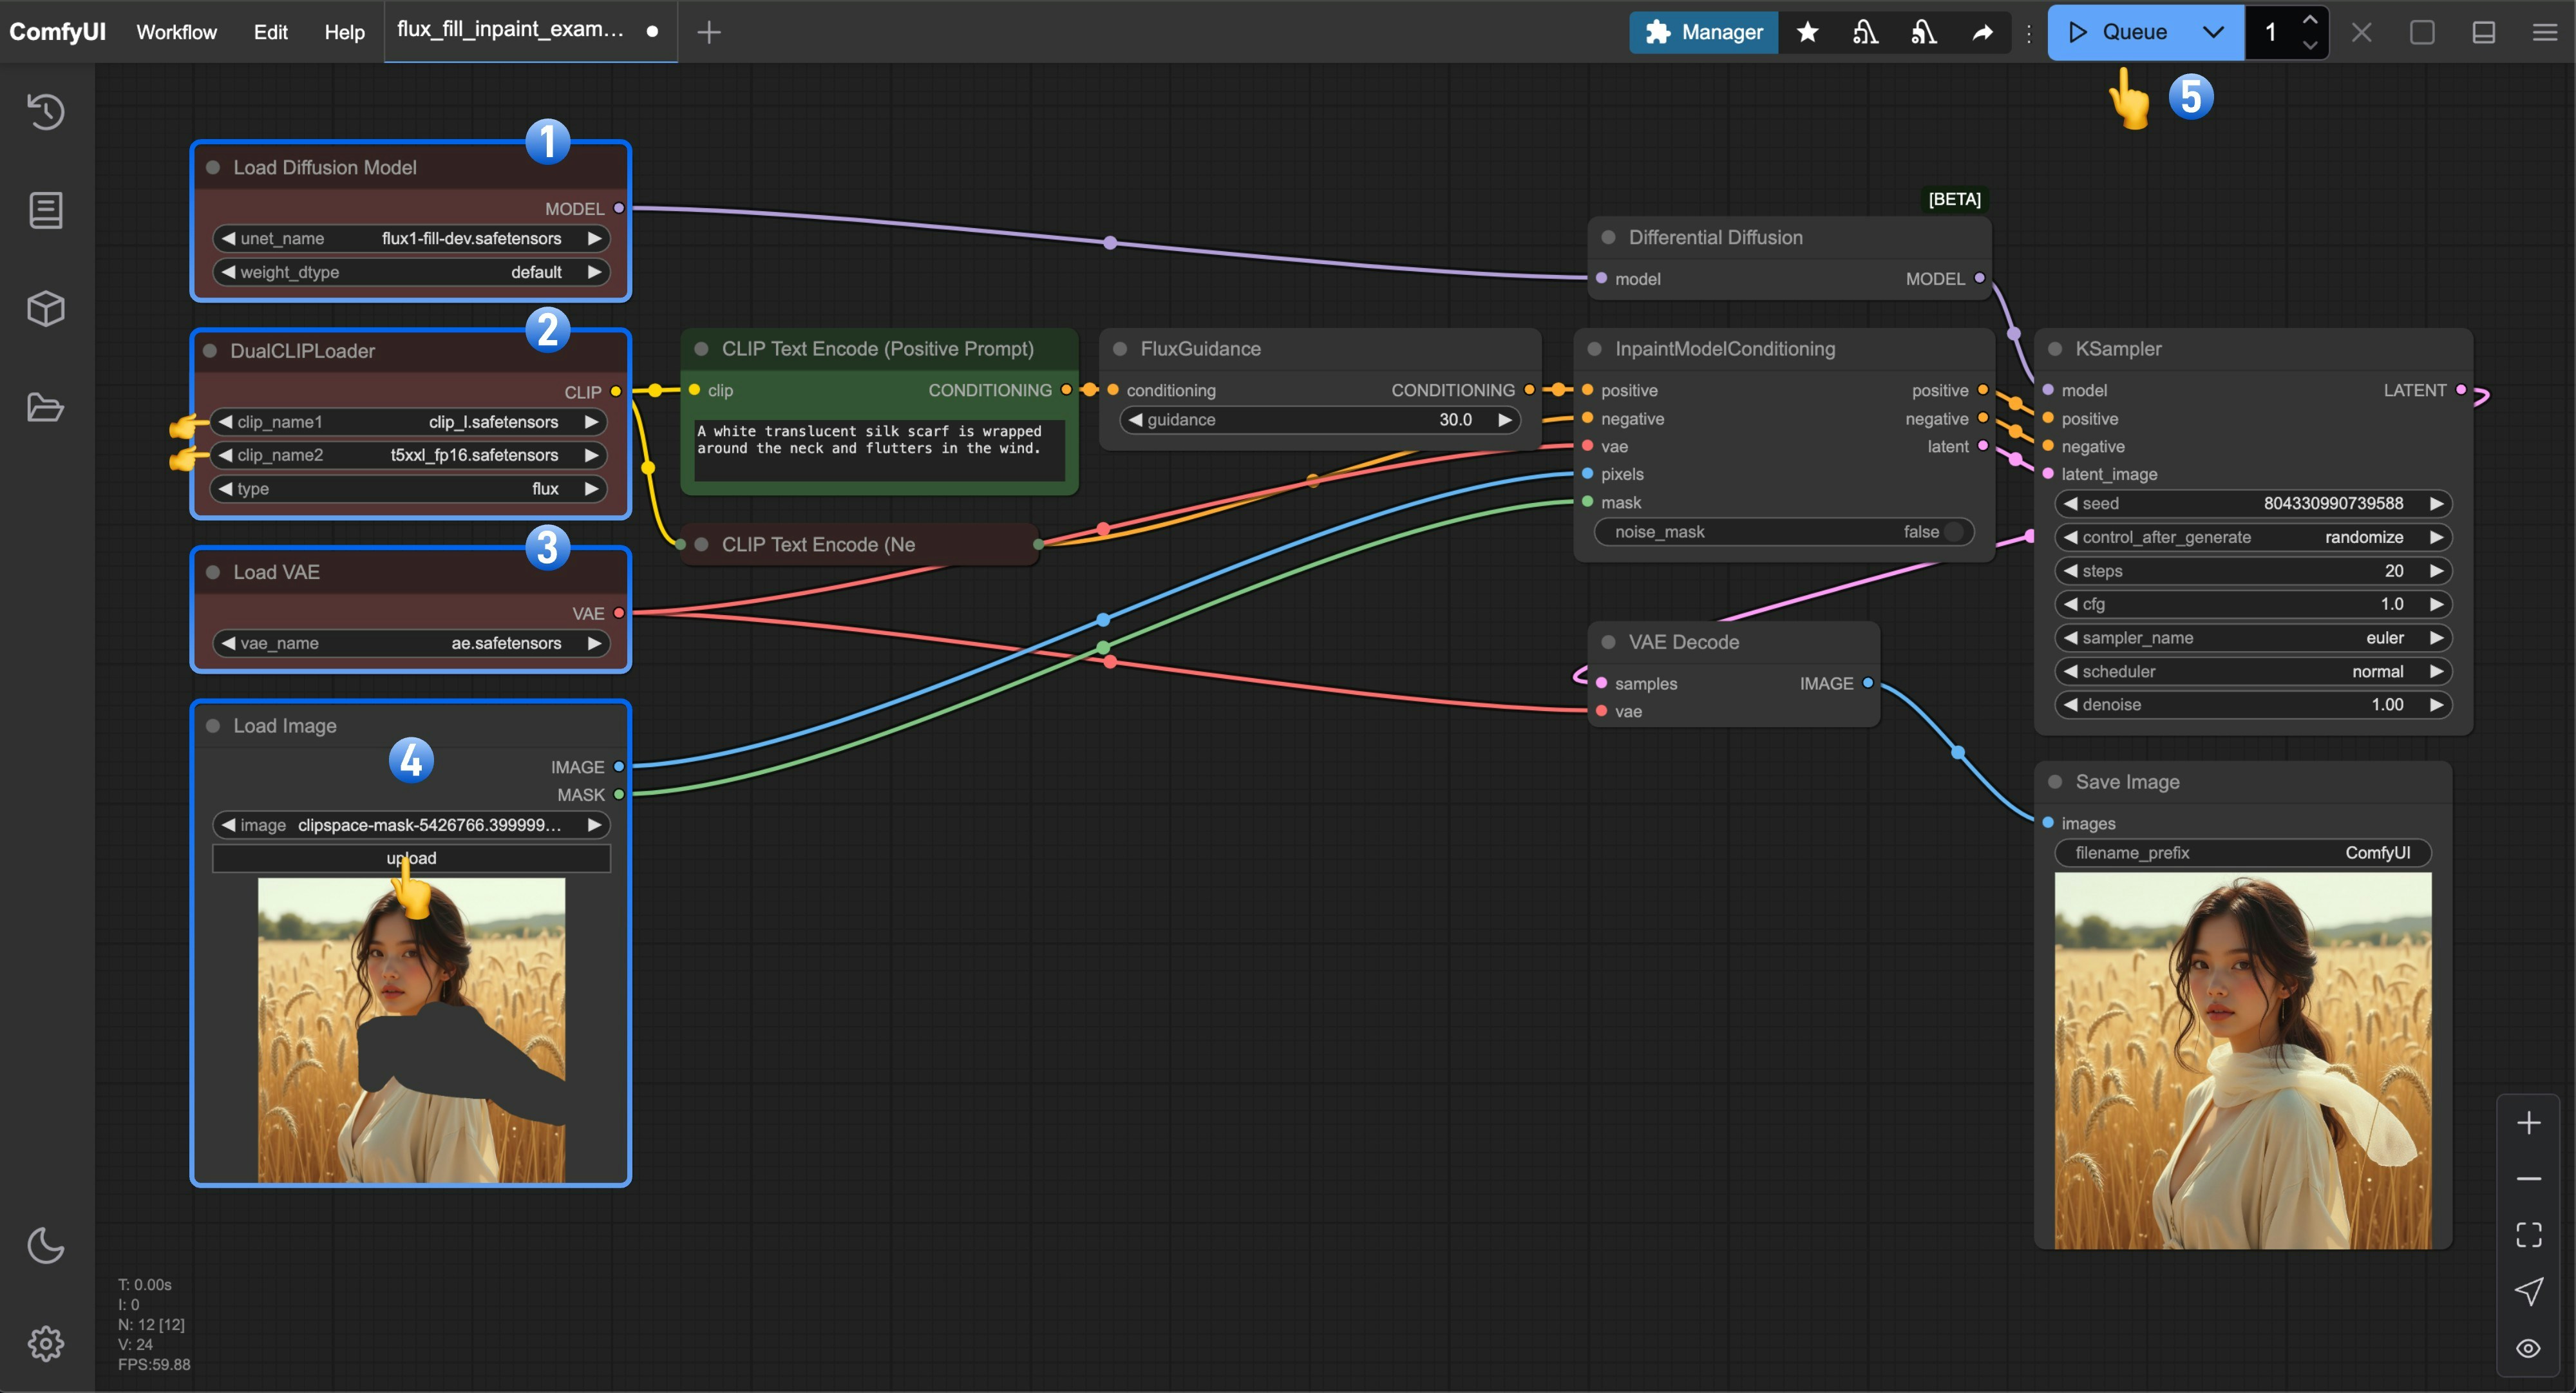 1. Ensure the `Load Diffusion Model` node has `flux1-fill-dev.safetensors` loaded.
2. Ensure the `DualCLIPLoader` node has the following models loaded:
* clip\_name1: `t5xxl_fp16.safetensors`
* clip\_name2: `clip_l.safetensors`
3. Ensure the `Load VAE` node has `ae.safetensors` loaded.
4. Upload the input image provided in the document to the `Load Image` node; if you're using the version without a mask, remember to complete the mask drawing using the mask editor
5. Click the `Queue` button, or use the shortcut `Ctrl(cmd) + Enter` to run the workflow
## Flux.1 Fill dev Outpainting Workflow
### 1. Outpainting workflow and asset
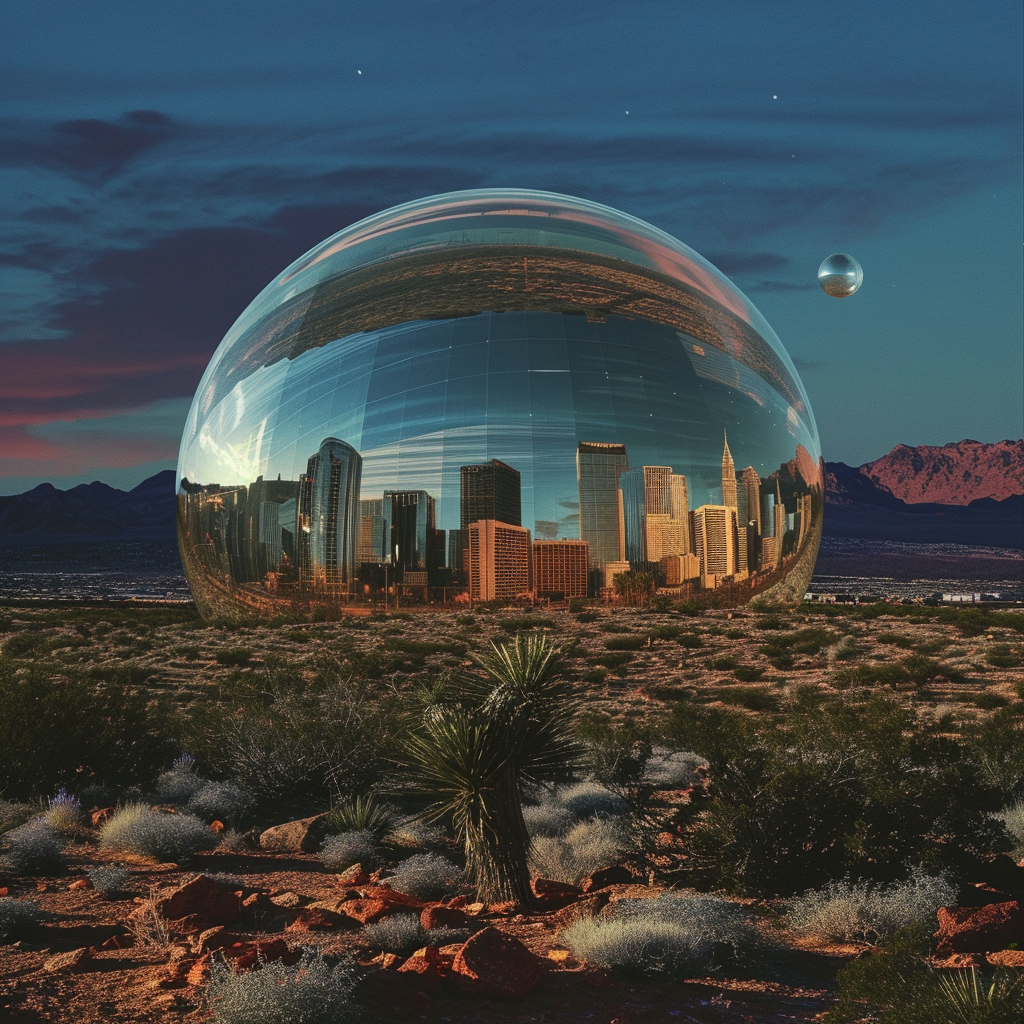
Please download the image below and drag it into ComfyUI to load the corresponding workflow

Please download the image below, we will use it as the input image
### 2. Steps to run the workflow
1. Ensure the `Load Diffusion Model` node has `flux1-fill-dev.safetensors` loaded.
2. Ensure the `DualCLIPLoader` node has the following models loaded:
* clip\_name1: `t5xxl_fp16.safetensors`
* clip\_name2: `clip_l.safetensors`
3. Ensure the `Load VAE` node has `ae.safetensors` loaded.
4. Upload the input image provided in the document to the `Load Image` node; if you're using the version without a mask, remember to complete the mask drawing using the mask editor
5. Click the `Queue` button, or use the shortcut `Ctrl(cmd) + Enter` to run the workflow
## Flux.1 Fill dev Outpainting Workflow
### 1. Outpainting workflow and asset
Please download the image below and drag it into ComfyUI to load the corresponding workflow

Please download the image below, we will use it as the input image

### 2. Steps to run the workflow
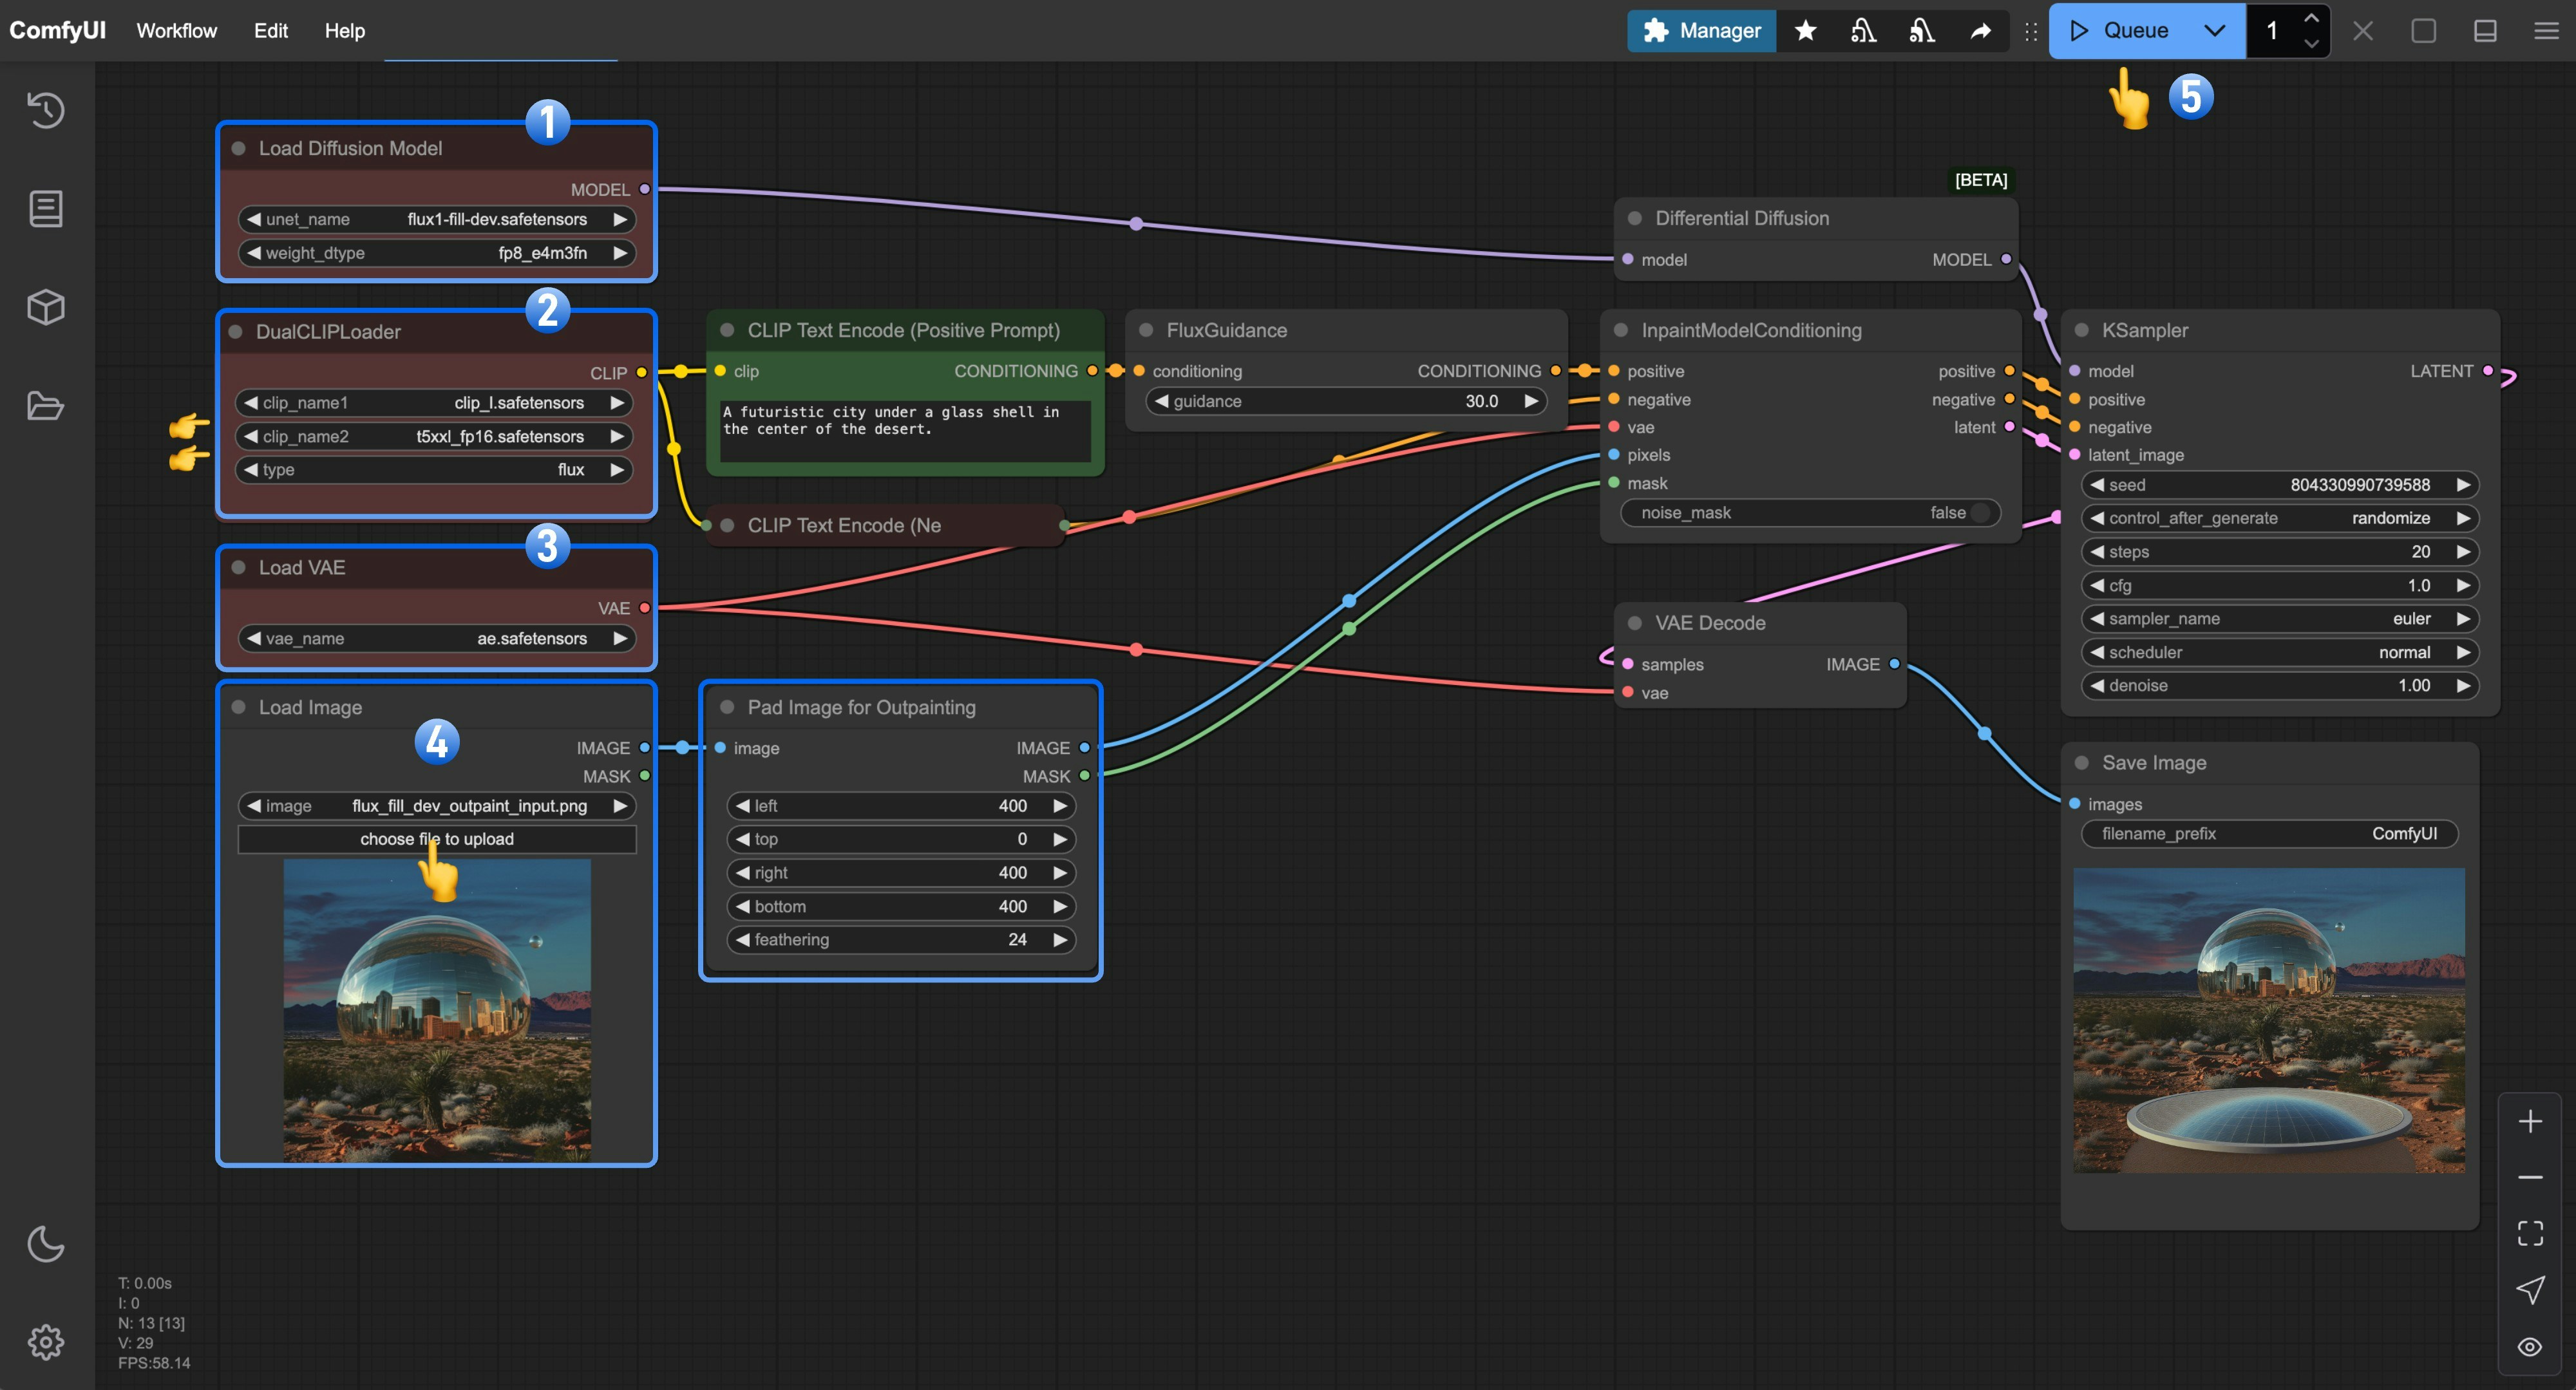 1. Ensure the `Load Diffusion Model` node has `flux1-fill-dev.safetensors` loaded.
2. Ensure the `DualCLIPLoader` node has the following models loaded:
* clip\_name1: `t5xxl_fp16.safetensors`
* clip\_name2: `clip_l.safetensors`
3. Ensure the `Load VAE` node has `ae.safetensors` loaded.
4. Upload the input image provided in the document to the `Load Image` node
5. Click the `Queue` button, or use the shortcut `Ctrl(cmd) + Enter` to run the workflow
1. Ensure the `Load Diffusion Model` node has `flux1-fill-dev.safetensors` loaded.
2. Ensure the `DualCLIPLoader` node has the following models loaded:
* clip\_name1: `t5xxl_fp16.safetensors`
* clip\_name2: `clip_l.safetensors`
3. Ensure the `Load VAE` node has `ae.safetensors` loaded.
4. Upload the input image provided in the document to the `Load Image` node
5. Click the `Queue` button, or use the shortcut `Ctrl(cmd) + Enter` to run the workflow