> ## Documentation Index
> Fetch the complete documentation index at: https://docs.comfy.org/llms.txt
> Use this file to discover all available pages before exploring further.
# ComfyUI OmniGen2 Native Workflow Examples
> ComfyUI OmniGen2 Native Workflow Examples - Unified text-to-image, image editing, and multi-image composition model.
## About OmniGen2
OmniGen2 is a powerful and efficient unified multimodal generation model with approximately **7B** total parameters (3B text model + 4B image generation model). Unlike OmniGen v1, OmniGen2 adopts an innovative dual-path Transformer architecture with completely independent text autoregressive model and image diffusion model, achieving parameter decoupling and specialized optimization.
### Model Highlights
* **Visual Understanding**: Inherits the powerful image content interpretation and analysis capabilities of the Qwen-VL-2.5 foundation model
* **Text-to-Image Generation**: Creates high-fidelity and aesthetically pleasing images from text prompts
* **Instruction-guided Image Editing**: Performs complex, instruction-based image modifications, achieving state-of-the-art performance among open-source models
* **Contextual Generation**: Versatile capabilities to process and flexibly combine diverse inputs (including people, reference objects, and scenes), producing novel and coherent visual outputs
### Technical Features
* **Dual-path Architecture**: Based on Qwen 2.5 VL (3B) text encoder + independent diffusion Transformer (4B)
* **Omni-RoPE Position Encoding**: Supports multi-image spatial positioning and identity distinction
* **Parameter Decoupling Design**: Avoids negative impact of text generation on image quality
* Support for complex text understanding and image understanding
* Controllable image generation and editing
* Excellent detail preservation capabilities
* Unified architecture supporting multiple image generation tasks
* Text generation capability: Can generate clear text content within images
Make sure your ComfyUI is updated.
* [Download ComfyUI](https://www.comfy.org/download)
* [Update Guide](/installation/update_comfyui)
Workflows in this guide can be found in the [Workflow Templates](/interface/features/template).
If you can't find them in the template, your ComfyUI may be outdated. (Desktop version's update will delay sometime)
If nodes are missing when loading a workflow, possible reasons:
1. You are not using the latest ComfyUI version (Nightly version)
2. Some nodes failed to import at startup
* The Desktop is base on ComfyUI stable release, it will auto-update when there is a new Desktop stable release available.
* [Cloud](https://cloud.comfy.org) will update after ComfyUI stable release.
So, if you find any core node missing in this document, it might be because the new core nodes have not yet been released in the latest stable version. Please wait for the next stable release.
## OmniGen2 Model Download
Since this article involves different workflows, the corresponding model files and installation locations are as follows. The download information for model files is also included in the corresponding workflows:
**Diffusion Models**
* [omnigen2\_fp16.safetensors](https://huggingface.co/Comfy-Org/Omnigen2_ComfyUI_repackaged/resolve/main/split_files/diffusion_models/omnigen2_fp16.safetensors)
**VAE**
* [ae.safetensors](https://huggingface.co/Comfy-Org/Lumina_Image_2.0_Repackaged/resolve/main/split_files/vae/ae.safetensors)
**Text Encoders**
* [qwen\_2.5\_vl\_fp16.safetensors](https://huggingface.co/Comfy-Org/Omnigen2_ComfyUI_repackaged/resolve/main/split_files/text_encoders/qwen_2.5_vl_fp16.safetensors)
File save location:
```
📂 ComfyUI/
├── 📂 models/
│ ├── 📂 diffusion_models/
│ │ └── omnigen2_fp16.safetensors
│ ├── 📂 vae/
│ │ └── ae.safetensors
│ └── 📂 text_encoders/
│ └── qwen_2.5_vl_fp16.safetensors
```
## ComfyUI OmniGen2 Text-to-Image Workflow
### 1. Download Workflow File
Run on Comfy Cloud

### 2. Complete Workflow Step by Step
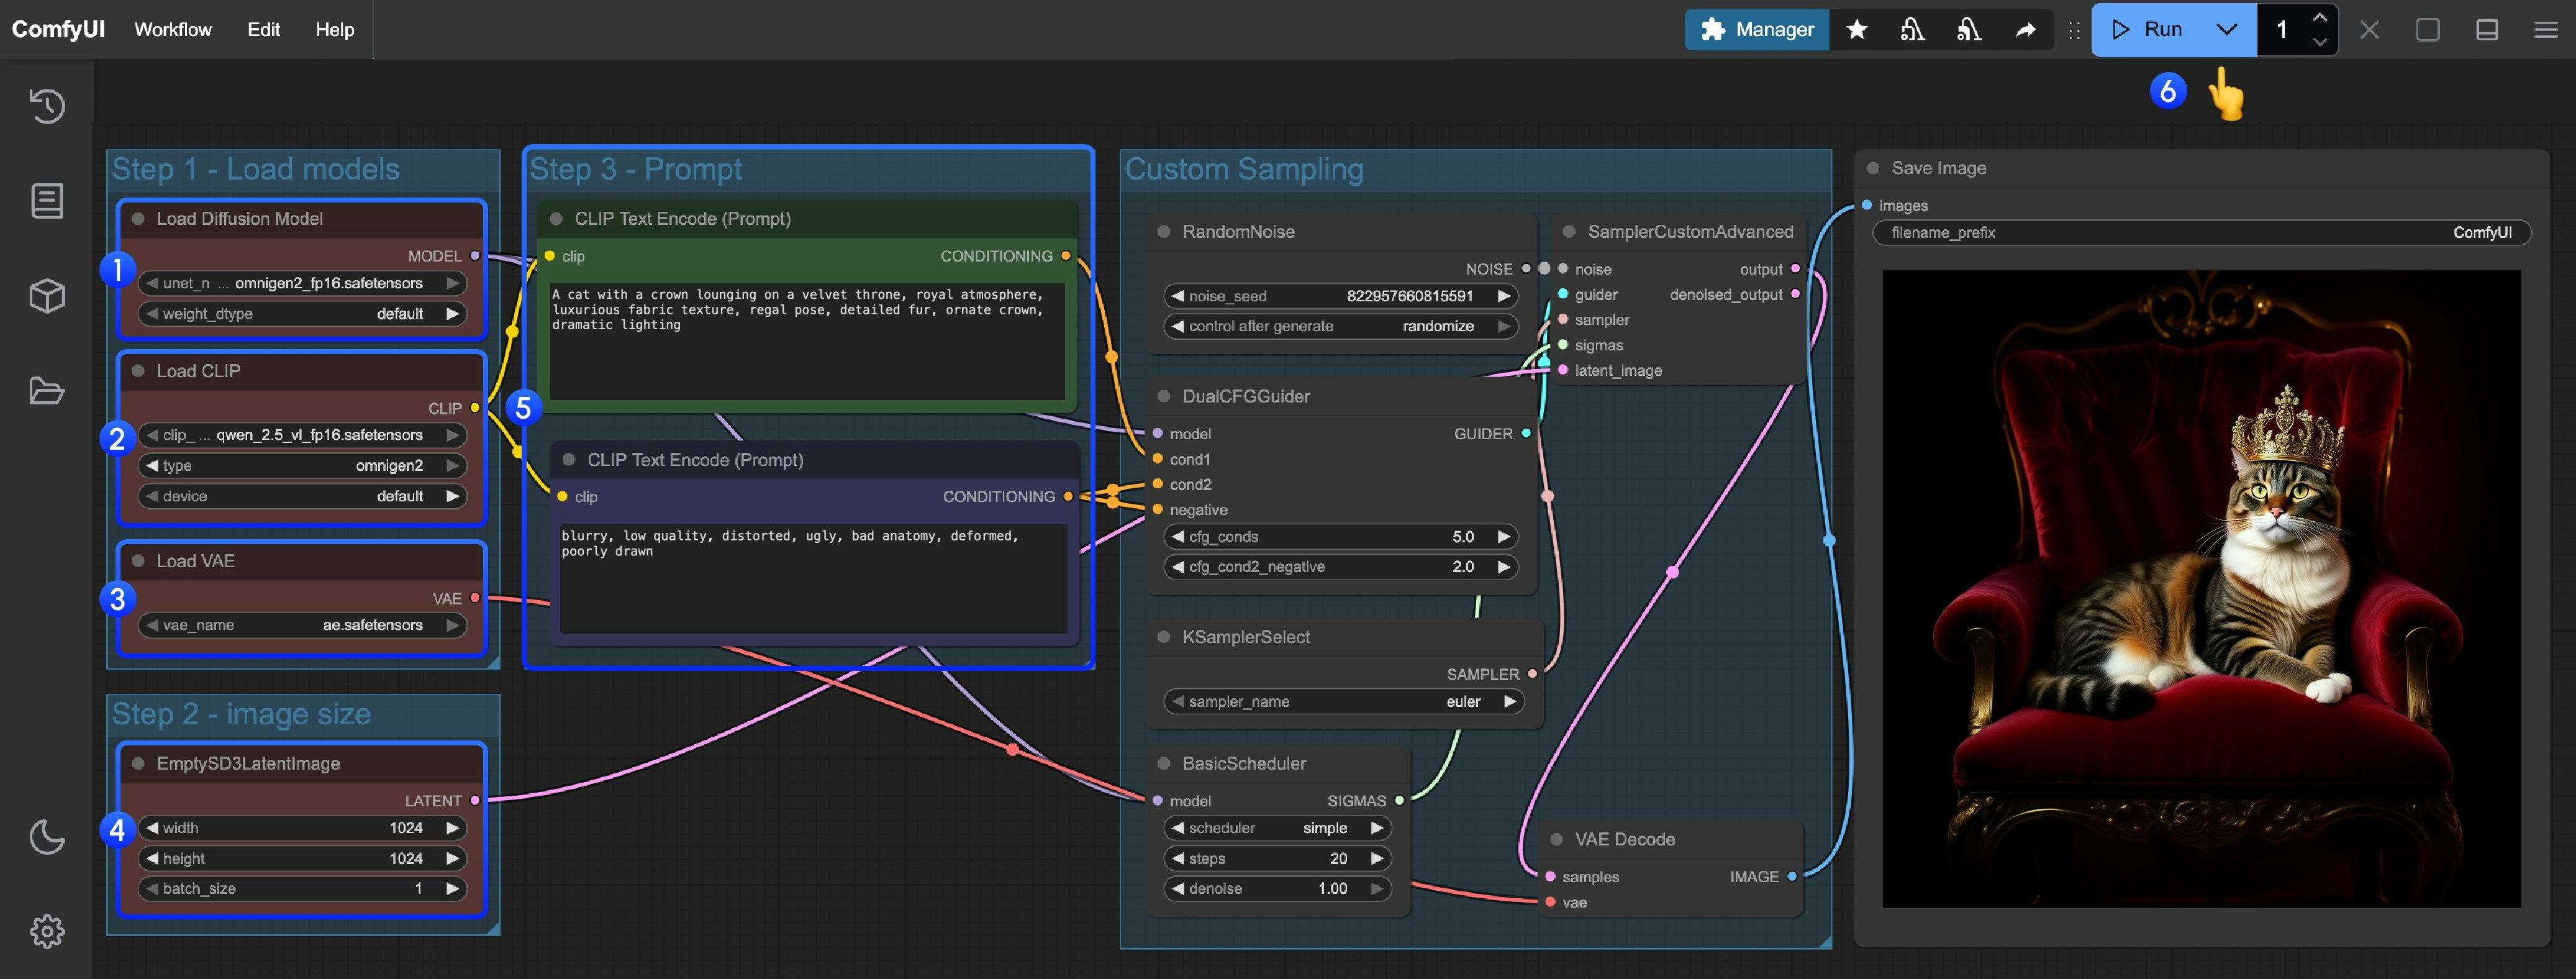 Please follow the numbered steps in the image for step-by-step confirmation to ensure smooth operation of the corresponding workflow:
1. **Load Main Model**: Ensure the `Load Diffusion Model` node loads `omnigen2_fp16.safetensors`
2. **Load Text Encoder**: Ensure the `Load CLIP` node loads `qwen_2.5_vl_fp16.safetensors`
3. **Load VAE**: Ensure the `Load VAE` node loads `ae.safetensors`
4. **Set Image Dimensions**: Set the generated image dimensions in the `EmptySD3LatentImage` node (recommended 1024x1024)
5. **Input Prompts**:
* Input positive prompts in the first `CLipTextEncode` node (content you want to appear in the image)
* Input negative prompts in the second `CLipTextEncode` node (content you don't want to appear in the image)
6. **Start Generation**: Click the `Queue Prompt` button, or use the shortcut `Ctrl(cmd) + Enter` to execute text-to-image generation
7. **View Results**: After generation is complete, the corresponding images will be automatically saved to the `ComfyUI/output/` directory, and you can also preview them in the `SaveImage` node
## ComfyUI OmniGen2 Image Editing Workflow
OmniGen2 has rich image editing capabilities and supports adding text to images
### 1. Download Workflow File
Please follow the numbered steps in the image for step-by-step confirmation to ensure smooth operation of the corresponding workflow:
1. **Load Main Model**: Ensure the `Load Diffusion Model` node loads `omnigen2_fp16.safetensors`
2. **Load Text Encoder**: Ensure the `Load CLIP` node loads `qwen_2.5_vl_fp16.safetensors`
3. **Load VAE**: Ensure the `Load VAE` node loads `ae.safetensors`
4. **Set Image Dimensions**: Set the generated image dimensions in the `EmptySD3LatentImage` node (recommended 1024x1024)
5. **Input Prompts**:
* Input positive prompts in the first `CLipTextEncode` node (content you want to appear in the image)
* Input negative prompts in the second `CLipTextEncode` node (content you don't want to appear in the image)
6. **Start Generation**: Click the `Queue Prompt` button, or use the shortcut `Ctrl(cmd) + Enter` to execute text-to-image generation
7. **View Results**: After generation is complete, the corresponding images will be automatically saved to the `ComfyUI/output/` directory, and you can also preview them in the `SaveImage` node
## ComfyUI OmniGen2 Image Editing Workflow
OmniGen2 has rich image editing capabilities and supports adding text to images
### 1. Download Workflow File
Run on Comfy Cloud

Download the image below, which we will use as the input image.

### 2. Complete Workflow Step by Step
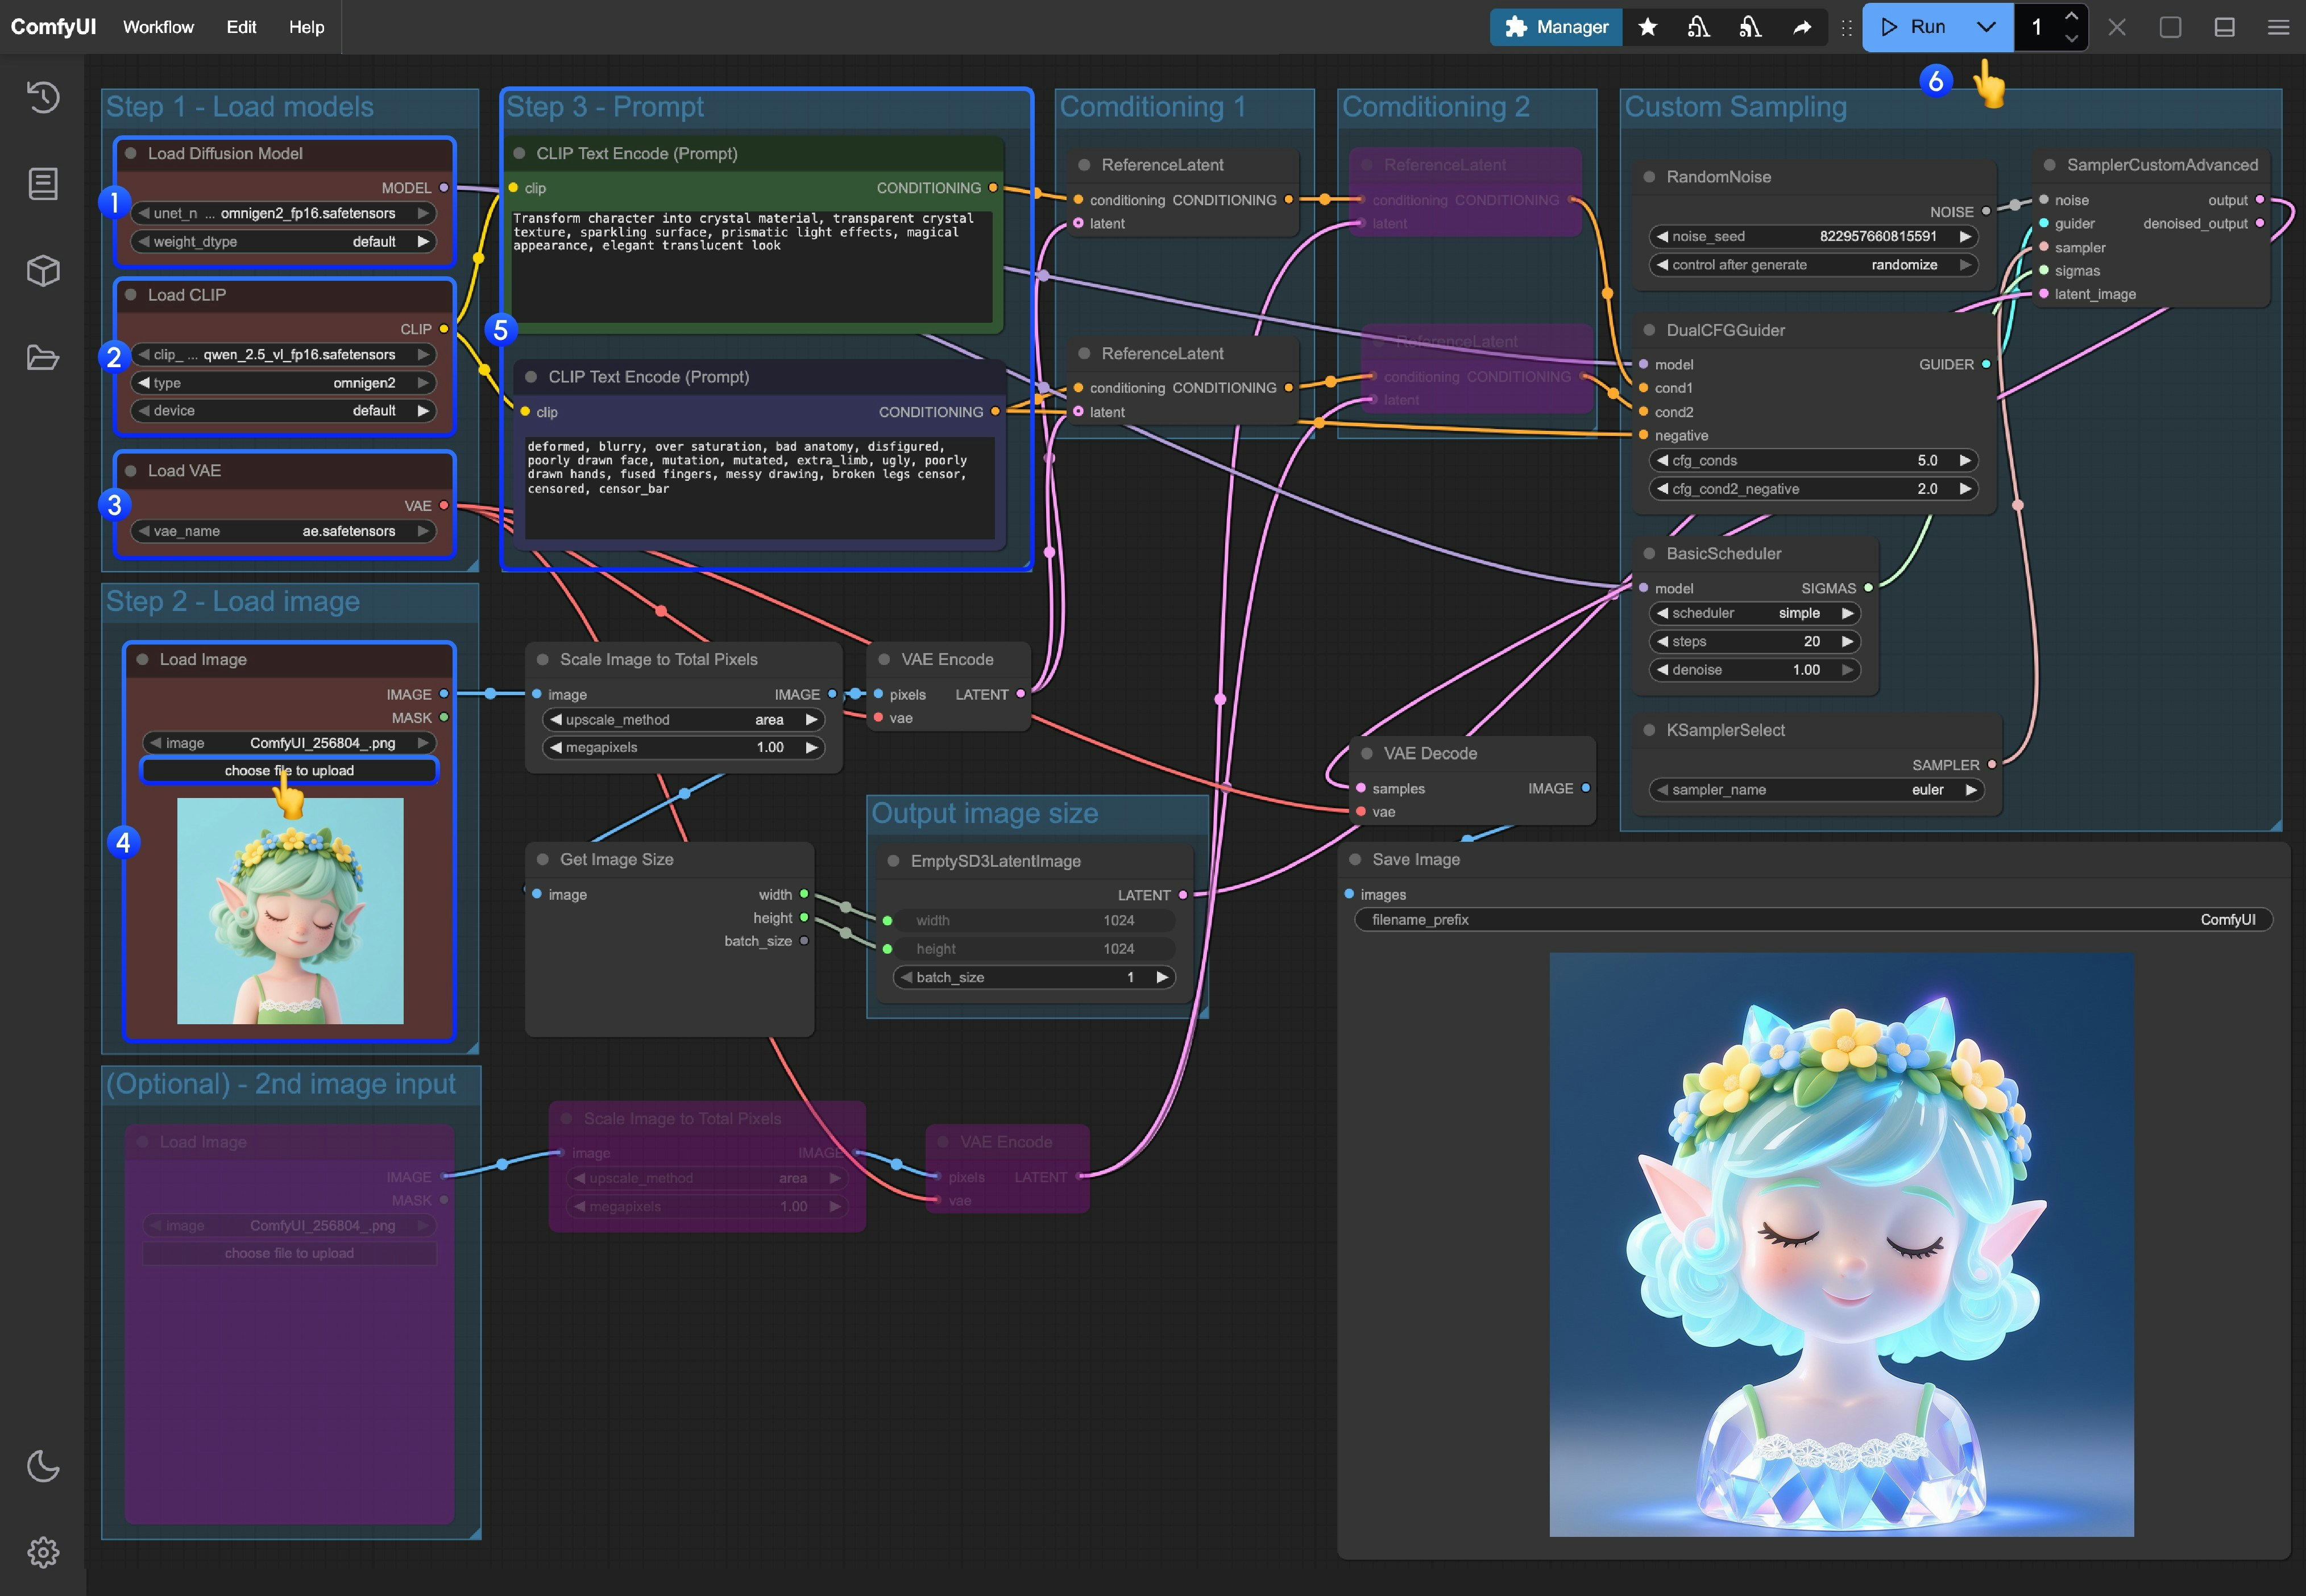 1. **Load Main Model**: Ensure the `Load Diffusion Model` node loads `omnigen2_fp16.safetensors`
2. **Load Text Encoder**: Ensure the `Load CLIP` node loads `qwen_2.5_vl_fp16.safetensors`
3. **Load VAE**: Ensure the `Load VAE` node loads `ae.safetensors`
4. **Upload Image**: Upload the provided image in the `Load Image` node
5. **Input Prompts**:
* Input positive prompts in the first `CLipTextEncode` node (content you want to appear in the image)
* Input negative prompts in the second `CLipTextEncode` node (content you don't want to appear in the image)
6. **Start Generation**: Click the `Queue Prompt` button, or use the shortcut `Ctrl(cmd) + Enter` to execute text-to-image generation
7. **View Results**: After generation is complete, the corresponding images will be automatically saved to the `ComfyUI/output/` directory, and you can also preview them in the `SaveImage` node
### 3. Additional Workflow Instructions
* If you want to enable the second image input, you can use the shortcut **Ctrl + B** to enable the corresponding node inputs for nodes that are in pink/purple state in the workflow
* If you want to customize dimensions, you can delete the `Get image size` node linked to the `EmptySD3LatentImage` node and input custom dimensions
1. **Load Main Model**: Ensure the `Load Diffusion Model` node loads `omnigen2_fp16.safetensors`
2. **Load Text Encoder**: Ensure the `Load CLIP` node loads `qwen_2.5_vl_fp16.safetensors`
3. **Load VAE**: Ensure the `Load VAE` node loads `ae.safetensors`
4. **Upload Image**: Upload the provided image in the `Load Image` node
5. **Input Prompts**:
* Input positive prompts in the first `CLipTextEncode` node (content you want to appear in the image)
* Input negative prompts in the second `CLipTextEncode` node (content you don't want to appear in the image)
6. **Start Generation**: Click the `Queue Prompt` button, or use the shortcut `Ctrl(cmd) + Enter` to execute text-to-image generation
7. **View Results**: After generation is complete, the corresponding images will be automatically saved to the `ComfyUI/output/` directory, and you can also preview them in the `SaveImage` node
### 3. Additional Workflow Instructions
* If you want to enable the second image input, you can use the shortcut **Ctrl + B** to enable the corresponding node inputs for nodes that are in pink/purple state in the workflow
* If you want to customize dimensions, you can delete the `Get image size` node linked to the `EmptySD3LatentImage` node and input custom dimensions