> ## Documentation Index
> Fetch the complete documentation index at: https://docs.comfy.org/llms.txt
> Use this file to discover all available pages before exploring further.
# Qwen-Image-Edit ComfyUI Native Workflow Example
> Qwen-Image-Edit is the image editing version of Qwen-Image, further trained based on the 20B model, supporting precise text editing and dual semantic/appearance editing capabilities.
**Qwen-Image-Edit** is the image editing version of Qwen-Image. It is further trained based on the 20B Qwen-Image model, successfully extending Qwen-Image's unique text rendering capabilities to editing tasks, enabling precise text editing. In addition, Qwen-Image-Edit feeds the input image into both Qwen2.5-VL (for visual semantic control) and the VAE Encoder (for visual appearance control), thus achieving dual semantic and appearance editing capabilities.
**Model Features**
Features include:
* Precise Text Editing: Qwen-Image-Edit supports bilingual (Chinese and English) text editing, allowing direct addition, deletion, and modification of text in images while preserving the original text size, font, and style.
* Dual Semantic/Appearance Editing: Qwen-Image-Edit supports not only low-level visual appearance editing (such as style transfer, addition, deletion, modification, etc.) but also high-level visual semantic editing (such as IP creation, object rotation, etc.).
* Strong Cross-Benchmark Performance: Evaluations on multiple public benchmarks show that Qwen-Image-Edit achieves SOTA in editing tasks, making it a powerful foundational model for image generation.
**Official Links**:
* [GitHub Repository](https://github.com/QwenLM/Qwen-Image)
* [Hugging Face](https://huggingface.co/Qwen/Qwen-Image-Edit)
* [ModelScope](https://modelscope.cn/models/qwen/Qwen-Image-Edit)
## ComfyOrg Qwen-Image-Edit Live Stream
## Qwen-Image-Edit ComfyUI Native Workflow Example
Make sure your ComfyUI is updated.
* [Download ComfyUI](https://www.comfy.org/download)
* [Update Guide](/installation/update_comfyui)
Workflows in this guide can be found in the [Workflow Templates](/interface/features/template).
If you can't find them in the template, your ComfyUI may be outdated. (Desktop version's update will delay sometime)
If nodes are missing when loading a workflow, possible reasons:
1. You are not using the latest ComfyUI version (Nightly version)
2. Some nodes failed to import at startup
* The Desktop is base on ComfyUI stable release, it will auto-update when there is a new Desktop stable release available.
* [Cloud](https://cloud.comfy.org) will update after ComfyUI stable release.
So, if you find any core node missing in this document, it might be because the new core nodes have not yet been released in the latest stable version. Please wait for the next stable release.
### 1. Workflow File
After updating ComfyUI, you can find the workflow file from the templates, or drag the workflow below into ComfyUI to load it.

Download the image below as input

### 2. Model Download
All models can be found at [Comfy-Org/Qwen-Image\_ComfyUI](https://huggingface.co/Comfy-Org/Qwen-Image_ComfyUI/tree/main) or [Comfy-Org/Qwen-Image-Edit\_ComfyUI](https://huggingface.co/Comfy-Org/Qwen-Image-Edit_ComfyUI)
**Diffusion model**
* [qwen\_image\_edit\_fp8\_e4m3fn.safetensors](https://huggingface.co/Comfy-Org/Qwen-Image-Edit_ComfyUI/resolve/main/split_files/diffusion_models/qwen_image_edit_fp8_e4m3fn.safetensors)
**LoRA**
* [Qwen-Image-Lightning-4steps-V1.0.safetensors](https://huggingface.co/lightx2v/Qwen-Image-Lightning/resolve/main/Qwen-Image-Lightning-4steps-V1.0.safetensors)
**Text encoder**
* [qwen\_2.5\_vl\_7b\_fp8\_scaled.safetensors](https://huggingface.co/Comfy-Org/Qwen-Image_ComfyUI/resolve/main/split_files/text_encoders/qwen_2.5_vl_7b_fp8_scaled.safetensors)
**VAE**
* [qwen\_image\_vae.safetensors](https://huggingface.co/Comfy-Org/Qwen-Image_ComfyUI/resolve/main/split_files/vae/qwen_image_vae.safetensors)
Model Storage Location
```
📂 ComfyUI/
├── 📂 models/
│ ├── 📂 diffusion_models/
│ │ └── qwen_image_edit_fp8_e4m3fn.safetensors
│ ├── 📂 loras/
│ │ └── Qwen-Image-Lightning-4steps-V1.0.safetensors
│ ├── 📂 vae/
│ │ └── qwen_image_vae.safetensors
│ └── 📂 text_encoders/
│ └── qwen_2.5_vl_7b_fp8_scaled.safetensors
```
### 3. Follow the Steps to Complete the Workflow
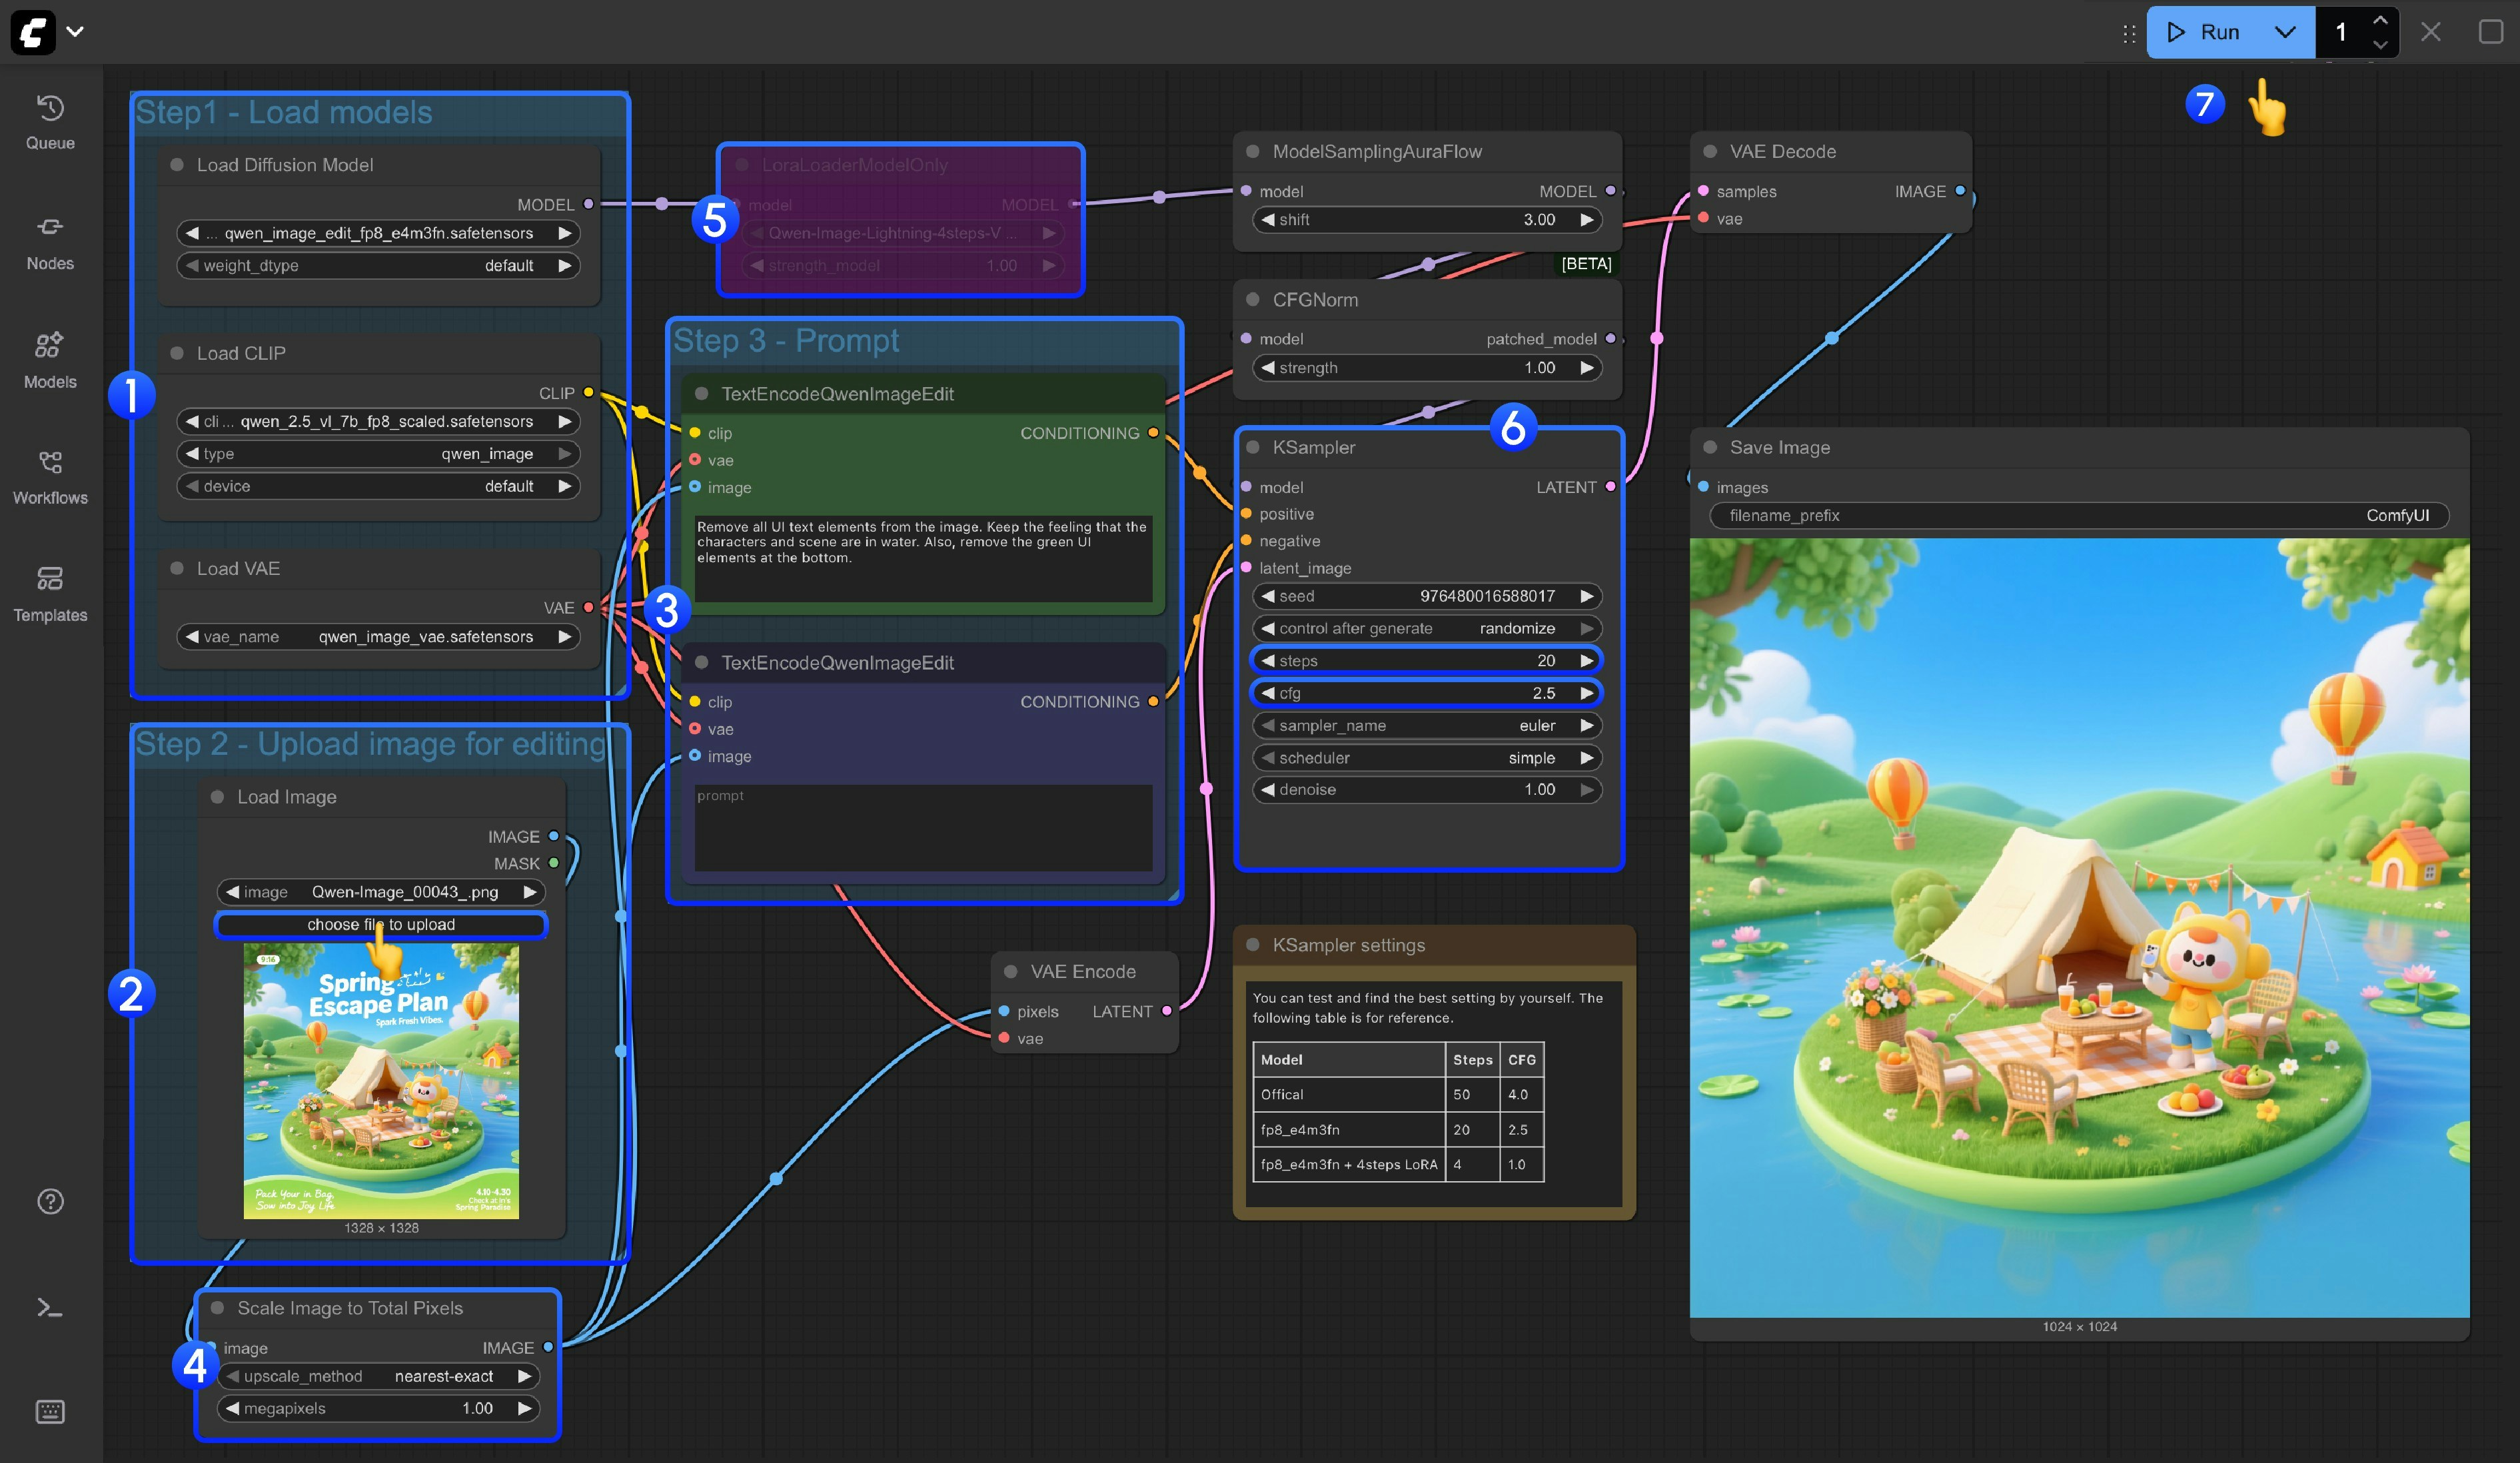
1. Model Loading
* Ensure the `Load Diffusion Model` node loads `qwen_image_edit_fp8_e4m3fn.safetensors`
* Ensure the `Load CLIP` node loads `qwen_2.5_vl_7b_fp8_scaled.safetensors`
* Ensure the `Load VAE` node loads `qwen_image_vae.safetensors`
2. Image Loading
* Ensure the `Load Image` node uploads the image to be edited
3. Prompt Setting
* Set the prompt in the `CLIP Text Encoder` node
4. The Scale Image to Total Pixels node will scale your input image to a total of one million pixels,
* Mainly to avoid quality loss in output images caused by oversized input images such as 2048x2048
* If you are familiar with your input image size, you can bypass this node using `Ctrl+B`
5. If you want to use the 4-step Lighting LoRA to speed up image generation, you can select the `LoraLoaderModelOnly` node and press `Ctrl+B` to enable it
6. For the `steps` and `cfg` settings of the Ksampler node, we've added a note below the node where you can test the optimal parameter settings
7. Click the `Queue` button, or use the shortcut `Ctrl(cmd) + Enter` to run the workflow
 1. Model Loading
* Ensure the `Load Diffusion Model` node loads `qwen_image_edit_fp8_e4m3fn.safetensors`
* Ensure the `Load CLIP` node loads `qwen_2.5_vl_7b_fp8_scaled.safetensors`
* Ensure the `Load VAE` node loads `qwen_image_vae.safetensors`
2. Image Loading
* Ensure the `Load Image` node uploads the image to be edited
3. Prompt Setting
* Set the prompt in the `CLIP Text Encoder` node
4. The Scale Image to Total Pixels node will scale your input image to a total of one million pixels,
* Mainly to avoid quality loss in output images caused by oversized input images such as 2048x2048
* If you are familiar with your input image size, you can bypass this node using `Ctrl+B`
5. If you want to use the 4-step Lighting LoRA to speed up image generation, you can select the `LoraLoaderModelOnly` node and press `Ctrl+B` to enable it
6. For the `steps` and `cfg` settings of the Ksampler node, we've added a note below the node where you can test the optimal parameter settings
7. Click the `Queue` button, or use the shortcut `Ctrl(cmd) + Enter` to run the workflow
1. Model Loading
* Ensure the `Load Diffusion Model` node loads `qwen_image_edit_fp8_e4m3fn.safetensors`
* Ensure the `Load CLIP` node loads `qwen_2.5_vl_7b_fp8_scaled.safetensors`
* Ensure the `Load VAE` node loads `qwen_image_vae.safetensors`
2. Image Loading
* Ensure the `Load Image` node uploads the image to be edited
3. Prompt Setting
* Set the prompt in the `CLIP Text Encoder` node
4. The Scale Image to Total Pixels node will scale your input image to a total of one million pixels,
* Mainly to avoid quality loss in output images caused by oversized input images such as 2048x2048
* If you are familiar with your input image size, you can bypass this node using `Ctrl+B`
5. If you want to use the 4-step Lighting LoRA to speed up image generation, you can select the `LoraLoaderModelOnly` node and press `Ctrl+B` to enable it
6. For the `steps` and `cfg` settings of the Ksampler node, we've added a note below the node where you can test the optimal parameter settings
7. Click the `Queue` button, or use the shortcut `Ctrl(cmd) + Enter` to run the workflow