Download Workflow for Qwen-Image Official Model
Distilled versionDownload Workflow for Distilled Model
### 2. Model Download **Available Models in ComfyUI** * Qwen-Image\_bf16 (40.9 GB) * Qwen-Image\_fp8 (20.4 GB) * Distilled versions (non-official, requires only 15 steps) All models are available at [Huggingface](https://huggingface.co/Comfy-Org/Qwen-Image_ComfyUI/tree/main) and [Modelscope](https://modelscope.cn/models/Comfy-Org/Qwen-Image_ComfyUI/files) **Diffusion model** * [qwen\_image\_fp8\_e4m3fn.safetensors](https://huggingface.co/Comfy-Org/Qwen-Image_ComfyUI/resolve/main/split_files/diffusion_models/qwen_image_fp8_e4m3fn.safetensors) Qwen\_image\_distill * [qwen\_image\_distill\_full\_fp8\_e4m3fn.safetensors](https://huggingface.co/Comfy-Org/Qwen-Image_ComfyUI/resolve/main/non_official/diffusion_models/qwen_image_distill_full_fp8_e4m3fn.safetensors) * [qwen\_image\_distill\_full\_bf16.safetensors](https://huggingface.co/Comfy-Org/Qwen-Image_ComfyUI/resolve/main/non_official/diffusion_models/qwen_image_distill_full_bf16.safetensors)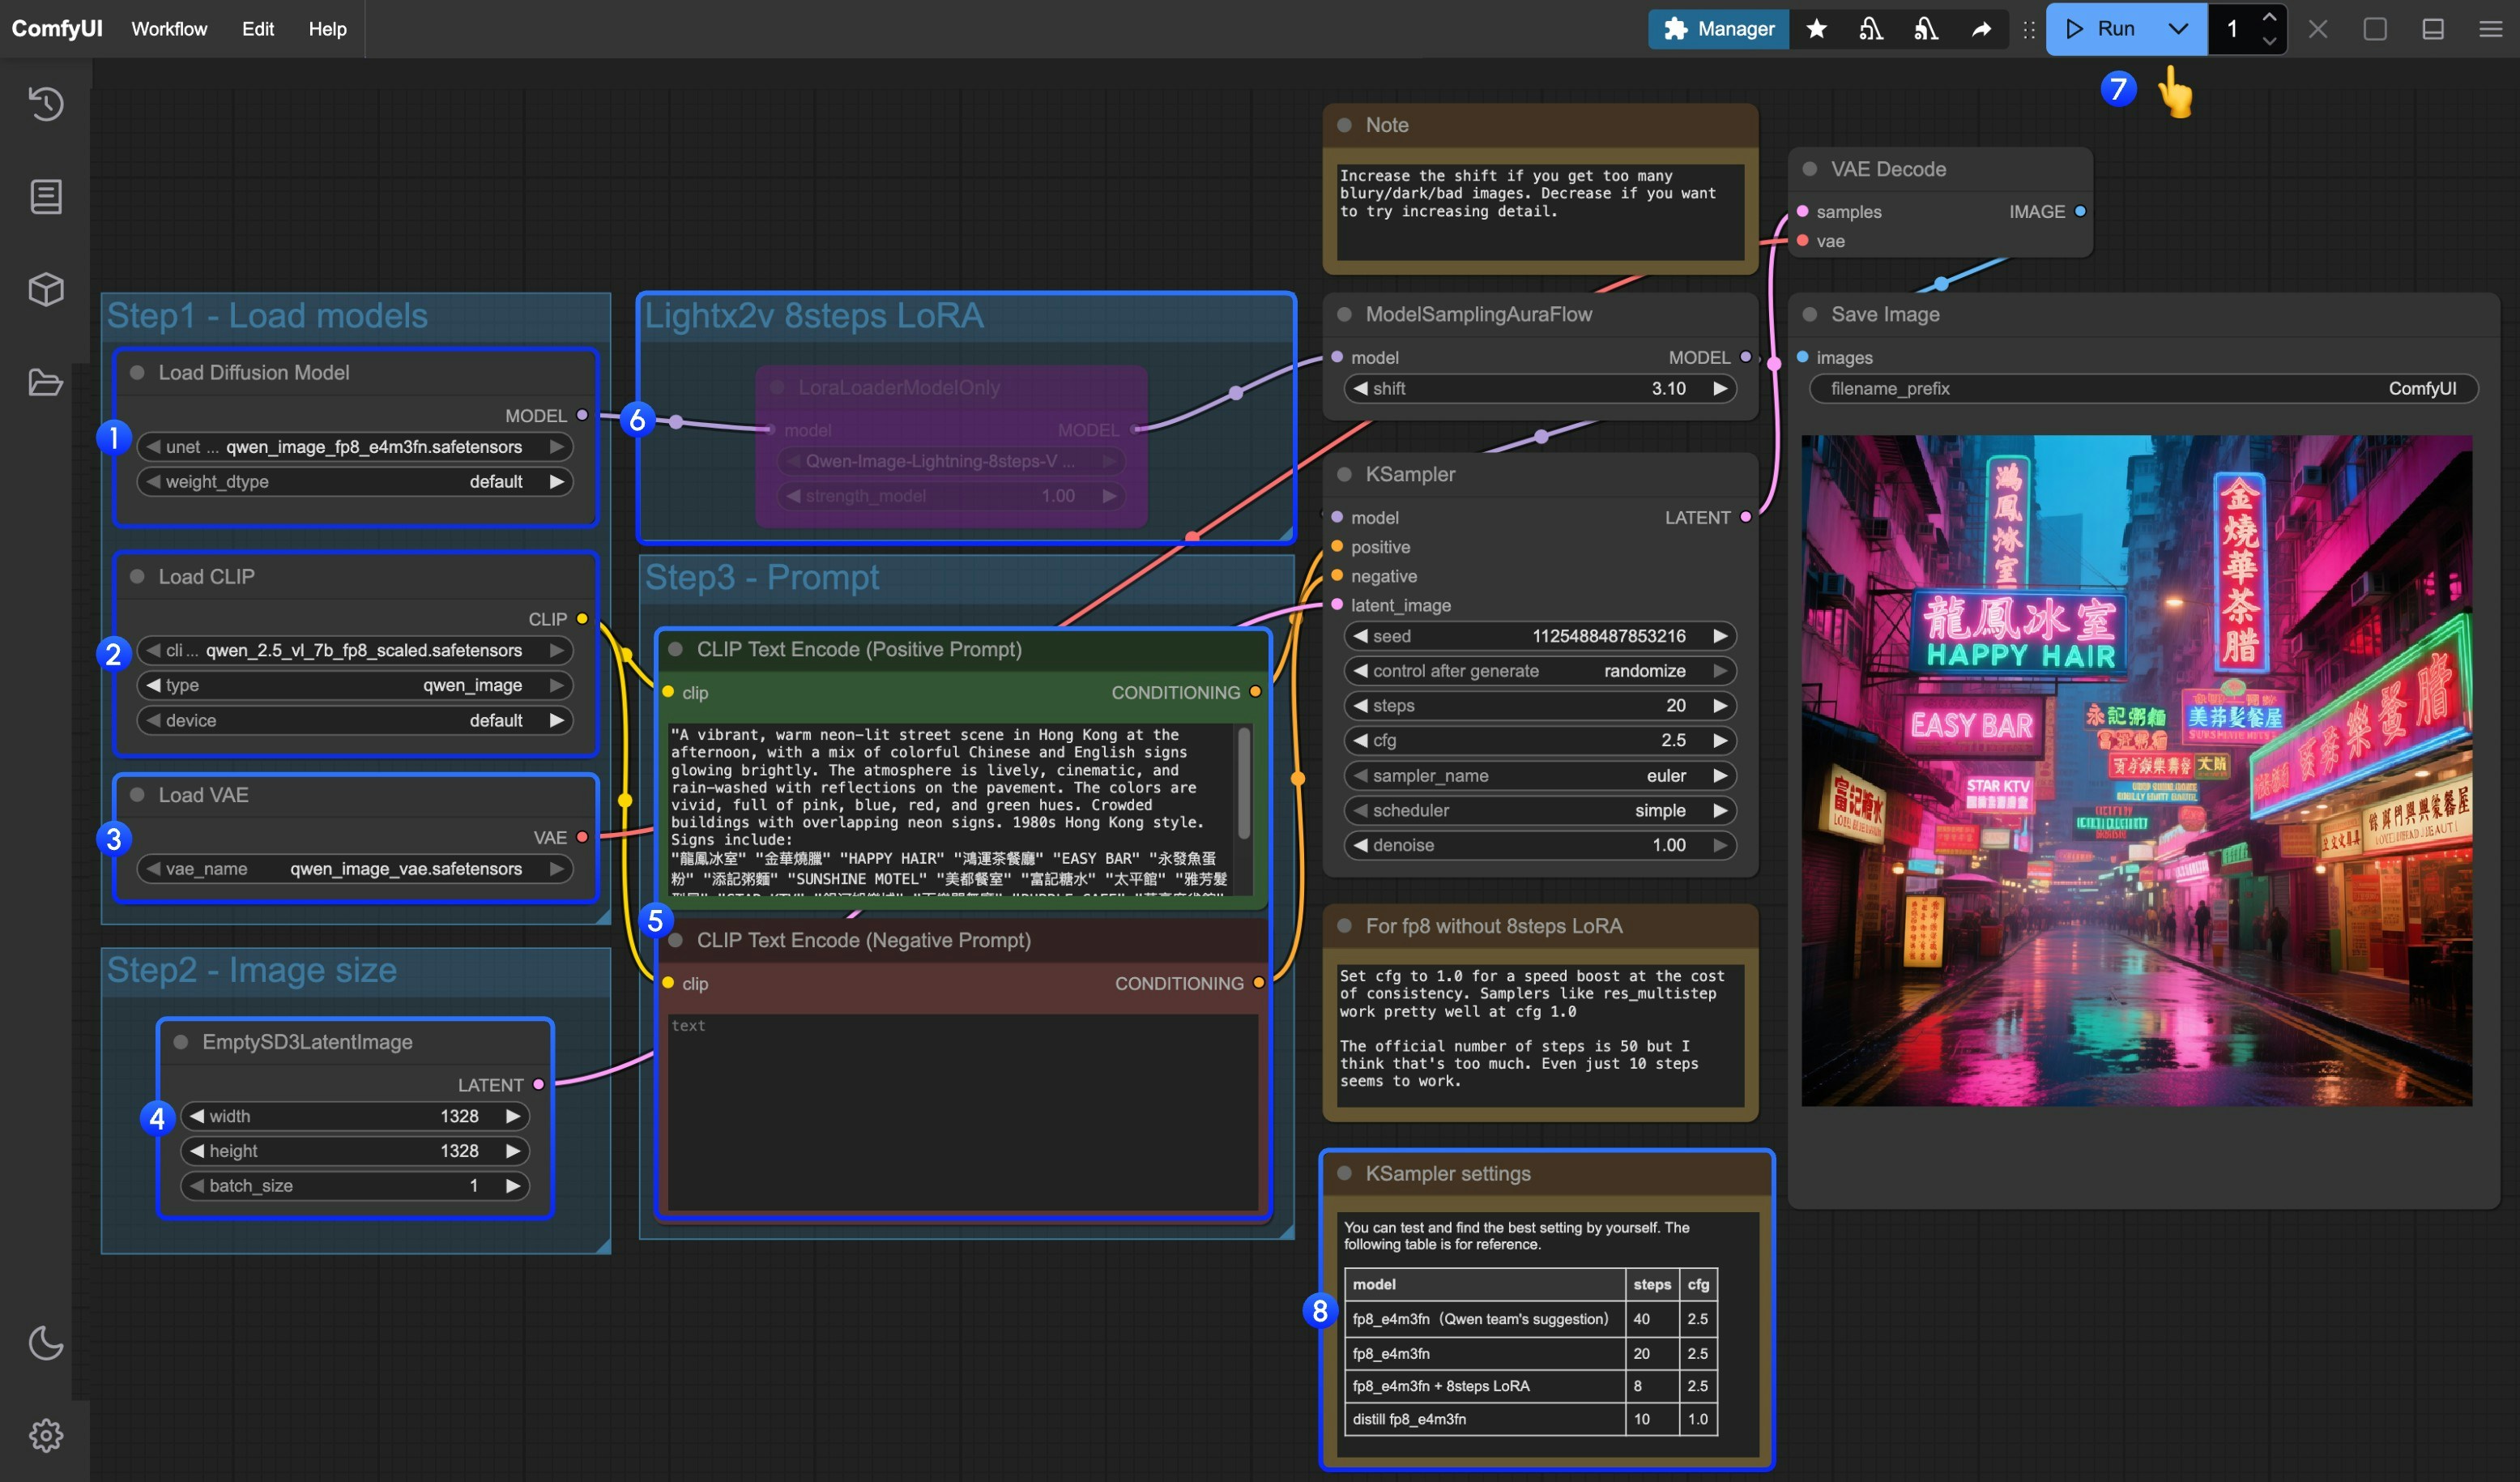 1. Make sure the `Load Diffusion Model` node has loaded `qwen_image_fp8_e4m3fn.safetensors`
2. Make sure the `Load CLIP` node has loaded `qwen_2.5_vl_7b_fp8_scaled.safetensors`
3. Make sure the `Load VAE` node has loaded `qwen_image_vae.safetensors`
4. Make sure the `EmptySD3LatentImage` node is set with the correct image dimensions
5. Set your prompt in the `CLIP Text Encoder` node; currently, it supports at least English, Chinese, Korean, Japanese, Italian, etc.
6. If you want to enable the 8-step acceleration LoRA by lightx2v, select the node and use `Ctrl + B` to enable it, and modify the Ksampler settings as described in step 8
7. Click the `Queue` button, or use the shortcut `Ctrl(cmd) + Enter` to run the workflow
8. For different model versions and workflows, adjust the KSampler parameters accordingly
1. Make sure the `Load Diffusion Model` node has loaded `qwen_image_fp8_e4m3fn.safetensors`
2. Make sure the `Load CLIP` node has loaded `qwen_2.5_vl_7b_fp8_scaled.safetensors`
3. Make sure the `Load VAE` node has loaded `qwen_image_vae.safetensors`
4. Make sure the `EmptySD3LatentImage` node is set with the correct image dimensions
5. Set your prompt in the `CLIP Text Encoder` node; currently, it supports at least English, Chinese, Korean, Japanese, Italian, etc.
6. If you want to enable the 8-step acceleration LoRA by lightx2v, select the node and use `Ctrl + B` to enable it, and modify the Ksampler settings as described in step 8
7. Click the `Queue` button, or use the shortcut `Ctrl(cmd) + Enter` to run the workflow
8. For different model versions and workflows, adjust the KSampler parameters accordingly
Download JSON Format Workflow
Download the image below as input  ### 2. Model Links 1. InstantX Controlnet Download [Qwen-Image-InstantX-ControlNet-Union.safetensors](https://huggingface.co/Comfy-Org/Qwen-Image-InstantX-ControlNets/resolve/main/split_files/controlnet/Qwen-Image-InstantX-ControlNet-Union.safetensors) and save it to the `ComfyUI/models/controlnet/` folder 2. **Lotus Depth model** We will use this model to generate the depth map of the image. The following two models need to be downloaded: **Diffusion Model** * [lotus-depth-d-v1-1.safetensors](https://huggingface.co/Comfy-Org/lotus/resolve/main/lotus-depth-d-v1-1.safetensors) **VAE Model** * [vae-ft-mse-840000-ema-pruned.safetensors](https://huggingface.co/stabilityai/sd-vae-ft-mse-original/resolve/main/vae-ft-mse-840000-ema-pruned.safetensors) or any SD1.5 VAE ``` ComfyUI/ ├── models/ │ ├── diffusion_models/ │ │ └─── lotus-depth-d-v1-1.safetensors │ └── vae/ │ └── lvae-ft-mse-840000-ema-pruned.safetensors ``` > You can also use custom nodes like [comfyui\_controlnet\_aux](https://github.com/Fannovel16/comfyui_controlnet_aux) to generate depth map. ### 3. Workflow Instructions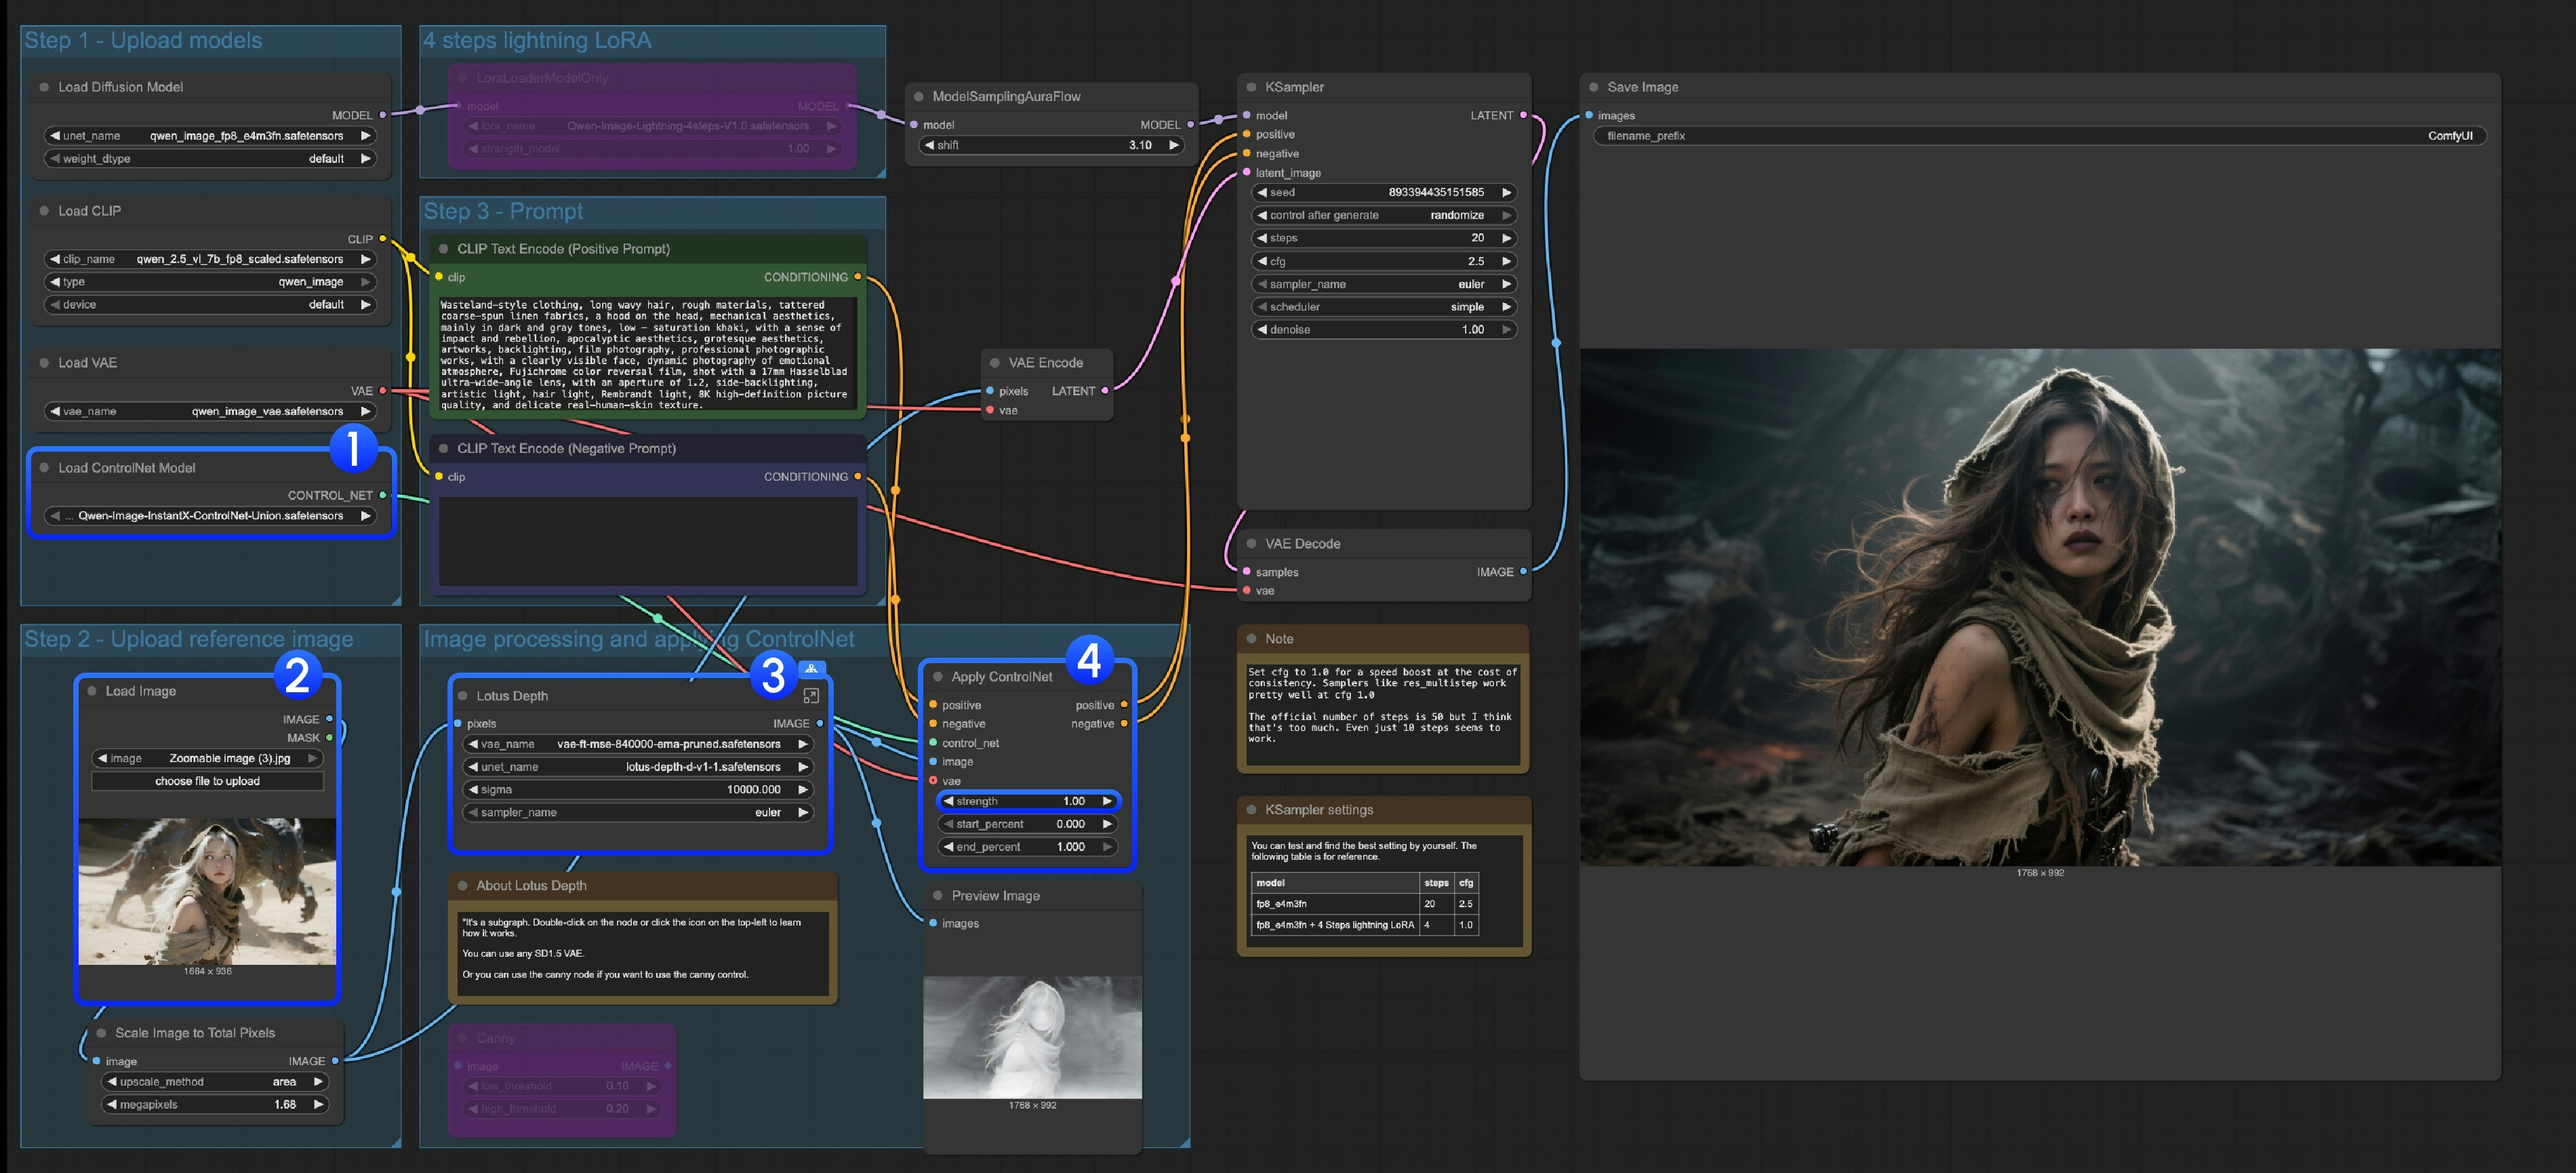 1. Ensure that the `Load ControlNet Model` node correctly loads the `Qwen-Image-InstantX-ControlNet-Union.safetensors` model
2. Upload input image
3. This subgraph uses the Lotus Depth model. You can find it in the templates or edit the subgraph to learn more, make sure all the models are loaded correctly
4. Click the `Run` button, or use the shortcut `Ctrl(cmd) + Enter` to run the workflow
## Qwen Image ControlNet DiffSynth-ControlNets Model Patches Workflow
Run on Comfy Cloud
This model is actually not a ControlNet, but a Model patch that supports three different control modes: canny, depth, and inpaint.
Original model address: [DiffSynth-Studio/Qwen-Image ControlNet](https://www.modelscope.cn/collections/Qwen-Image-ControlNet-6157b44e89d444)
Comfy Org rehost address: [Qwen-Image-DiffSynth-ControlNets/model\_patches](https://huggingface.co/Comfy-Org/Qwen-Image-DiffSynth-ControlNets/tree/main/split_files/model_patches)
### 1. Workflow and Input Images
Download the image below and drag it into ComfyUI to load the corresponding workflow

1. Ensure that the `Load ControlNet Model` node correctly loads the `Qwen-Image-InstantX-ControlNet-Union.safetensors` model
2. Upload input image
3. This subgraph uses the Lotus Depth model. You can find it in the templates or edit the subgraph to learn more, make sure all the models are loaded correctly
4. Click the `Run` button, or use the shortcut `Ctrl(cmd) + Enter` to run the workflow
## Qwen Image ControlNet DiffSynth-ControlNets Model Patches Workflow
Run on Comfy Cloud
This model is actually not a ControlNet, but a Model patch that supports three different control modes: canny, depth, and inpaint.
Original model address: [DiffSynth-Studio/Qwen-Image ControlNet](https://www.modelscope.cn/collections/Qwen-Image-ControlNet-6157b44e89d444)
Comfy Org rehost address: [Qwen-Image-DiffSynth-ControlNets/model\_patches](https://huggingface.co/Comfy-Org/Qwen-Image-DiffSynth-ControlNets/tree/main/split_files/model_patches)
### 1. Workflow and Input Images
Download the image below and drag it into ComfyUI to load the corresponding workflow

Download JSON Format Workflow
Download the image below as input:  ### 2. Model Links Other models are the same as the Qwen-Image basic workflow. You only need to download the models below and save them to the `ComfyUI/models/model_patches` folder * [qwen\_image\_canny\_diffsynth\_controlnet.safetensors](https://huggingface.co/Comfy-Org/Qwen-Image-DiffSynth-ControlNets/resolve/main/split_files/model_patches/qwen_image_canny_diffsynth_controlnet.safetensors) * [qwen\_image\_depth\_diffsynth\_controlnet.safetensors](https://huggingface.co/Comfy-Org/Qwen-Image-DiffSynth-ControlNets/resolve/main/split_files/model_patches/qwen_image_depth_diffsynth_controlnet.safetensors) * [qwen\_image\_inpaint\_diffsynth\_controlnet.safetensors](https://huggingface.co/Comfy-Org/Qwen-Image-DiffSynth-ControlNets/resolve/main/split_files/model_patches/qwen_image_inpaint_diffsynth_controlnet.safetensors) ### 3. Workflow Usage Instructions Currently, diffsynth has three patch models: Canny, Depth, and Inpaint. If you're using ControlNet-related workflows for the first time, you need to understand that control images need to be preprocessed into supported image formats before they can be used and recognized by the model.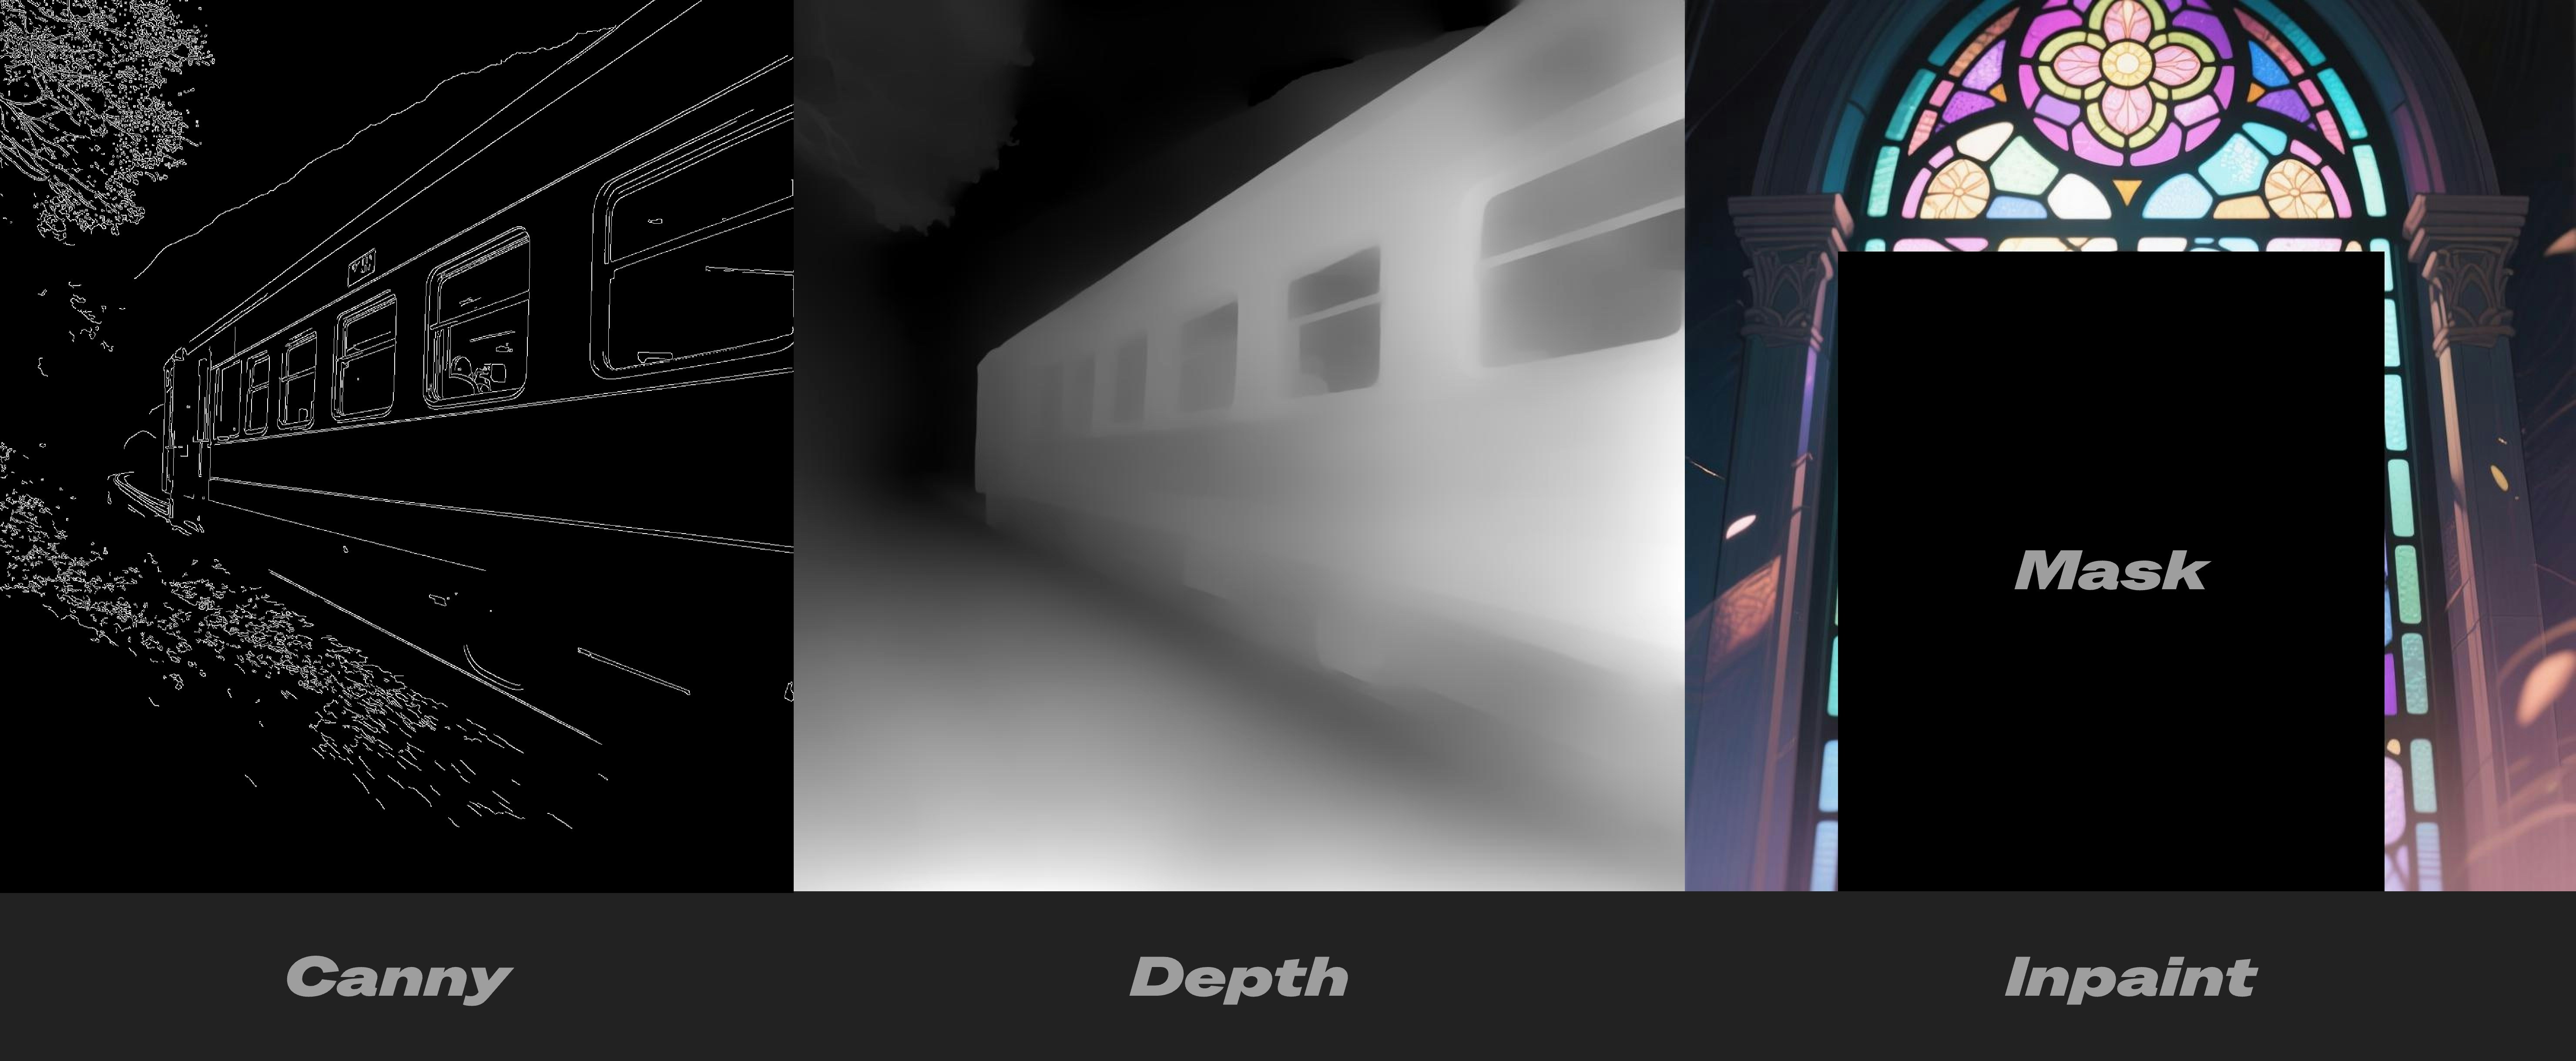 * Canny: Processed canny edge, line art contours
* Depth: Preprocessed depth map showing spatial relationships
* Inpaint: Requires using Mask to mark areas that need to be repainted
Since this patch model is divided into three different models, you need to select the correct preprocessing type when inputting to ensure proper image preprocessing.
**Canny Model ControlNet Usage Instructions**
* Canny: Processed canny edge, line art contours
* Depth: Preprocessed depth map showing spatial relationships
* Inpaint: Requires using Mask to mark areas that need to be repainted
Since this patch model is divided into three different models, you need to select the correct preprocessing type when inputting to ensure proper image preprocessing.
**Canny Model ControlNet Usage Instructions**
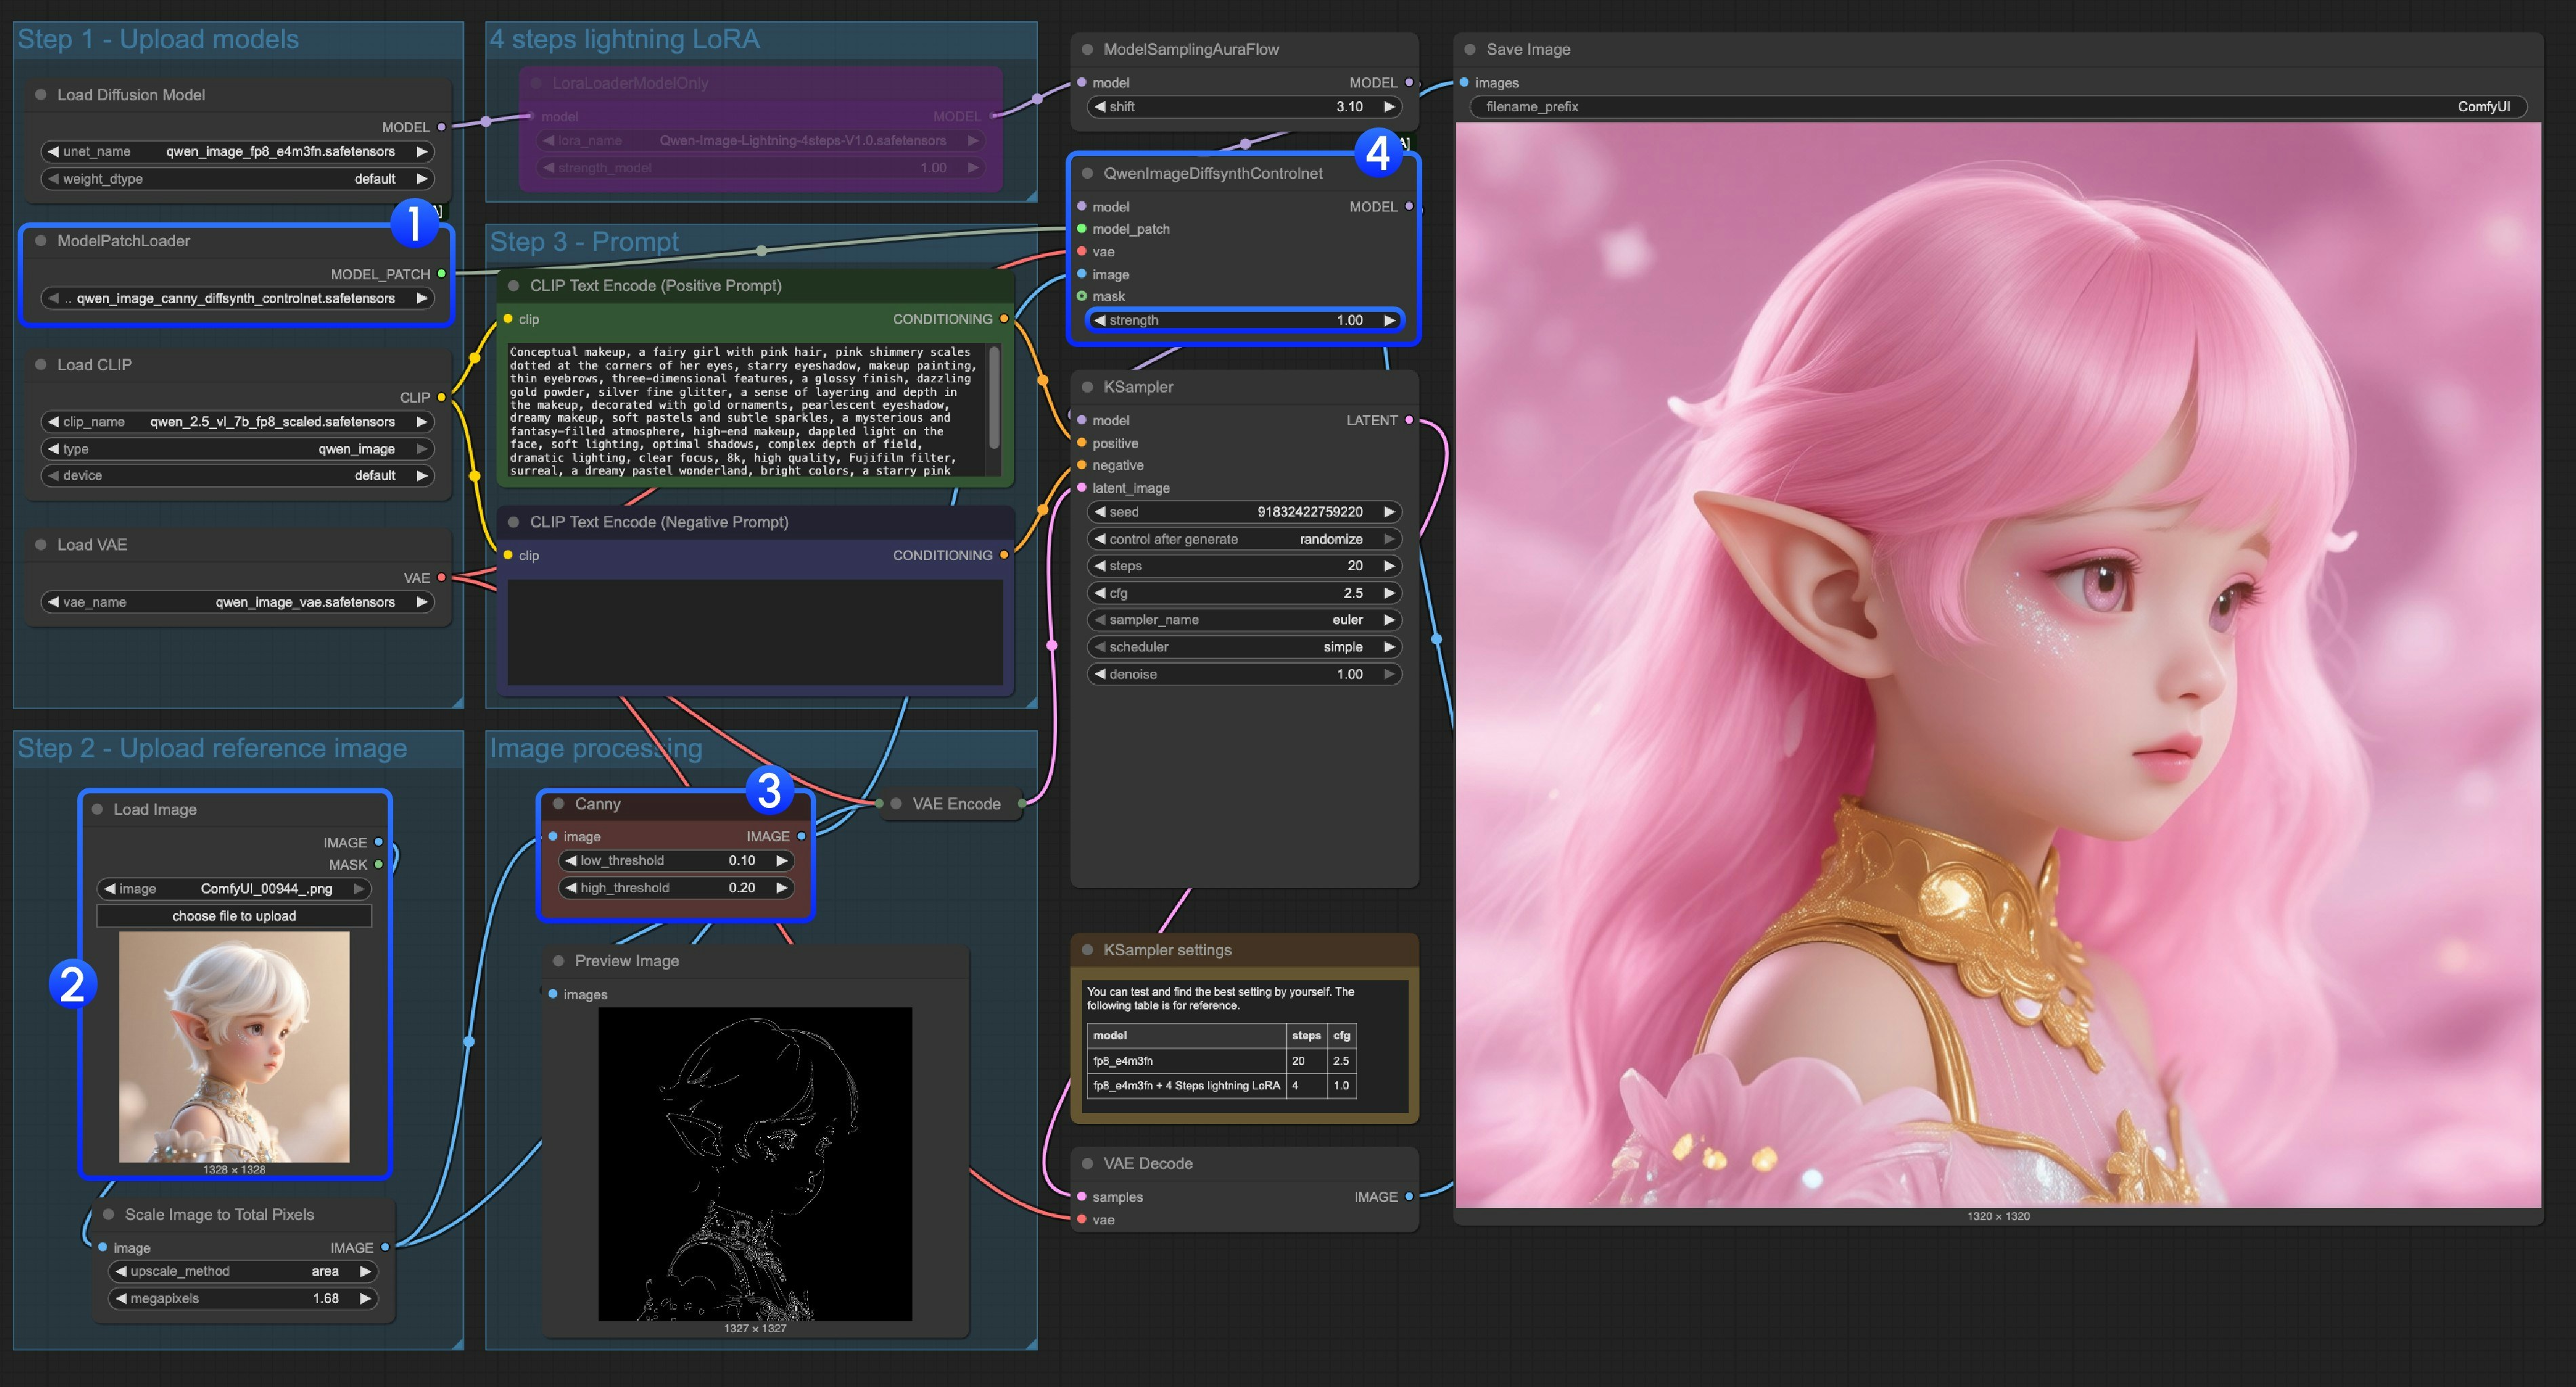 1. Ensure that `qwen_image_canny_diffsynth_controlnet.safetensors` is loaded
2. Upload input image for subsequent processing
3. The Canny node is a native preprocessing node that will preprocess the input image according to your set parameters to control generation
4. If needed, you can modify the `strength` in the `QwenImageDiffsynthControlnet` node to control the intensity of line art control
5. Click the `Run` button, or use the shortcut `Ctrl(cmd) + Enter` to run the workflow
> For using qwen\_image\_depth\_diffsynth\_controlnet.safetensors, you need to preprocess the image into a depth map and replace the `image processing` part. For this usage, please refer to the InstantX processing method in this document. Other parts are similar to using the Canny model.
**Inpaint Model ControlNet Usage Instructions**
1. Ensure that `qwen_image_canny_diffsynth_controlnet.safetensors` is loaded
2. Upload input image for subsequent processing
3. The Canny node is a native preprocessing node that will preprocess the input image according to your set parameters to control generation
4. If needed, you can modify the `strength` in the `QwenImageDiffsynthControlnet` node to control the intensity of line art control
5. Click the `Run` button, or use the shortcut `Ctrl(cmd) + Enter` to run the workflow
> For using qwen\_image\_depth\_diffsynth\_controlnet.safetensors, you need to preprocess the image into a depth map and replace the `image processing` part. For this usage, please refer to the InstantX processing method in this document. Other parts are similar to using the Canny model.
**Inpaint Model ControlNet Usage Instructions**
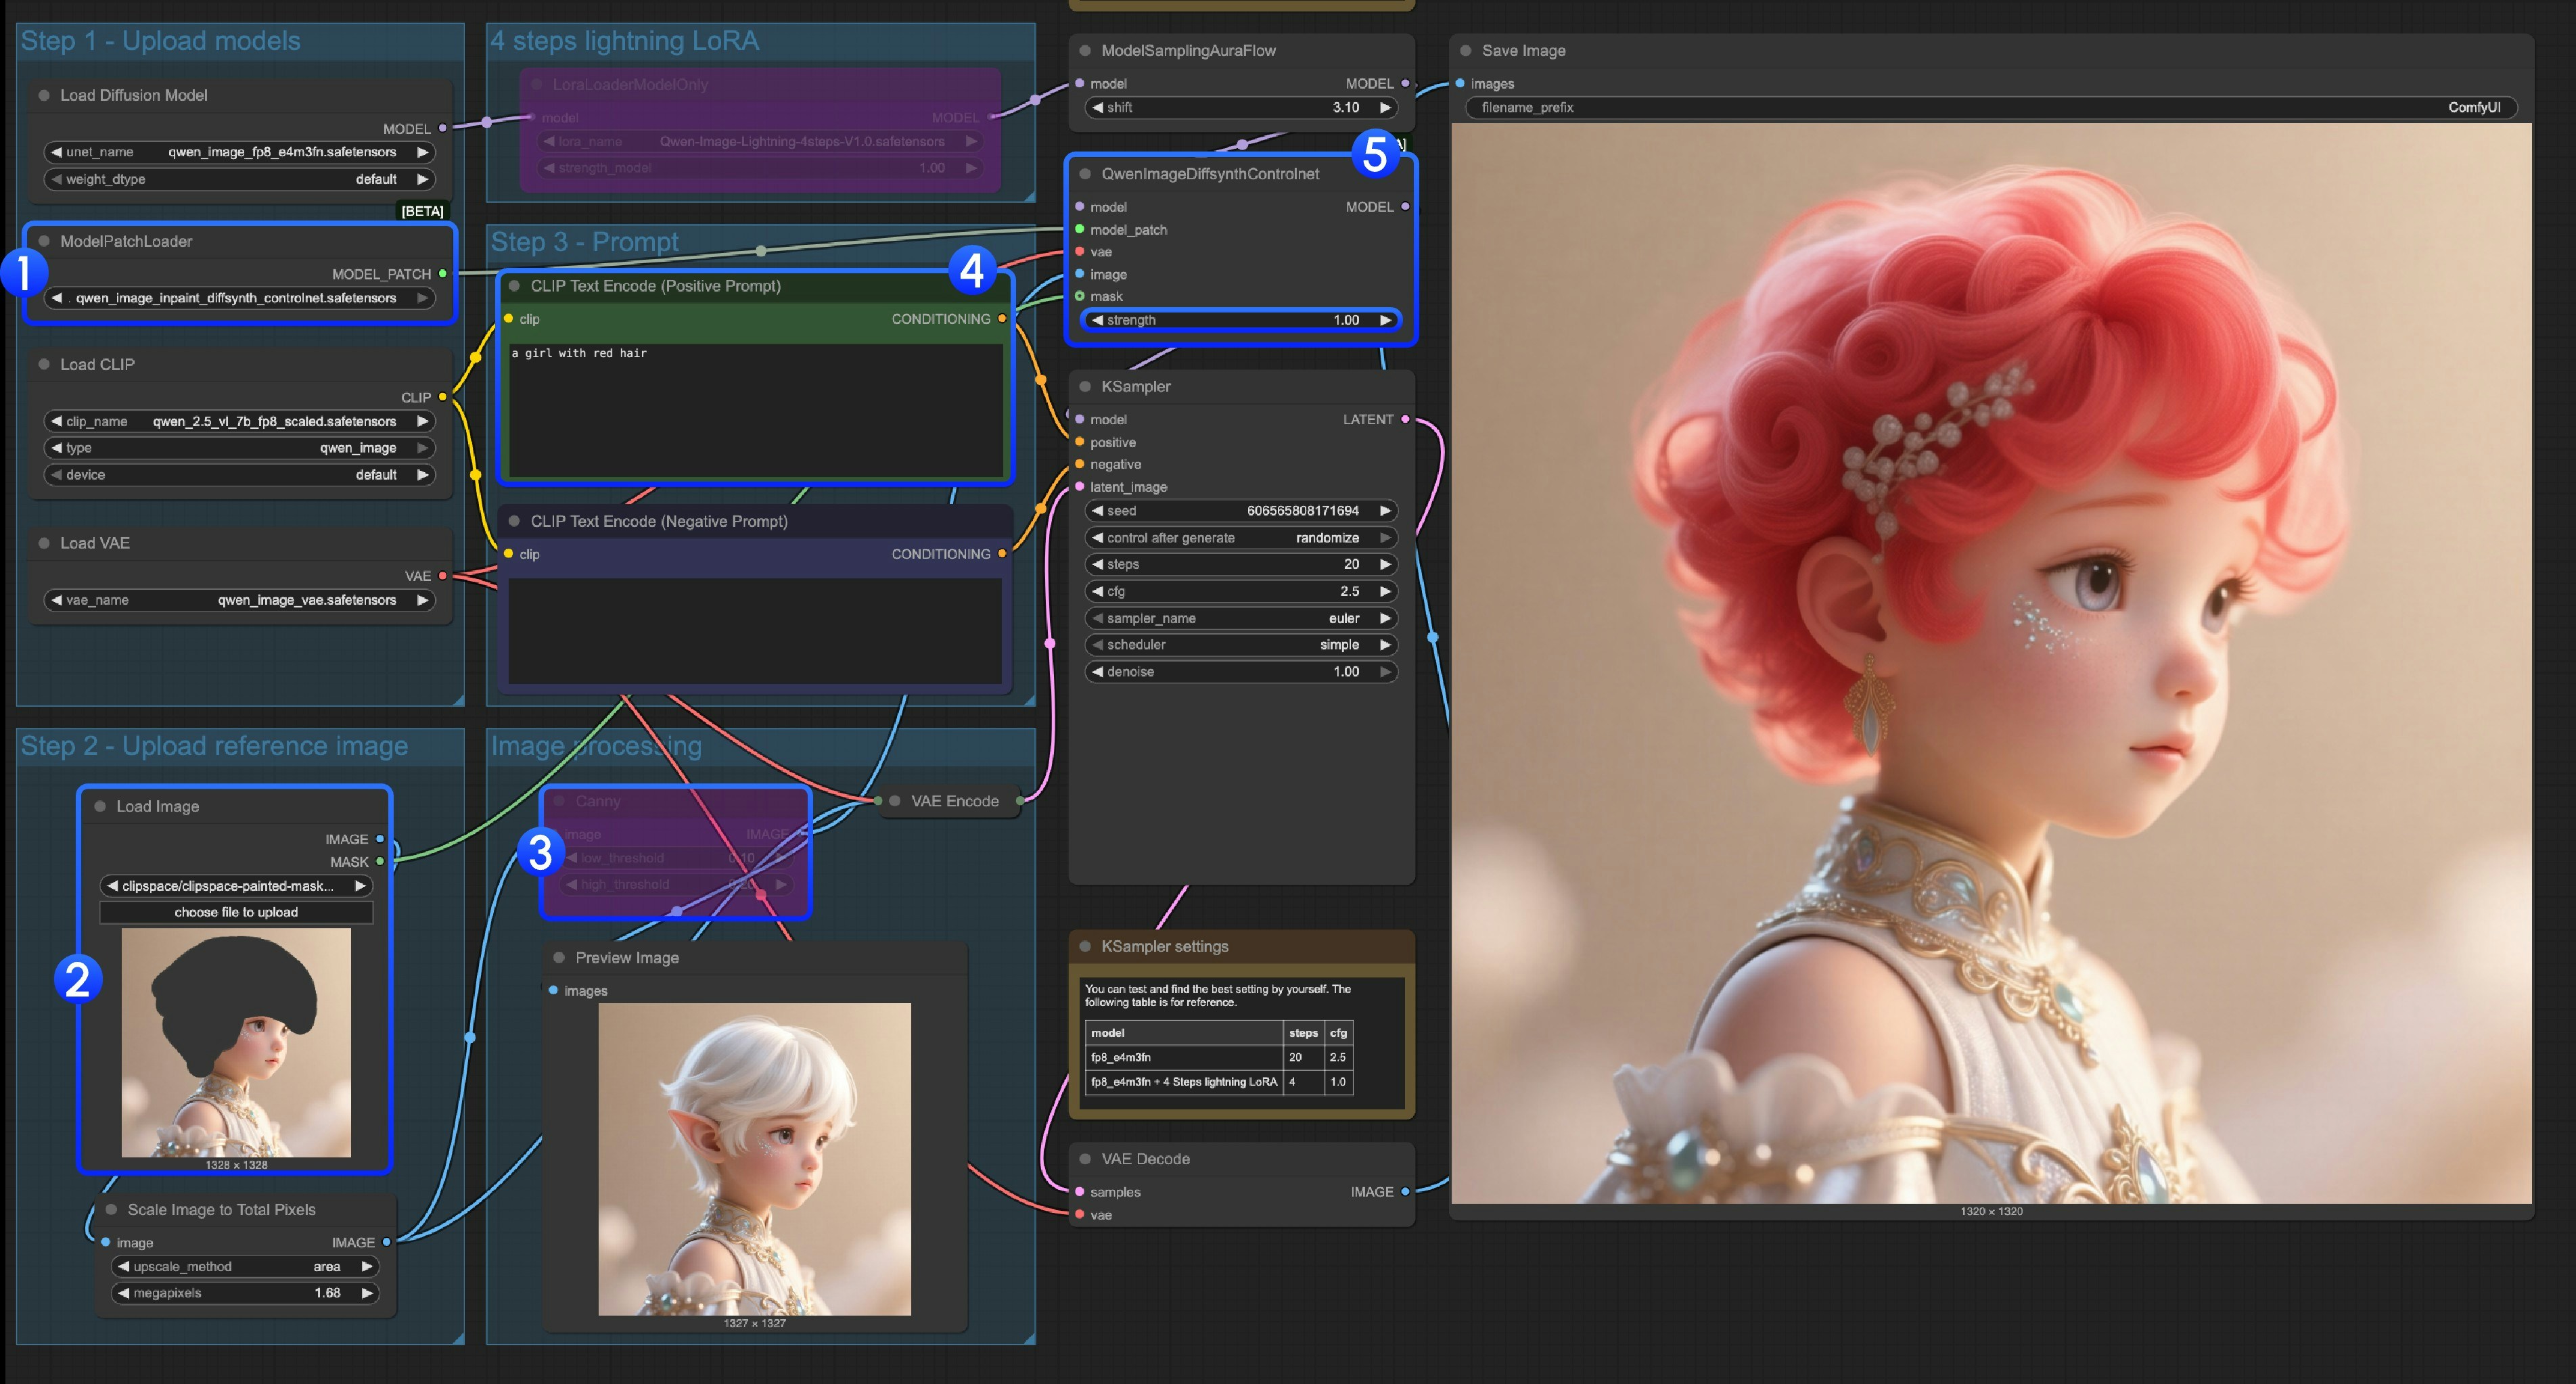 For the Inpaint model, it requires using the [Mask Editor](/interface/maskeditor) to draw a mask and use it as input control condition.
1. Ensure that `ModelPatchLoader` loads the `qwen_image_inpaint_diffsynth_controlnet.safetensors` model
2. Upload image and use the [Mask Editor](/interface/maskeditor) to draw a mask. You need to connect the `mask` output of the corresponding `Load Image` node to the `mask` input of `QwenImageDiffsynthControlnet` to ensure the corresponding mask is loaded
3. Use the `Ctrl-B` shortcut to set the original Canny in the workflow to bypass mode, making the corresponding Canny node processing ineffective
4. In `CLIP Text Encoder`, input what you want to change the masked area to
5. If needed, you can modify the `strength` in the `QwenImageDiffsynthControlnet` node to control the corresponding control intensity
6. Click the `Run` button, or use the shortcut `Ctrl(cmd) + Enter` to run the workflow
## Qwen Image Union ControlNet LoRA Workflow
Run on Comfy Cloud
Original model address: [DiffSynth-Studio/Qwen-Image-In-Context-Control-Union](https://www.modelscope.cn/models/DiffSynth-Studio/Qwen-Image-In-Context-Control-Union/)
Comfy Org rehost address: [qwen\_image\_union\_diffsynth\_lora.safetensors](https://huggingface.co/Comfy-Org/Qwen-Image-DiffSynth-ControlNets/blob/main/split_files/loras/qwen_image_union_diffsynth_lora.safetensors): Image structure control LoRA supporting canny, depth, pose, lineart, softedge, normal, openpose
### 1. Workflow and Input Images
Download the image below and drag it into ComfyUI to load the workflow

For the Inpaint model, it requires using the [Mask Editor](/interface/maskeditor) to draw a mask and use it as input control condition.
1. Ensure that `ModelPatchLoader` loads the `qwen_image_inpaint_diffsynth_controlnet.safetensors` model
2. Upload image and use the [Mask Editor](/interface/maskeditor) to draw a mask. You need to connect the `mask` output of the corresponding `Load Image` node to the `mask` input of `QwenImageDiffsynthControlnet` to ensure the corresponding mask is loaded
3. Use the `Ctrl-B` shortcut to set the original Canny in the workflow to bypass mode, making the corresponding Canny node processing ineffective
4. In `CLIP Text Encoder`, input what you want to change the masked area to
5. If needed, you can modify the `strength` in the `QwenImageDiffsynthControlnet` node to control the corresponding control intensity
6. Click the `Run` button, or use the shortcut `Ctrl(cmd) + Enter` to run the workflow
## Qwen Image Union ControlNet LoRA Workflow
Run on Comfy Cloud
Original model address: [DiffSynth-Studio/Qwen-Image-In-Context-Control-Union](https://www.modelscope.cn/models/DiffSynth-Studio/Qwen-Image-In-Context-Control-Union/)
Comfy Org rehost address: [qwen\_image\_union\_diffsynth\_lora.safetensors](https://huggingface.co/Comfy-Org/Qwen-Image-DiffSynth-ControlNets/blob/main/split_files/loras/qwen_image_union_diffsynth_lora.safetensors): Image structure control LoRA supporting canny, depth, pose, lineart, softedge, normal, openpose
### 1. Workflow and Input Images
Download the image below and drag it into ComfyUI to load the workflow

Download JSON Format Workflow
Download the image below as input  ### 2. Model Links Download the model below. Since this is a LoRA model, it needs to be saved to the `ComfyUI/models/loras/` folder * [qwen\_image\_union\_diffsynth\_lora.safetensors](https://huggingface.co/Comfy-Org/Qwen-Image-DiffSynth-ControlNets/blob/main/split_files/loras/qwen_image_union_diffsynth_lora.safetensors): Image structure control LoRA supporting canny, depth, pose, lineart, softedge, normal, openpose ### 3. Workflow Instructions This model is a unified control LoRA that supports canny, depth, pose, lineart, softedge, normal, openpose controls. Since many image preprocessing native nodes are not fully supported, you should use something like [comfyui\_controlnet\_aux](https://github.com/Fannovel16/comfyui_controlnet_aux) to complete other image preprocessing.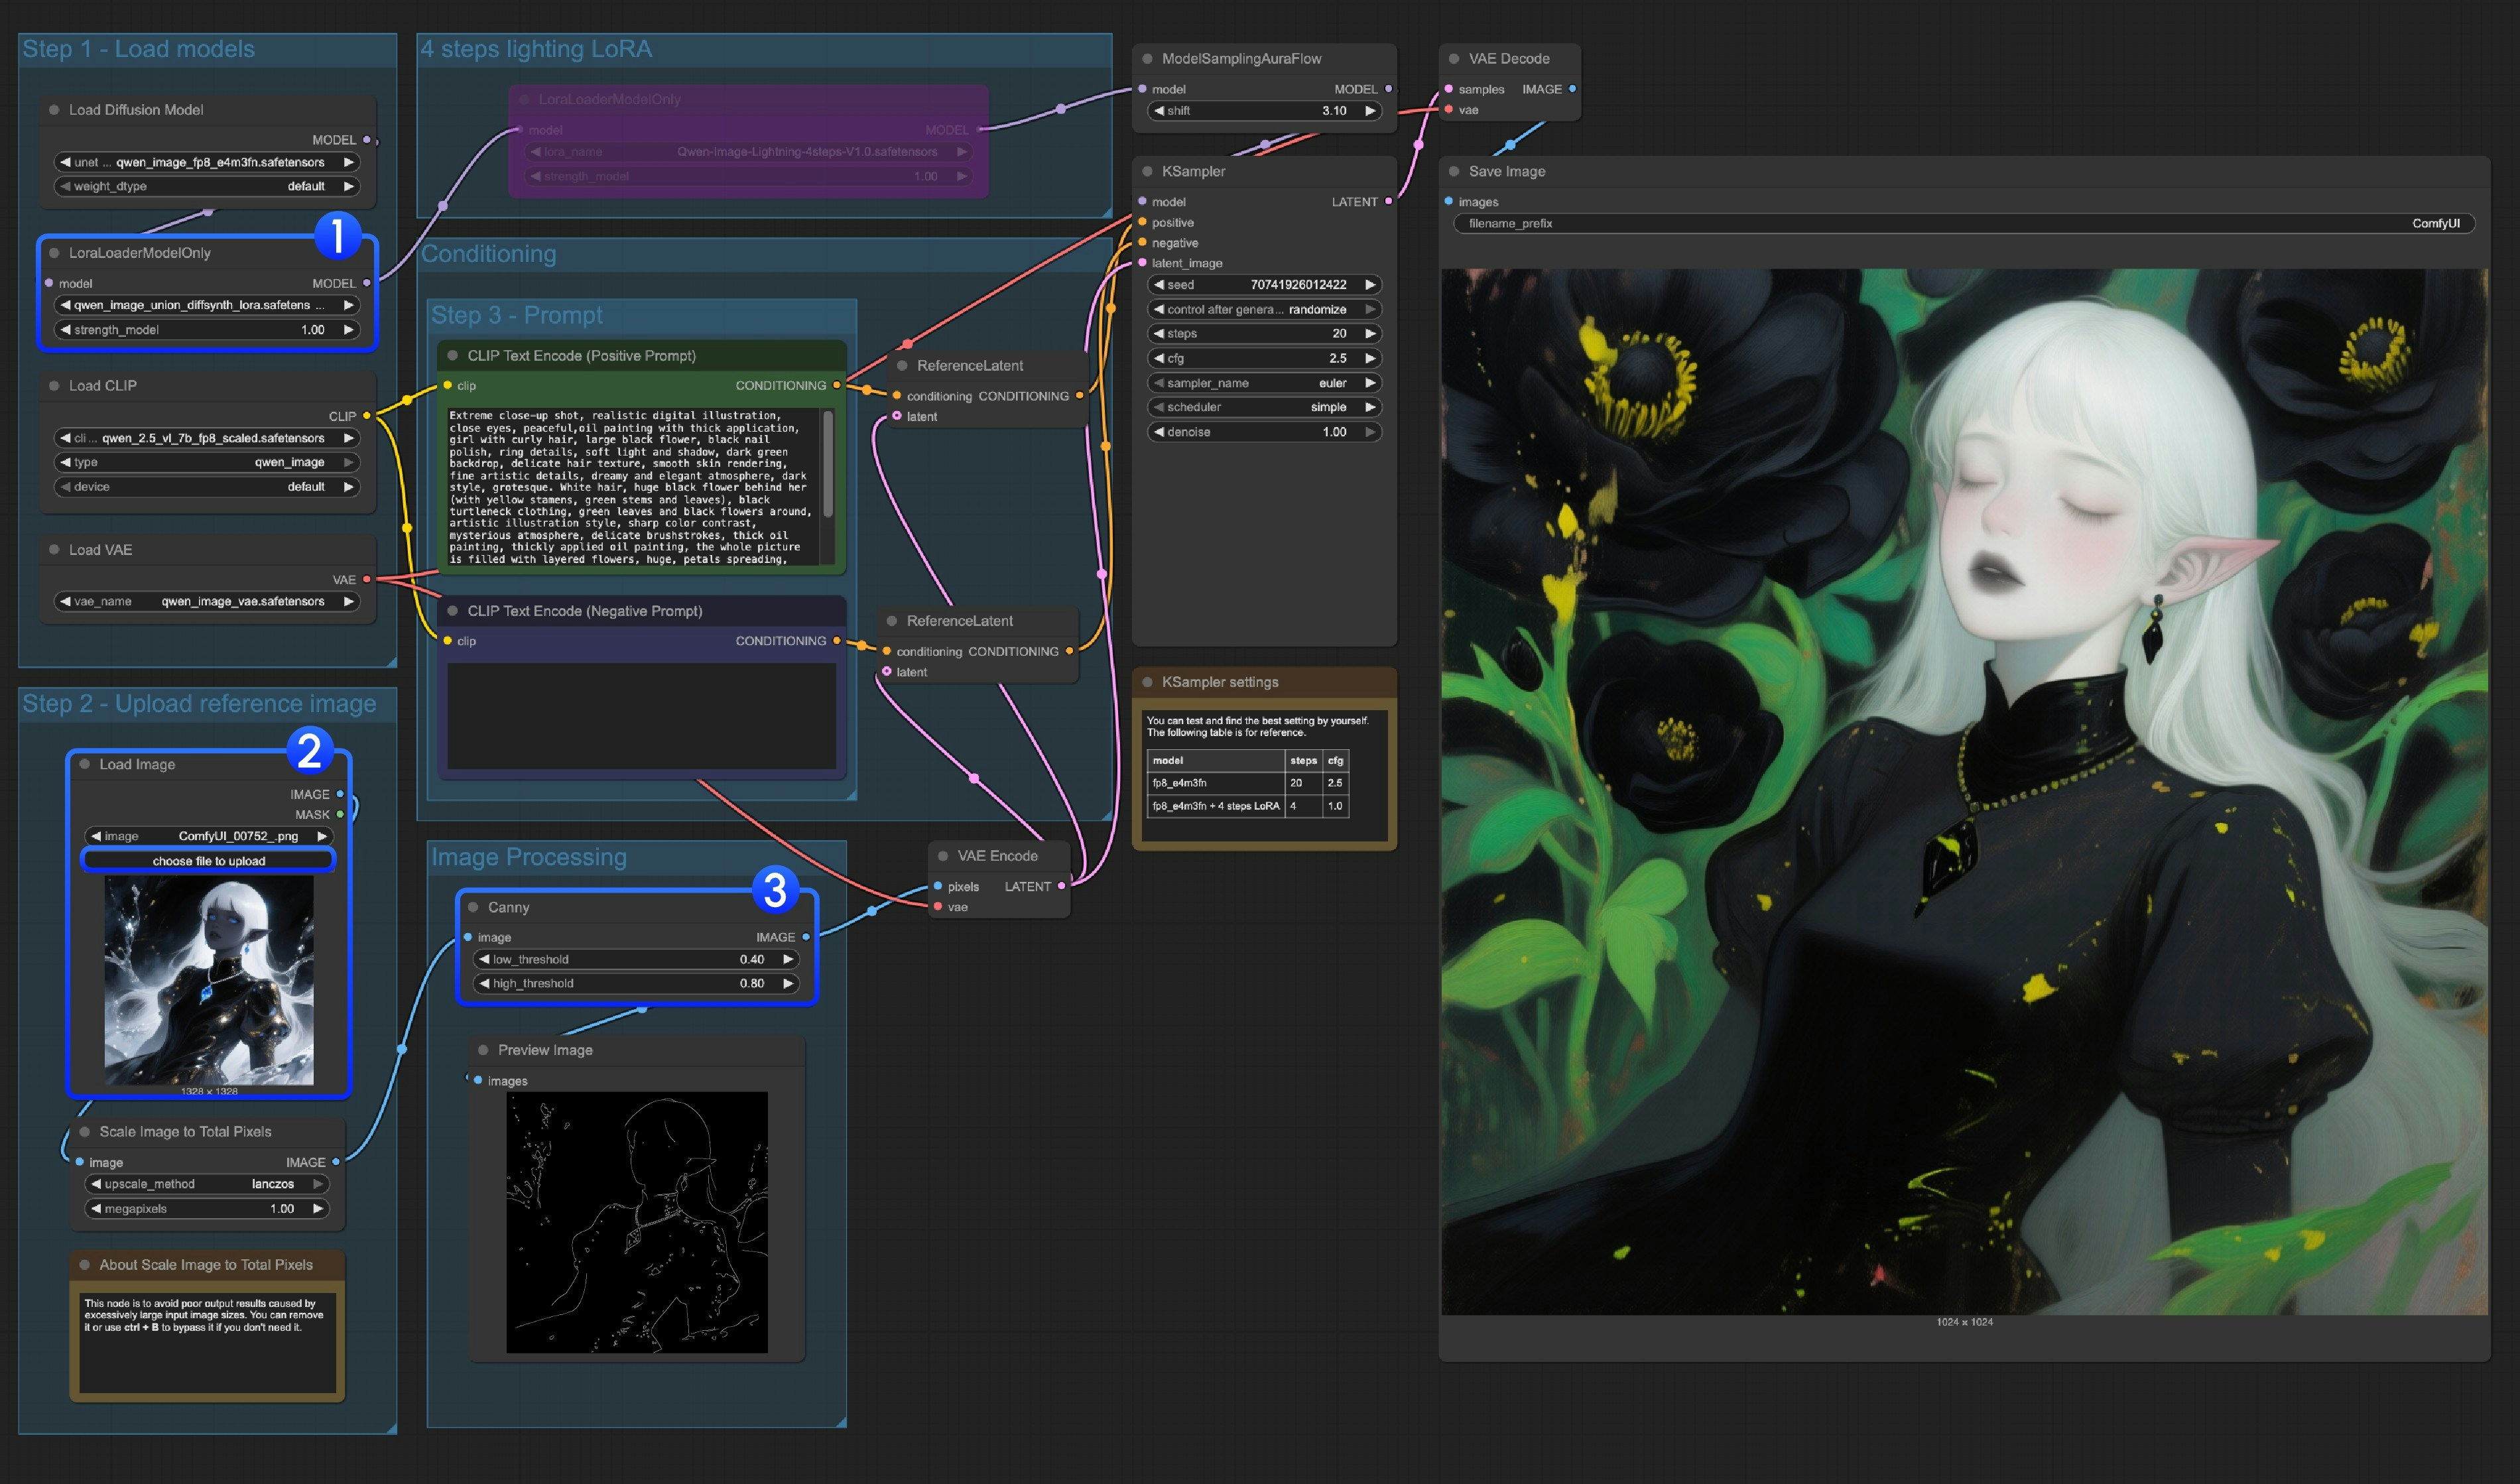 1. Ensure that `LoraLoaderModelOnly` correctly loads the `qwen_image_union_diffsynth_lora.safetensors` model
2. Upload input image
3. If needed, you can adjust the `Canny` node parameters. Since different input images require different parameter settings to get better image preprocessing results, you can try adjusting the corresponding parameter values to get more/fewer details
4. Click the `Run` button, or use the shortcut `Ctrl(cmd) + Enter` to run the workflow
> For other types of control, you also need to replace the image processing part.
1. Ensure that `LoraLoaderModelOnly` correctly loads the `qwen_image_union_diffsynth_lora.safetensors` model
2. Upload input image
3. If needed, you can adjust the `Canny` node parameters. Since different input images require different parameter settings to get better image preprocessing results, you can try adjusting the corresponding parameter values to get more/fewer details
4. Click the `Run` button, or use the shortcut `Ctrl(cmd) + Enter` to run the workflow
> For other types of control, you also need to replace the image processing part.