> ## Documentation Index
> Fetch the complete documentation index at: https://docs.comfy.org/llms.txt
> Use this file to discover all available pages before exploring further.
# ComfyUI Flux.1 Kontext Pro Image API Node Official Example
> This guide will show you how to use the Flux.1 Kontext Pro Image Partner node in ComfyUI to perform image editing
FLUX.1 Kontext is a professional image-to-image editing model developed by Black Forest Labs, focusing on intelligent understanding of image context and precise editing.
It can perform various editing tasks without complex descriptions, including object modification, style transfer, background replacement, character consistency editing, and text editing.
The core advantage of Kontext lies in its excellent context understanding ability and character consistency maintenance, ensuring that key elements such as character features and composition layout remain stable even after multiple iterations of editing.
Currently, ComfyUI has supported two models of Flux.1 Kontext:
* **Kontext Pro** is ideal for editing, composing, and remixing.
* **Kontext Max** pushes the limits on typography, prompt precision, and speed.
In this guide, we will briefly introduce how to use the Flux.1 Kontext Partner nodes to perform image editing through corresponding workflows.
To use the API nodes, you need to ensure that you are logged in properly and using a permitted network environment. Please refer to the [API Nodes Overview](/tutorials/partner-nodes/overview) section of the documentation to understand the specific requirements for using the API nodes.
Make sure your ComfyUI is updated.
* [Download ComfyUI](https://www.comfy.org/download)
* [Update Guide](/installation/update_comfyui)
Workflows in this guide can be found in the [Workflow Templates](/interface/features/template).
If you can't find them in the template, your ComfyUI may be outdated. (Desktop version's update will delay sometime)
If nodes are missing when loading a workflow, possible reasons:
1. You are not using the latest ComfyUI version (Nightly version)
2. Some nodes failed to import at startup
* The Desktop is base on ComfyUI stable release, it will auto-update when there is a new Desktop stable release available.
* [Cloud](https://cloud.comfy.org) will update after ComfyUI stable release.
So, if you find any core node missing in this document, it might be because the new core nodes have not yet been released in the latest stable version. Please wait for the next stable release.
## Flux.1 Kontext Multiple Image Input Workflow
We have recently updated to support multiple image input workflows. Using the new `Image Stitch` node, you can stitch multiple images into a single image and edit it using Flux.1 Kontext.
### 1. Workflow File Download
The `metadata` of the images below contains the workflow information. Please download and drag them into ComfyUI to load the corresponding workflow.

Download the following images for input or use your own images:



### 2. Complete the Workflow Step by Step
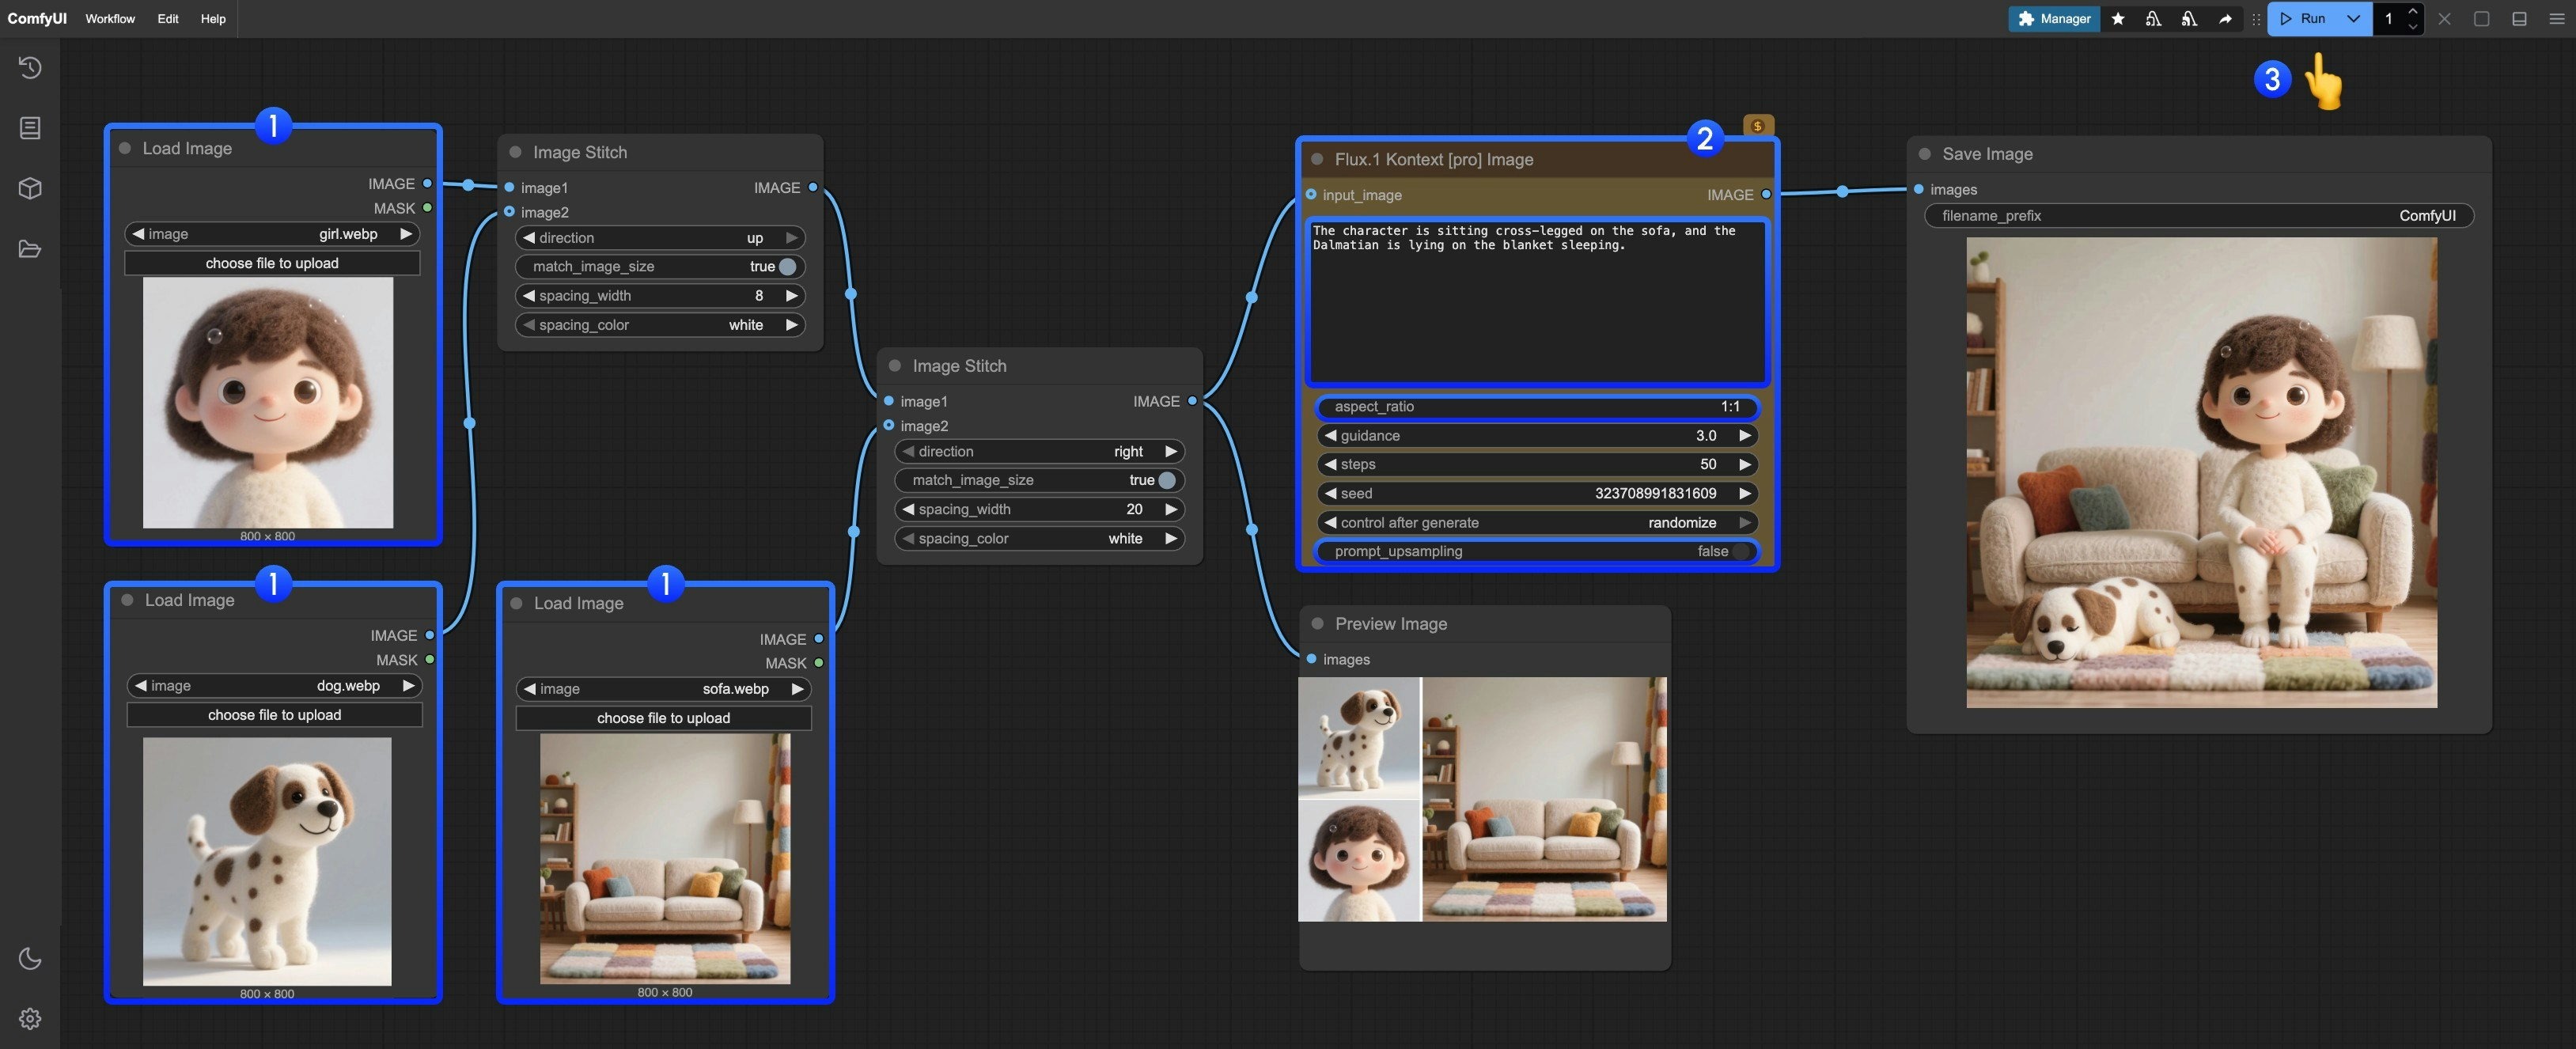 You can follow the numbered steps in the image to complete the workflow:
1. Upload the provided images in the `Load image` node
2. Modify the necessary parameters in `Flux.1 Kontext Pro Image`:
* `prompt` Enter the prompt for the image you want to edit
* `aspect_ratio` Set the aspect ratio of the original image, which must be between 1:4 and 4:1
* `prompt_upsampling` Set whether to use prompt upsampling. If enabled, it will automatically modify the prompt to get richer results, but the results are not reproducible
3. Click the `Run` button or use the shortcut `Ctrl(cmd) + Enter` to execute the image editing
4. After waiting for the API to return results, you can view the edited image in the `Save Image` node, and the corresponding image will also be saved to the `ComfyUI/output/` directory
The subsequent two workflows only differ in the Partner nodes used. In fact, you only need to modify based on the multiple image input workflow, with no significant differences
## Flux.1 Kontext Pro Image API Node Workflow
### 1. Workflow File Download
The `metadata` of the image below contains the workflow information. Please download and drag it into ComfyUI to load the corresponding workflow.

Download the image below for input or use your own image:

### 2. Complete the Workflow Step by Step
You can follow the numbered steps in the image to complete the workflow:
1. Upload the provided images in the `Load image` node
2. Modify the necessary parameters in `Flux.1 Kontext Pro Image`:
* `prompt` Enter the prompt for the image you want to edit
* `aspect_ratio` Set the aspect ratio of the original image, which must be between 1:4 and 4:1
* `prompt_upsampling` Set whether to use prompt upsampling. If enabled, it will automatically modify the prompt to get richer results, but the results are not reproducible
3. Click the `Run` button or use the shortcut `Ctrl(cmd) + Enter` to execute the image editing
4. After waiting for the API to return results, you can view the edited image in the `Save Image` node, and the corresponding image will also be saved to the `ComfyUI/output/` directory
The subsequent two workflows only differ in the Partner nodes used. In fact, you only need to modify based on the multiple image input workflow, with no significant differences
## Flux.1 Kontext Pro Image API Node Workflow
### 1. Workflow File Download
The `metadata` of the image below contains the workflow information. Please download and drag it into ComfyUI to load the corresponding workflow.

Download the image below for input or use your own image:

### 2. Complete the Workflow Step by Step
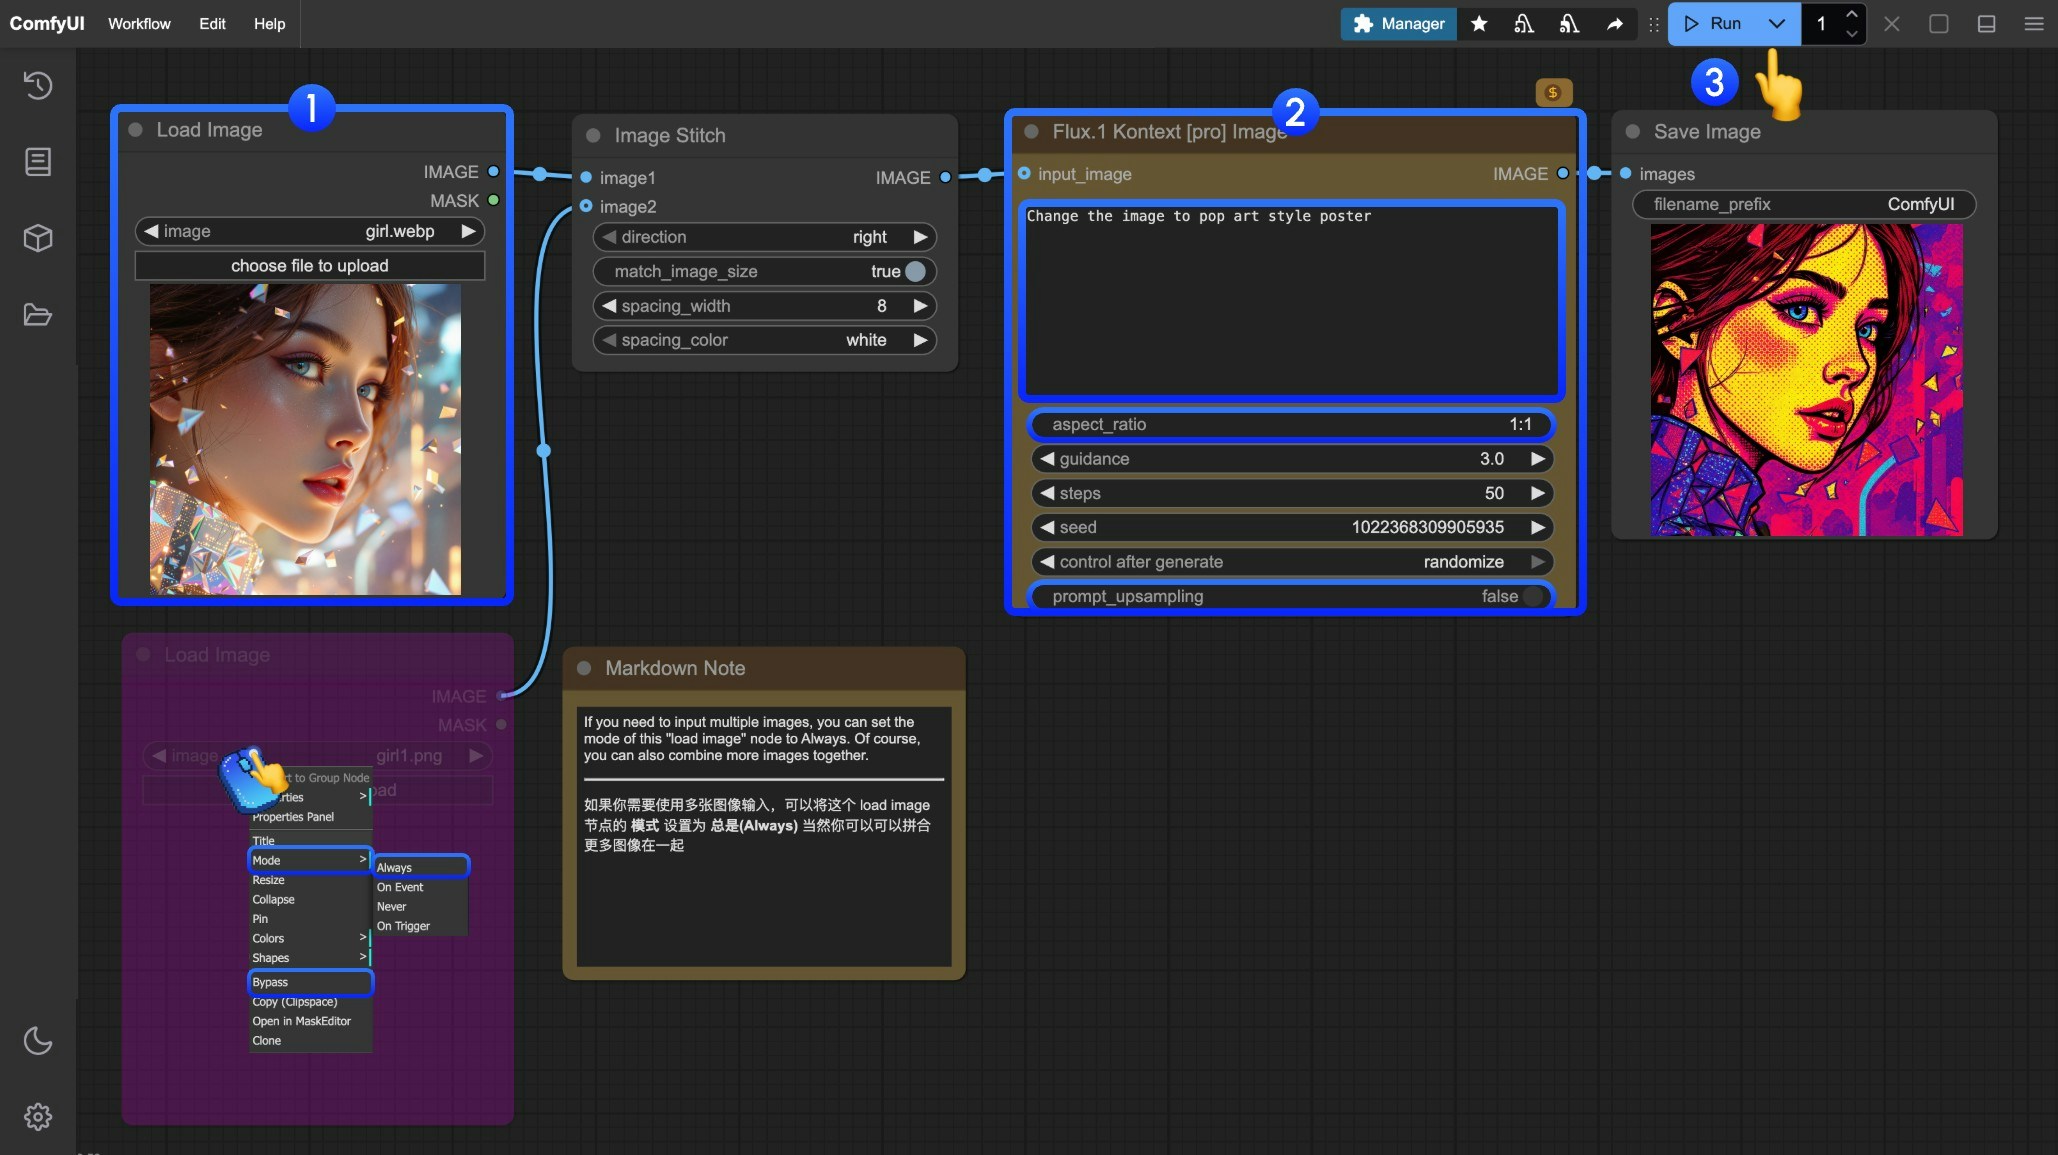 You can follow the numbered steps in the image to complete the workflow:
1. Load the image you want to edit in the `Load Image` node
2. (Optional) Modify the necessary parameters in `Flux.1 Kontext Pro Image`
3. Click the `Run` button or use the shortcut `Ctrl(cmd) + Enter` to execute the image editing
4. After waiting for the API to return results, you can view the edited image in the `Save Image` node, and the corresponding image will also be saved to the `ComfyUI/output/` directory
## Flux.1 Kontext Max Image API Node Workflow
### 1. Workflow File Download
The `metadata` of the image below contains the workflow information. Please download and drag it into ComfyUI to load the corresponding workflow.

Download the image below for input or use your own image for demonstration:

### 2. Complete the Workflow Step by Step
You can follow the numbered steps in the image to complete the workflow:
1. Load the image you want to edit in the `Load Image` node
2. (Optional) Modify the necessary parameters in `Flux.1 Kontext Pro Image`
3. Click the `Run` button or use the shortcut `Ctrl(cmd) + Enter` to execute the image editing
4. After waiting for the API to return results, you can view the edited image in the `Save Image` node, and the corresponding image will also be saved to the `ComfyUI/output/` directory
## Flux.1 Kontext Max Image API Node Workflow
### 1. Workflow File Download
The `metadata` of the image below contains the workflow information. Please download and drag it into ComfyUI to load the corresponding workflow.

Download the image below for input or use your own image for demonstration:

### 2. Complete the Workflow Step by Step
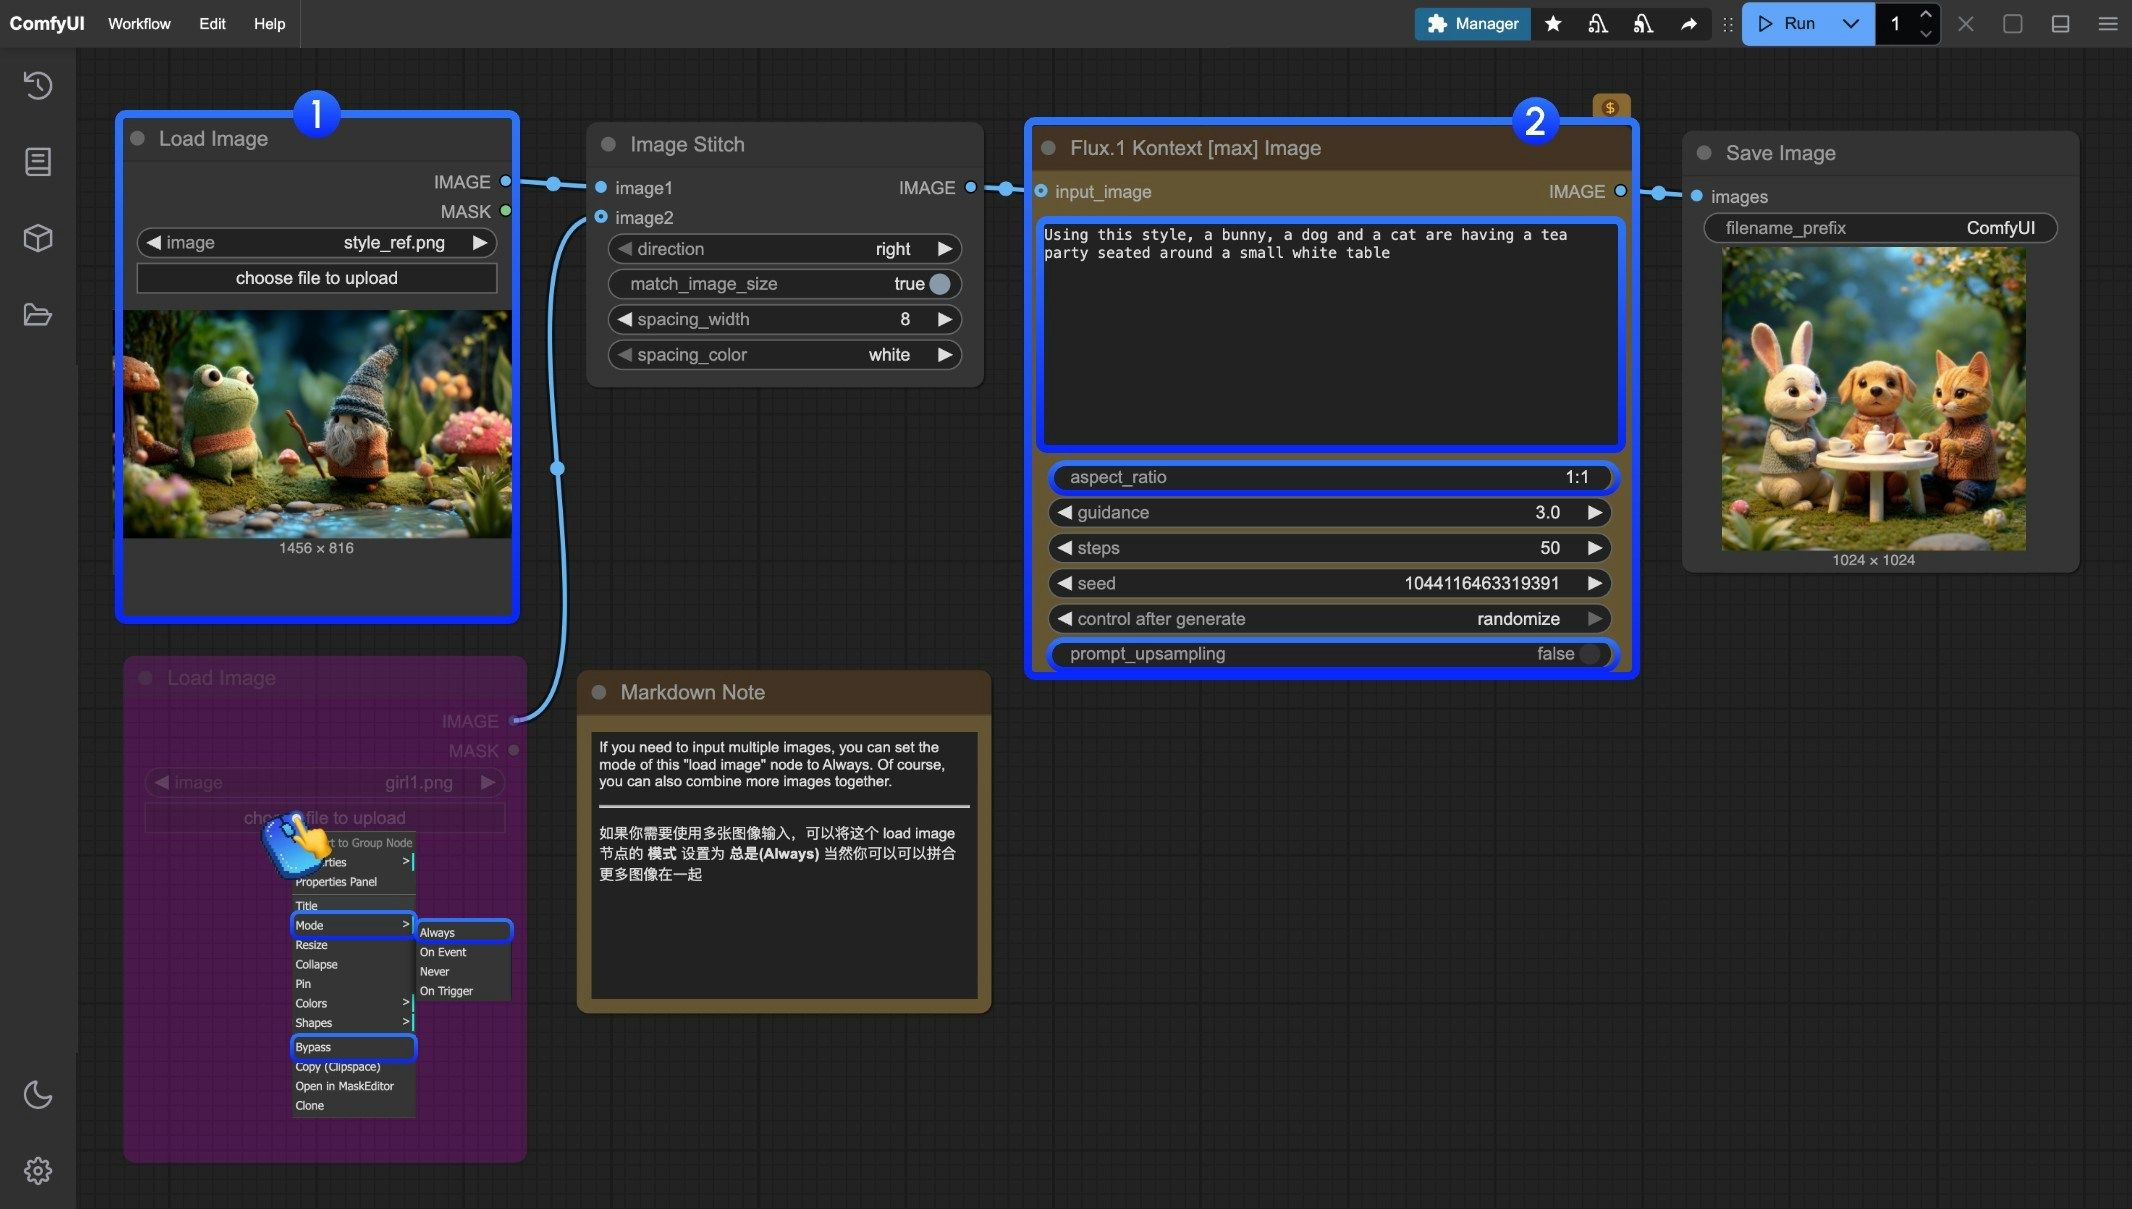 You can follow the numbered steps in the image to complete the workflow:
1. Load the image you want to edit in the `Load Image` node
2. (Optional) Modify the necessary parameters in `Flux.1 Kontext Max Image`
3. Click the `Run` button or use the shortcut `Ctrl(cmd) + Enter` to execute the image editing
4. After waiting for the API to return results, you can view the edited image in the `Save Image` node, and the corresponding image will also be saved to the `ComfyUI/output/` directory
## Flux Kontext Prompt Techniques
### 1. Basic Modifications
* Simple and direct: `"Change the car color to red"`
* Maintain style: `"Change to daytime while maintaining the same style of the painting"`
### 2. Style Transfer
**Principles:**
* Clearly name style: `"Transform to Bauhaus art style"`
* Describe characteristics: `"Transform to oil painting with visible brushstrokes, thick paint texture"`
* Preserve composition: `"Change to Bauhaus style while maintaining the original composition"`
### 3. Character Consistency
**Framework:**
* Specific description: `"The woman with short black hair"` instead of "she"
* Preserve features: `"while maintaining the same facial features, hairstyle, and expression"`
* Step-by-step modifications: Change background first, then actions
### 4. Text Editing
* Use quotes: `"Replace 'joy' with 'BFL'"`
* Maintain format: `"Replace text while maintaining the same font style"`
## Common Problem Solutions
### Character Changes Too Much
❌ Wrong: `"Transform the person into a Viking"`
✅ Correct: `"Change the clothes to be a viking warrior while preserving facial features"`
### Composition Position Changes
❌ Wrong: `"Put him on a beach"`
✅ Correct: `"Change the background to a beach while keeping the person in the exact same position, scale, and pose"`
### Style Application Inaccuracy
❌ Wrong: `"Make it a sketch"`
✅ Correct: `"Convert to pencil sketch with natural graphite lines, cross-hatching, and visible paper texture"`
## Core Principles
1. **Be Specific and Clear** - Use precise descriptions, avoid vague terms
2. **Step-by-step Editing** - Break complex modifications into multiple simple steps
3. **Explicit Preservation** - State what should remain unchanged
4. **Verb Selection** - Use "change", "replace" rather than "transform"
## Best Practice Templates
**Object Modification:**
`"Change [object] to [new state], keep [content to preserve] unchanged"`
**Style Transfer:**
`"Transform to [specific style], while maintaining [composition/character/other] unchanged"`
**Background Replacement:**
`"Change the background to [new background], keep the subject in the exact same position and pose"`
**Text Editing:**
`"Replace '[original text]' with '[new text]', maintain the same font style"`
> **Remember:** The more specific, the better. Kontext excels at understanding detailed instructions and maintaining consistency.
Built with [Mintlify](https://mintlify.com).
You can follow the numbered steps in the image to complete the workflow:
1. Load the image you want to edit in the `Load Image` node
2. (Optional) Modify the necessary parameters in `Flux.1 Kontext Max Image`
3. Click the `Run` button or use the shortcut `Ctrl(cmd) + Enter` to execute the image editing
4. After waiting for the API to return results, you can view the edited image in the `Save Image` node, and the corresponding image will also be saved to the `ComfyUI/output/` directory
## Flux Kontext Prompt Techniques
### 1. Basic Modifications
* Simple and direct: `"Change the car color to red"`
* Maintain style: `"Change to daytime while maintaining the same style of the painting"`
### 2. Style Transfer
**Principles:**
* Clearly name style: `"Transform to Bauhaus art style"`
* Describe characteristics: `"Transform to oil painting with visible brushstrokes, thick paint texture"`
* Preserve composition: `"Change to Bauhaus style while maintaining the original composition"`
### 3. Character Consistency
**Framework:**
* Specific description: `"The woman with short black hair"` instead of "she"
* Preserve features: `"while maintaining the same facial features, hairstyle, and expression"`
* Step-by-step modifications: Change background first, then actions
### 4. Text Editing
* Use quotes: `"Replace 'joy' with 'BFL'"`
* Maintain format: `"Replace text while maintaining the same font style"`
## Common Problem Solutions
### Character Changes Too Much
❌ Wrong: `"Transform the person into a Viking"`
✅ Correct: `"Change the clothes to be a viking warrior while preserving facial features"`
### Composition Position Changes
❌ Wrong: `"Put him on a beach"`
✅ Correct: `"Change the background to a beach while keeping the person in the exact same position, scale, and pose"`
### Style Application Inaccuracy
❌ Wrong: `"Make it a sketch"`
✅ Correct: `"Convert to pencil sketch with natural graphite lines, cross-hatching, and visible paper texture"`
## Core Principles
1. **Be Specific and Clear** - Use precise descriptions, avoid vague terms
2. **Step-by-step Editing** - Break complex modifications into multiple simple steps
3. **Explicit Preservation** - State what should remain unchanged
4. **Verb Selection** - Use "change", "replace" rather than "transform"
## Best Practice Templates
**Object Modification:**
`"Change [object] to [new state], keep [content to preserve] unchanged"`
**Style Transfer:**
`"Transform to [specific style], while maintaining [composition/character/other] unchanged"`
**Background Replacement:**
`"Change the background to [new background], keep the subject in the exact same position and pose"`
**Text Editing:**
`"Replace '[original text]' with '[new text]', maintain the same font style"`
> **Remember:** The more specific, the better. Kontext excels at understanding detailed instructions and maintaining consistency.
Built with [Mintlify](https://mintlify.com).