> ## Documentation Index
> Fetch the complete documentation index at: https://docs.comfy.org/llms.txt
> Use this file to discover all available pages before exploring further.
# Moonvalley API Node Official ComfyUI Example
> This article introduces how to use Moonvalley Partner nodes for text-to-video, image-to-video, and video-to-video capabilities in ComfyUI.
Moonvalley Marey Realism v1.5 is an AI video generation model designed for cinematic-level creation. The model is **trained entirely with commercially licensed content**, ensuring **copyright compliance and commercial safety**.
## Product Highlights
* Exceptional prompt comprehension: Accurately interprets complex prompt instructions.
* Native 1080p HD quality: The training dataset is based on **1080P** videos, resulting in fine and detailed output.
* Realistic physics and dynamic performance: Precisely simulates physical motion models and natural dynamics, delivering professional-grade realism.
* Complex scene layering and advanced lighting effects: Supports foreground, midground, and background layering in complex scenes, with intelligent spatial relationship understanding.
* Production-level control features such as motion and pose transfer: Automatically generates realistic lighting for composite scenes.
Currently, Moonvalley-related Partner nodes are natively supported in ComfyUI. You can use the corresponding text-to-video, image-to-video, and video-to-video capabilities directly in ComfyUI.
To use the API nodes, you need to ensure that you are logged in properly and using a permitted network environment. Please refer to the [API Nodes Overview](/tutorials/partner-nodes/overview) section of the documentation to understand the specific requirements for using the API nodes.
Make sure your ComfyUI is updated.
* [Download ComfyUI](https://www.comfy.org/download)
* [Update Guide](/installation/update_comfyui)
Workflows in this guide can be found in the [Workflow Templates](/interface/features/template).
If you can't find them in the template, your ComfyUI may be outdated. (Desktop version's update will delay sometime)
If nodes are missing when loading a workflow, possible reasons:
1. You are not using the latest ComfyUI version (Nightly version)
2. Some nodes failed to import at startup
* The Desktop is base on ComfyUI stable release, it will auto-update when there is a new Desktop stable release available.
* [Cloud](https://cloud.comfy.org) will update after ComfyUI stable release.
So, if you find any core node missing in this document, it might be because the new core nodes have not yet been released in the latest stable version. Please wait for the next stable release.
## Moonvalley Text-to-Video Workflow
### 1. Download the Workflow File
### 2. Follow the Steps to Run the Workflow
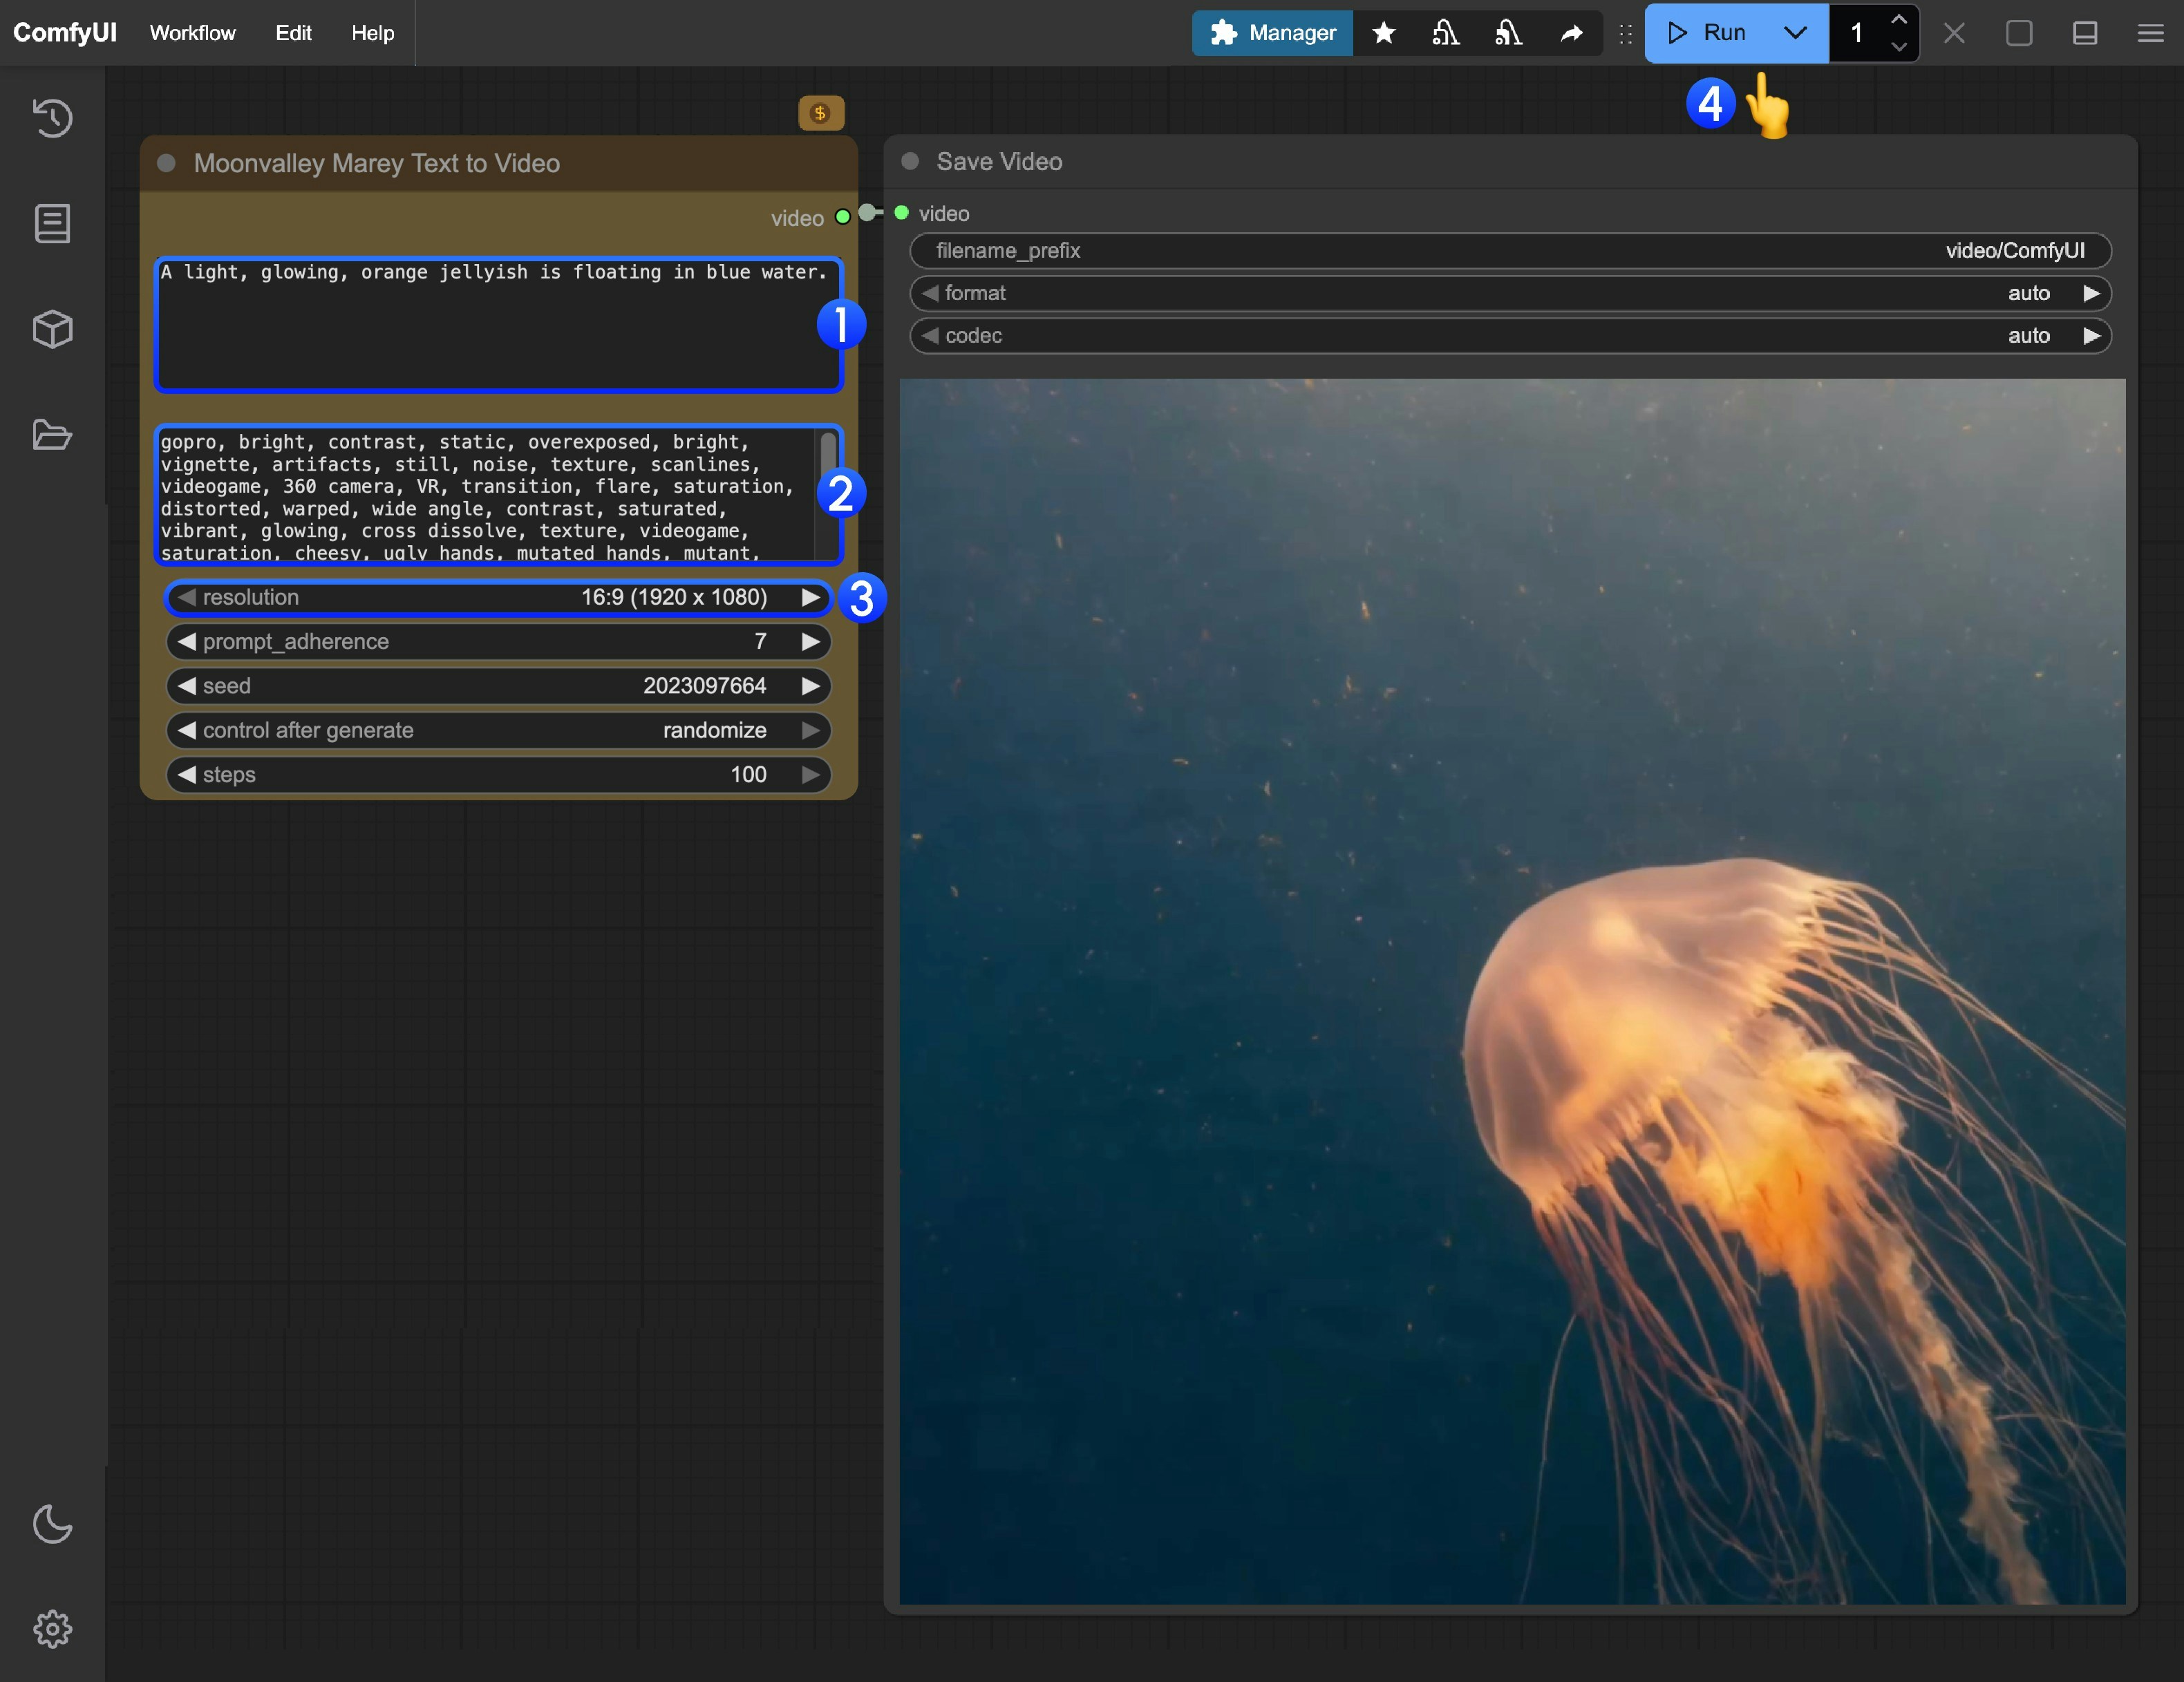
1. Enter the positive prompt (content you want to appear in the video)
2. Enter the negative prompt (content you do not want to appear in the video)
3. Modify the video output resolution
4. Click the `Run` button, or use the shortcut `Ctrl(cmd) + Enter` to start video generation
5. After the API returns the result, you can view the generated video in the `Save Video` node. The video will also be saved in the `ComfyUI/output/` directory
## Moonvalley Image-to-Video Workflow
### 1. Download the Workflow File
Download the image below as the input image

### 2. Follow the Steps to Run the Workflow
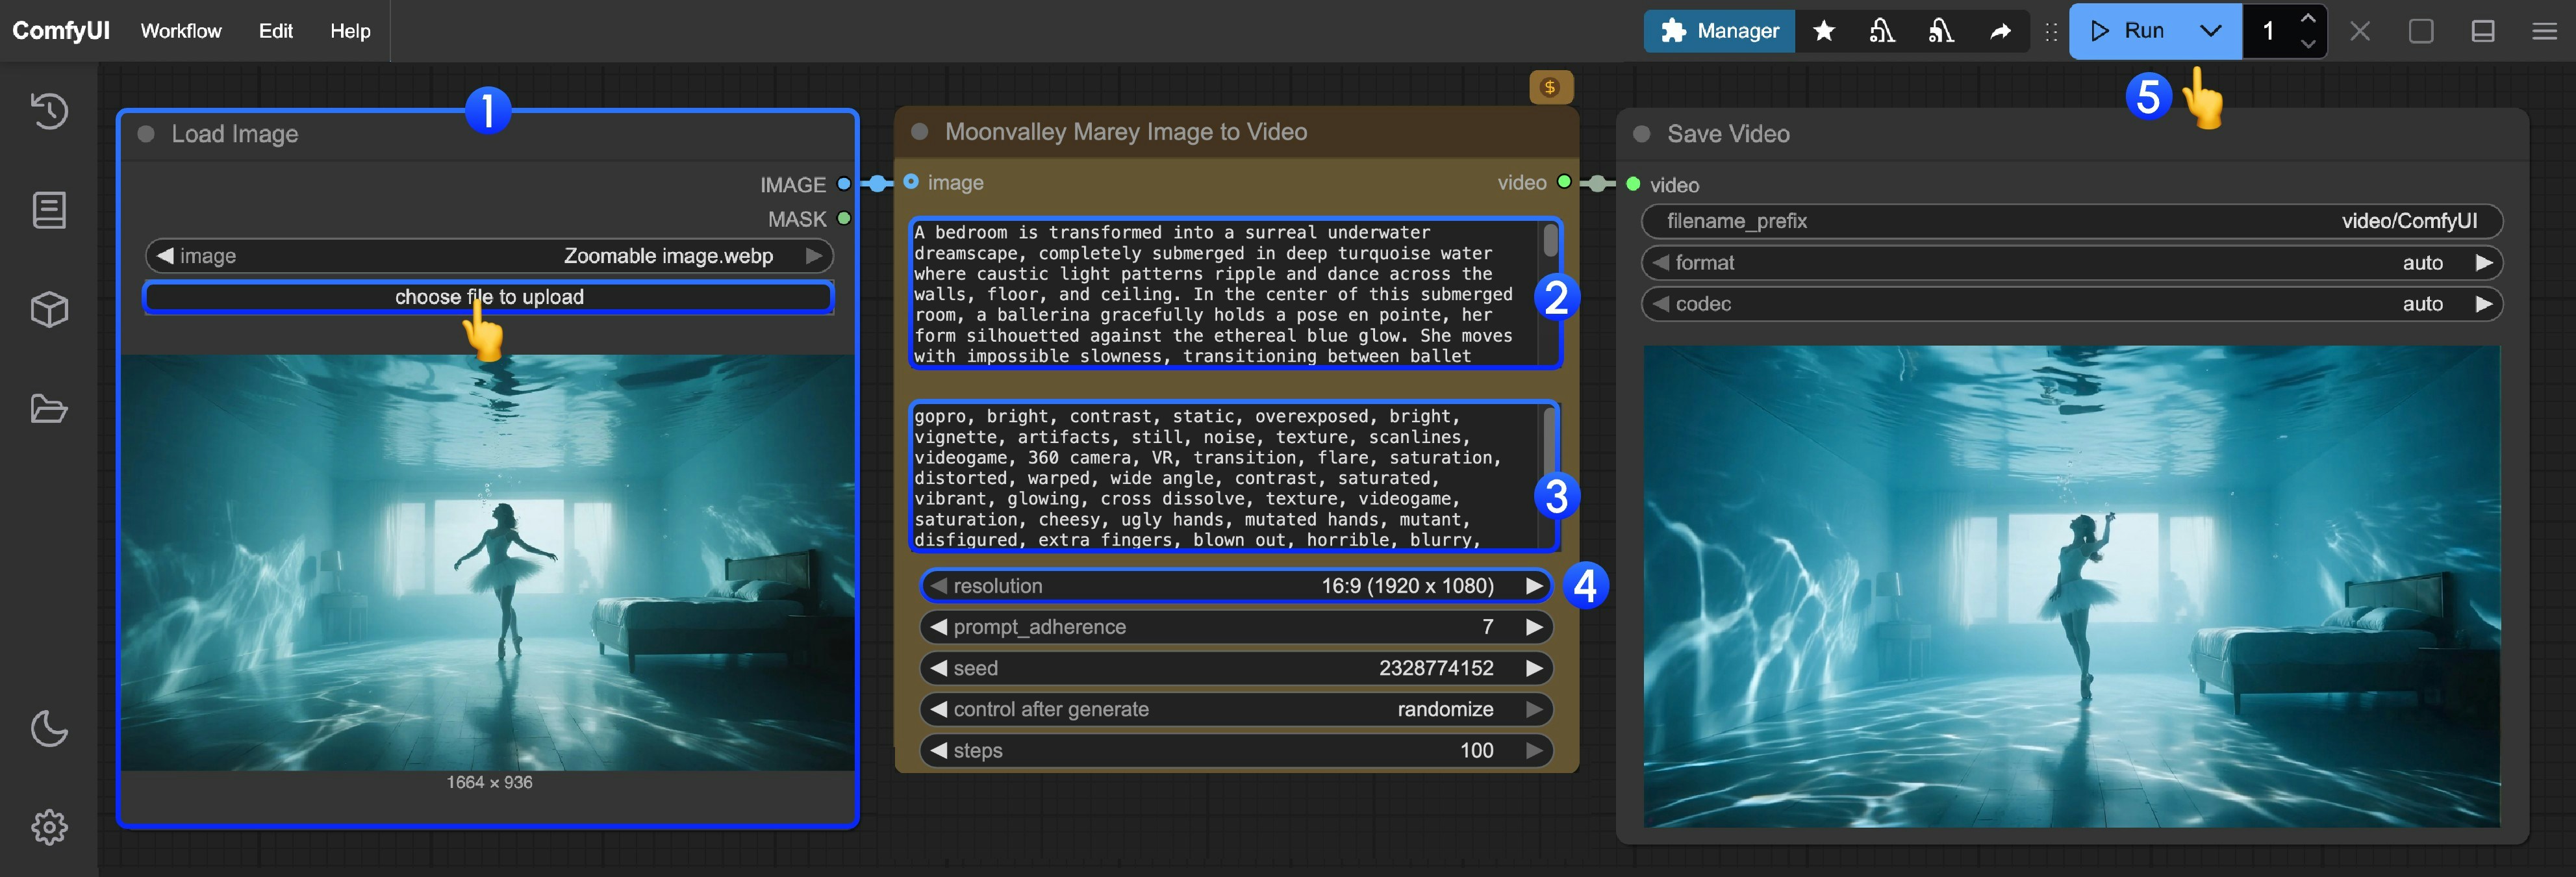
1. Load the input image in the `Load Image` node
2. Enter the positive prompt (content you want to appear in the video)
3. Enter the negative prompt (content you do not want to appear in the video)
4. Modify the video output resolution
5. Click the `Run` button, or use the shortcut `Ctrl(cmd) + Enter` to start video generation
6. After the API returns the result, you can view the generated video in the `Save Video` node. The video will also be saved in the `ComfyUI/output/` directory
## Moonvalley Video-to-Video Workflow
The `Moonvalley Marey Video to Video` node allows you to input a reference video for video re-drawing. You can use the reference video's motion or character poses for video generation.
### 1. Download the Workflow File
Download the video below as the input video:
### 2. Follow the Steps to Run the Workflow
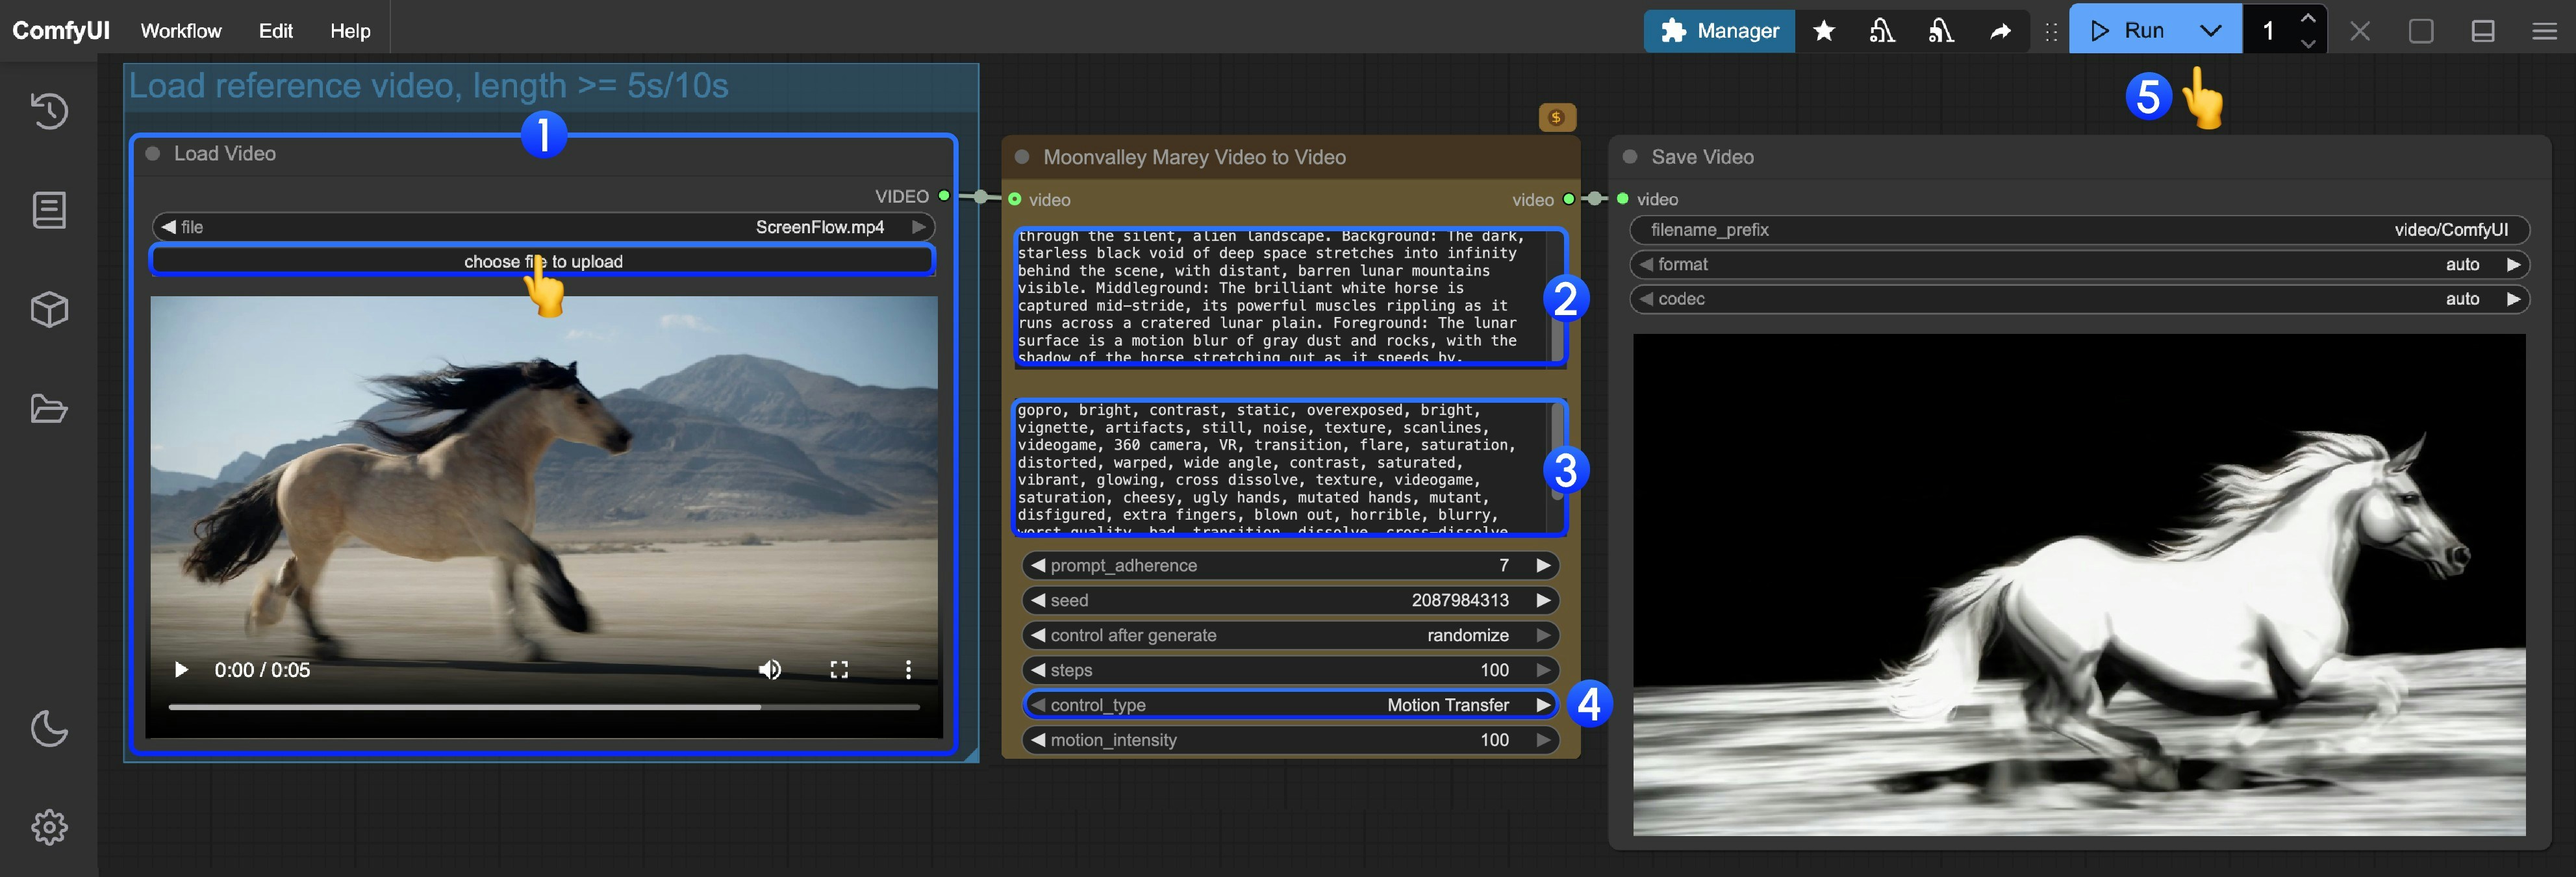
1. Load the reference video (or your own material) in the `Load Video` node
* If the final video duration is 5s, the input video must be longer than 5s
* If the final video duration is 10s, the input video must be longer than 10s
2. Enter the positive prompt (content you want to appear in the video)
3. Enter the negative prompt (content you do not want to appear in the video)
4. Set the `control_type` parameter to choose the reference type for video re-drawing
* `Motion Transfer`: Generate based on the motion in the reference video
* `Pose Transfer`: Generate based on the character poses in the reference video
5. Click the `Run` button, or use the shortcut `Ctrl(cmd) + Enter` to start video generation
6. After the API returns the result, you can view the generated video in the `Save Video` node. The video will also be saved in the `ComfyUI/output/` directory
Built with [Mintlify](https://mintlify.com).
 1. Enter the positive prompt (content you want to appear in the video)
2. Enter the negative prompt (content you do not want to appear in the video)
3. Modify the video output resolution
4. Click the `Run` button, or use the shortcut `Ctrl(cmd) + Enter` to start video generation
5. After the API returns the result, you can view the generated video in the `Save Video` node. The video will also be saved in the `ComfyUI/output/` directory
## Moonvalley Image-to-Video Workflow
### 1. Download the Workflow File
1. Enter the positive prompt (content you want to appear in the video)
2. Enter the negative prompt (content you do not want to appear in the video)
3. Modify the video output resolution
4. Click the `Run` button, or use the shortcut `Ctrl(cmd) + Enter` to start video generation
5. After the API returns the result, you can view the generated video in the `Save Video` node. The video will also be saved in the `ComfyUI/output/` directory
## Moonvalley Image-to-Video Workflow
### 1. Download the Workflow File
 1. Load the input image in the `Load Image` node
2. Enter the positive prompt (content you want to appear in the video)
3. Enter the negative prompt (content you do not want to appear in the video)
4. Modify the video output resolution
5. Click the `Run` button, or use the shortcut `Ctrl(cmd) + Enter` to start video generation
6. After the API returns the result, you can view the generated video in the `Save Video` node. The video will also be saved in the `ComfyUI/output/` directory
## Moonvalley Video-to-Video Workflow
The `Moonvalley Marey Video to Video` node allows you to input a reference video for video re-drawing. You can use the reference video's motion or character poses for video generation.
### 1. Download the Workflow File
1. Load the input image in the `Load Image` node
2. Enter the positive prompt (content you want to appear in the video)
3. Enter the negative prompt (content you do not want to appear in the video)
4. Modify the video output resolution
5. Click the `Run` button, or use the shortcut `Ctrl(cmd) + Enter` to start video generation
6. After the API returns the result, you can view the generated video in the `Save Video` node. The video will also be saved in the `ComfyUI/output/` directory
## Moonvalley Video-to-Video Workflow
The `Moonvalley Marey Video to Video` node allows you to input a reference video for video re-drawing. You can use the reference video's motion or character poses for video generation.
### 1. Download the Workflow File
 1. Load the reference video (or your own material) in the `Load Video` node
* If the final video duration is 5s, the input video must be longer than 5s
* If the final video duration is 10s, the input video must be longer than 10s
2. Enter the positive prompt (content you want to appear in the video)
3. Enter the negative prompt (content you do not want to appear in the video)
4. Set the `control_type` parameter to choose the reference type for video re-drawing
* `Motion Transfer`: Generate based on the motion in the reference video
* `Pose Transfer`: Generate based on the character poses in the reference video
5. Click the `Run` button, or use the shortcut `Ctrl(cmd) + Enter` to start video generation
6. After the API returns the result, you can view the generated video in the `Save Video` node. The video will also be saved in the `ComfyUI/output/` directory
Built with [Mintlify](https://mintlify.com).
1. Load the reference video (or your own material) in the `Load Video` node
* If the final video duration is 5s, the input video must be longer than 5s
* If the final video duration is 10s, the input video must be longer than 10s
2. Enter the positive prompt (content you want to appear in the video)
3. Enter the negative prompt (content you do not want to appear in the video)
4. Set the `control_type` parameter to choose the reference type for video re-drawing
* `Motion Transfer`: Generate based on the motion in the reference video
* `Pose Transfer`: Generate based on the character poses in the reference video
5. Click the `Run` button, or use the shortcut `Ctrl(cmd) + Enter` to start video generation
6. After the API returns the result, you can view the generated video in the `Save Video` node. The video will also be saved in the `ComfyUI/output/` directory
Built with [Mintlify](https://mintlify.com).