> ## Documentation Index
> Fetch the complete documentation index at: https://docs.comfy.org/llms.txt
> Use this file to discover all available pages before exploring further.
# OpenAI GPT-Image-1 Node
> Learn how to use the OpenAI GPT-Image-1 Partner node to generate images in ComfyUI
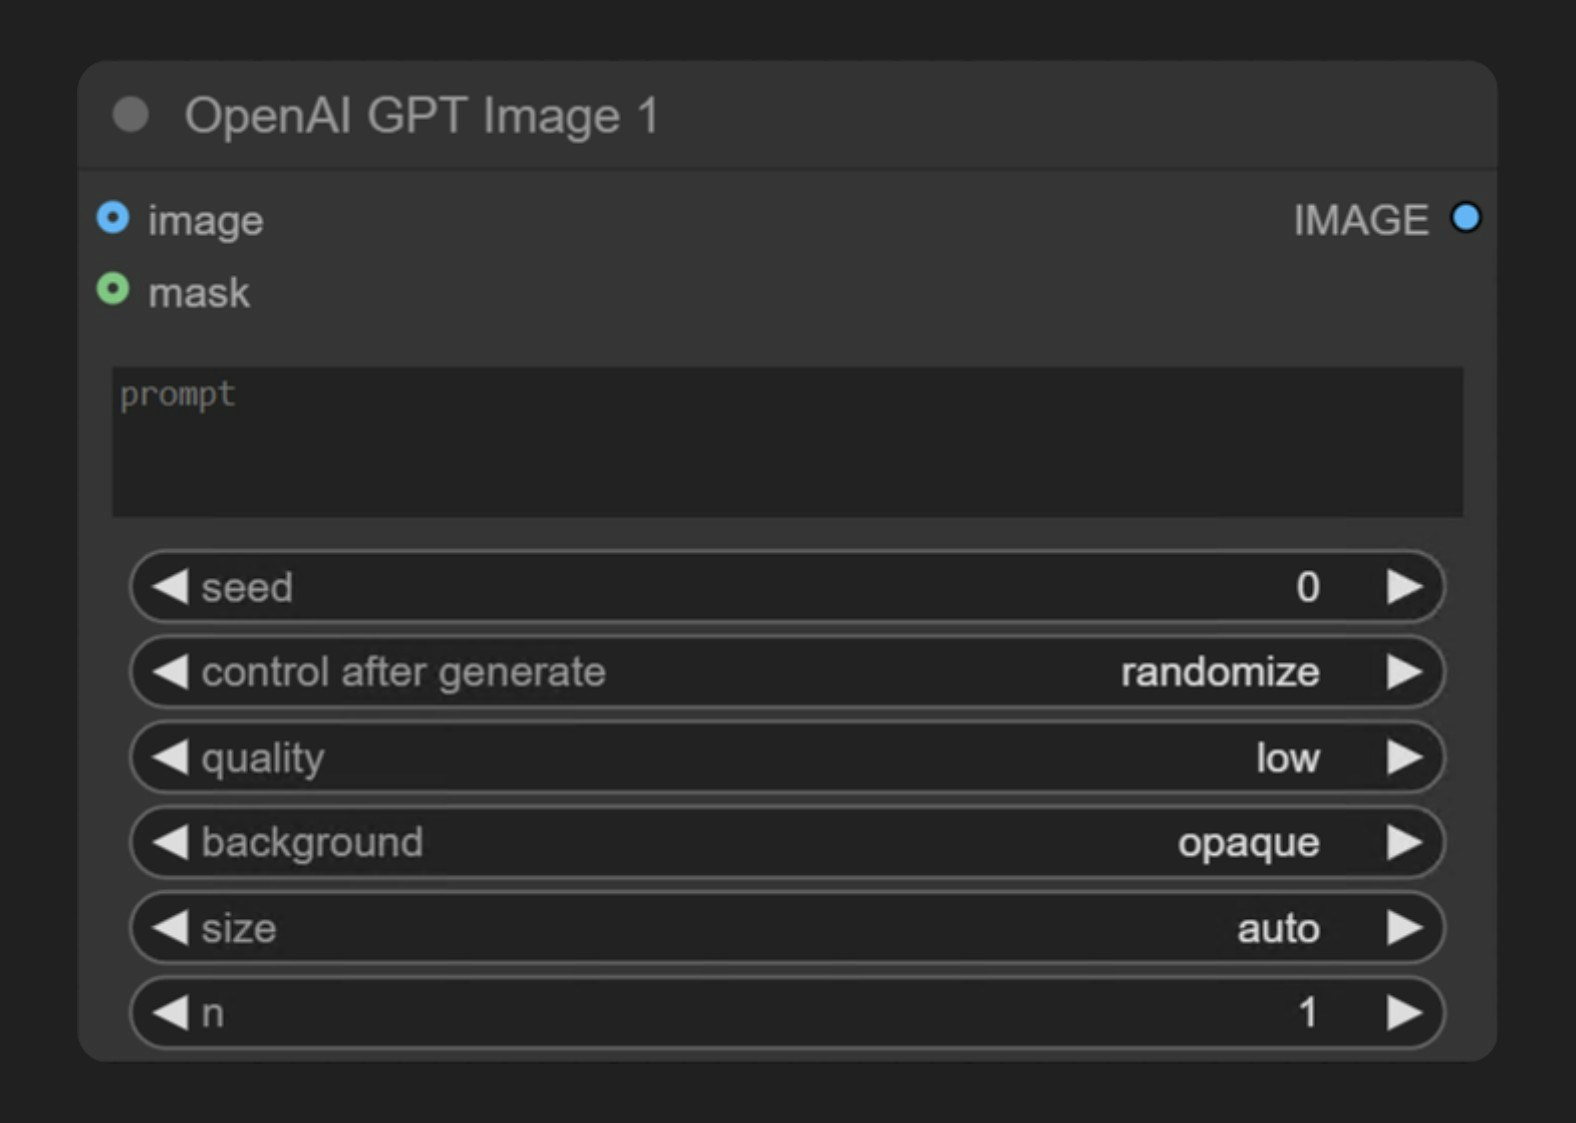 OpenAI GPT-Image-1 is part of the ComfyUI Partner nodes series that allows users to generate images through OpenAI's **GPT-Image-1** model. This is the same model used for image generation in ChatGPT 4o.
This node supports:
* Text-to-image generation
* Image editing functionality (inpainting through masks)
## Node Overview
The **OpenAI GPT-Image-1** node synchronously generates images through OpenAI's image generation API. It receives text prompts and returns images matching the description. GPT-Image-1 is OpenAI's most advanced image generation model currently available, capable of creating highly detailed and realistic images.
To use the Partner Nodes, you need to ensure that you are logged in properly and using a permitted network environment. Please refer to the [Partner Nodes Overview](/tutorials/partner-nodes/overview) section of the documentation to understand the specific requirements for using the Partner Nodes.
Make sure your ComfyUI is updated.
* [Download ComfyUI](https://www.comfy.org/download)
* [Update Guide](/installation/update_comfyui)
Workflows in this guide can be found in the [Workflow Templates](/interface/features/template).
If you can't find them in the template, your ComfyUI may be outdated. (Desktop version's update will delay sometime)
If nodes are missing when loading a workflow, possible reasons:
1. You are not using the latest ComfyUI version (Nightly version)
2. Some nodes failed to import at startup
* The Desktop is base on ComfyUI stable release, it will auto-update when there is a new Desktop stable release available.
* [Cloud](https://cloud.comfy.org) will update after ComfyUI stable release.
So, if you find any core node missing in this document, it might be because the new core nodes have not yet been released in the latest stable version. Please wait for the next stable release.
## Parameter Description
### Required Parameters
| Parameter | Type | Description |
| --------- | ---- | ------------------------------------------------------------- |
| `prompt` | Text | Text prompt describing the image content you want to generate |
### Widget Parameters
| Parameter | Type | Options | Default | Description |
| ------------ | ------- | ------------------------------------- | ------- | ------------------------------------------------------- |
| `seed` | Integer | 0-2147483647 | 0 | Random seed used to control generation results |
| `quality` | Option | low, medium, high | low | Image quality setting, affects cost and generation time |
| `background` | Option | opaque, transparent | opaque | Whether the returned image has a background |
| `size` | Option | auto, 1024x1024, 1024x1536, 1536x1024 | auto | Size of the generated image |
| `n` | Integer | 1-8 | 1 | Number of images to generate |
### Optional Parameters
| Parameter | Type | Options | Default | Description |
| --------- | ----- | --------------- | ------- | ----------------------------------------------------------- |
| `image` | Image | Any image input | None | Optional reference image for image editing |
| `mask` | Mask | Mask input | None | Optional mask for inpainting (white areas will be replaced) |
## Usage Examples
### Text-to-Image Example
The image below contains a simple text-to-image workflow. Please download the image and drag it into ComfyUI to load the corresponding workflow.
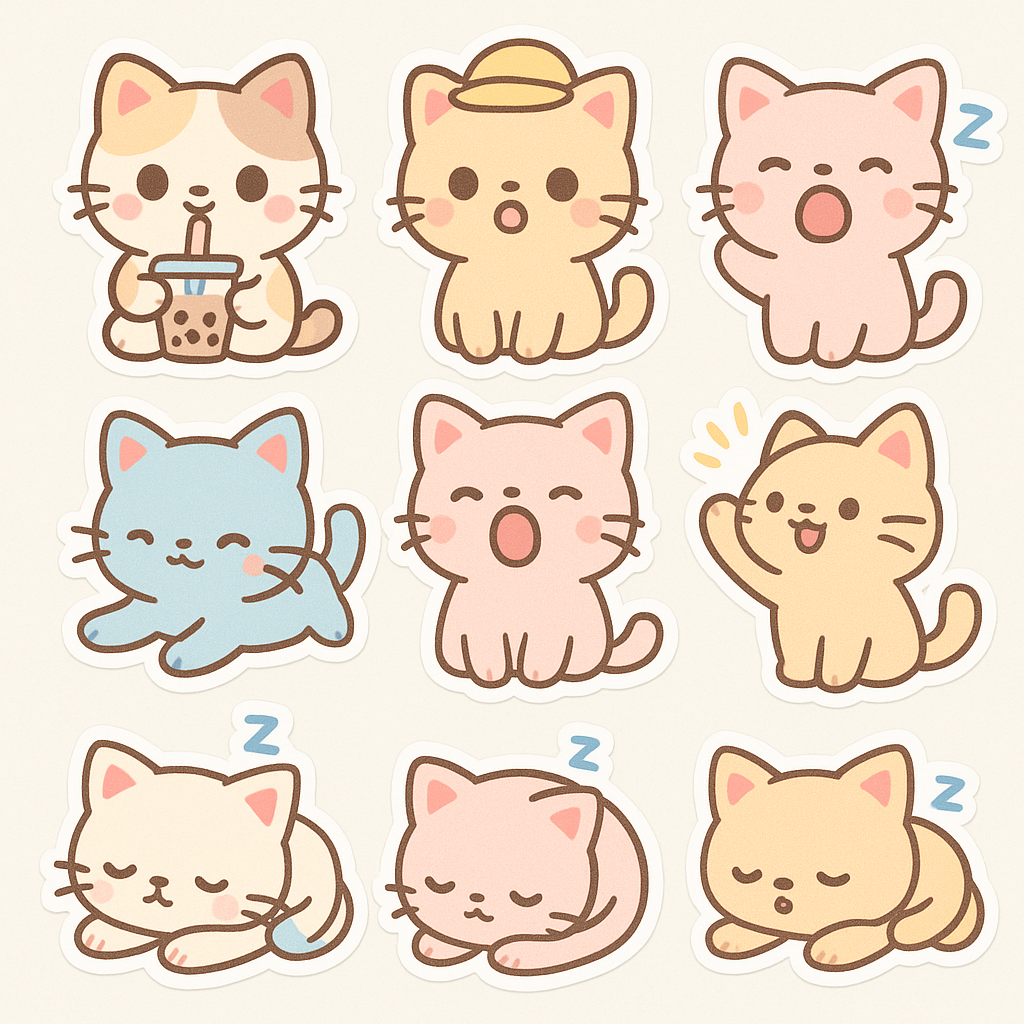
The corresponding workflow is very simple:
OpenAI GPT-Image-1 is part of the ComfyUI Partner nodes series that allows users to generate images through OpenAI's **GPT-Image-1** model. This is the same model used for image generation in ChatGPT 4o.
This node supports:
* Text-to-image generation
* Image editing functionality (inpainting through masks)
## Node Overview
The **OpenAI GPT-Image-1** node synchronously generates images through OpenAI's image generation API. It receives text prompts and returns images matching the description. GPT-Image-1 is OpenAI's most advanced image generation model currently available, capable of creating highly detailed and realistic images.
To use the Partner Nodes, you need to ensure that you are logged in properly and using a permitted network environment. Please refer to the [Partner Nodes Overview](/tutorials/partner-nodes/overview) section of the documentation to understand the specific requirements for using the Partner Nodes.
Make sure your ComfyUI is updated.
* [Download ComfyUI](https://www.comfy.org/download)
* [Update Guide](/installation/update_comfyui)
Workflows in this guide can be found in the [Workflow Templates](/interface/features/template).
If you can't find them in the template, your ComfyUI may be outdated. (Desktop version's update will delay sometime)
If nodes are missing when loading a workflow, possible reasons:
1. You are not using the latest ComfyUI version (Nightly version)
2. Some nodes failed to import at startup
* The Desktop is base on ComfyUI stable release, it will auto-update when there is a new Desktop stable release available.
* [Cloud](https://cloud.comfy.org) will update after ComfyUI stable release.
So, if you find any core node missing in this document, it might be because the new core nodes have not yet been released in the latest stable version. Please wait for the next stable release.
## Parameter Description
### Required Parameters
| Parameter | Type | Description |
| --------- | ---- | ------------------------------------------------------------- |
| `prompt` | Text | Text prompt describing the image content you want to generate |
### Widget Parameters
| Parameter | Type | Options | Default | Description |
| ------------ | ------- | ------------------------------------- | ------- | ------------------------------------------------------- |
| `seed` | Integer | 0-2147483647 | 0 | Random seed used to control generation results |
| `quality` | Option | low, medium, high | low | Image quality setting, affects cost and generation time |
| `background` | Option | opaque, transparent | opaque | Whether the returned image has a background |
| `size` | Option | auto, 1024x1024, 1024x1536, 1536x1024 | auto | Size of the generated image |
| `n` | Integer | 1-8 | 1 | Number of images to generate |
### Optional Parameters
| Parameter | Type | Options | Default | Description |
| --------- | ----- | --------------- | ------- | ----------------------------------------------------------- |
| `image` | Image | Any image input | None | Optional reference image for image editing |
| `mask` | Mask | Mask input | None | Optional mask for inpainting (white areas will be replaced) |
## Usage Examples
### Text-to-Image Example
The image below contains a simple text-to-image workflow. Please download the image and drag it into ComfyUI to load the corresponding workflow.

The corresponding workflow is very simple:
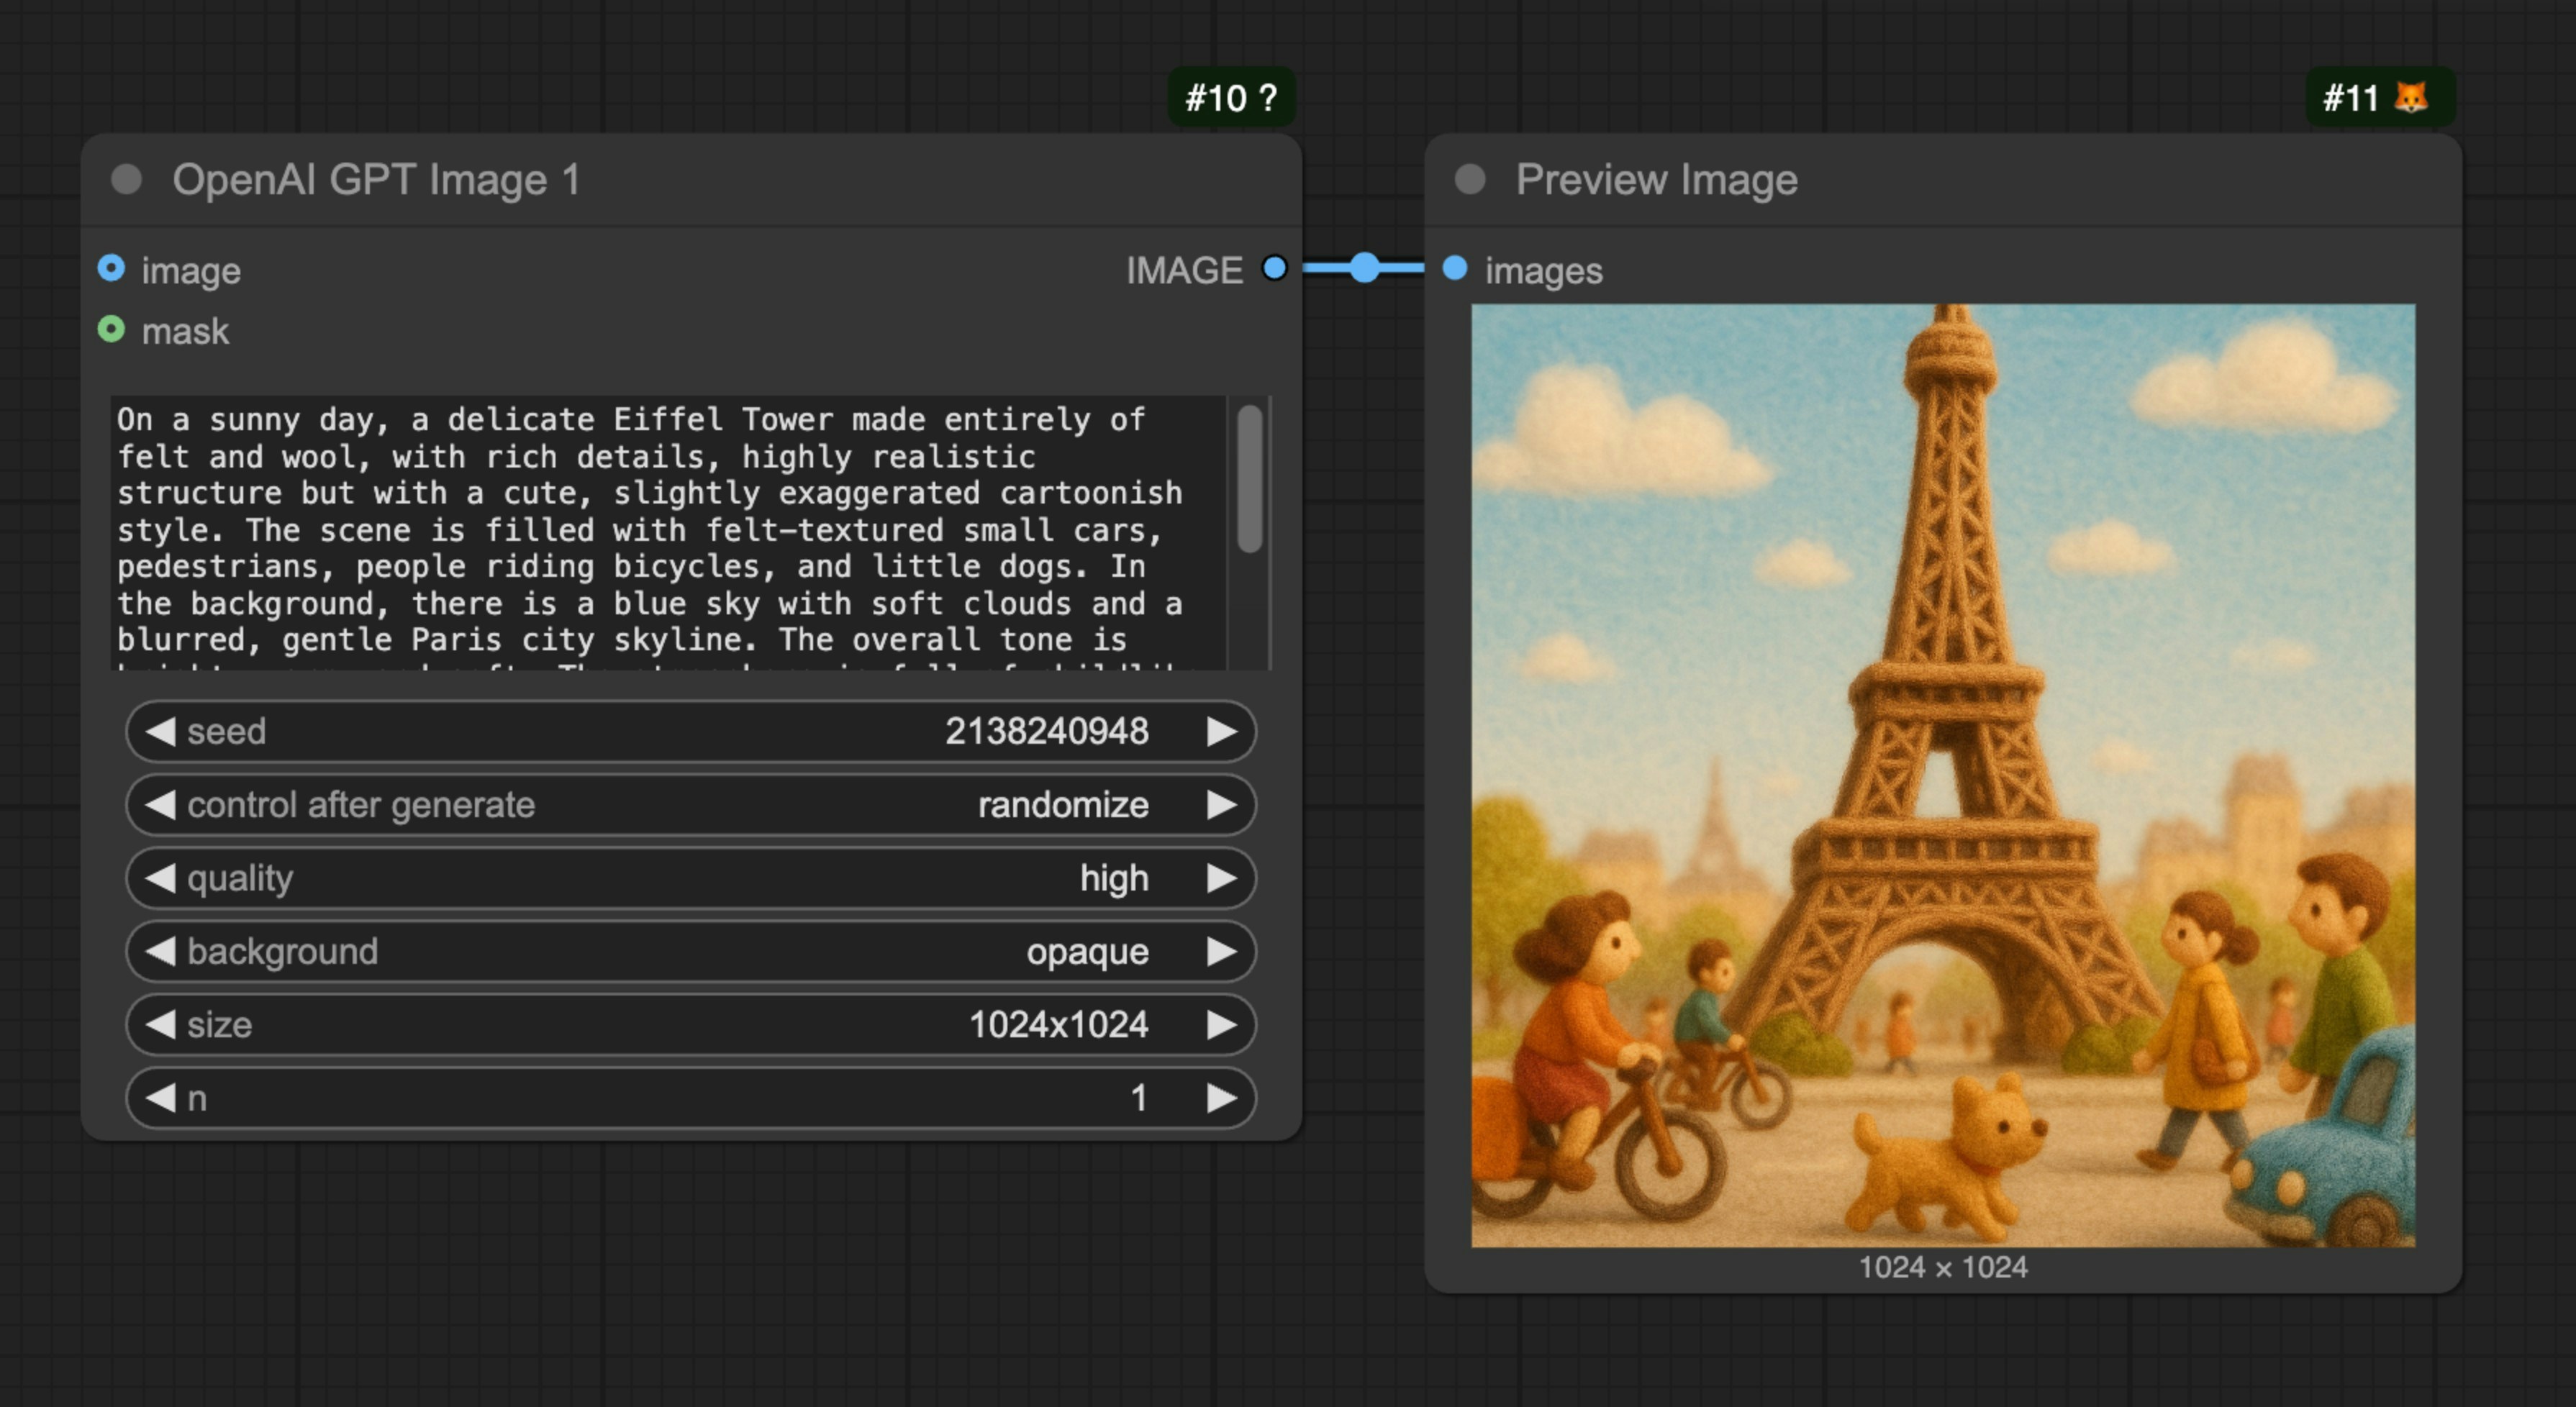 You only need to load the `OpenAI GPT-Image-1` node, input the description of the image you want to generate in the `prompt` node, connect a `Save Image` node, and then run the workflow.
### Image-to-Image Example
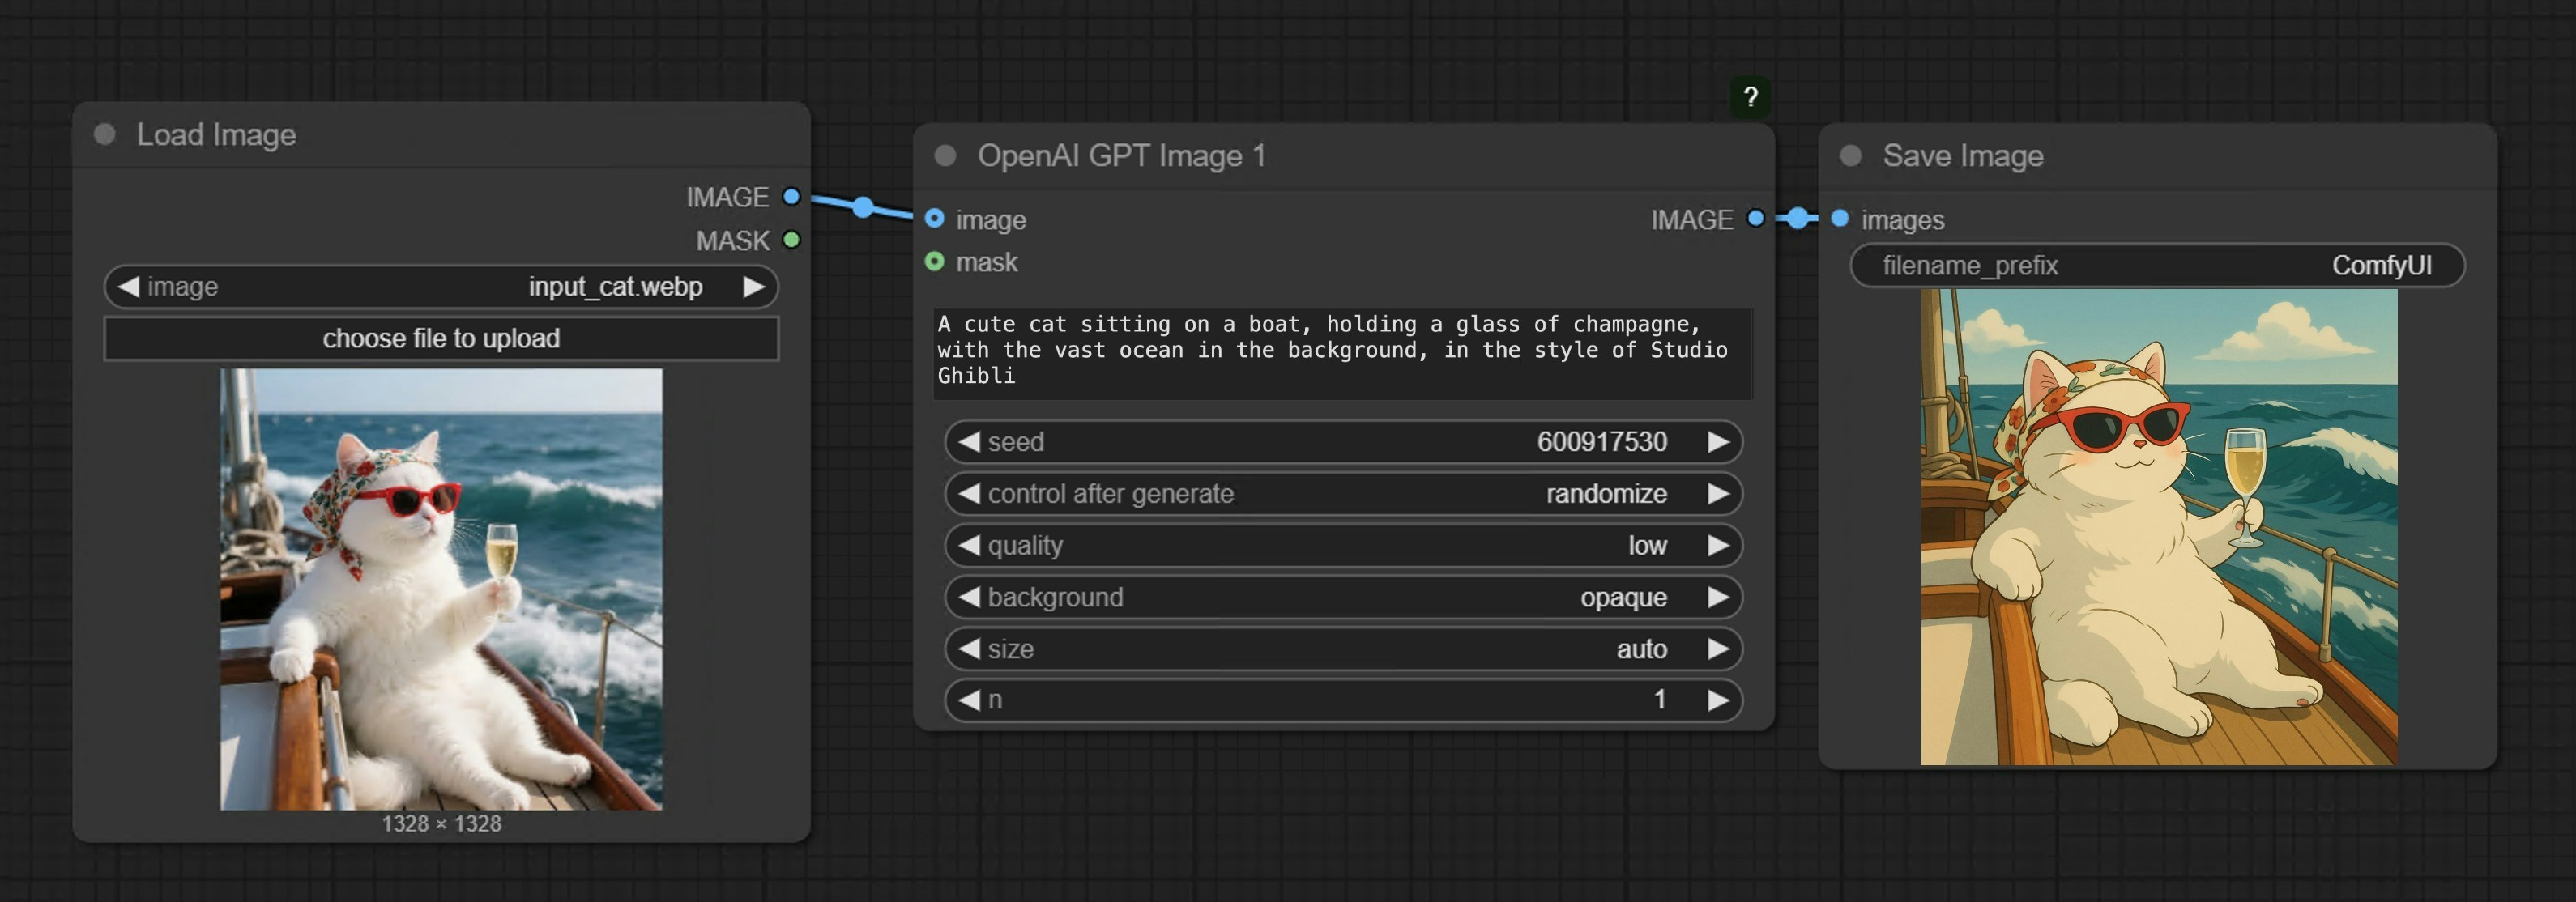
The image below contains a simple image-to-image workflow. Please download the image and drag it into ComfyUI to load the corresponding workflow.

We will use the image below as input:

In this workflow, we use the `OpenAI GPT-Image-1` node to generate images and the `Load Image` node to load the input image, then connect it to the `image` input of the `OpenAI GPT-Image-1` node.
You only need to load the `OpenAI GPT-Image-1` node, input the description of the image you want to generate in the `prompt` node, connect a `Save Image` node, and then run the workflow.
### Image-to-Image Example
The image below contains a simple image-to-image workflow. Please download the image and drag it into ComfyUI to load the corresponding workflow.

We will use the image below as input:

In this workflow, we use the `OpenAI GPT-Image-1` node to generate images and the `Load Image` node to load the input image, then connect it to the `image` input of the `OpenAI GPT-Image-1` node.
 ### Multiple Image Input Example
Please download the image below and drag it into ComfyUI to load the corresponding workflow.

Use the hat image below as an additional input image.

The corresponding workflow is shown in the image below:
### Multiple Image Input Example
Please download the image below and drag it into ComfyUI to load the corresponding workflow.

Use the hat image below as an additional input image.

The corresponding workflow is shown in the image below:
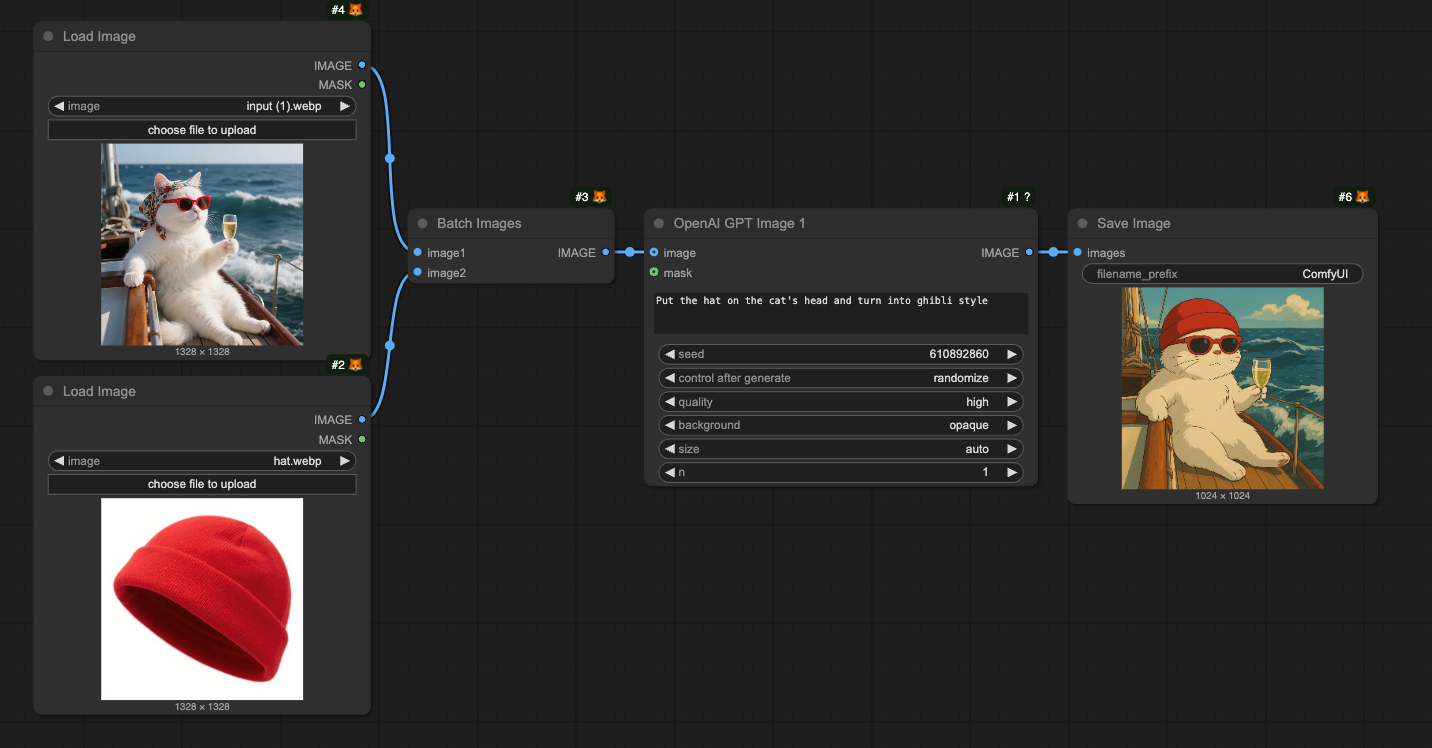 The `Batch Images` node is used to load multiple images into the `OpenAI GPT-Image-1` node.
### Inpainting Workflow
GPT-Image-1 also supports image editing functionality, allowing you to specify areas to replace using a mask. Below is a simple inpainting workflow example:
Download the image below and drag it into ComfyUI to load the corresponding workflow. We will continue to use the input image from the image-to-image workflow section.

The corresponding workflow is shown in the image
The `Batch Images` node is used to load multiple images into the `OpenAI GPT-Image-1` node.
### Inpainting Workflow
GPT-Image-1 also supports image editing functionality, allowing you to specify areas to replace using a mask. Below is a simple inpainting workflow example:
Download the image below and drag it into ComfyUI to load the corresponding workflow. We will continue to use the input image from the image-to-image workflow section.

The corresponding workflow is shown in the image
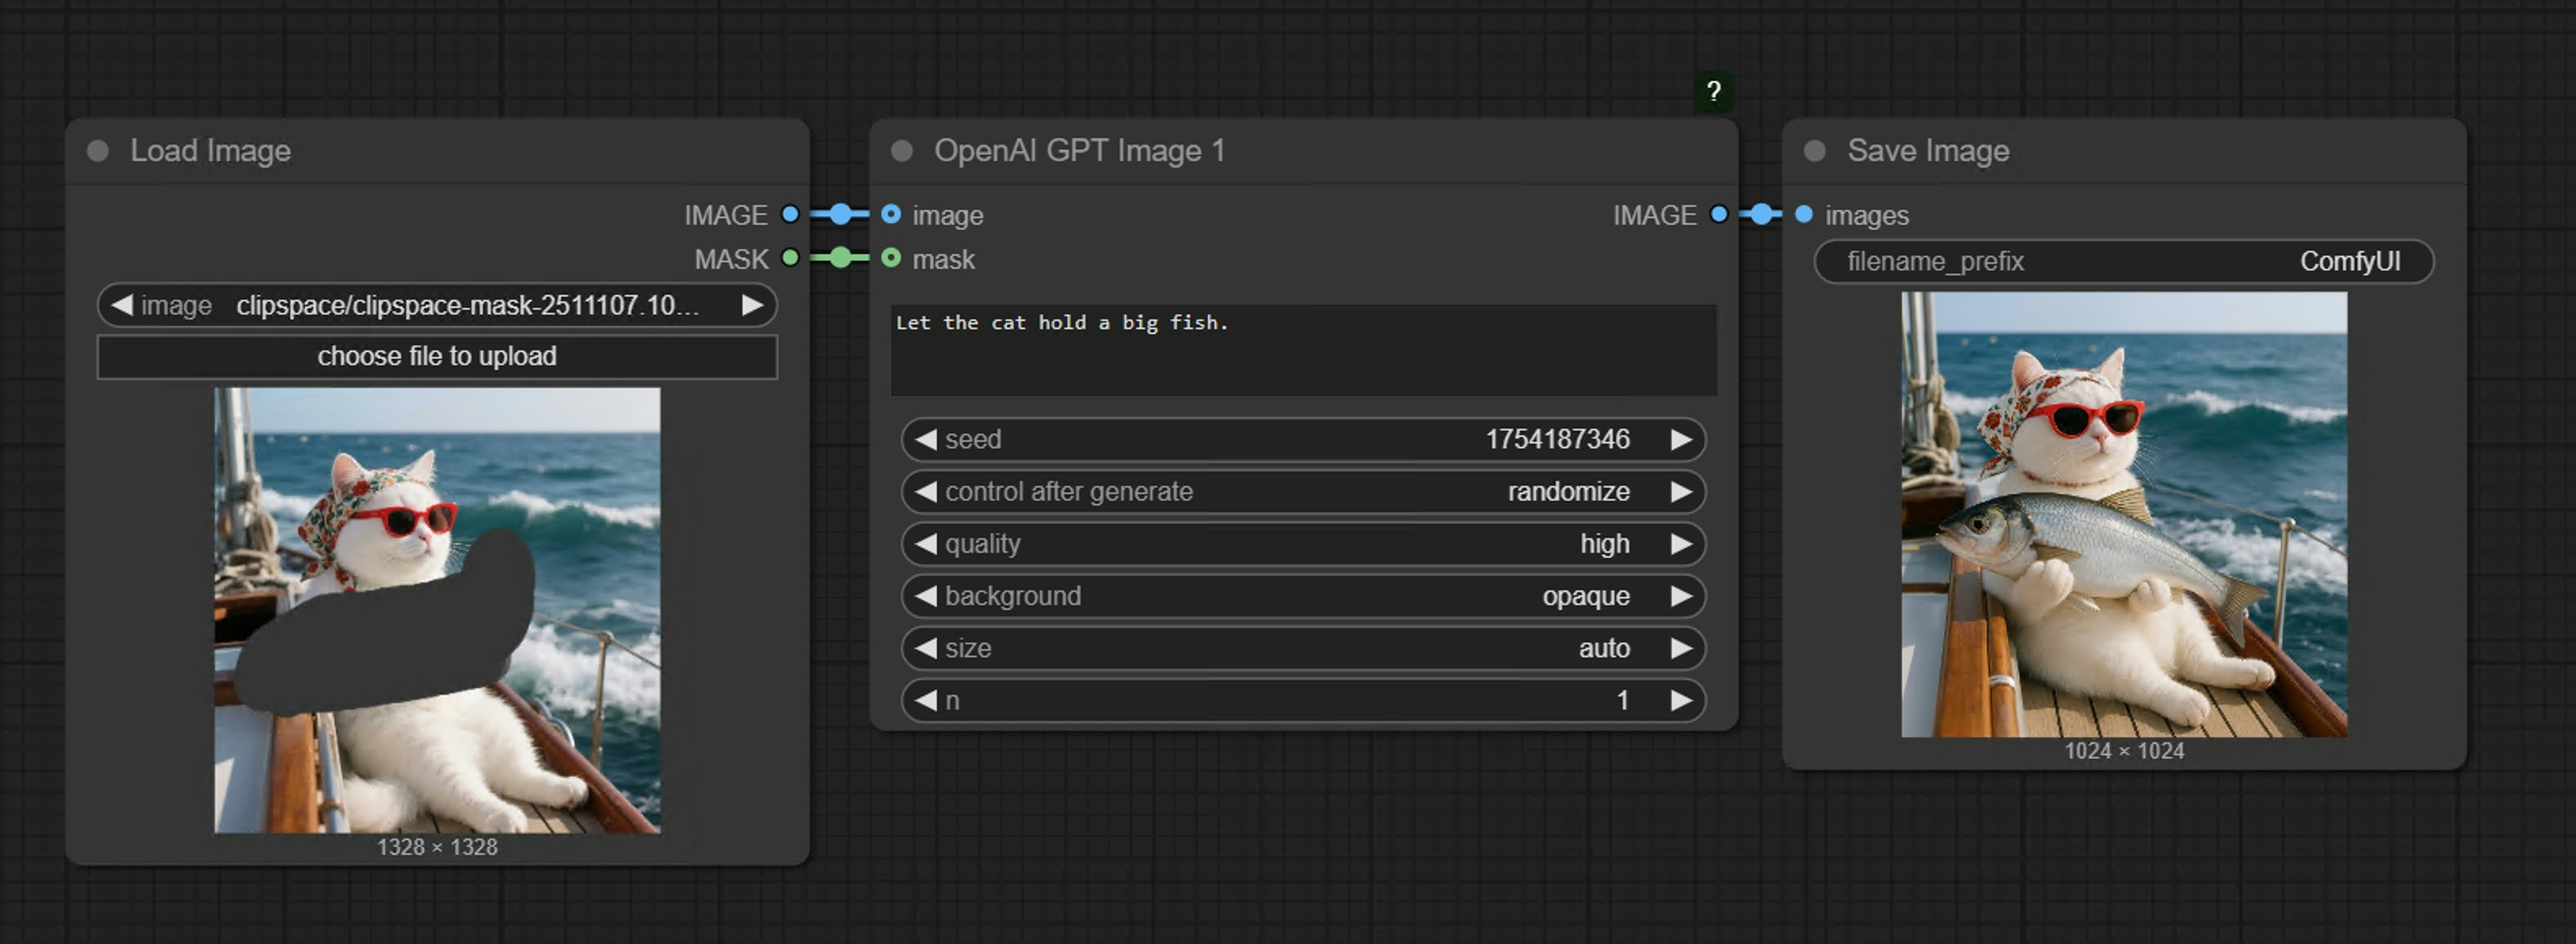 Compared to the image-to-image workflow, we use the MaskEditor in the `Load Image` node through the right-click menu to draw a mask, then connect it to the `mask` input of the `OpenAI GPT-Image-1` node to complete the workflow.
**Notes**
* The mask and image must be the same size
* When inputting large images, the node will automatically resize the image to an appropriate size
## FAQs
Please update your ComfyUI to the latest version (the latest commit or the latest [desktop version](https://www.comfy.org/download)).
We may add more API support in the future, and the corresponding nodes will be updated, so please keep your ComfyUI up to date.
Please note that you need to distinguish between the nightly version and the release version.
In some cases, the latest `release` version may not be updated in time compared to the `nightly` version.
Since we are still iterating quickly, please ensure you are using the latest version when you cannot find the corresponding node.
API access requires that your current request is based on a secure network environment. The current requirements for API access are as follows:
* The local network only allows access from `127.0.0.1` or `localhost`, which may mean that you cannot use the Partner Nodes in a ComfyUI service started with the `--listen` parameter in a LAN environment.
* Able to access our API service normally (a proxy service may be required in some regions).
* Your account does not have enough [credits](/interface/credits).
* Currently, only `127.0.0.1` or `localhost` access is supported.
* Ensure your account has enough credits.
Partner Nodes require credits for API calls to closed-source models, so they do not support free usage.
Please refer to the following documentation:
1. [Comfy Account](/interface/user): Find the `User` section in the settings menu to log in.
2. [Credits](/interface/credits): After logging in, the settings interface will show the credits menu. You can purchase credits in `Settings` → `Credits`. We use a prepaid system, so there will be no unexpected charges.
3. Complete the payment through Stripe.
4. Check if the credits have been updated. If not, try restarting or refreshing the page.
Currently, we do not support refunds for credits.
If you believe there is an error resulting in unused balance due to technical issues, please [contact support](mailto:support@comfy.org).
Credits are not intended to be used as a negative balance or credit line. However, due to race conditions where partner nodes don't always report costs before execution, a single execution may consume more credits than your remaining balance and temporarily result in a negative balance after completion. When your balance is negative, you will not be able to run Partner Nodes until you top up and restore a positive balance. Please ensure you have enough credits before making API calls.
Please visit the [Credits](/interface/credits) menu after logging in to check the corresponding credits.
Currently, the Partner Nodes are still in the testing phase and do not support this feature yet, but we have considered adding it.
Yes, the expiration depends on the type of credits:
* **Monthly credits**: Expire at the end of your billing period
* **Top-up credits**: Expire 1 year from the date of purchase
No, your credits cannot be transferred to other users and are limited to the currently logged-in account, but we do not restrict the number of devices that can log in.
We do not limit the number of devices that can log in; you can use your account anywhere you want.
Email a request to [support@comfy.org](mailto:support@comfy.org) and we will delete your information
Partner Nodes send your inputs (prompts, images, and other content) to third-party providers for processing. These providers enforce their own content moderation policies. Please do not submit NSFW or other prohibited content to API nodes.
Compared to the image-to-image workflow, we use the MaskEditor in the `Load Image` node through the right-click menu to draw a mask, then connect it to the `mask` input of the `OpenAI GPT-Image-1` node to complete the workflow.
**Notes**
* The mask and image must be the same size
* When inputting large images, the node will automatically resize the image to an appropriate size
## FAQs
Please update your ComfyUI to the latest version (the latest commit or the latest [desktop version](https://www.comfy.org/download)).
We may add more API support in the future, and the corresponding nodes will be updated, so please keep your ComfyUI up to date.
Please note that you need to distinguish between the nightly version and the release version.
In some cases, the latest `release` version may not be updated in time compared to the `nightly` version.
Since we are still iterating quickly, please ensure you are using the latest version when you cannot find the corresponding node.
API access requires that your current request is based on a secure network environment. The current requirements for API access are as follows:
* The local network only allows access from `127.0.0.1` or `localhost`, which may mean that you cannot use the Partner Nodes in a ComfyUI service started with the `--listen` parameter in a LAN environment.
* Able to access our API service normally (a proxy service may be required in some regions).
* Your account does not have enough [credits](/interface/credits).
* Currently, only `127.0.0.1` or `localhost` access is supported.
* Ensure your account has enough credits.
Partner Nodes require credits for API calls to closed-source models, so they do not support free usage.
Please refer to the following documentation:
1. [Comfy Account](/interface/user): Find the `User` section in the settings menu to log in.
2. [Credits](/interface/credits): After logging in, the settings interface will show the credits menu. You can purchase credits in `Settings` → `Credits`. We use a prepaid system, so there will be no unexpected charges.
3. Complete the payment through Stripe.
4. Check if the credits have been updated. If not, try restarting or refreshing the page.
Currently, we do not support refunds for credits.
If you believe there is an error resulting in unused balance due to technical issues, please [contact support](mailto:support@comfy.org).
Credits are not intended to be used as a negative balance or credit line. However, due to race conditions where partner nodes don't always report costs before execution, a single execution may consume more credits than your remaining balance and temporarily result in a negative balance after completion. When your balance is negative, you will not be able to run Partner Nodes until you top up and restore a positive balance. Please ensure you have enough credits before making API calls.
Please visit the [Credits](/interface/credits) menu after logging in to check the corresponding credits.
Currently, the Partner Nodes are still in the testing phase and do not support this feature yet, but we have considered adding it.
Yes, the expiration depends on the type of credits:
* **Monthly credits**: Expire at the end of your billing period
* **Top-up credits**: Expire 1 year from the date of purchase
No, your credits cannot be transferred to other users and are limited to the currently logged-in account, but we do not restrict the number of devices that can log in.
We do not limit the number of devices that can log in; you can use your account anywhere you want.
Email a request to [support@comfy.org](mailto:support@comfy.org) and we will delete your information
Partner Nodes send your inputs (prompts, images, and other content) to third-party providers for processing. These providers enforce their own content moderation policies. Please do not submit NSFW or other prohibited content to API nodes.