Download Json Format Workflow File
Download the image below as input image  ### 2. Complete the Workflow Execution Step by Step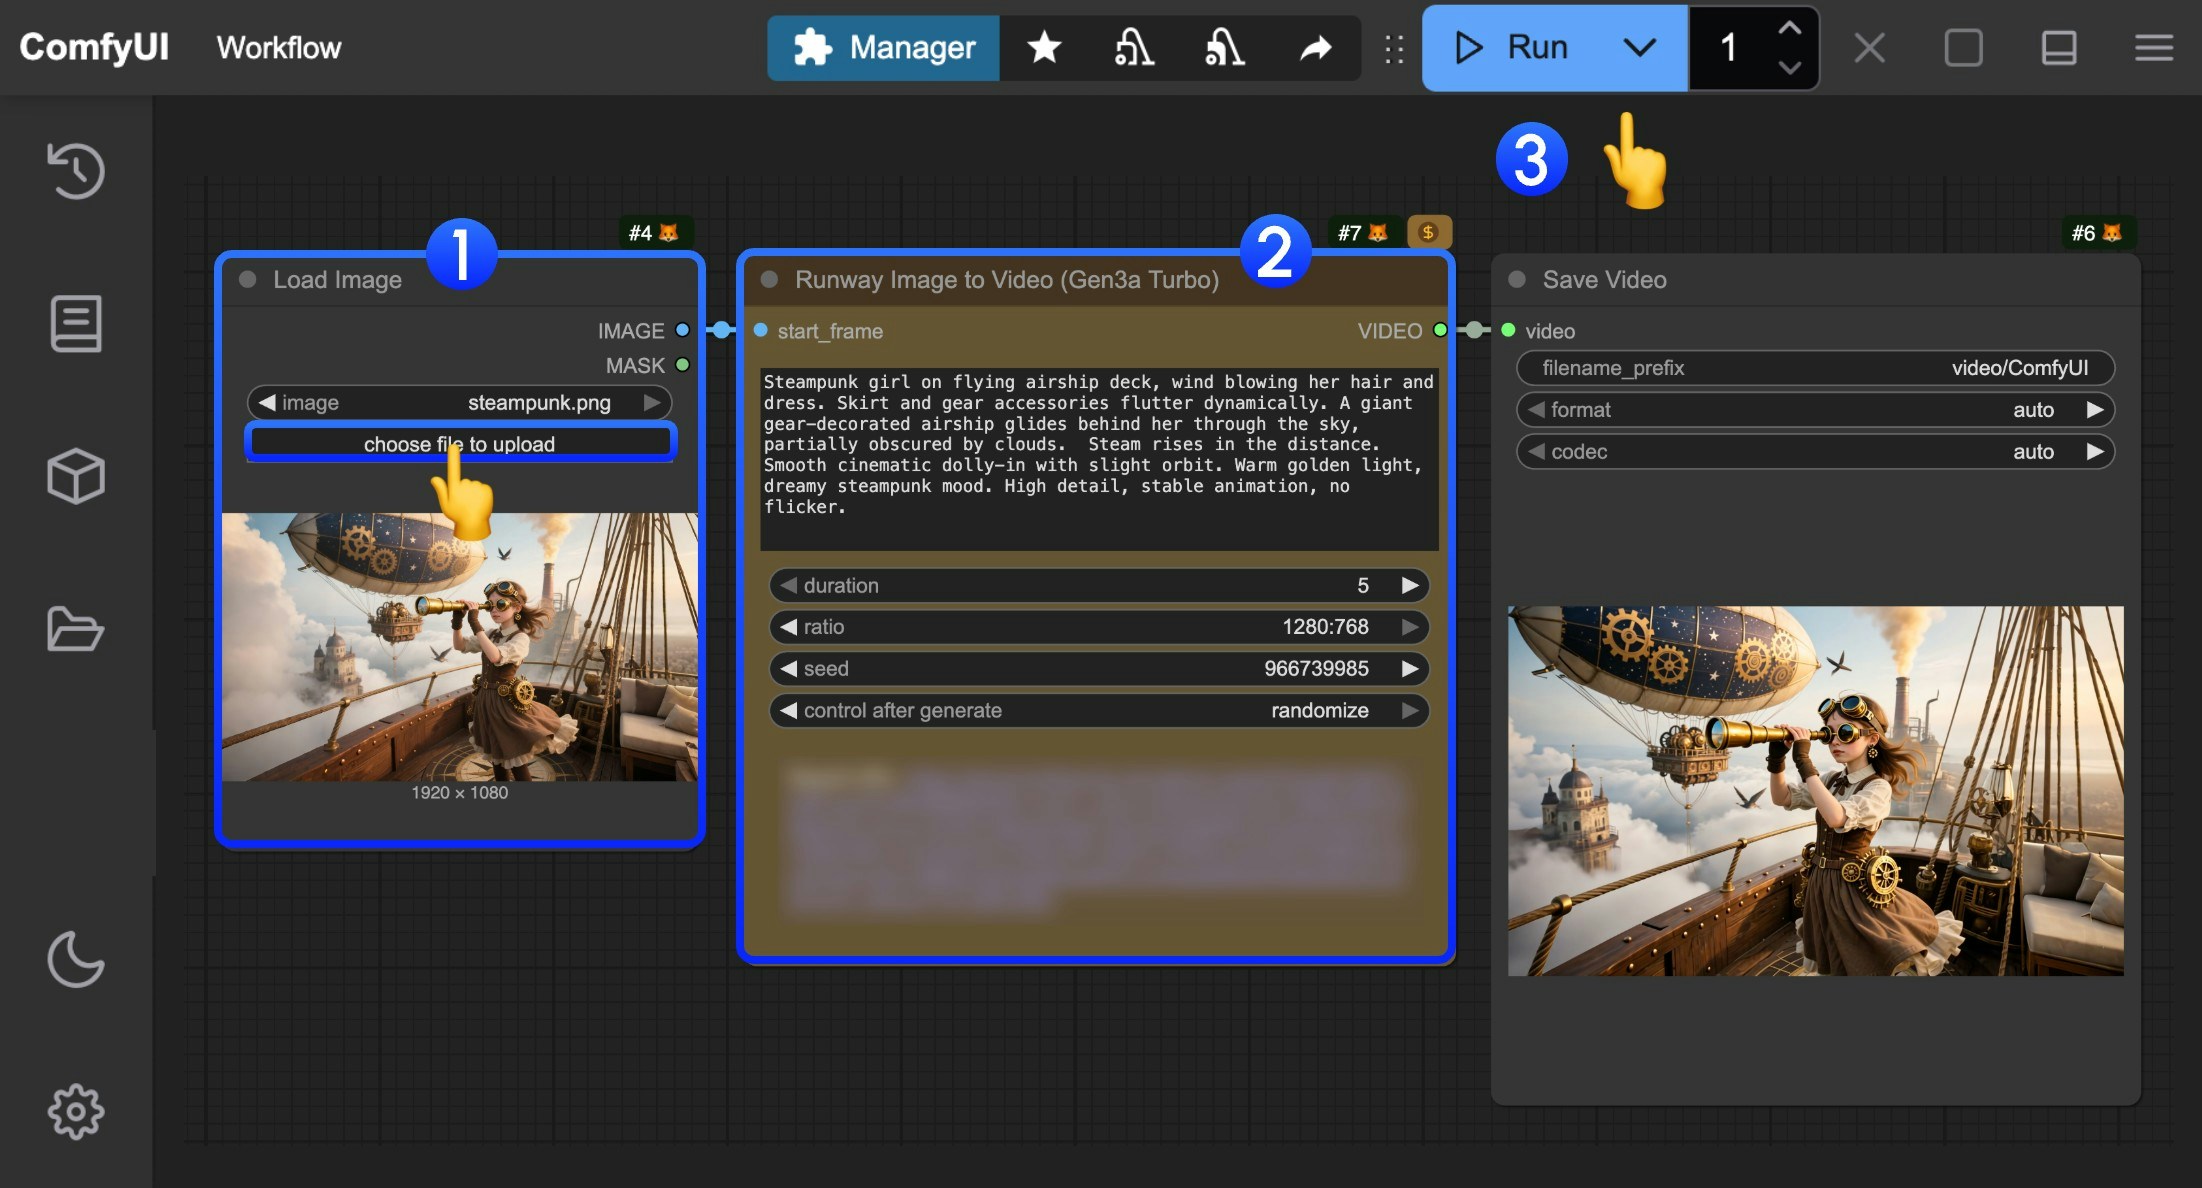 You can refer to the numbers in the image to complete the basic image-to-video workflow execution:
1. In the `Load Image` node, load the provided input image
2. In the `Runway Gen3a turbo` node, set the `prompt` to describe video content, modify the `duration` parameter to set video length, modify the `ratio` parameter to set video aspect ratio
3. Click the `Run` button, or use the shortcut `Ctrl(cmd) + Enter` to execute video generation.
4. After waiting for the API to return results, you can view the generated video in the `Save Video` node (right-click to save). The corresponding video will also be saved to the `ComfyUI/output/` directory.
## Gen4 turbo Image-to-Video Workflow
### 1. Workflow File Download
The video below contains workflow information in its `metadata`. Please download and drag it into ComfyUI to load the corresponding workflow.
You can refer to the numbers in the image to complete the basic image-to-video workflow execution:
1. In the `Load Image` node, load the provided input image
2. In the `Runway Gen3a turbo` node, set the `prompt` to describe video content, modify the `duration` parameter to set video length, modify the `ratio` parameter to set video aspect ratio
3. Click the `Run` button, or use the shortcut `Ctrl(cmd) + Enter` to execute video generation.
4. After waiting for the API to return results, you can view the generated video in the `Save Video` node (right-click to save). The corresponding video will also be saved to the `ComfyUI/output/` directory.
## Gen4 turbo Image-to-Video Workflow
### 1. Workflow File Download
The video below contains workflow information in its `metadata`. Please download and drag it into ComfyUI to load the corresponding workflow.
Download Json Format Workflow File
Download the image below as input image  ### 2. Complete the Workflow Execution Step by Step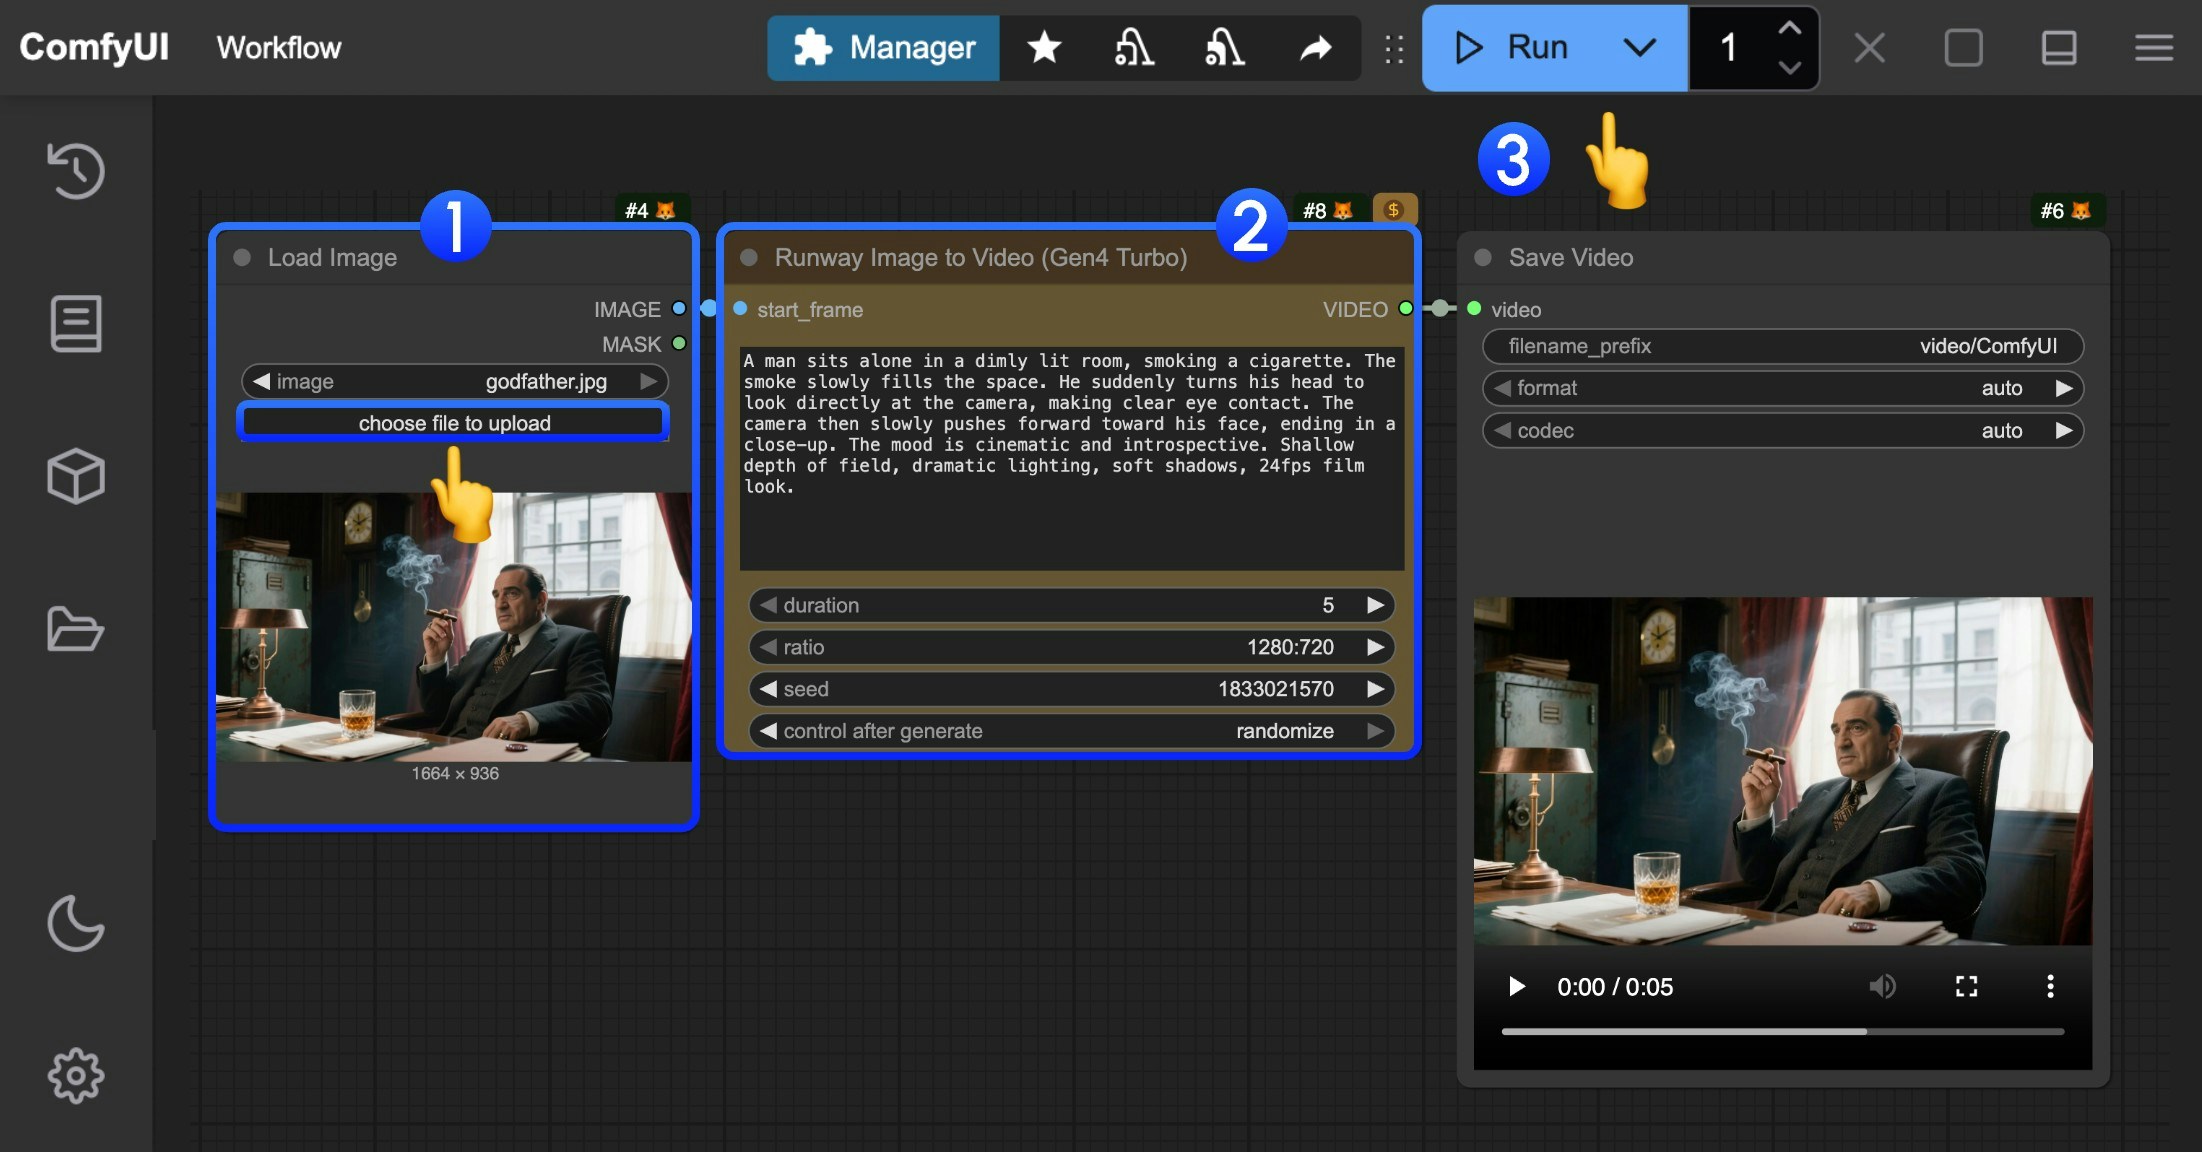 You can refer to the numbers in the image to complete the basic image-to-video workflow execution:
1. In the `Load Image` node, load the provided input image
2. In the `Runway Gen4 turbo` node, set the `prompt` to describe video content, modify the `duration` parameter to set video length, modify the `ratio` parameter to set video aspect ratio
3. Click the `Run` button, or use the shortcut `Ctrl(cmd) + Enter` to execute video generation.
4. After waiting for the API to return results, you can view the generated video in the `Save Video` node (right-click to save). The corresponding video will also be saved to the `ComfyUI/output/` directory.
## First-Last Frame Video Generation Workflow
### 1. Workflow File Download
The video below contains workflow information in its `metadata`. Please download and drag it into ComfyUI to load the corresponding workflow.
You can refer to the numbers in the image to complete the basic image-to-video workflow execution:
1. In the `Load Image` node, load the provided input image
2. In the `Runway Gen4 turbo` node, set the `prompt` to describe video content, modify the `duration` parameter to set video length, modify the `ratio` parameter to set video aspect ratio
3. Click the `Run` button, or use the shortcut `Ctrl(cmd) + Enter` to execute video generation.
4. After waiting for the API to return results, you can view the generated video in the `Save Video` node (right-click to save). The corresponding video will also be saved to the `ComfyUI/output/` directory.
## First-Last Frame Video Generation Workflow
### 1. Workflow File Download
The video below contains workflow information in its `metadata`. Please download and drag it into ComfyUI to load the corresponding workflow.
Download Json Format Workflow File
Download the images below as input images   ### 2. Complete the Workflow Execution Step by Step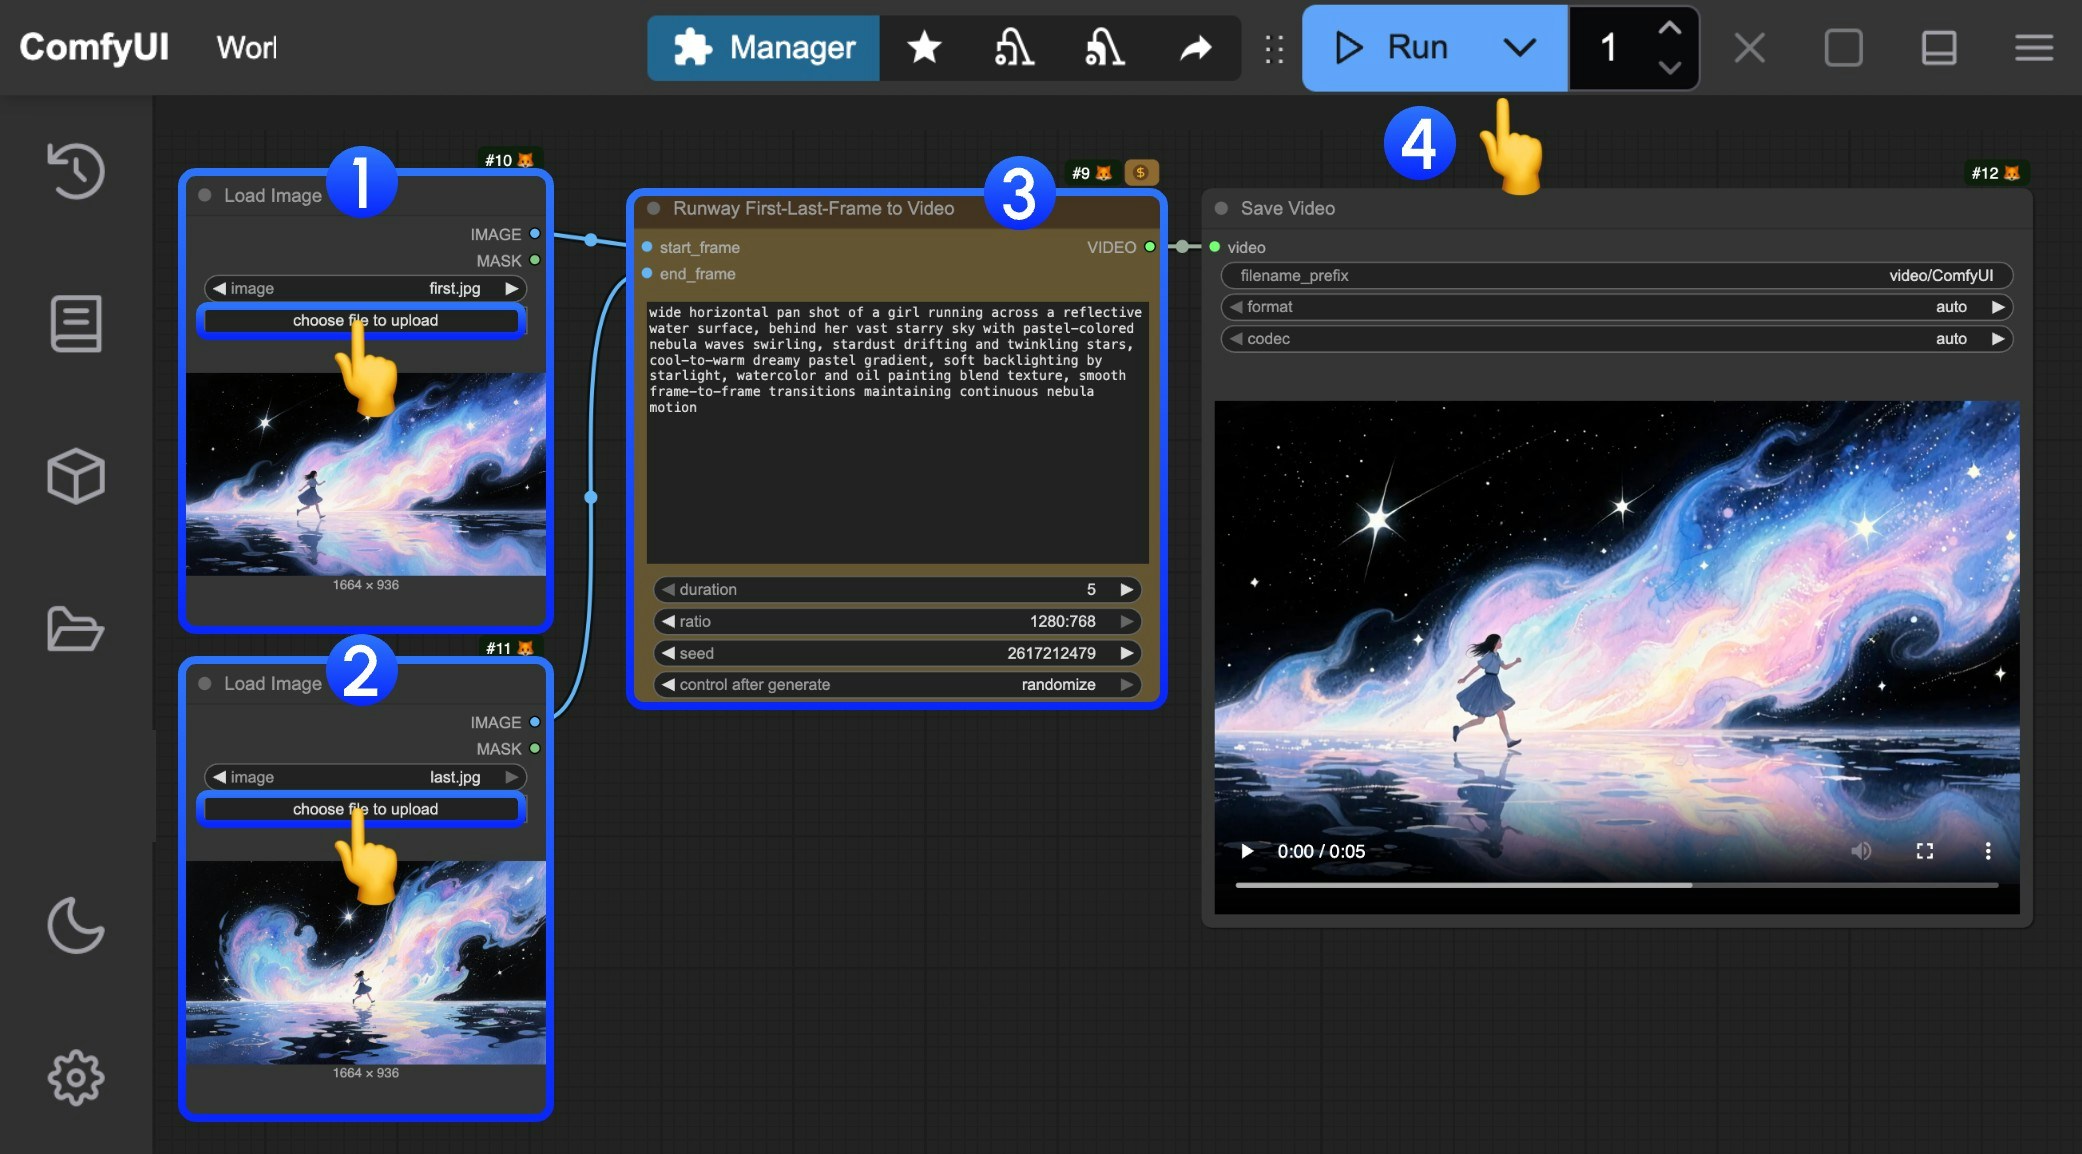 You can refer to the numbers in the image to complete the basic first-last frame to video workflow execution:
1. In the `Load Image` node, load the starting frame
2. In the `Load Image` node, load the ending frame
3. In the `Runway First-Last-Frame to Video` node, set the `prompt` to describe video content, modify the `duration` parameter to set video length, modify the `ratio` parameter to set video aspect ratio
4. Click the `Run` button, or use the shortcut `Ctrl(cmd) + Enter` to execute video generation.
5. After waiting for the API to return results, you can view the generated video in the `Save Video` node (right-click to save). The corresponding video will also be saved to the `ComfyUI/output/` directory.
Built with [Mintlify](https://mintlify.com).
You can refer to the numbers in the image to complete the basic first-last frame to video workflow execution:
1. In the `Load Image` node, load the starting frame
2. In the `Load Image` node, load the ending frame
3. In the `Runway First-Last-Frame to Video` node, set the `prompt` to describe video content, modify the `duration` parameter to set video length, modify the `ratio` parameter to set video aspect ratio
4. Click the `Run` button, or use the shortcut `Ctrl(cmd) + Enter` to execute video generation.
5. After waiting for the API to return results, you can view the generated video in the `Save Video` node (right-click to save). The corresponding video will also be saved to the `ComfyUI/output/` directory.
Built with [Mintlify](https://mintlify.com).