> ## Documentation Index
> Fetch the complete documentation index at: https://docs.comfy.org/llms.txt
> Use this file to discover all available pages before exploring further.
# Stability AI Stable Diffusion 3.5 API Node ComfyUI Official Example
> This article will introduce how to use Stability AI Stable Diffusion 3.5 Partner node's text-to-image and image-to-image capabilities in ComfyUI
The [Stability AI Stable Diffusion 3.5 Image](/built-in-nodes/partner-node/image/stability-ai/stability-ai-stable-diffusion-3-5-image) node allows you to use Stability AI's Stable Diffusion 3.5 model to create high-quality, detail-rich image content through text prompts or reference images.
In this guide, we will show you how to set up workflows for both text-to-image and image-to-image generation using this node.
To use the API nodes, you need to ensure that you are logged in properly and using a permitted network environment. Please refer to the [API Nodes Overview](/tutorials/partner-nodes/overview) section of the documentation to understand the specific requirements for using the API nodes.
Make sure your ComfyUI is updated.
* [Download ComfyUI](https://www.comfy.org/download)
* [Update Guide](/installation/update_comfyui)
Workflows in this guide can be found in the [Workflow Templates](/interface/features/template).
If you can't find them in the template, your ComfyUI may be outdated. (Desktop version's update will delay sometime)
If nodes are missing when loading a workflow, possible reasons:
1. You are not using the latest ComfyUI version (Nightly version)
2. Some nodes failed to import at startup
* The Desktop is base on ComfyUI stable release, it will auto-update when there is a new Desktop stable release available.
* [Cloud](https://cloud.comfy.org) will update after ComfyUI stable release.
So, if you find any core node missing in this document, it might be because the new core nodes have not yet been released in the latest stable version. Please wait for the next stable release.
## Stability AI Stable Diffusion 3.5 Text-to-Image Workflow
### 1. Workflow File Download
The image below contains workflow information in its `metadata`. Please download and drag it into ComfyUI to load the corresponding workflow.

### 2. Complete the Workflow Step by Step
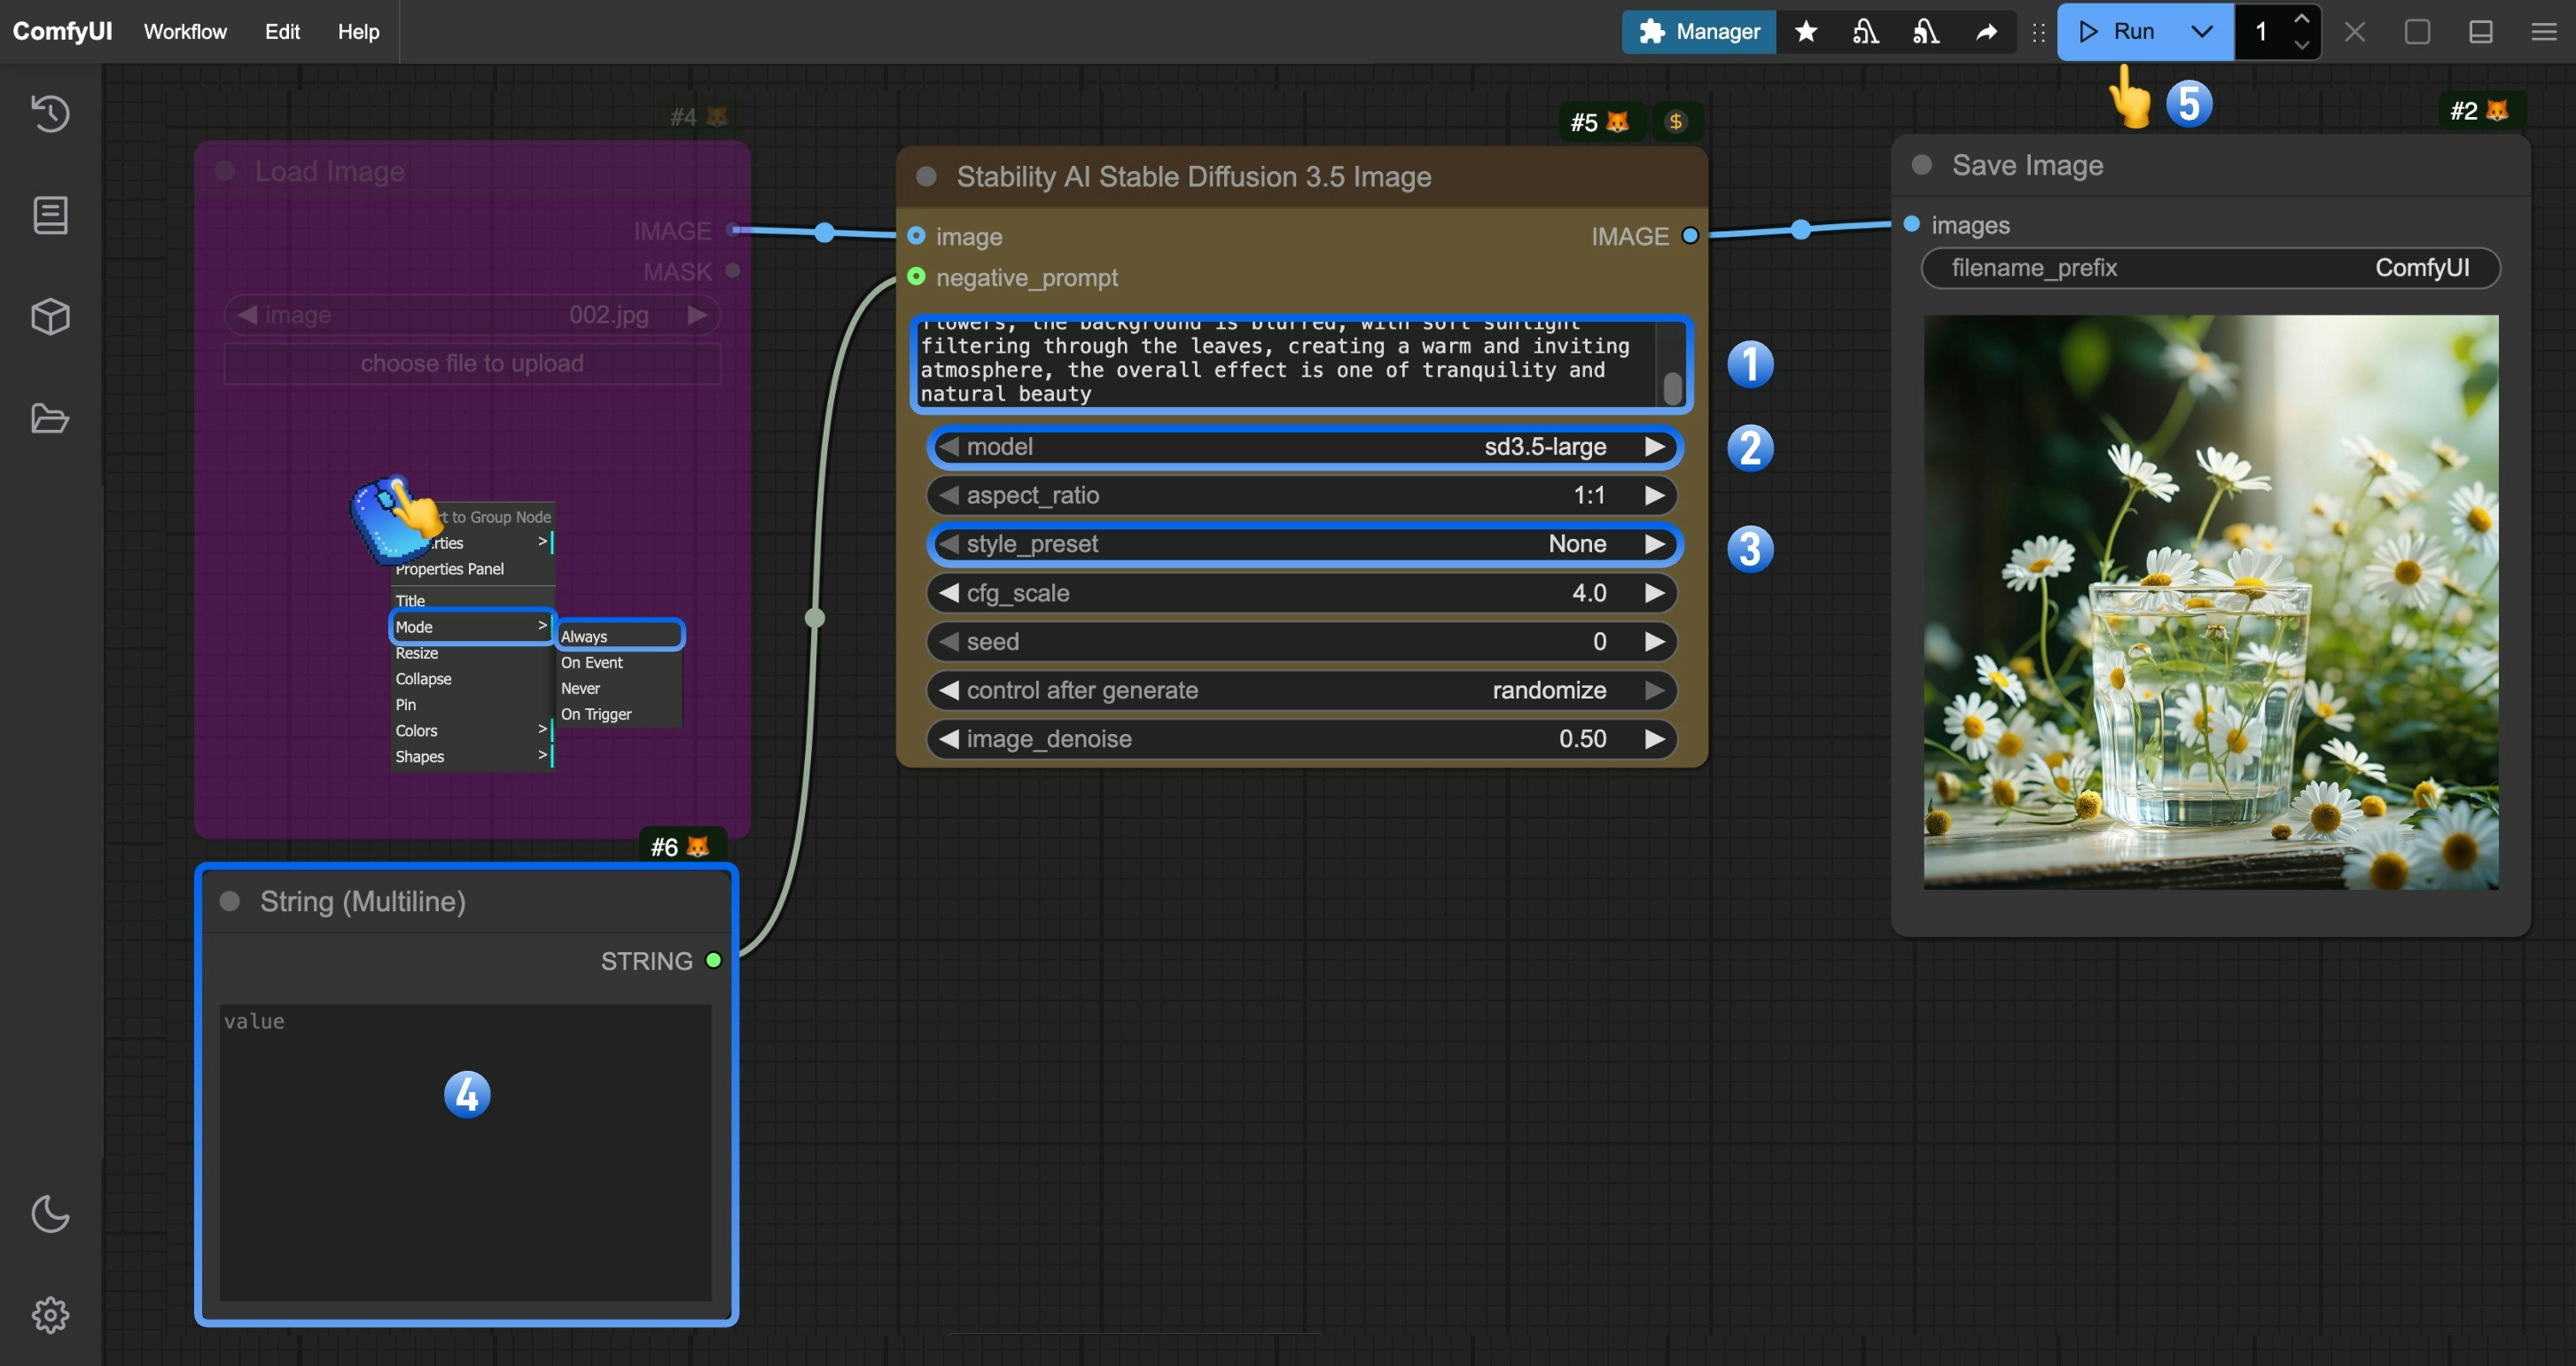 You can follow the numbered steps in the image to complete the basic text-to-image workflow:
1. (Optional) Modify the `prompt` parameter in the `Stability AI Stable Diffusion 3.5 Image` node to input your desired image description. More detailed prompts often result in better image quality.
2. (Optional) Select the `model` parameter to choose which SD 3.5 model version to use.
3. (Optional) Select the `style_preset` parameter to control the visual style of the image. Different presets produce images with different stylistic characteristics, such as "cinematic" or "anime". Select "None" to not apply any specific style.
4. (Optional) Edit the `String(Multiline)` to modify negative prompts, specifying elements you don't want to appear in the generated image.
5. Click the `Run` button or use the shortcut `Ctrl(cmd) + Enter` to execute the image generation.
6. After the API returns results, you can view the generated image in the `Save Image` node. The image will also be saved to the `ComfyUI/output/` directory.
### 3. Additional Notes
* **Prompt**: The prompt is one of the most important parameters in the generation process. Detailed, clear descriptions lead to better results. Can include elements like scene, subject, colors, lighting, and style.
* **CFG Scale**: Controls how closely the generator follows the prompt. Higher values make the image more closely match the prompt description, but too high may result in oversaturated or unnatural results.
* **Style Preset**: Offers various preset styles for quickly defining the overall style of the image.
* **Negative Prompt**: Used to specify elements you don't want to appear in the generated image.
* **Seed Parameter**: Can be used to reproduce or fine-tune generation results, helpful for iteration during creation.
* Currently the `Load Image` node is in "Bypass" mode. To enable it, refer to the step guide and right-click the node to set "Mode" to "Always" to enable input, switching to image-to-image mode.
* `image_denoise` has no effect when there is no input image.
## Stability AI Stable Diffusion 3.5 Image-to-Image Workflow
### 1. Workflow File Download
The image below contains workflow information in its `metadata`. Please download and drag it into ComfyUI to load the corresponding workflow.
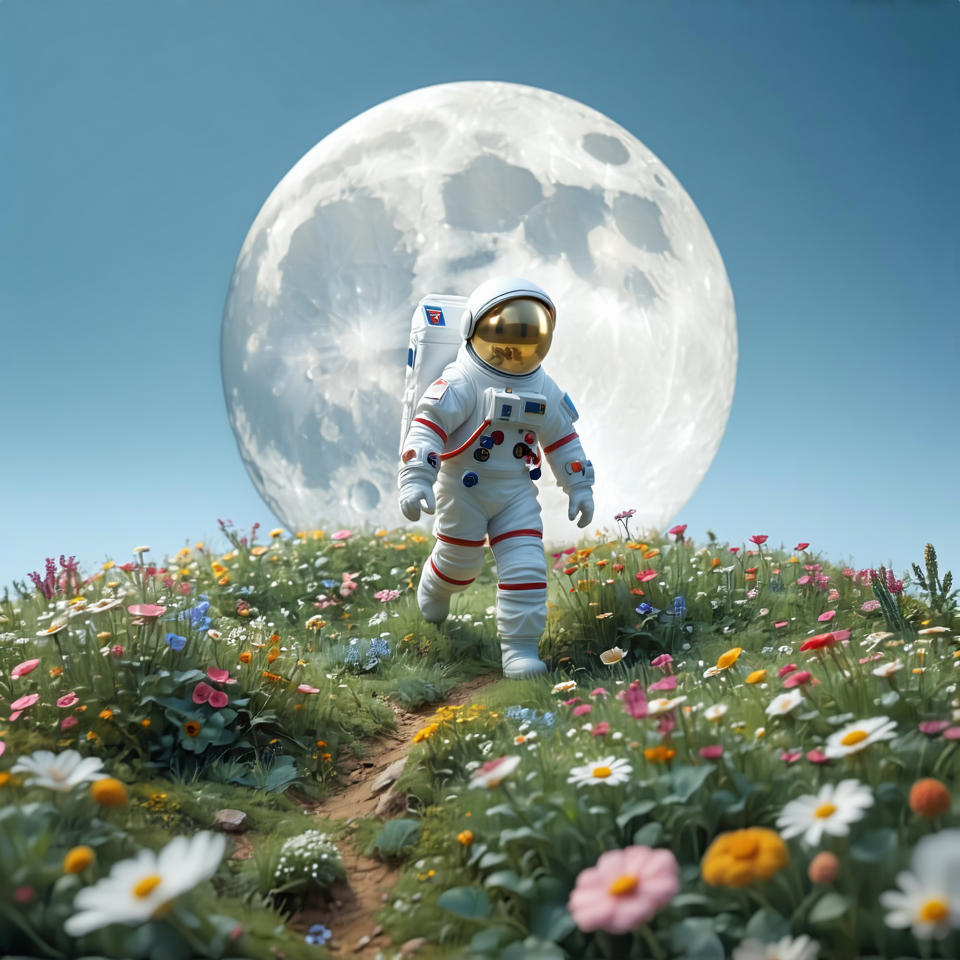
Download the image below to use as input
!\[Stability AI Stable Diffusion 3.5 Image-to-Image Workflow Input Image]\(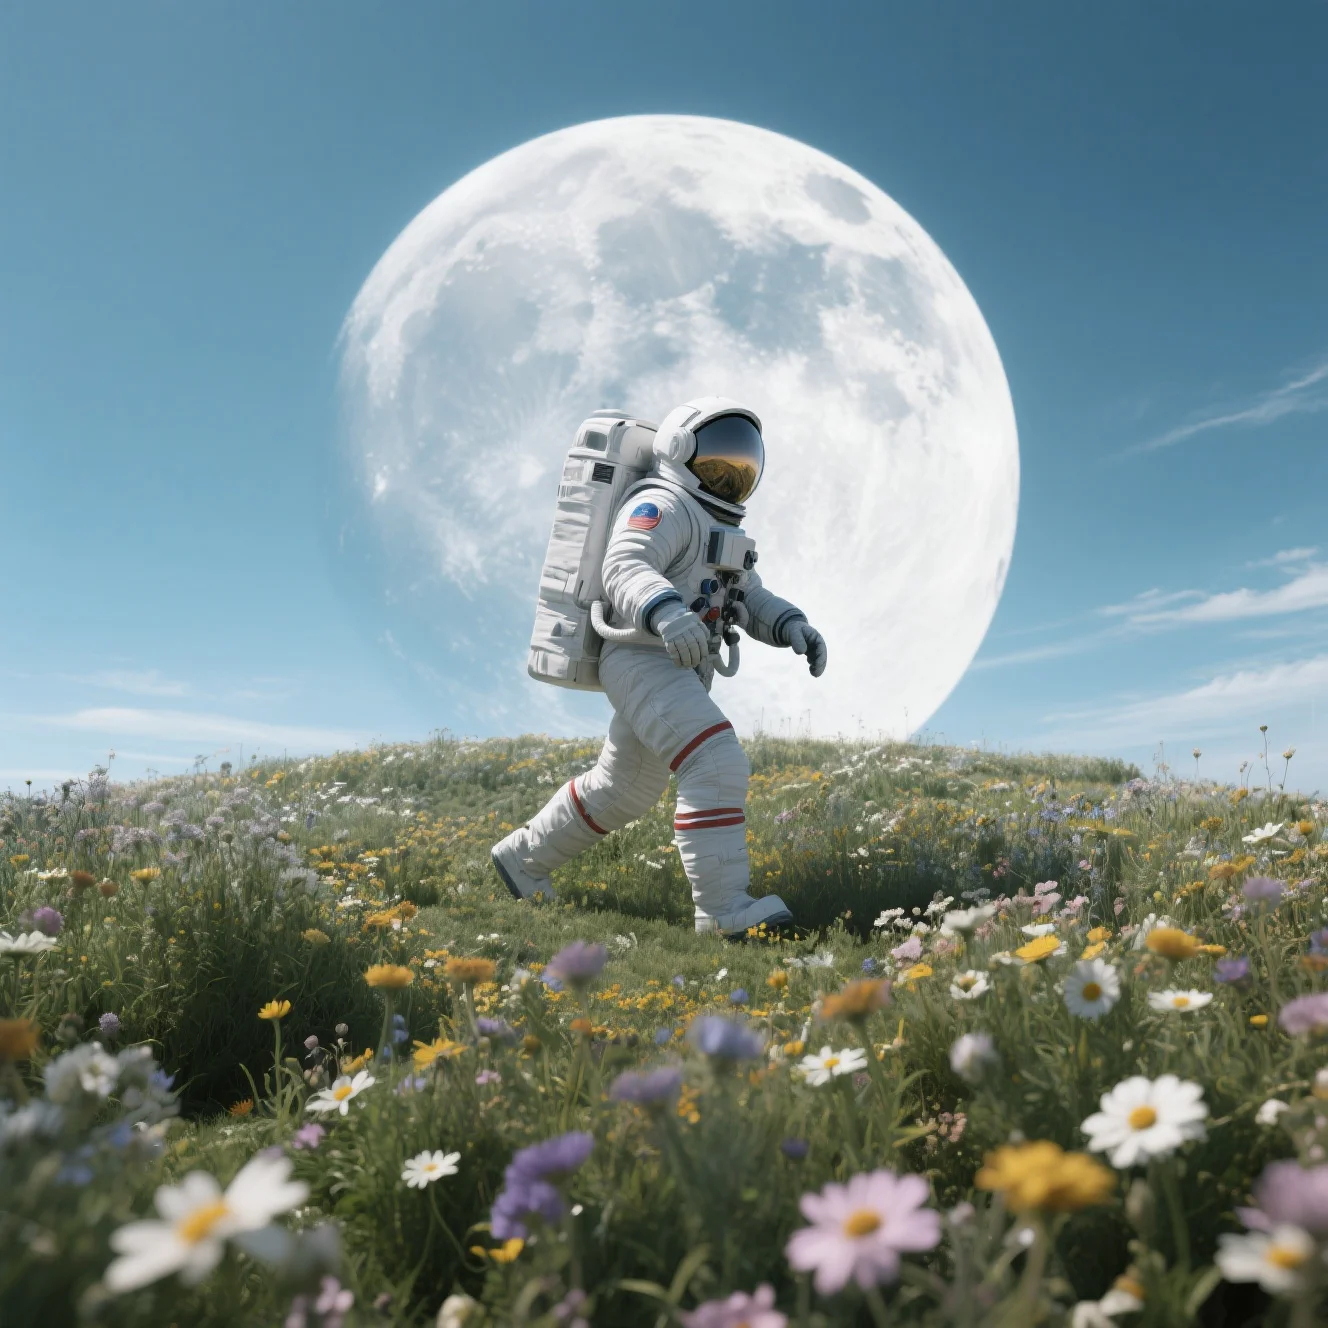
### 2. Complete the Workflow Step by Step
You can follow the numbered steps in the image to complete the basic text-to-image workflow:
1. (Optional) Modify the `prompt` parameter in the `Stability AI Stable Diffusion 3.5 Image` node to input your desired image description. More detailed prompts often result in better image quality.
2. (Optional) Select the `model` parameter to choose which SD 3.5 model version to use.
3. (Optional) Select the `style_preset` parameter to control the visual style of the image. Different presets produce images with different stylistic characteristics, such as "cinematic" or "anime". Select "None" to not apply any specific style.
4. (Optional) Edit the `String(Multiline)` to modify negative prompts, specifying elements you don't want to appear in the generated image.
5. Click the `Run` button or use the shortcut `Ctrl(cmd) + Enter` to execute the image generation.
6. After the API returns results, you can view the generated image in the `Save Image` node. The image will also be saved to the `ComfyUI/output/` directory.
### 3. Additional Notes
* **Prompt**: The prompt is one of the most important parameters in the generation process. Detailed, clear descriptions lead to better results. Can include elements like scene, subject, colors, lighting, and style.
* **CFG Scale**: Controls how closely the generator follows the prompt. Higher values make the image more closely match the prompt description, but too high may result in oversaturated or unnatural results.
* **Style Preset**: Offers various preset styles for quickly defining the overall style of the image.
* **Negative Prompt**: Used to specify elements you don't want to appear in the generated image.
* **Seed Parameter**: Can be used to reproduce or fine-tune generation results, helpful for iteration during creation.
* Currently the `Load Image` node is in "Bypass" mode. To enable it, refer to the step guide and right-click the node to set "Mode" to "Always" to enable input, switching to image-to-image mode.
* `image_denoise` has no effect when there is no input image.
## Stability AI Stable Diffusion 3.5 Image-to-Image Workflow
### 1. Workflow File Download
The image below contains workflow information in its `metadata`. Please download and drag it into ComfyUI to load the corresponding workflow.

Download the image below to use as input
!\[Stability AI Stable Diffusion 3.5 Image-to-Image Workflow Input Image]\(
### 2. Complete the Workflow Step by Step
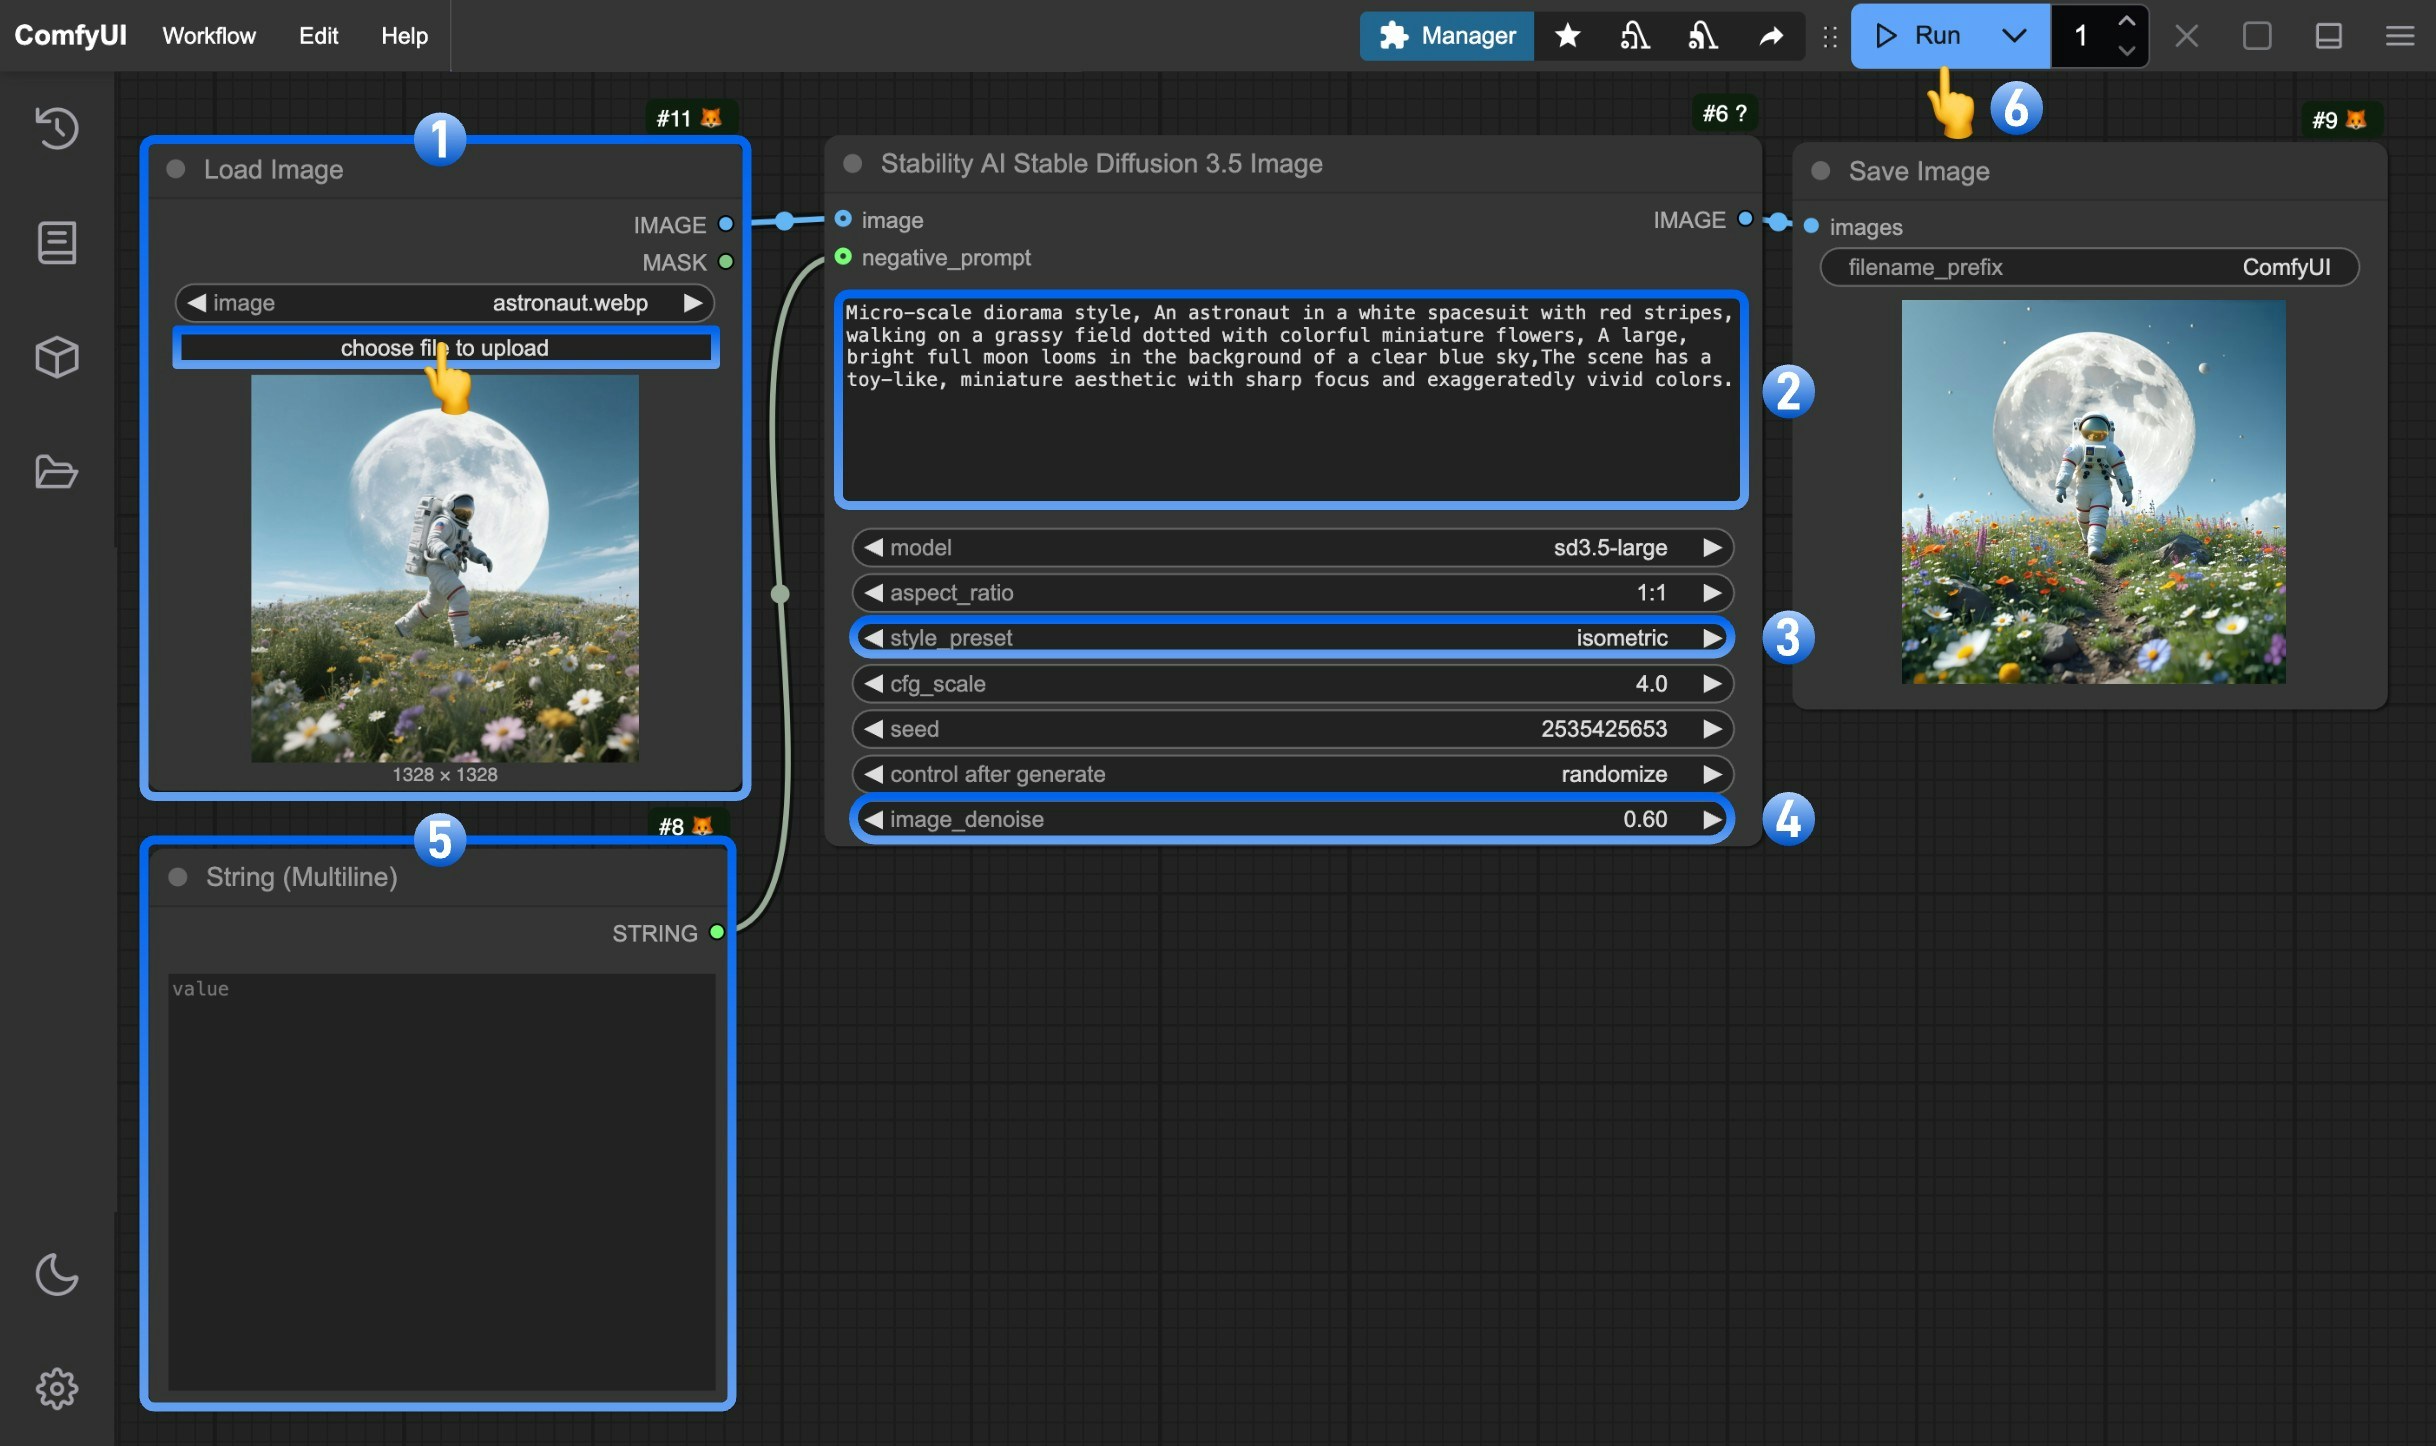 You can follow the numbered steps in the image to complete the image-to-image workflow:
1. Load a reference image through the `Load Image` node, which will serve as the basis for generation.
2. (Optional) Modify the `prompt` parameter in the `Stability AI Stable Diffusion 3.5 Image` node to describe elements you want to change or enhance in the reference image.
3. (Optional) Select the `style_preset` parameter to control the visual style of the image. Different presets produce images with different stylistic characteristics.
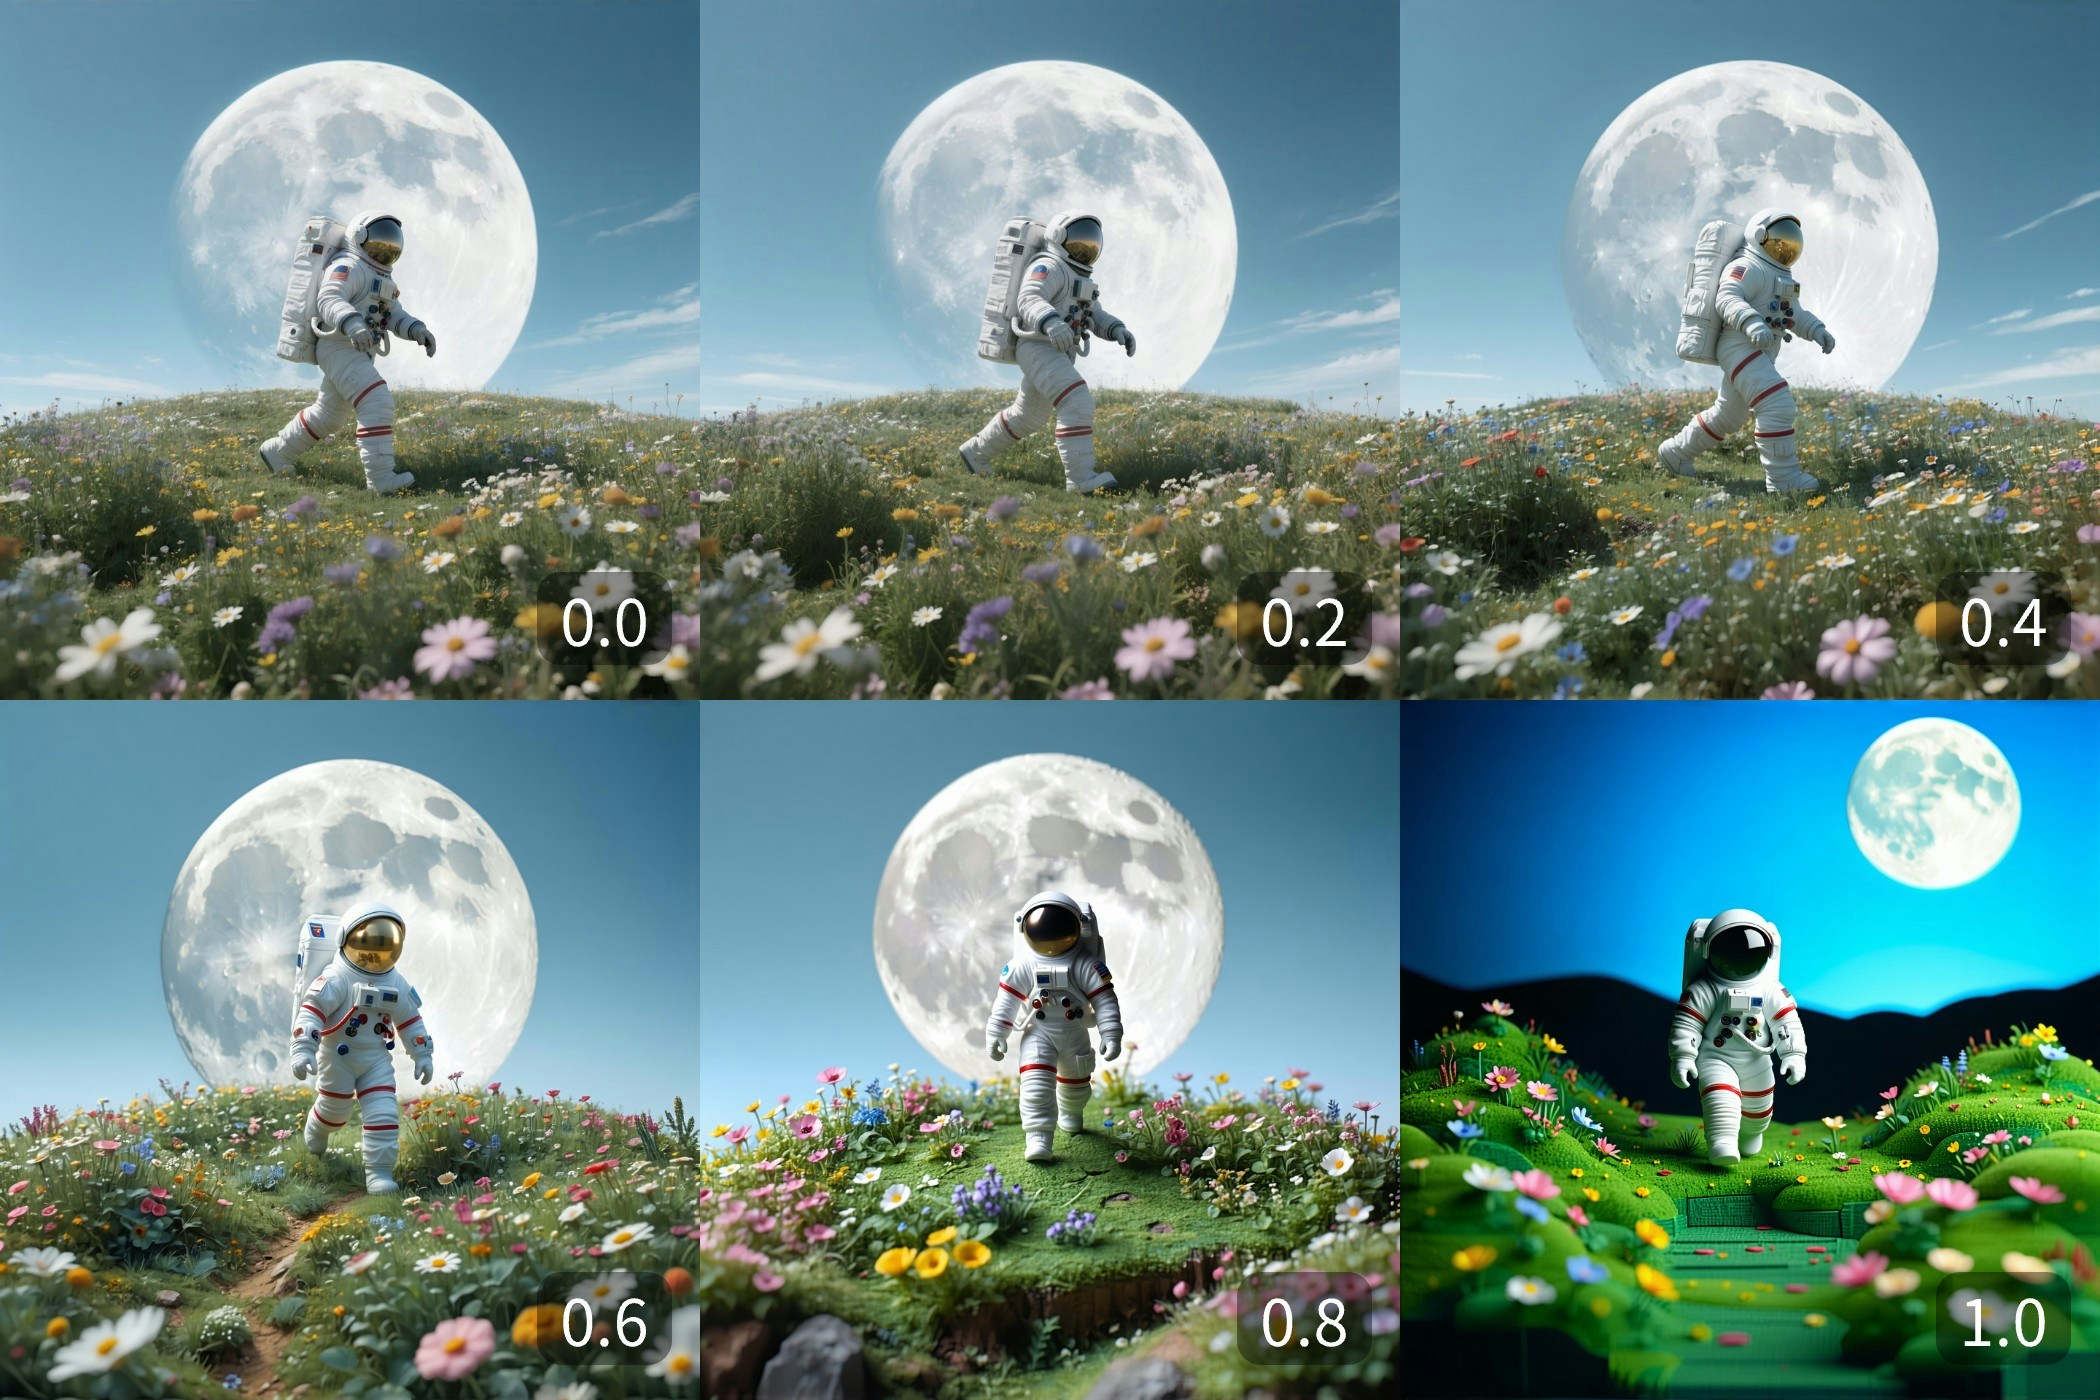
4. (Optional|Important) Adjust the `image_denoise` parameter (range 0.0-1.0) to control how much the original image is modified:
* Values closer to 0.0 make the generated image more similar to the input reference image (at 0.0, it's basically identical to the original)
* Values closer to 1.0 make the generated image more like pure text-to-image generation (at 1.0, it's as if no reference image was provided)
5. (Optional) Edit the `String(Multiline)` to modify negative prompts, specifying elements you don't want to appear in the generated image.
6. Click the `Run` button or use the shortcut `Ctrl(cmd) + Enter` to execute the image generation.
7. After the API returns results, you can view the generated image in the `Save Image` node. The image will also be saved to the `ComfyUI/output/` directory.
### 3. Additional Notes
The image below shows a comparison of results with and without input image using the same parameter settings:
You can follow the numbered steps in the image to complete the image-to-image workflow:
1. Load a reference image through the `Load Image` node, which will serve as the basis for generation.
2. (Optional) Modify the `prompt` parameter in the `Stability AI Stable Diffusion 3.5 Image` node to describe elements you want to change or enhance in the reference image.
3. (Optional) Select the `style_preset` parameter to control the visual style of the image. Different presets produce images with different stylistic characteristics.
4. (Optional|Important) Adjust the `image_denoise` parameter (range 0.0-1.0) to control how much the original image is modified:
* Values closer to 0.0 make the generated image more similar to the input reference image (at 0.0, it's basically identical to the original)
* Values closer to 1.0 make the generated image more like pure text-to-image generation (at 1.0, it's as if no reference image was provided)
5. (Optional) Edit the `String(Multiline)` to modify negative prompts, specifying elements you don't want to appear in the generated image.
6. Click the `Run` button or use the shortcut `Ctrl(cmd) + Enter` to execute the image generation.
7. After the API returns results, you can view the generated image in the `Save Image` node. The image will also be saved to the `ComfyUI/output/` directory.
### 3. Additional Notes
The image below shows a comparison of results with and without input image using the same parameter settings:
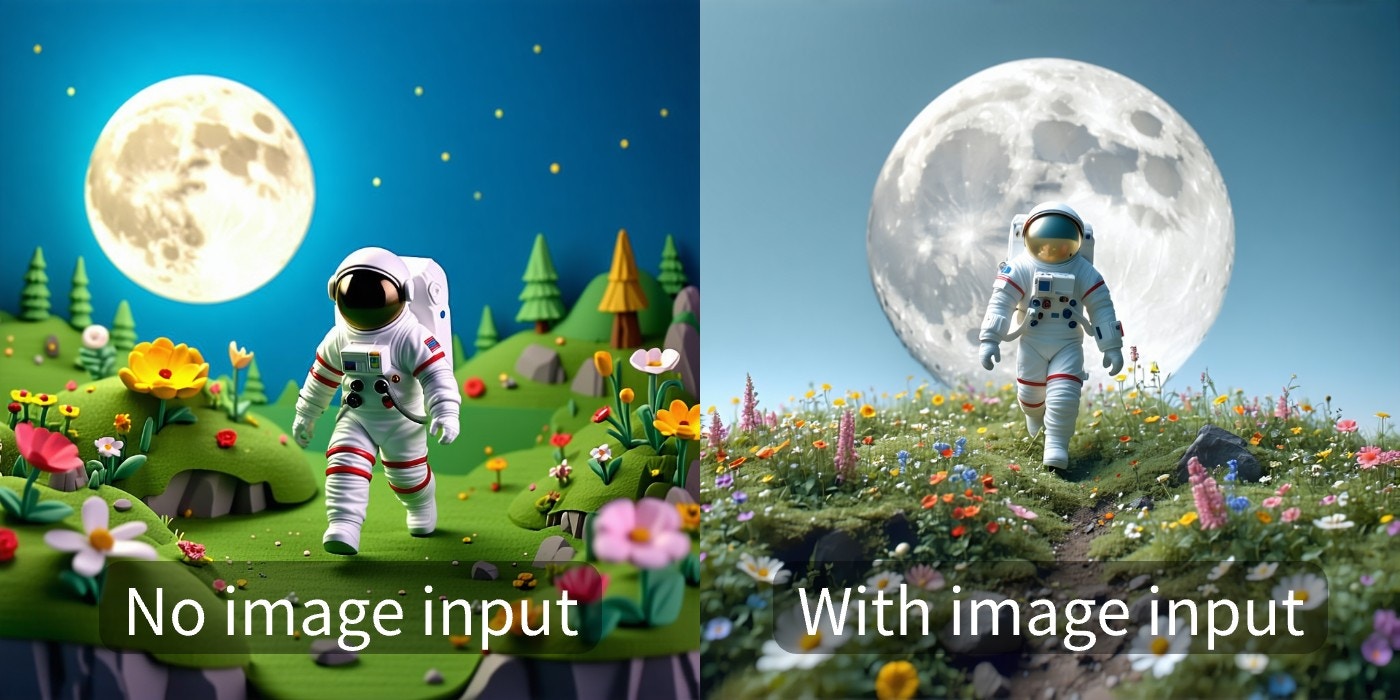 **Image Denoise**: This parameter determines how much of the original image's features are preserved during generation. It's the most crucial adjustment parameter in image-to-image mode. The image below shows the effects of different denoising strengths:
 * **Reference Image Selection**: Choosing images with clear subjects and good composition usually yields better results.
* **Prompt Tips**: In image-to-image mode, prompts should focus more on elements you want to change or enhance, rather than describing everything already present in the image.
* **Mode Switching**: When an input image is provided, the node automatically switches from text-to-image mode to image-to-image mode, and aspect ratio parameters are ignored.
## Related Node Details
You can refer to the documentation below to understand detailed parameter settings for the corresponding node
Stability Stable Diffusion 3.5 Image API Node Documentation
Built with [Mintlify](https://mintlify.com).
* **Reference Image Selection**: Choosing images with clear subjects and good composition usually yields better results.
* **Prompt Tips**: In image-to-image mode, prompts should focus more on elements you want to change or enhance, rather than describing everything already present in the image.
* **Mode Switching**: When an input image is provided, the node automatically switches from text-to-image mode to image-to-image mode, and aspect ratio parameters are ignored.
## Related Node Details
You can refer to the documentation below to understand detailed parameter settings for the corresponding node
Stability Stable Diffusion 3.5 Image API Node Documentation
Built with [Mintlify](https://mintlify.com).