Download Json Format Workflow File
### 2. Complete the Workflow Execution Step by Step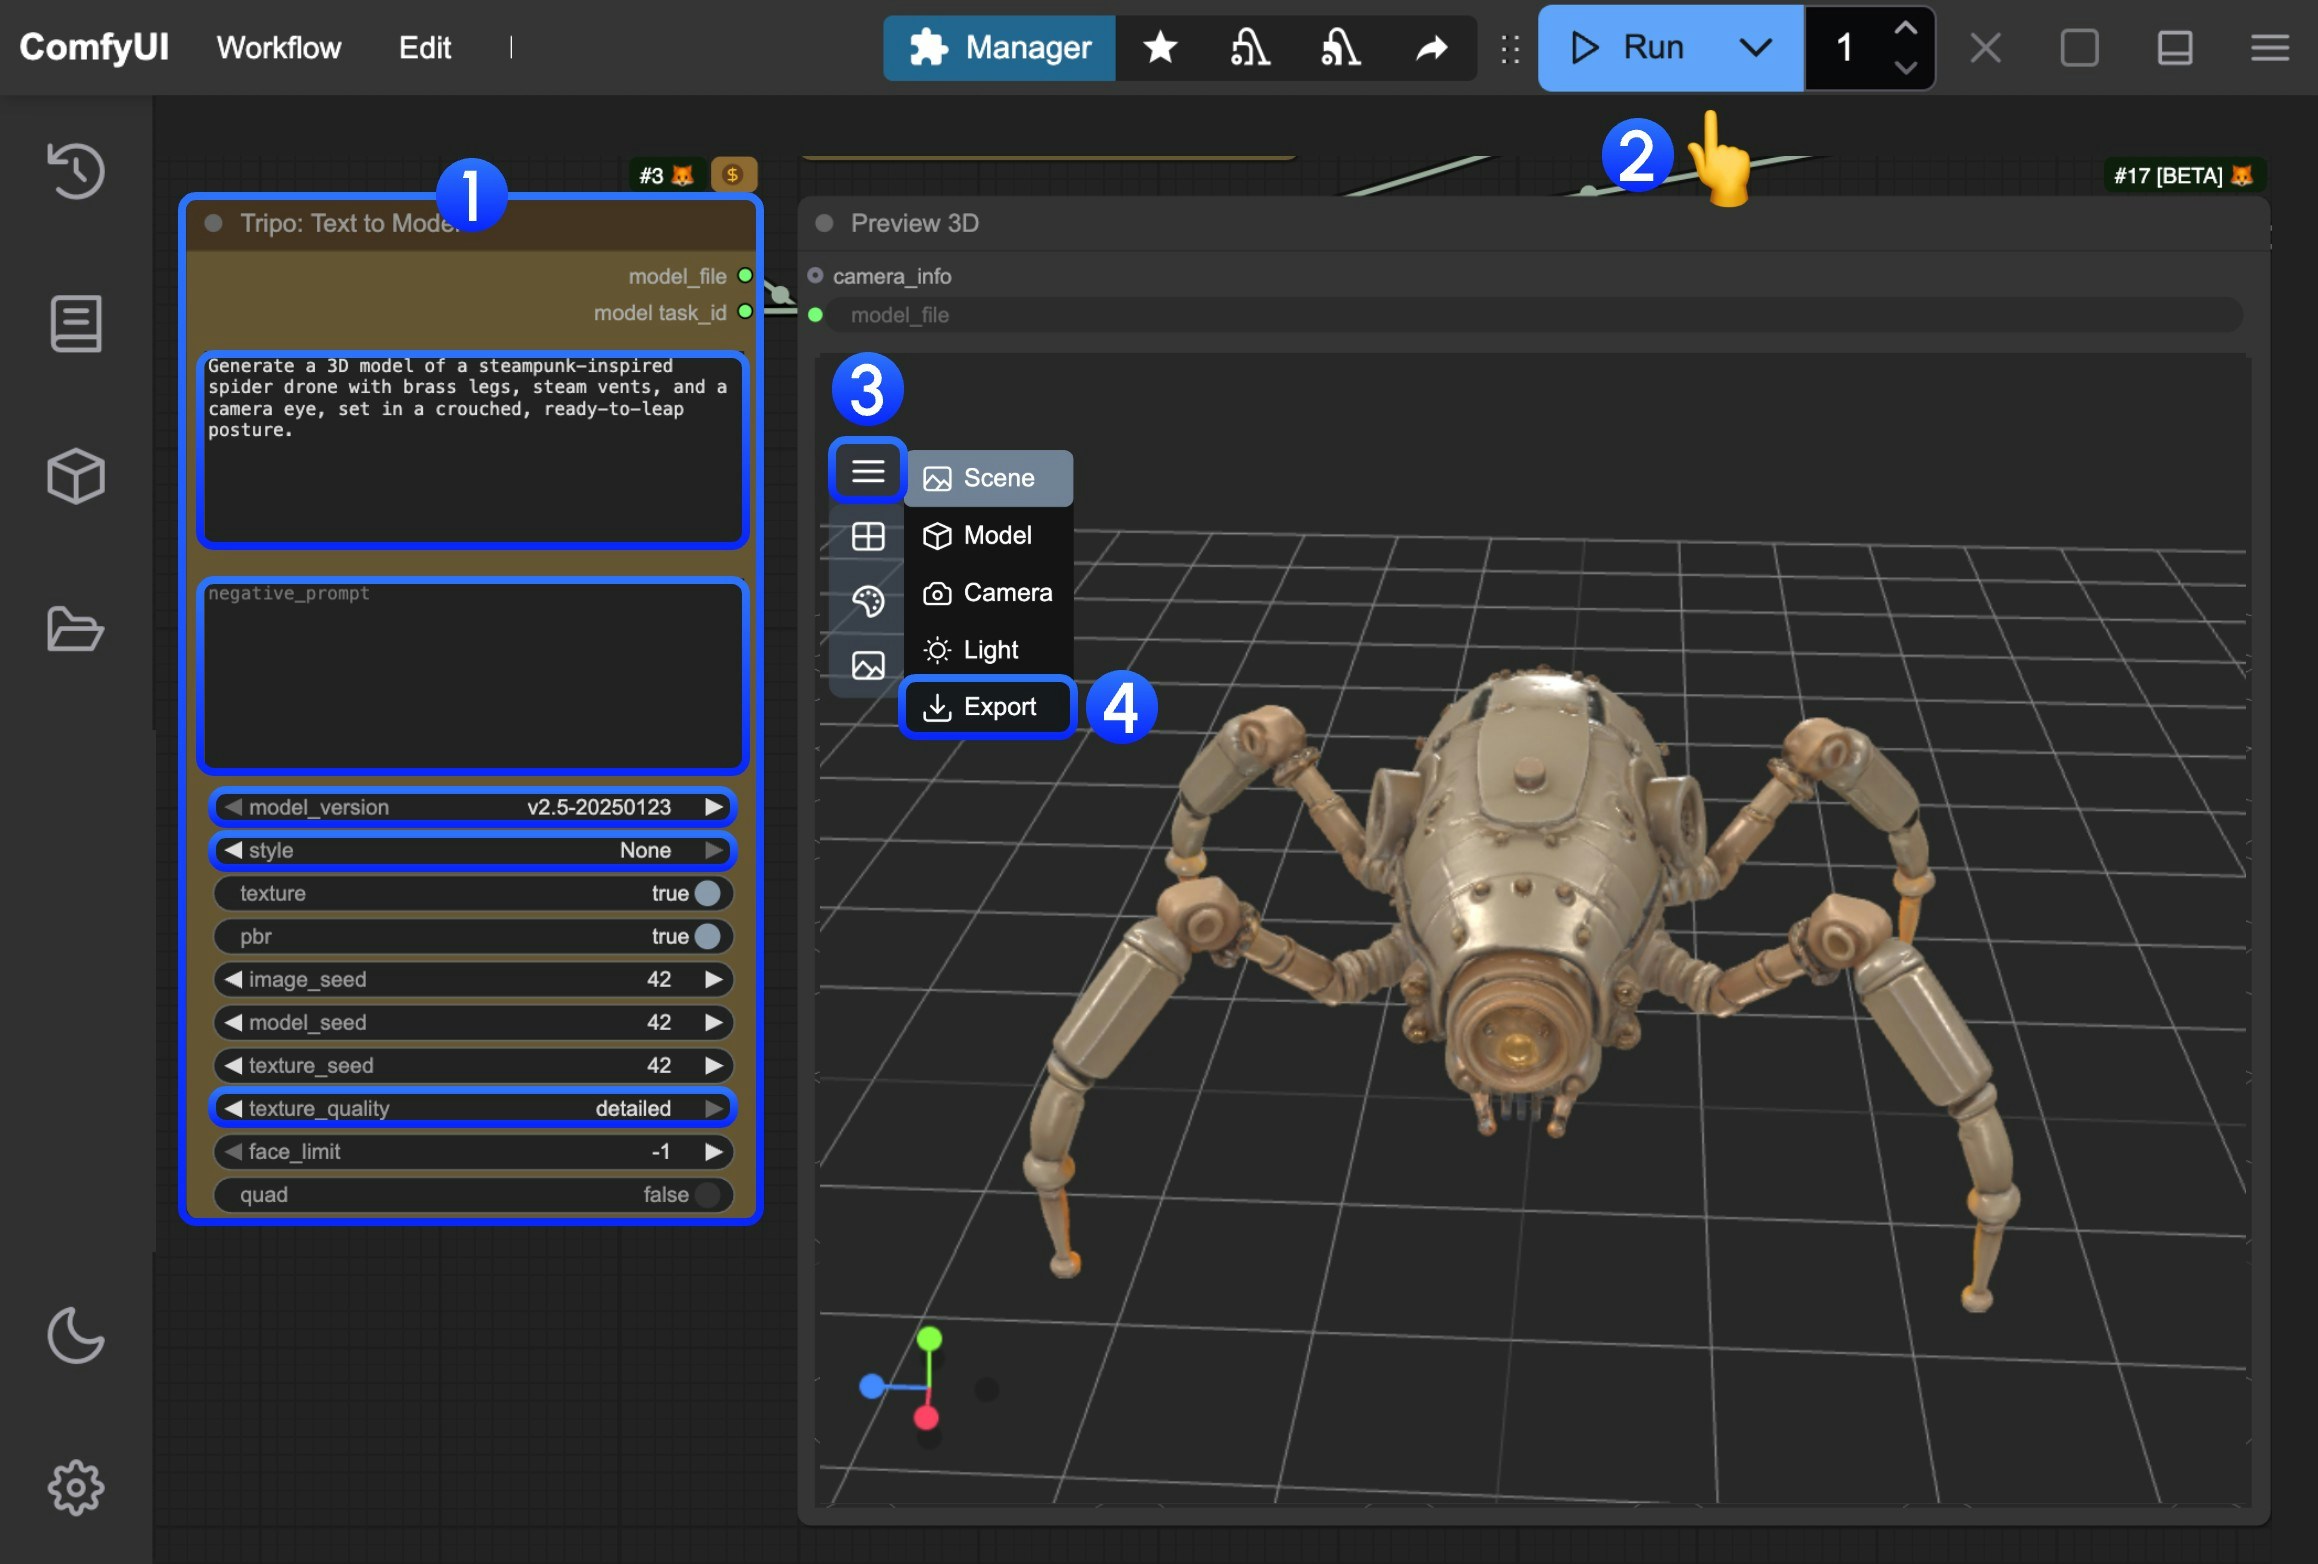 You can refer to the numbers in the image to complete the basic text-to-model workflow execution:
1. In the `Tripo: Text to Model` node, input your prompt in the `prompt` field
* model: You can select different models, currently only v1.4 model supports subsequent optimization with `Tripo: Refine Draft model`
* style: You can set different styles
* texture\_quality: You can set different texture qualities
2. Click the `Run` button, or use the shortcut `Ctrl(cmd) + Enter` to execute model generation. After the workflow completes, the corresponding model will be automatically saved to the `ComfyUI/output/` directory
3. In the `Preview 3D` node, click to expand the menu
4. Select `Export` to directly export the corresponding model
## Image-to-Model Workflow
### 1. Workflow File Download
Download the file below and drag it into ComfyUI to load the corresponding workflow.
You can refer to the numbers in the image to complete the basic text-to-model workflow execution:
1. In the `Tripo: Text to Model` node, input your prompt in the `prompt` field
* model: You can select different models, currently only v1.4 model supports subsequent optimization with `Tripo: Refine Draft model`
* style: You can set different styles
* texture\_quality: You can set different texture qualities
2. Click the `Run` button, or use the shortcut `Ctrl(cmd) + Enter` to execute model generation. After the workflow completes, the corresponding model will be automatically saved to the `ComfyUI/output/` directory
3. In the `Preview 3D` node, click to expand the menu
4. Select `Export` to directly export the corresponding model
## Image-to-Model Workflow
### 1. Workflow File Download
Download the file below and drag it into ComfyUI to load the corresponding workflow.
Download Json Format Workflow File
Download the image below as input image  ### 2. Complete the Workflow Execution Step by Step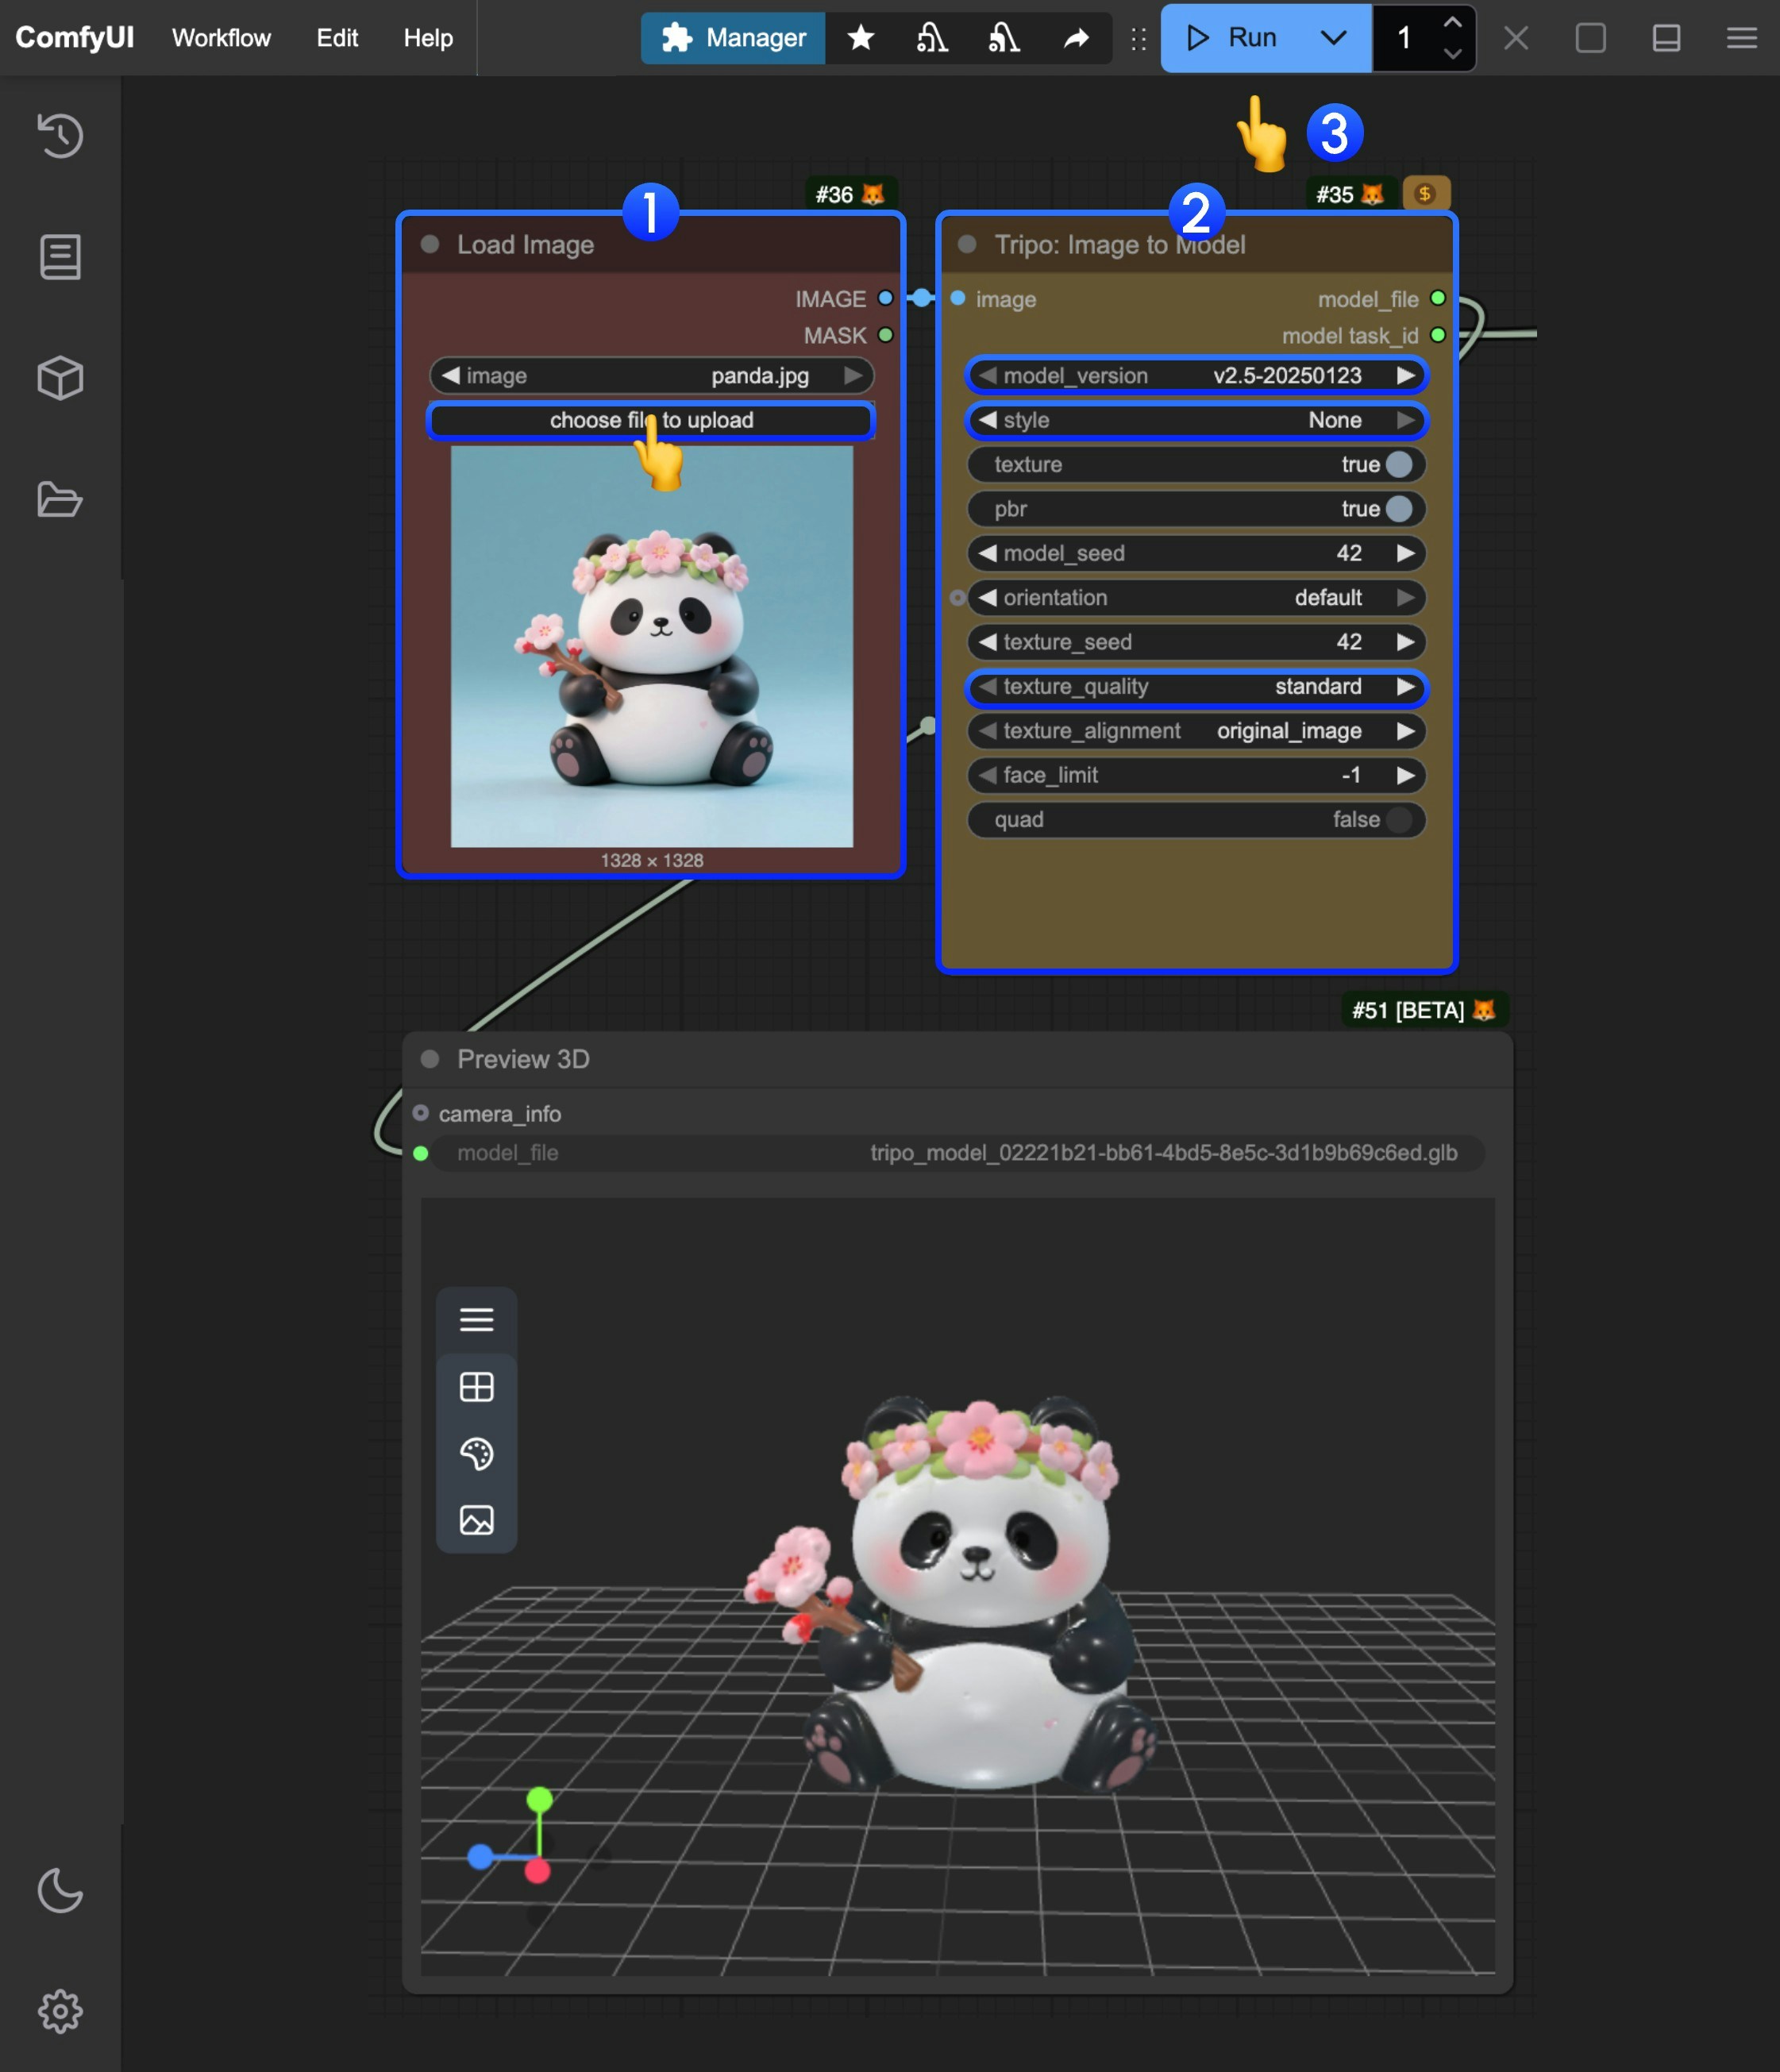 You can refer to the numbers in the image to complete the basic image-to-model workflow execution:
1. In the `Load Image` node, load the provided input image
2. In the `Tripo: Image to Model` node, modify the corresponding parameter settings
* model: You can select different models, currently only v1.4 model supports subsequent optimization with `Tripo: Refine Draft model`
* style: You can set different styles
* texture\_quality: You can set different texture qualities
3. Click the `Run` button, or use the shortcut `Ctrl(cmd) + Enter` to execute model generation. After the workflow completes, the corresponding model will be automatically saved to the `ComfyUI/output/` directory
4. For model download, please refer to the instructions in the text-to-model section
## Multi-view Model Generation Workflow
### 1. Workflow File Download
Download the file below and drag it into ComfyUI to load the corresponding workflow.
You can refer to the numbers in the image to complete the basic image-to-model workflow execution:
1. In the `Load Image` node, load the provided input image
2. In the `Tripo: Image to Model` node, modify the corresponding parameter settings
* model: You can select different models, currently only v1.4 model supports subsequent optimization with `Tripo: Refine Draft model`
* style: You can set different styles
* texture\_quality: You can set different texture qualities
3. Click the `Run` button, or use the shortcut `Ctrl(cmd) + Enter` to execute model generation. After the workflow completes, the corresponding model will be automatically saved to the `ComfyUI/output/` directory
4. For model download, please refer to the instructions in the text-to-model section
## Multi-view Model Generation Workflow
### 1. Workflow File Download
Download the file below and drag it into ComfyUI to load the corresponding workflow.
Download Json Format Workflow File
Download the images below as input images   ### 2. Complete the Workflow Execution Step by Step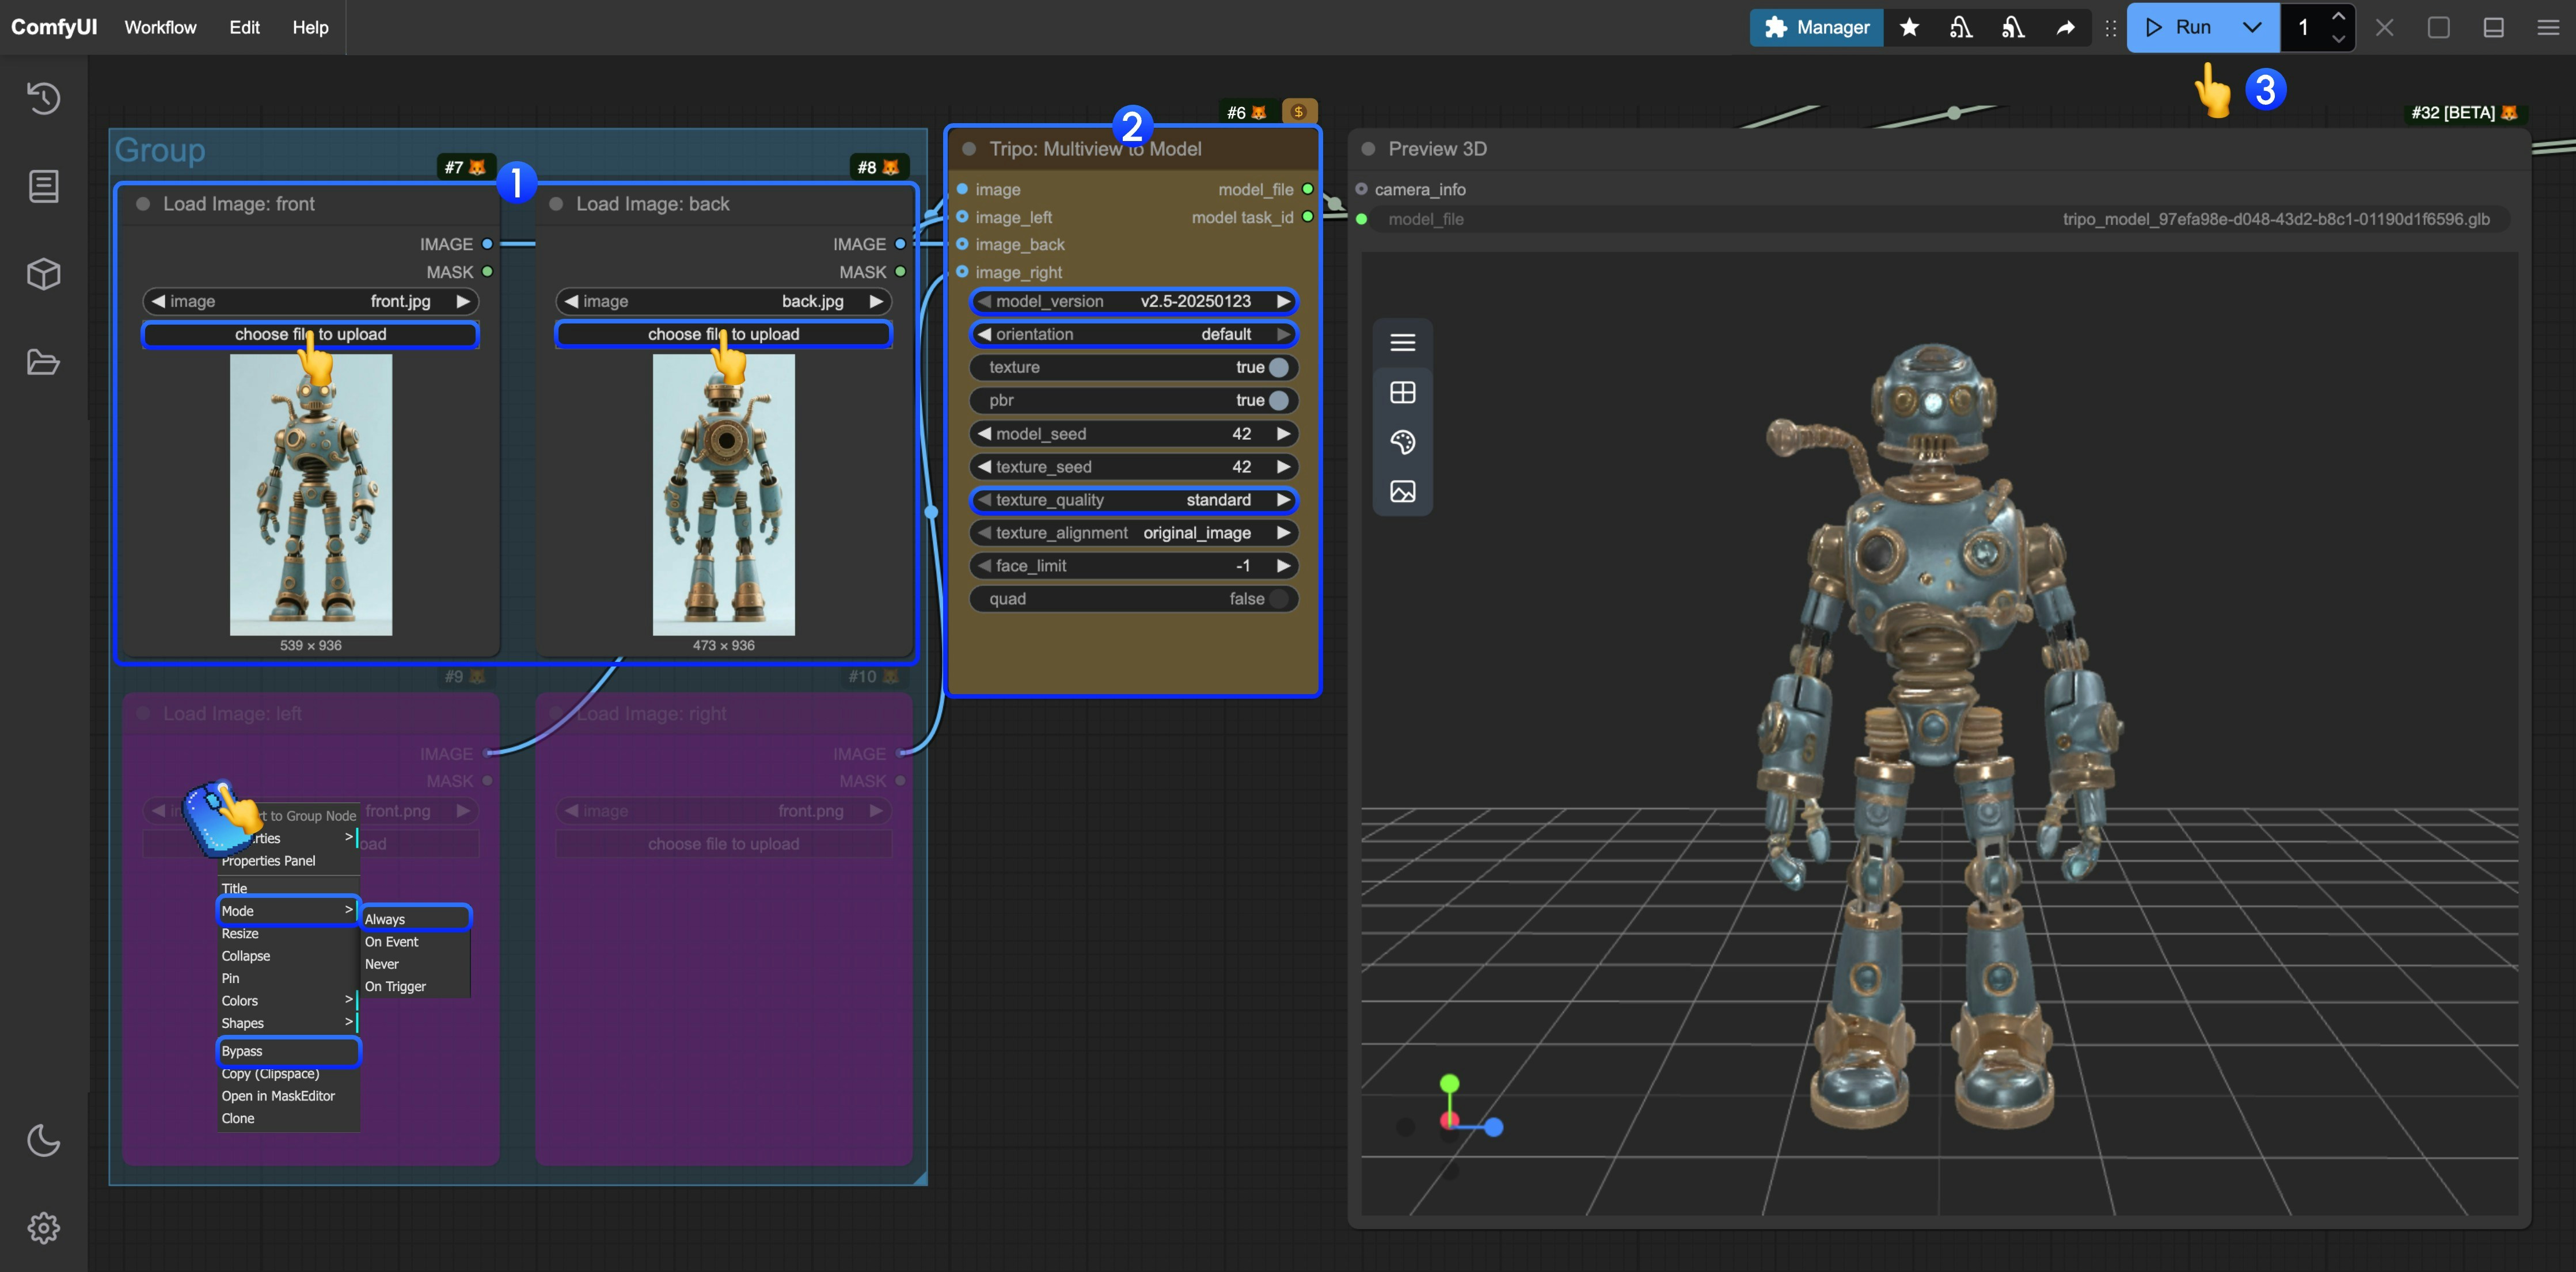 You can refer to the numbers in the image to complete the basic multi-view to model workflow execution:
1. In the `Load Image` nodes, load the provided input images respectively
2. In the `Tripo: Image to Model` node, modify the corresponding parameter settings
* model: You can select different models, currently only v1.4 model supports subsequent optimization with `Tripo: Refine Draft model`
* style: You can set different styles
* texture\_quality: You can set different texture qualities
3. Click the `Run` button, or use the shortcut `Ctrl(cmd) + Enter` to execute model generation. After the workflow completes, the corresponding model will be automatically saved to the `ComfyUI/output/` directory
4. For other view inputs, you can refer to the step diagram and set the corresponding node mode to `Always` to enable it
5. For model download, please refer to the instructions in the text-to-model section
## Subsequent Task Processing for the Same Task
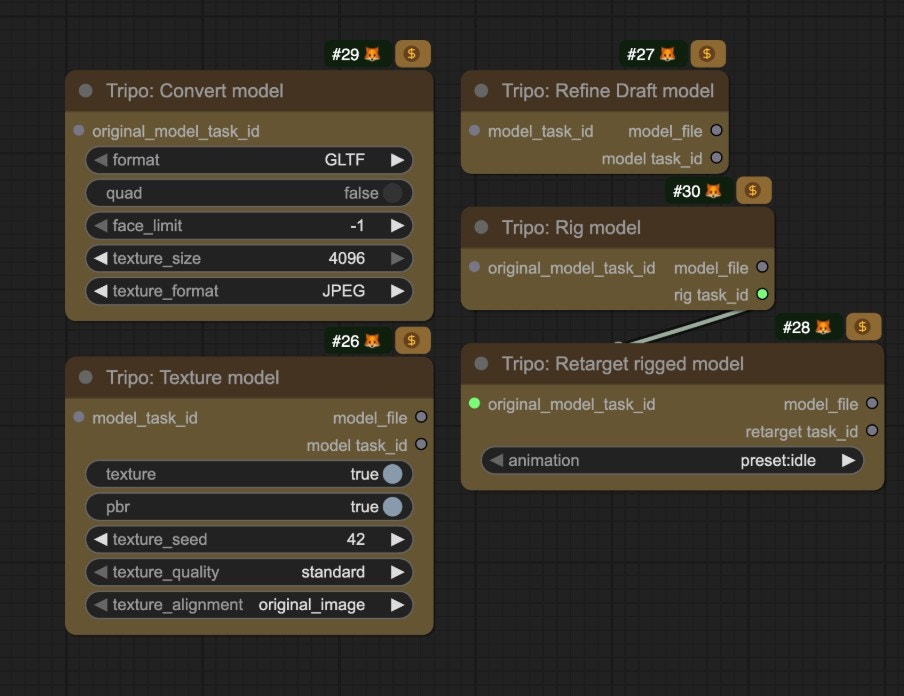
Tripo's corresponding nodes provide subsequent processing for the same task, you only need to input the corresponding `model_task_id` in the relevant nodes, and we have also provided the corresponding nodes in the relevant templates, you can also modify the corresponding node mode as needed to enable it
You can refer to the numbers in the image to complete the basic multi-view to model workflow execution:
1. In the `Load Image` nodes, load the provided input images respectively
2. In the `Tripo: Image to Model` node, modify the corresponding parameter settings
* model: You can select different models, currently only v1.4 model supports subsequent optimization with `Tripo: Refine Draft model`
* style: You can set different styles
* texture\_quality: You can set different texture qualities
3. Click the `Run` button, or use the shortcut `Ctrl(cmd) + Enter` to execute model generation. After the workflow completes, the corresponding model will be automatically saved to the `ComfyUI/output/` directory
4. For other view inputs, you can refer to the step diagram and set the corresponding node mode to `Always` to enable it
5. For model download, please refer to the instructions in the text-to-model section
## Subsequent Task Processing for the Same Task
Tripo's corresponding nodes provide subsequent processing for the same task, you only need to input the corresponding `model_task_id` in the relevant nodes, and we have also provided the corresponding nodes in the relevant templates, you can also modify the corresponding node mode as needed to enable it