> ## Documentation Index
> Fetch the complete documentation index at: https://docs.comfy.org/llms.txt
> Use this file to discover all available pages before exploring further.
# ComfyUI Wan2.1 Video Examples
> This guide demonstrates how to generate videos with first and last frames using Wan2.1 Video in ComfyUI
Wan2.1 Video series is a video generation model open-sourced by Alibaba in February 2025 under the [Apache 2.0 license](https://github.com/Wan-Video/Wan2.1?tab=Apache-2.0-1-ov-file).
It offers two versions:
* 14B (14 billion parameters)
* 1.3B (1.3 billion parameters)
Covering multiple tasks including text-to-video (T2V) and image-to-video (I2V).
The model not only outperforms existing open-source models in performance but more importantly, its lightweight version requires only 8GB of VRAM to run, significantly lowering the barrier to entry.
* [Wan2.1 Code Repository](https://github.com/Wan-Video/Wan2.1)
* [Wan2.1 Model Repository](https://huggingface.co/Wan-AI)
## Wan2.1 ComfyUI Native Workflow Examples
Please update ComfyUI to the latest version before starting the examples to make sure you have native Wan Video support.
## Model Installation
All models mentioned in this guide can be found [here](https://huggingface.co/Comfy-Org/Wan_2.1_ComfyUI_repackaged/tree/main/split_files). Below are the common models you'll need for the examples in this guide, which you can download in advance:
Choose one version from **Text encoders** to download:
* [umt5\_xxl\_fp16.safetensors](https://huggingface.co/Comfy-Org/Wan_2.1_ComfyUI_repackaged/resolve/main/split_files/text_encoders/umt5_xxl_fp16.safetensors?download=true)
* [umt5\_xxl\_fp8\_e4m3fn\_scaled.safetensors](https://huggingface.co/Comfy-Org/Wan_2.1_ComfyUI_repackaged/resolve/main/split_files/text_encoders/umt5_xxl_fp8_e4m3fn_scaled.safetensors?download=true)
**VAE**
* [wan\_2.1\_vae.safetensors](https://huggingface.co/Comfy-Org/Wan_2.1_ComfyUI_repackaged/resolve/main/split_files/vae/wan_2.1_vae.safetensors?download=true)
**CLIP Vision**
* [clip\_vision\_h.safetensors](https://huggingface.co/Comfy-Org/Wan_2.1_ComfyUI_repackaged/resolve/main/split_files/clip_vision/clip_vision_h.safetensors?download=true)
File storage locations:
```
ComfyUI/
├── models/
│ ├── diffusion_models/
│ ├── ... # Let's download the models in the corresponding workflow
│ ├── text_encoders/
│ │ └─── umt5_xxl_fp8_e4m3fn_scaled.safetensors
│ └── vae/
│ │ └── wan_2.1_vae.safetensors
│ └── clip_vision/
│ └── clip_vision_h.safetensors
```
For diffusion models, we'll use the fp16 precision models in this guide because we've found that they perform better than the bf16 versions. If you need other precision versions, please visit [here](https://huggingface.co/Comfy-Org/Wan_2.1_ComfyUI_repackaged/tree/main/split_files/diffusion_models) to download them.
## Wan2.1 Text-to-Video Workflow
Before starting the workflow, please download [wan2.1\_t2v\_1.3B\_fp16.safetensors](https://huggingface.co/Comfy-Org/Wan_2.1_ComfyUI_repackaged/resolve/main/split_files/diffusion_models/wan2.1_t2v_1.3B_fp16.safetensors?download=true) and save it to the `ComfyUI/models/diffusion_models/` directory.
> If you need other t2v precision versions, please visit [here](https://huggingface.co/Comfy-Org/Wan_2.1_ComfyUI_repackaged/tree/main/split_files/diffusion_models) to download them.
### 1. Workflow File Download

Download the file below and drag it into ComfyUI to load the corresponding workflow:
### 2. Complete the Workflow Step by Step
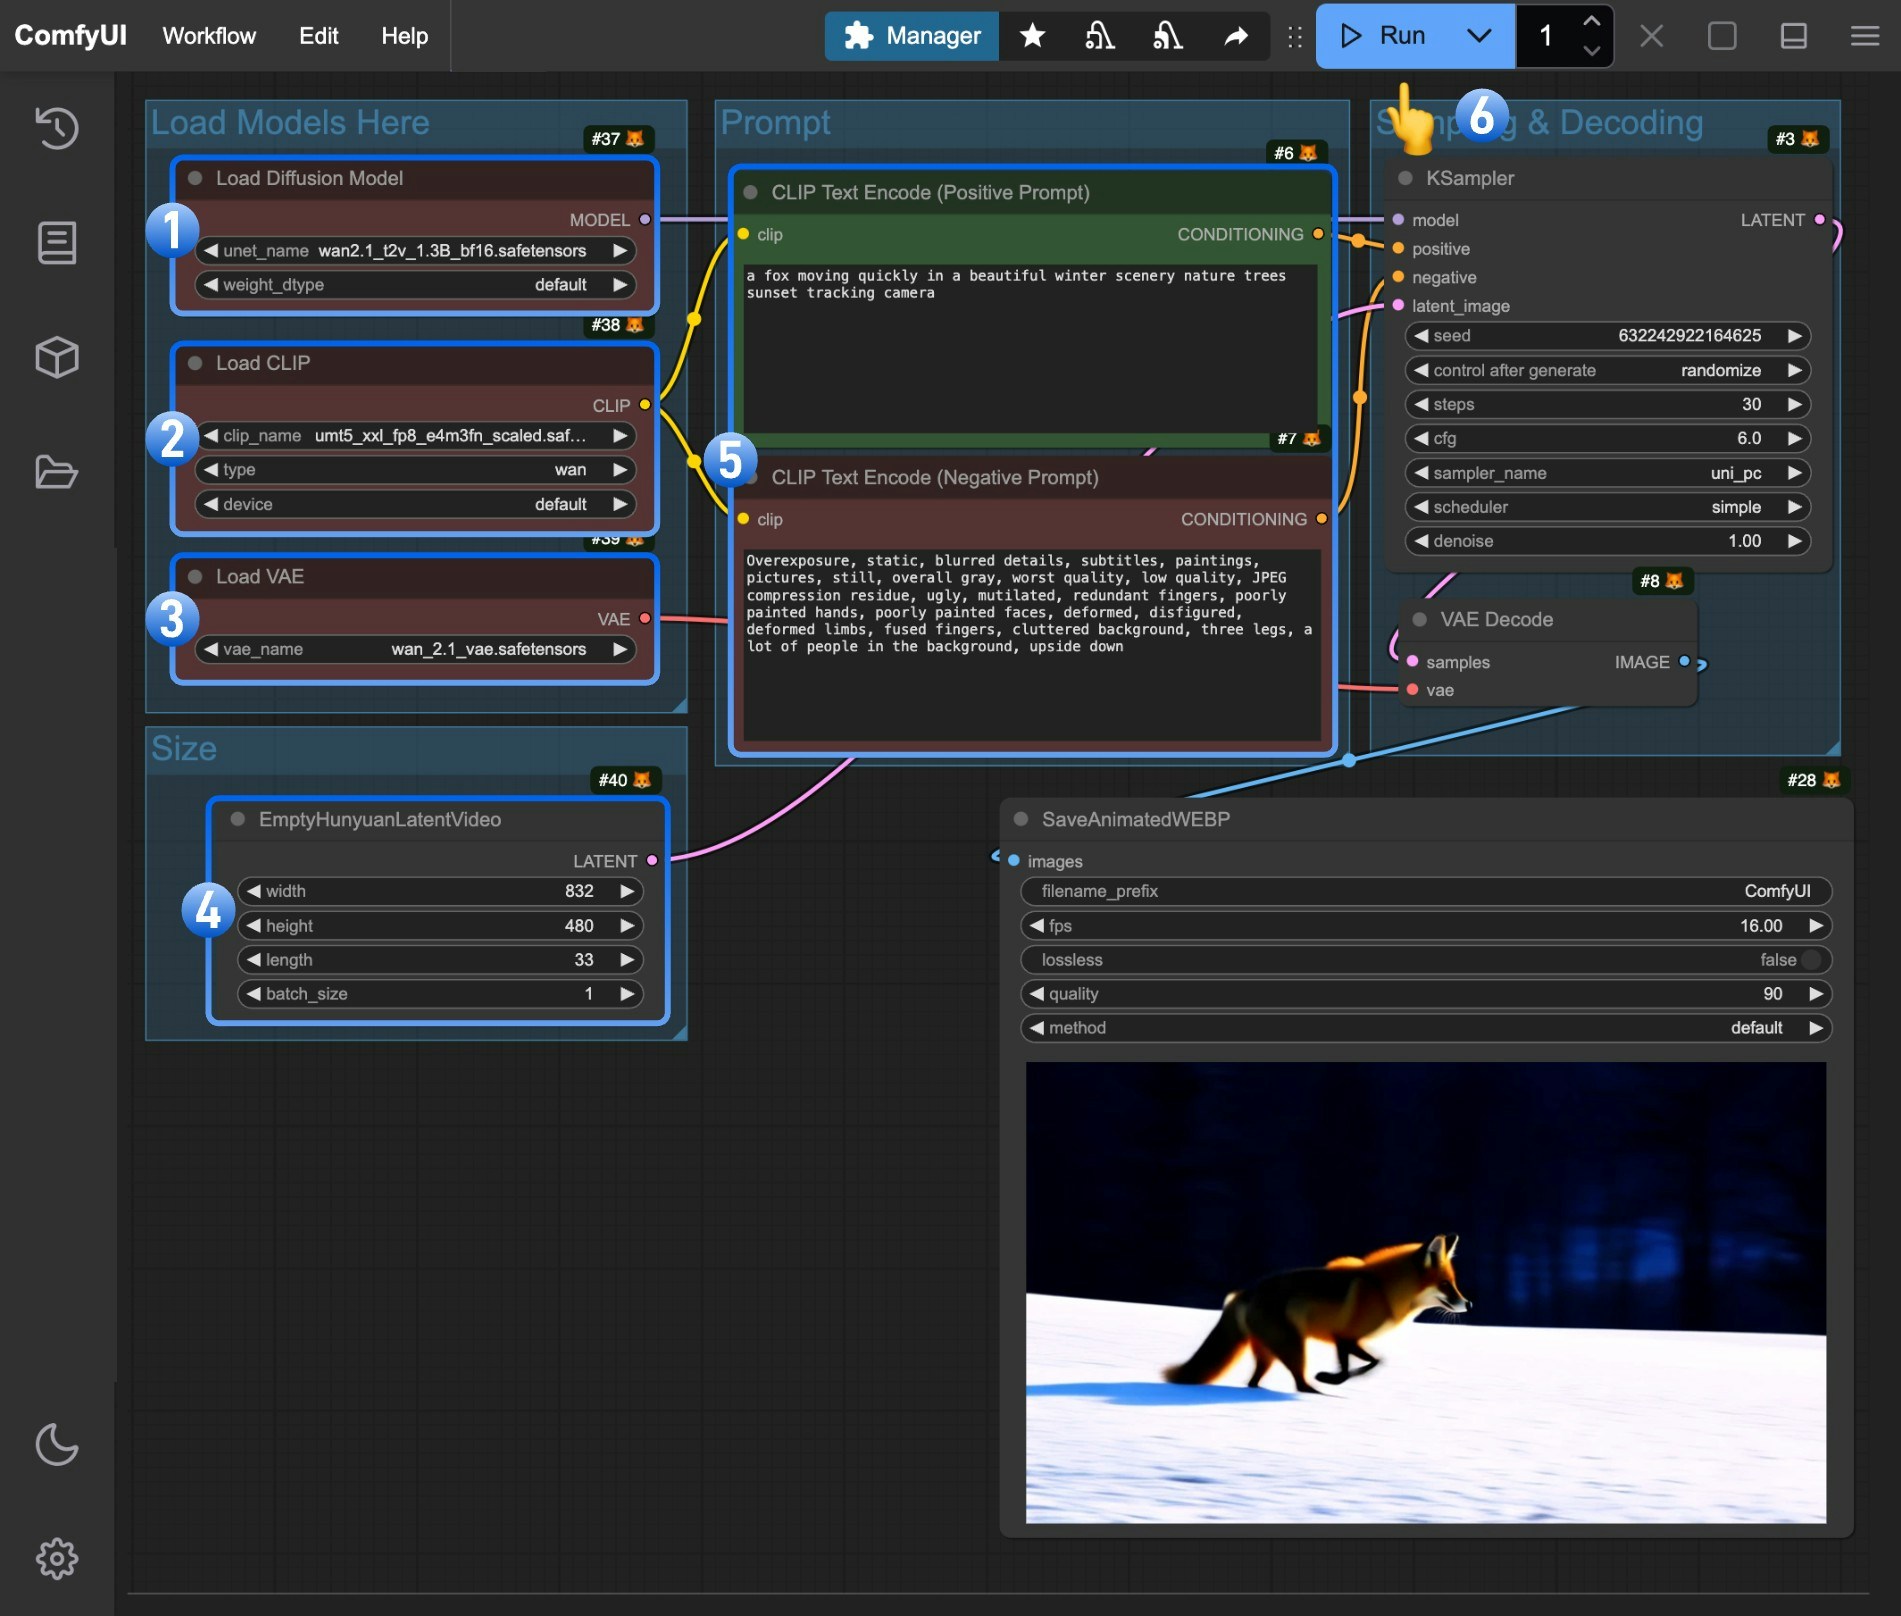
1. Make sure the `Load Diffusion Model` node has loaded the `wan2.1_t2v_1.3B_fp16.safetensors` model
2. Make sure the `Load CLIP` node has loaded the `umt5_xxl_fp8_e4m3fn_scaled.safetensors` model
3. Make sure the `Load VAE` node has loaded the `wan_2.1_vae.safetensors` model
4. (Optional) You can modify the video dimensions in the `EmptyHunyuanLatentVideo` node if needed
5. (Optional) If you need to modify the prompts (positive and negative), make changes in the `CLIP Text Encoder` node at number `5`
6. Click the `Run` button or use the shortcut `Ctrl(cmd) + Enter` to execute the video generation
## Wan2.1 Image-to-Video Workflow
**Since Wan Video separates the 480P and 720P models**, we'll need to provide examples for both resolutions in this guide. In addition to using different models, they also have slight parameter differences.
### 480P Version
#### 1. Workflow and Input Image
Download the image below and drag it into ComfyUI to load the corresponding workflow:

We'll use the following image as input:

#### 2. Model Download
Please download [wan2.1\_i2v\_480p\_14B\_fp16.safetensors](https://huggingface.co/Comfy-Org/Wan_2.1_ComfyUI_repackaged/resolve/main/split_files/diffusion_models/wan2.1_i2v_480p_14B_fp16.safetensors?download=true) and save it to the `ComfyUI/models/diffusion_models/` directory.
#### 3. Complete the Workflow Step by Step
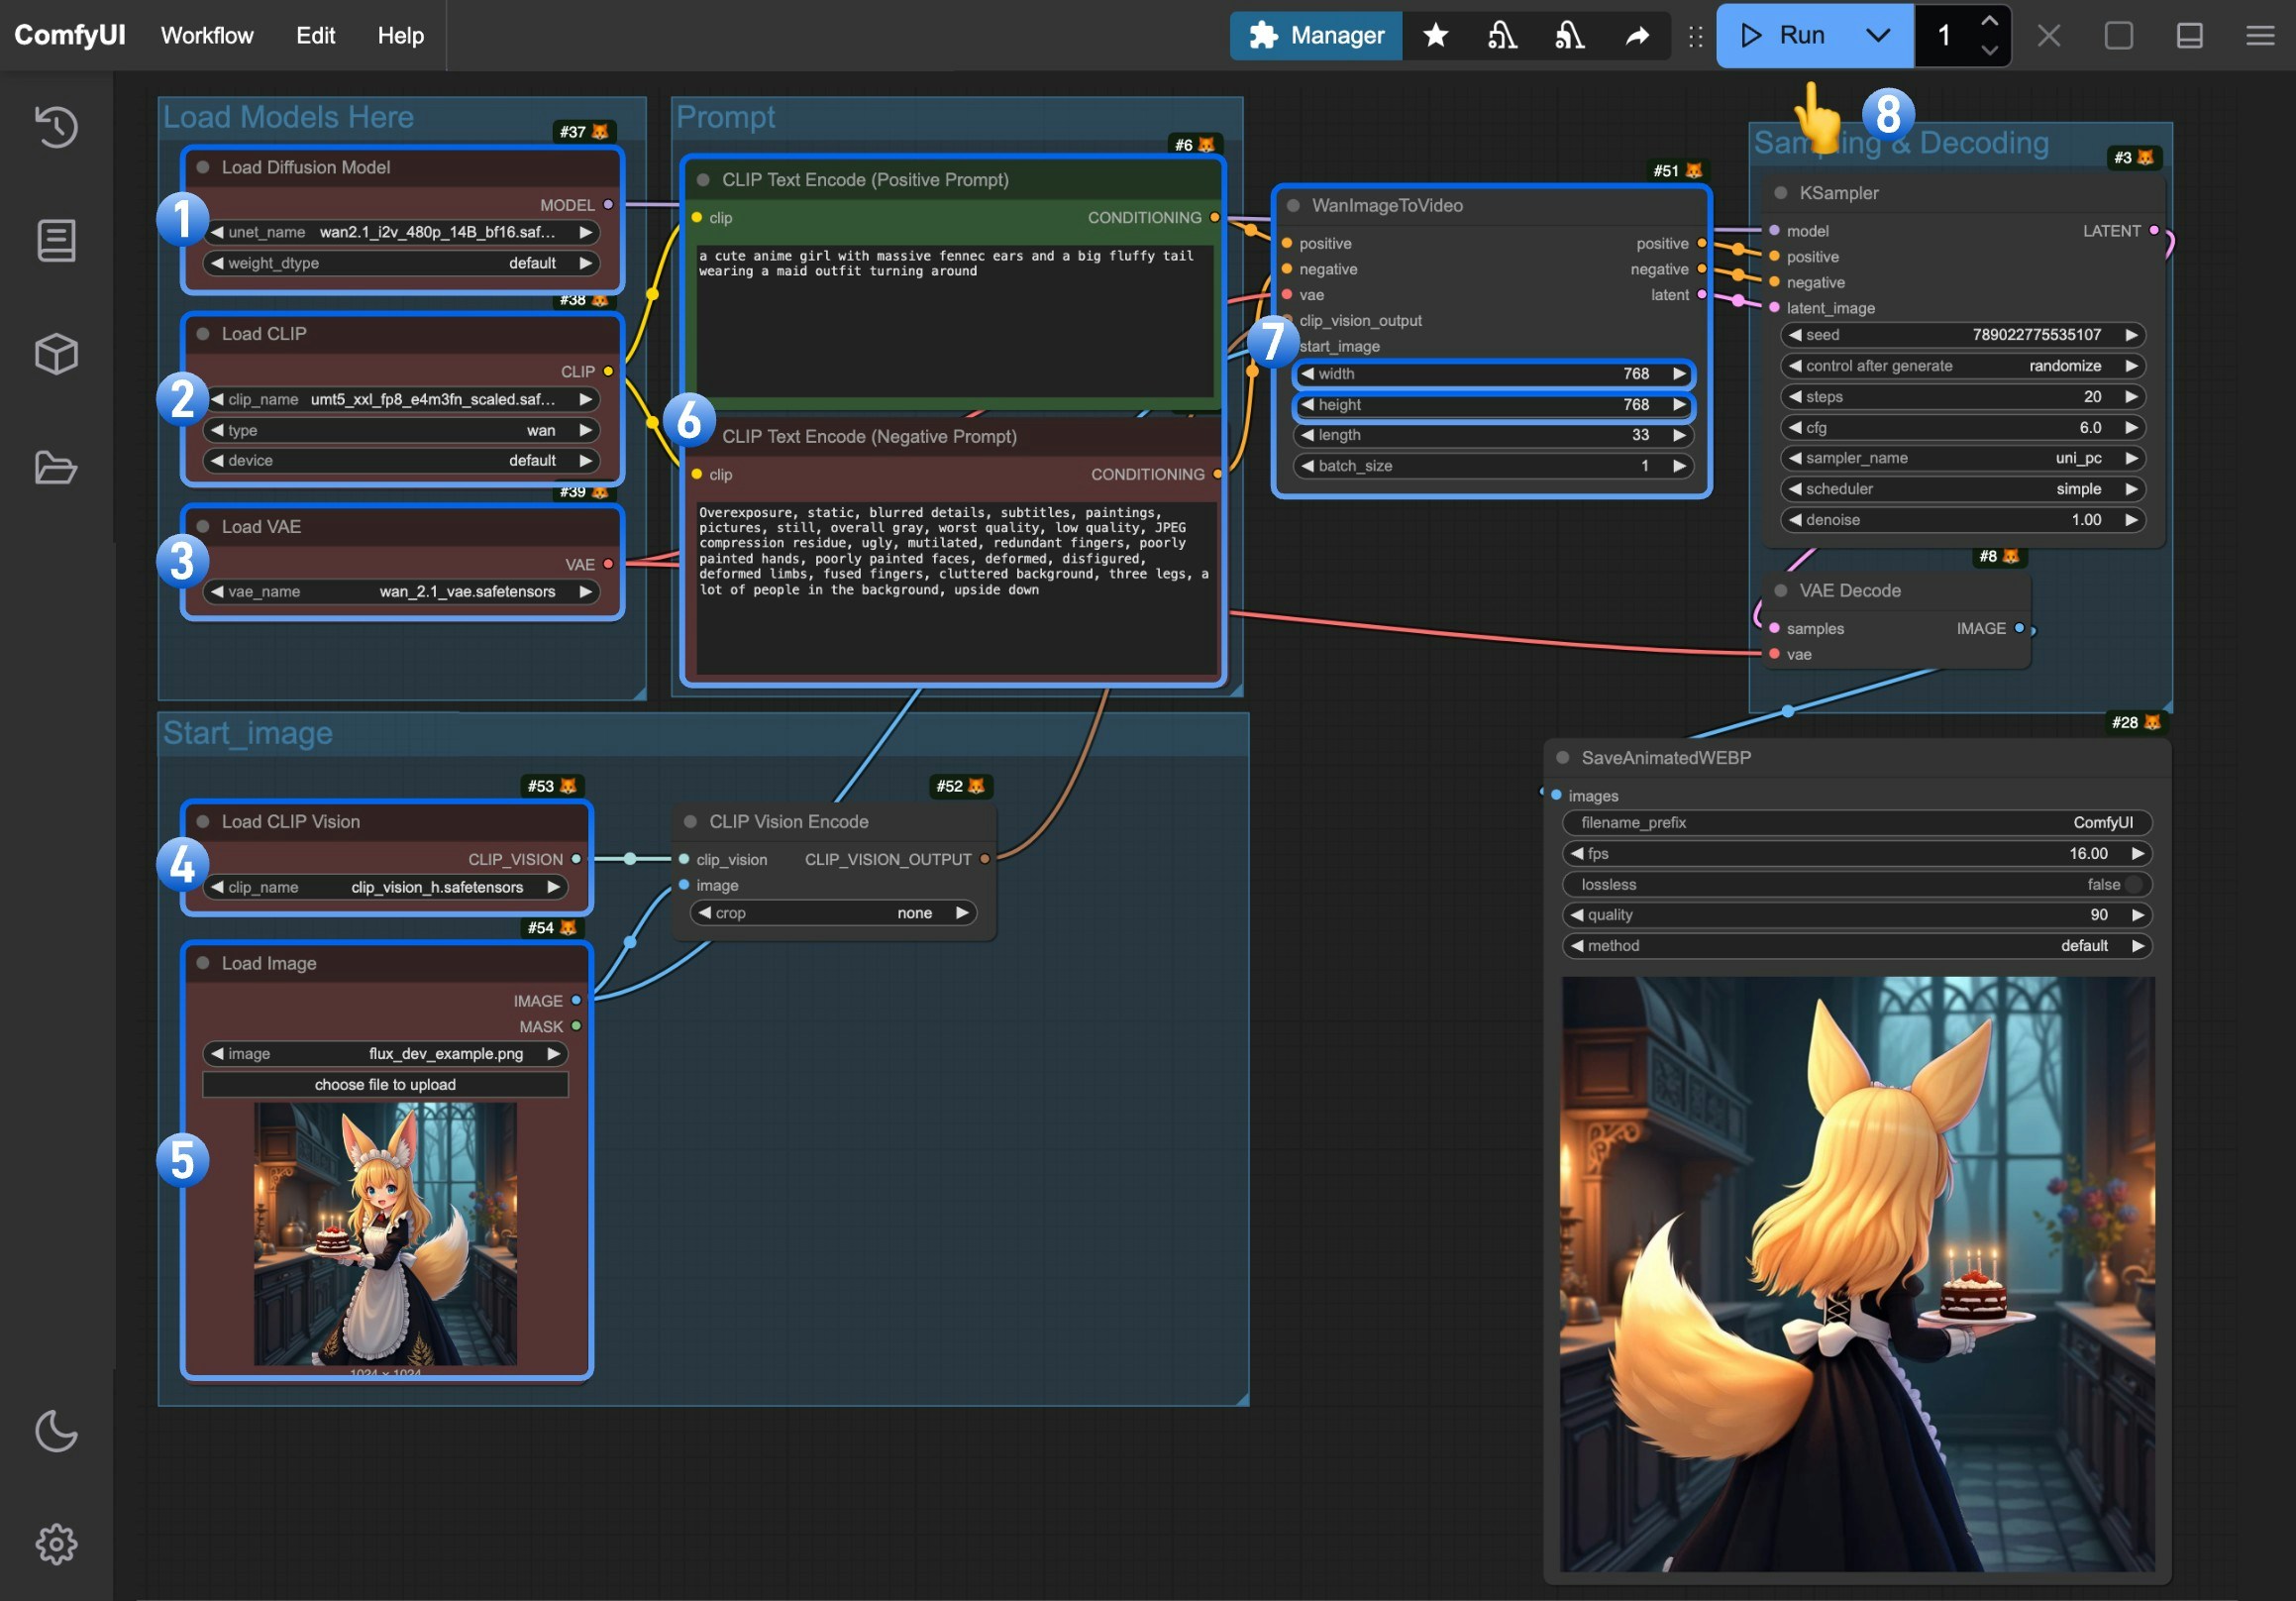
1. Make sure the `Load Diffusion Model` node has loaded the `wan2.1_i2v_480p_14B_fp16.safetensors` model
2. Make sure the `Load CLIP` node has loaded the `umt5_xxl_fp8_e4m3fn_scaled.safetensors` model
3. Make sure the `Load VAE` node has loaded the `wan_2.1_vae.safetensors` model
4. Make sure the `Load CLIP Vision` node has loaded the `clip_vision_h.safetensors` model
5. Upload the provided input image in the `Load Image` node
6. (Optional) Enter the video description content you want to generate in the `CLIP Text Encoder` node
7. (Optional) You can modify the video dimensions in the `WanImageToVideo` node if needed
8. Click the `Run` button or use the shortcut `Ctrl(cmd) + Enter` to execute the video generation
### 720P Version
#### 1. Workflow and Input Image
Download the image below and drag it into ComfyUI to load the corresponding workflow:

We'll use the following image as input:

#### 2. Model Download
Please download [wan2.1\_i2v\_720p\_14B\_fp16.safetensors](https://huggingface.co/Comfy-Org/Wan_2.1_ComfyUI_repackaged/resolve/main/split_files/diffusion_models/wan2.1_i2v_720p_14B_fp16.safetensors?download=true) and save it to the `ComfyUI/models/diffusion_models/` directory.
#### 3. Complete the Workflow Step by Step
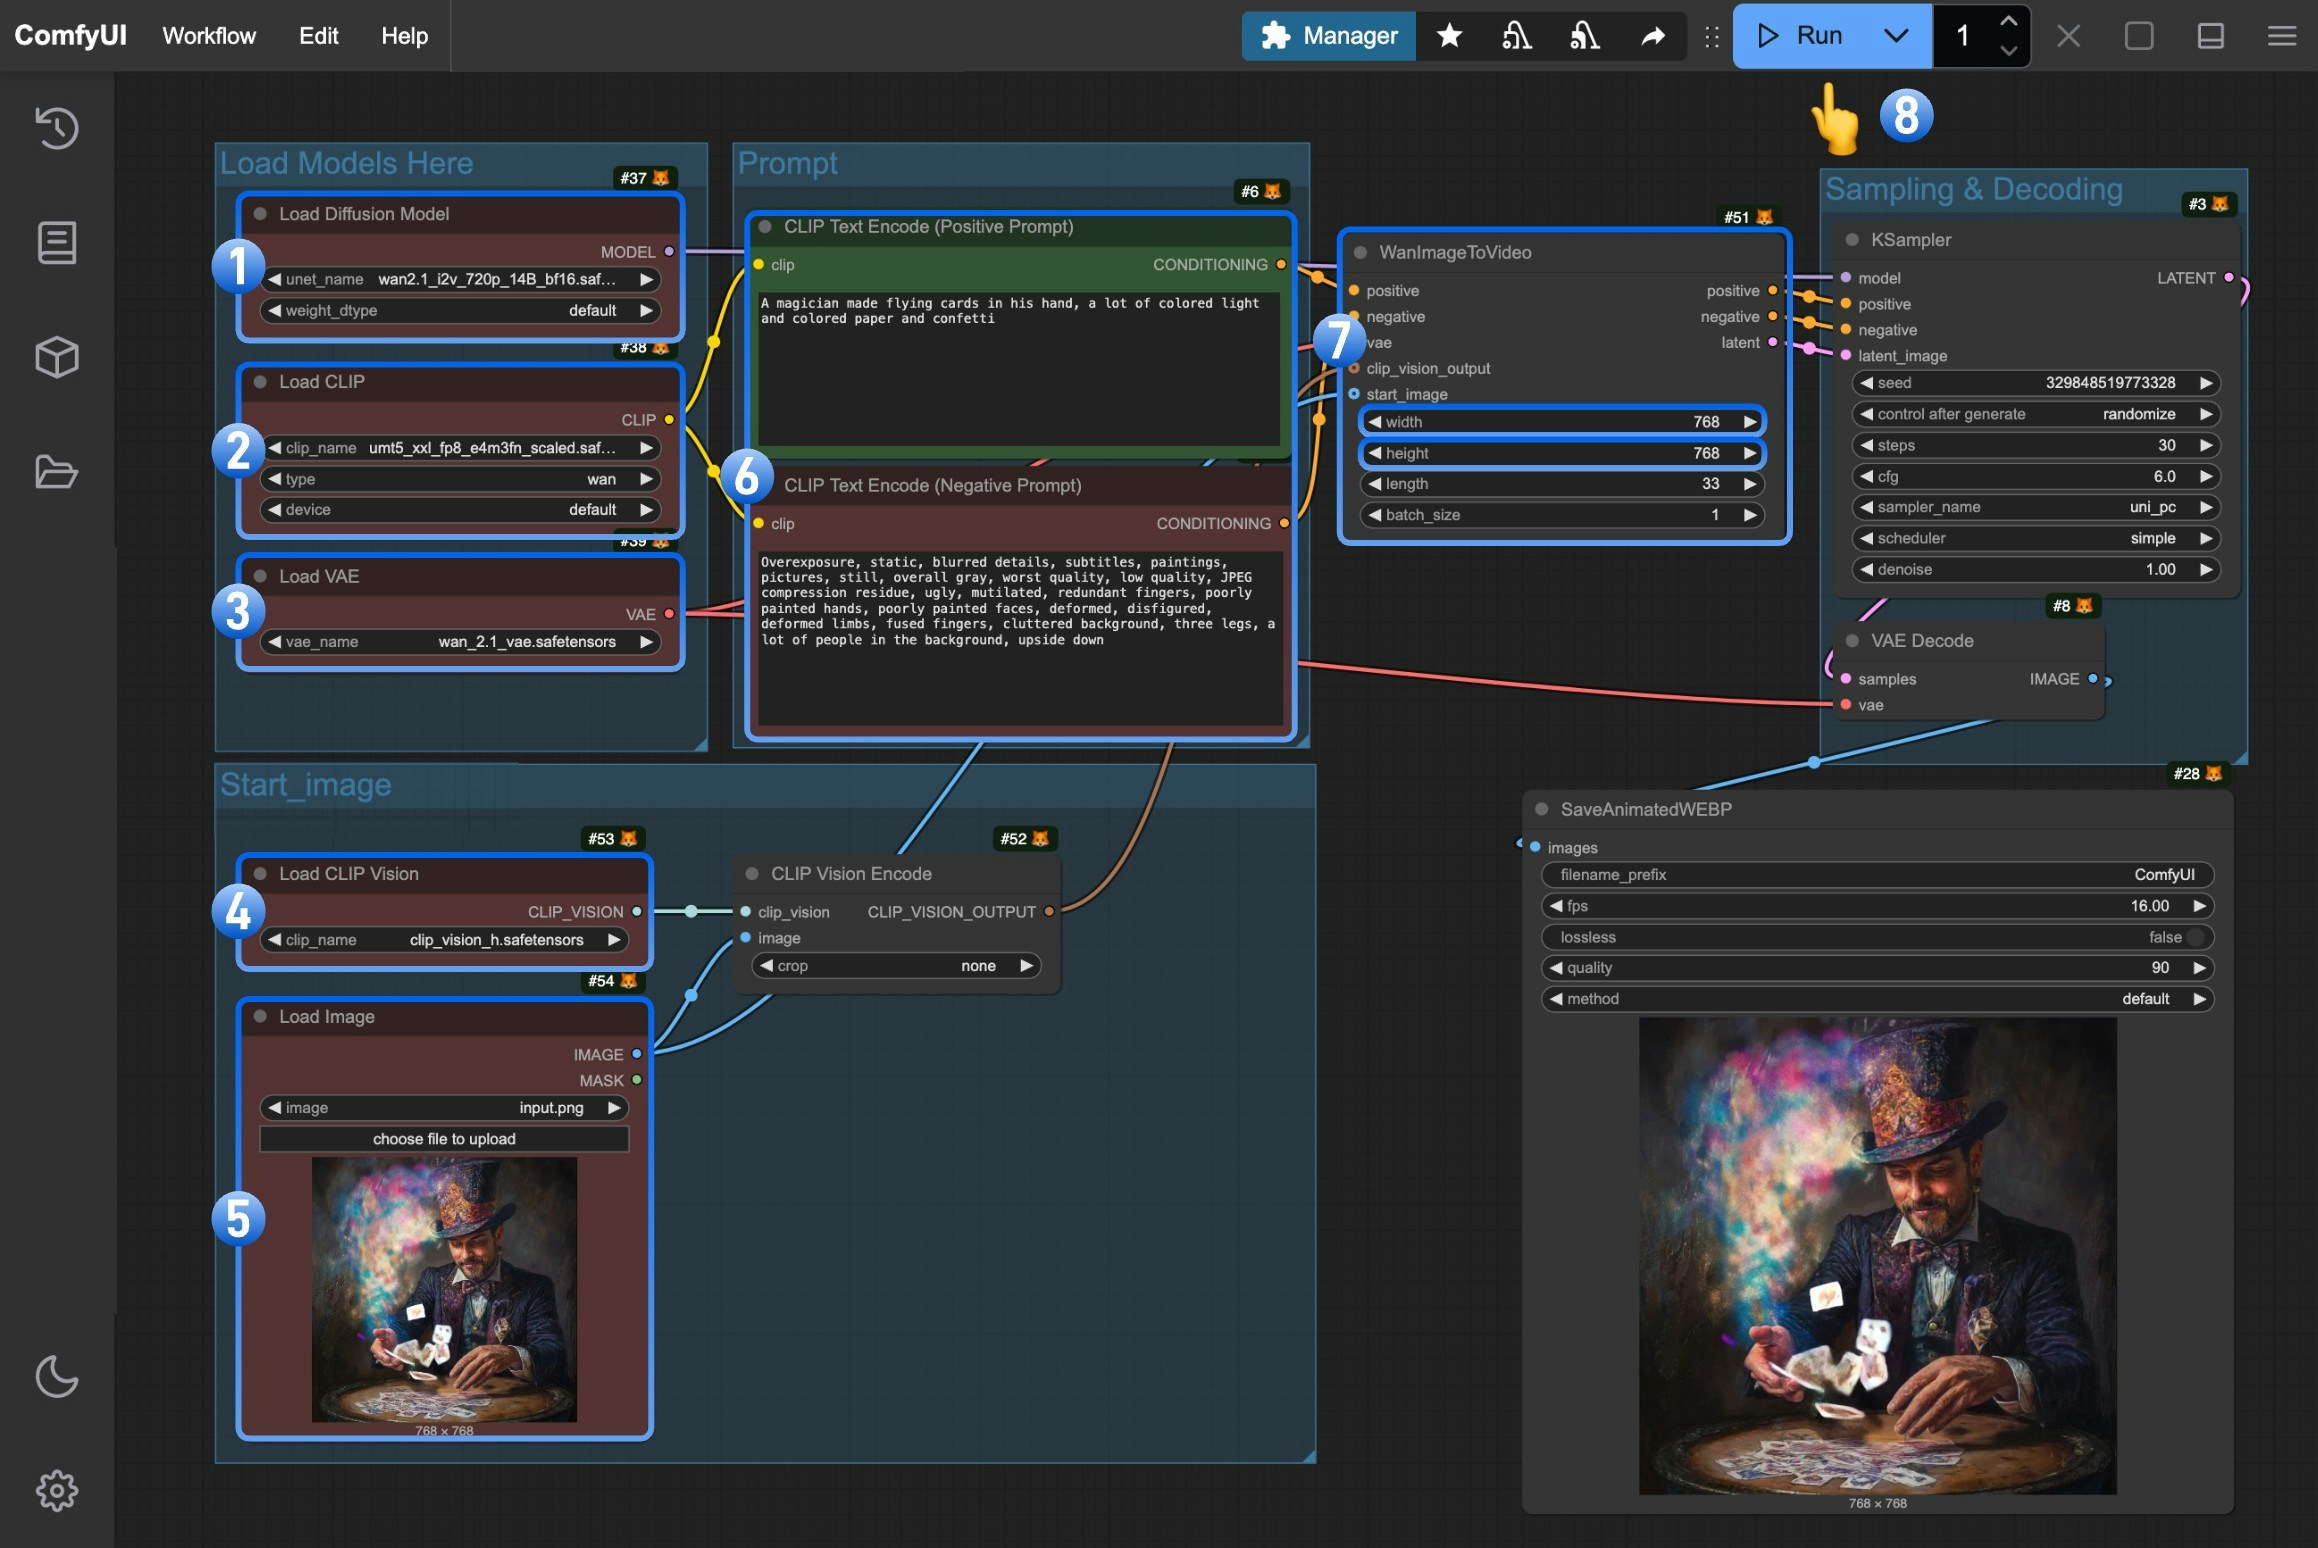
1. Make sure the `Load Diffusion Model` node has loaded the `wan2.1_i2v_720p_14B_fp16.safetensors` model
2. Make sure the `Load CLIP` node has loaded the `umt5_xxl_fp8_e4m3fn_scaled.safetensors` model
3. Make sure the `Load VAE` node has loaded the `wan_2.1_vae.safetensors` model
4. Make sure the `Load CLIP Vision` node has loaded the `clip_vision_h.safetensors` model
5. Upload the provided input image in the `Load Image` node
6. (Optional) Enter the video description content you want to generate in the `CLIP Text Encoder` node
7. (Optional) You can modify the video dimensions in the `WanImageToVideo` node if needed
8. Click the `Run` button or use the shortcut `Ctrl(cmd) + Enter` to execute the video generation
 1. Make sure the `Load Diffusion Model` node has loaded the `wan2.1_t2v_1.3B_fp16.safetensors` model
2. Make sure the `Load CLIP` node has loaded the `umt5_xxl_fp8_e4m3fn_scaled.safetensors` model
3. Make sure the `Load VAE` node has loaded the `wan_2.1_vae.safetensors` model
4. (Optional) You can modify the video dimensions in the `EmptyHunyuanLatentVideo` node if needed
5. (Optional) If you need to modify the prompts (positive and negative), make changes in the `CLIP Text Encoder` node at number `5`
6. Click the `Run` button or use the shortcut `Ctrl(cmd) + Enter` to execute the video generation
## Wan2.1 Image-to-Video Workflow
**Since Wan Video separates the 480P and 720P models**, we'll need to provide examples for both resolutions in this guide. In addition to using different models, they also have slight parameter differences.
### 480P Version
#### 1. Workflow and Input Image
Download the image below and drag it into ComfyUI to load the corresponding workflow:

We'll use the following image as input:

#### 2. Model Download
Please download [wan2.1\_i2v\_480p\_14B\_fp16.safetensors](https://huggingface.co/Comfy-Org/Wan_2.1_ComfyUI_repackaged/resolve/main/split_files/diffusion_models/wan2.1_i2v_480p_14B_fp16.safetensors?download=true) and save it to the `ComfyUI/models/diffusion_models/` directory.
#### 3. Complete the Workflow Step by Step
1. Make sure the `Load Diffusion Model` node has loaded the `wan2.1_t2v_1.3B_fp16.safetensors` model
2. Make sure the `Load CLIP` node has loaded the `umt5_xxl_fp8_e4m3fn_scaled.safetensors` model
3. Make sure the `Load VAE` node has loaded the `wan_2.1_vae.safetensors` model
4. (Optional) You can modify the video dimensions in the `EmptyHunyuanLatentVideo` node if needed
5. (Optional) If you need to modify the prompts (positive and negative), make changes in the `CLIP Text Encoder` node at number `5`
6. Click the `Run` button or use the shortcut `Ctrl(cmd) + Enter` to execute the video generation
## Wan2.1 Image-to-Video Workflow
**Since Wan Video separates the 480P and 720P models**, we'll need to provide examples for both resolutions in this guide. In addition to using different models, they also have slight parameter differences.
### 480P Version
#### 1. Workflow and Input Image
Download the image below and drag it into ComfyUI to load the corresponding workflow:

We'll use the following image as input:

#### 2. Model Download
Please download [wan2.1\_i2v\_480p\_14B\_fp16.safetensors](https://huggingface.co/Comfy-Org/Wan_2.1_ComfyUI_repackaged/resolve/main/split_files/diffusion_models/wan2.1_i2v_480p_14B_fp16.safetensors?download=true) and save it to the `ComfyUI/models/diffusion_models/` directory.
#### 3. Complete the Workflow Step by Step
 1. Make sure the `Load Diffusion Model` node has loaded the `wan2.1_i2v_480p_14B_fp16.safetensors` model
2. Make sure the `Load CLIP` node has loaded the `umt5_xxl_fp8_e4m3fn_scaled.safetensors` model
3. Make sure the `Load VAE` node has loaded the `wan_2.1_vae.safetensors` model
4. Make sure the `Load CLIP Vision` node has loaded the `clip_vision_h.safetensors` model
5. Upload the provided input image in the `Load Image` node
6. (Optional) Enter the video description content you want to generate in the `CLIP Text Encoder` node
7. (Optional) You can modify the video dimensions in the `WanImageToVideo` node if needed
8. Click the `Run` button or use the shortcut `Ctrl(cmd) + Enter` to execute the video generation
### 720P Version
#### 1. Workflow and Input Image
Download the image below and drag it into ComfyUI to load the corresponding workflow:

We'll use the following image as input:

#### 2. Model Download
Please download [wan2.1\_i2v\_720p\_14B\_fp16.safetensors](https://huggingface.co/Comfy-Org/Wan_2.1_ComfyUI_repackaged/resolve/main/split_files/diffusion_models/wan2.1_i2v_720p_14B_fp16.safetensors?download=true) and save it to the `ComfyUI/models/diffusion_models/` directory.
#### 3. Complete the Workflow Step by Step
1. Make sure the `Load Diffusion Model` node has loaded the `wan2.1_i2v_480p_14B_fp16.safetensors` model
2. Make sure the `Load CLIP` node has loaded the `umt5_xxl_fp8_e4m3fn_scaled.safetensors` model
3. Make sure the `Load VAE` node has loaded the `wan_2.1_vae.safetensors` model
4. Make sure the `Load CLIP Vision` node has loaded the `clip_vision_h.safetensors` model
5. Upload the provided input image in the `Load Image` node
6. (Optional) Enter the video description content you want to generate in the `CLIP Text Encoder` node
7. (Optional) You can modify the video dimensions in the `WanImageToVideo` node if needed
8. Click the `Run` button or use the shortcut `Ctrl(cmd) + Enter` to execute the video generation
### 720P Version
#### 1. Workflow and Input Image
Download the image below and drag it into ComfyUI to load the corresponding workflow:

We'll use the following image as input:

#### 2. Model Download
Please download [wan2.1\_i2v\_720p\_14B\_fp16.safetensors](https://huggingface.co/Comfy-Org/Wan_2.1_ComfyUI_repackaged/resolve/main/split_files/diffusion_models/wan2.1_i2v_720p_14B_fp16.safetensors?download=true) and save it to the `ComfyUI/models/diffusion_models/` directory.
#### 3. Complete the Workflow Step by Step
 1. Make sure the `Load Diffusion Model` node has loaded the `wan2.1_i2v_720p_14B_fp16.safetensors` model
2. Make sure the `Load CLIP` node has loaded the `umt5_xxl_fp8_e4m3fn_scaled.safetensors` model
3. Make sure the `Load VAE` node has loaded the `wan_2.1_vae.safetensors` model
4. Make sure the `Load CLIP Vision` node has loaded the `clip_vision_h.safetensors` model
5. Upload the provided input image in the `Load Image` node
6. (Optional) Enter the video description content you want to generate in the `CLIP Text Encoder` node
7. (Optional) You can modify the video dimensions in the `WanImageToVideo` node if needed
8. Click the `Run` button or use the shortcut `Ctrl(cmd) + Enter` to execute the video generation
1. Make sure the `Load Diffusion Model` node has loaded the `wan2.1_i2v_720p_14B_fp16.safetensors` model
2. Make sure the `Load CLIP` node has loaded the `umt5_xxl_fp8_e4m3fn_scaled.safetensors` model
3. Make sure the `Load VAE` node has loaded the `wan_2.1_vae.safetensors` model
4. Make sure the `Load CLIP Vision` node has loaded the `clip_vision_h.safetensors` model
5. Upload the provided input image in the `Load Image` node
6. (Optional) Enter the video description content you want to generate in the `CLIP Text Encoder` node
7. (Optional) You can modify the video dimensions in the `WanImageToVideo` node if needed
8. Click the `Run` button or use the shortcut `Ctrl(cmd) + Enter` to execute the video generation