> ## Documentation Index
> Fetch the complete documentation index at: https://docs.comfy.org/llms.txt
> Use this file to discover all available pages before exploring further.
# ComfyUI Wan2.2 Fun Camera Control: Video Generation Workflow Example
> This article demonstrates how to use camera control for video generation with Wan2.2 Fun Camera Control in ComfyUI.
**Wan2.2-Fun-Camera-Control** is a next-generation video generation and camera control model developed by Alibaba PAI. By introducing innovative Camera Control Codes and combining deep learning with multimodal conditional inputs, it generates high-quality videos that adhere to predefined camera motion conditions. The model is released under the **Apache 2.0 license**, allowing for commercial use.
**Key Features**:
* **Camera Motion Control**: Supports various camera motion modes, including **Pan Up**, **Pan Down**, **Pan Left**, **Pan Right**, **Zoom In**, **Zoom Out**, and combinations thereof.
* **High-Quality Video Generation**: Based on the Wan2.2 architecture, it outputs cinematic-quality videos.
Here are the relevant model weights and code repository:
* [🤗Wan2.2-Fun-A14B-Control-Camera](https://huggingface.co/alibaba-pai/Wan2.2-Fun-A14B-Control-Camera)
* Code Repository: [VideoX-Fun](https://github.com/aigc-apps/VideoX-Fun)
## Wan2.2 Fun Camera Control: Video Generation Workflow Example
Make sure your ComfyUI is updated.
* [Download ComfyUI](https://www.comfy.org/download)
* [Update Guide](/installation/update_comfyui)
Workflows in this guide can be found in the [Workflow Templates](/interface/features/template).
If you can't find them in the template, your ComfyUI may be outdated. (Desktop version's update will delay sometime)
If nodes are missing when loading a workflow, possible reasons:
1. You are not using the latest ComfyUI version (Nightly version)
2. Some nodes failed to import at startup
* The Desktop is base on ComfyUI stable release, it will auto-update when there is a new Desktop stable release available.
* [Cloud](https://cloud.comfy.org) will update after ComfyUI stable release.
So, if you find any core node missing in this document, it might be because the new core nodes have not yet been released in the latest stable version. Please wait for the next stable release.
The workflow provided includes two versions:
1. Using the [Wan2.2-Lightning](https://huggingface.co/lightx2v/Wan2.2-Lightning) 4-step LoRA via lightx2v: This may result in reduced video dynamics but offers faster generation.
2. The fp8\_scaled version without the acceleration LoRA.
Below are the timing results tested on an RTX4090D 24GB GPU for 640\*640 resolution and 81-frame length:
| Model Type | Resolution | VRAM Usage | First Generation Time | Second Generation Time |
| ------------------------- | ---------- | ---------- | --------------------- | ---------------------- |
| fp8\_scaled | 640×640 | 84% | ≈ 536 seconds | ≈ 513 seconds |
| fp8\_scaled + 4-step LoRA | 640×640 | 89% | ≈ 108 seconds | ≈ 71 seconds |
While the 4-step LoRA improves initial user experience, it may reduce video dynamism. By default, the accelerated LoRA version is enabled. To switch workflows, select the nodes and press **Ctrl+B**.
### 1. Workflow and Asset Download
Download the video or JSON file below and drag it into ComfyUI to load the corresponding workflow. The workflow will prompt you to download the models.
Download JSON Workflow
Please download the image below, which we will use as input.

### 2. Model Links
The following models can be found in [Wan\_2.2\_ComfyUI\_Repackaged](https://huggingface.co/Comfy-Org/Wan_2.2_ComfyUI_Repackaged):
**Diffusion Model**
* [wan2.2\_fun\_camera\_high\_noise\_14B\_fp8\_scaled.safetensors](https://huggingface.co/Comfy-Org/Wan_2.2_ComfyUI_Repackaged/resolve/main/split_files/diffusion_models/wan2.2_fun_camera_high_noise_14B_fp8_scaled.safetensors)
* [wan2.2\_fun\_camera\_low\_noise\_14B\_fp8\_scaled.safetensors](https://huggingface.co/Comfy-Org/Wan_2.2_ComfyUI_Repackaged/resolve/main/split_files/diffusion_models/wan2.2_fun_camera_low_noise_14B_fp8_scaled.safetensors)
**Wan2.2-Lightning LoRA (Optional, for acceleration)**
* [wan2.2\_i2v\_lightx2v\_4steps\_lora\_v1\_high\_noise.safetensors](https://huggingface.co/Comfy-Org/Wan_2.2_ComfyUI_Repackaged/resolve/main/split_files/loras/wan2.2_i2v_lightx2v_4steps_lora_v1_high_noise.safetensors)
* [wan2.2\_i2v\_lightx2v\_4steps\_lora\_v1\_low\_noise.safetensors](https://huggingface.co/Comfy-Org/Wan_2.2_ComfyUI_Repackaged/resolve/main/split_files/loras/wan2.2_i2v_lightx2v_4steps_lora_v1_low_noise.safetensors)
**VAE**
* [wan\_2.1\_vae.safetensors](https://huggingface.co/Comfy-Org/Wan_2.2_ComfyUI_Repackaged/resolve/main/split_files/vae/wan_2.1_vae.safetensors)
**Text Encoder**
* [umt5\_xxl\_fp8\_e4m3fn\_scaled.safetensors](https://huggingface.co/Comfy-Org/Wan_2.1_ComfyUI_repackaged/resolve/main/split_files/text_encoders/umt5_xxl_fp8_e4m3fn_scaled.safetensors)
File save location
```
ComfyUI/
├───📂 models/
│ ├───📂 diffusion_models/
│ │ ├─── wan2.2_fun_camera_low_noise_14B_fp8_scaled.safetensors
│ │ └─── wan2.2_fun_camera_high_noise_14B_fp8_scaled.safetensors
│ ├───📂 loras/
│ │ ├─── wan2.2_i2v_lightx2v_4steps_lora_v1_high_noise.safetensors
│ │ └─── wan2.2_i2v_lightx2v_4steps_lora_v1_low_noise.safetensors
│ ├───📂 text_encoders/
│ │ └─── umt5_xxl_fp8_e4m3fn_scaled.safetensors
│ └───📂 vae/
│ └── wan_2.1_vae.safetensors
```
### 3. Complete the Workflow Step-by-Step
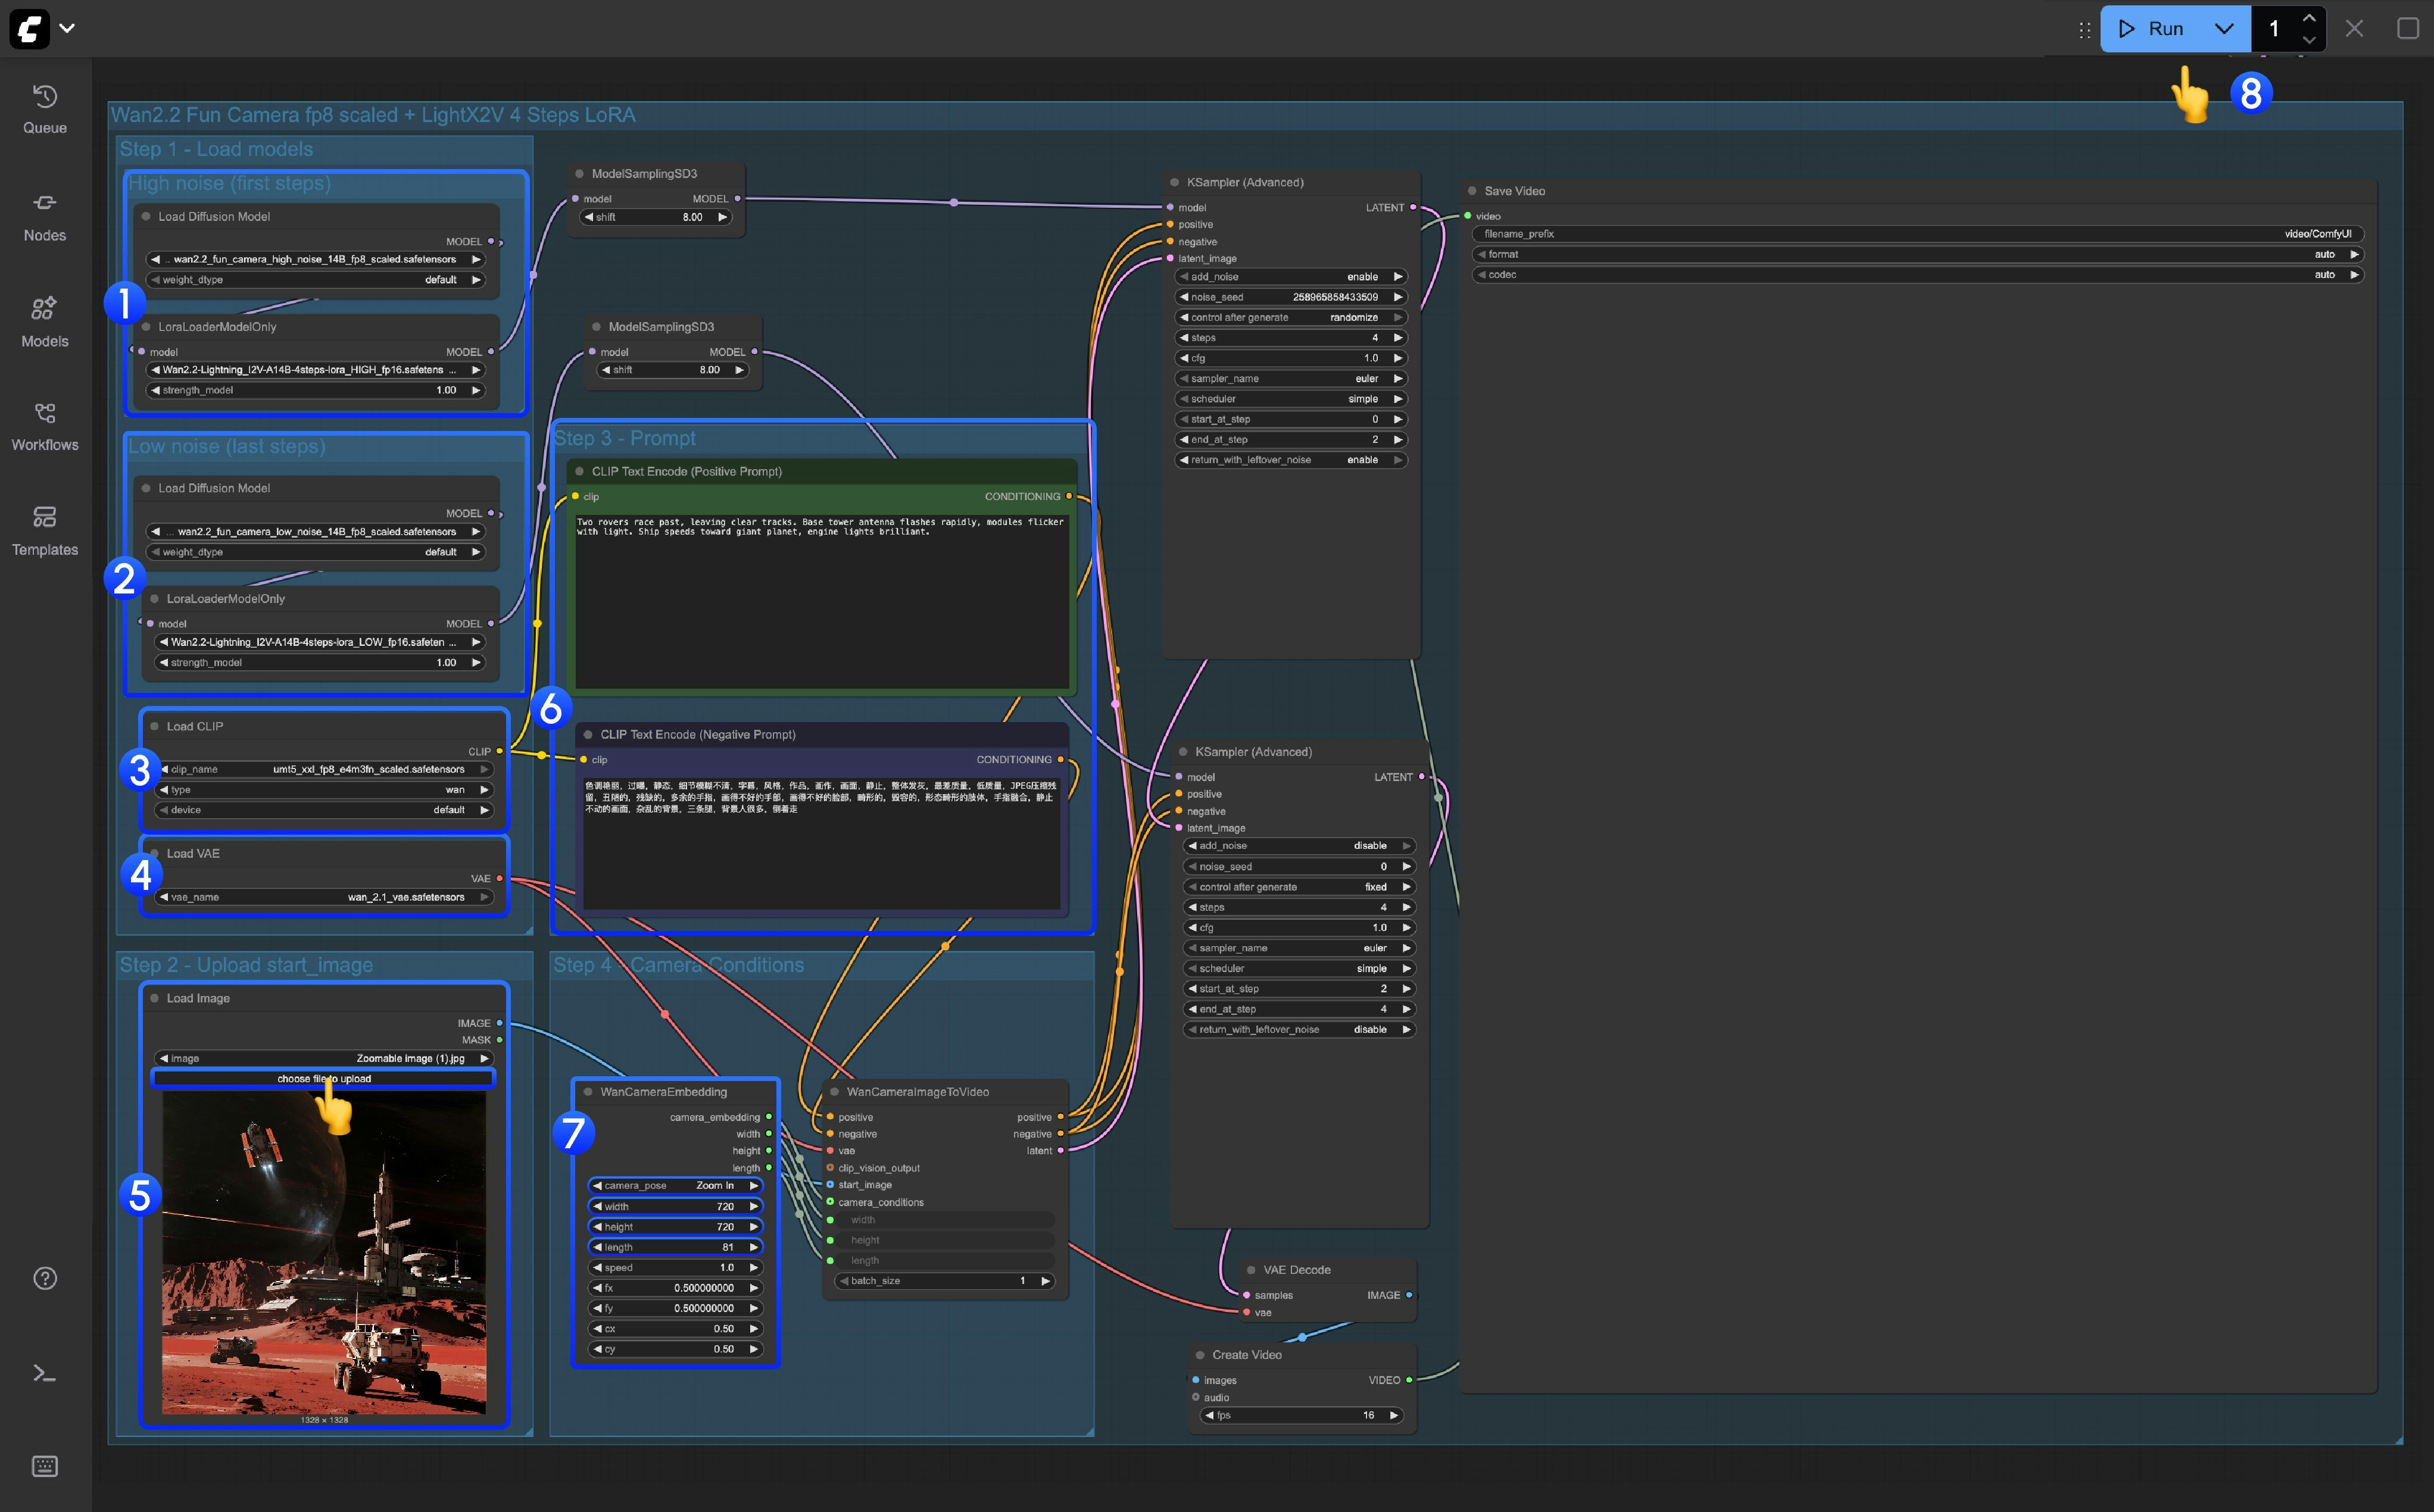 This workflow uses LoRA. Ensure the Diffusion model and LoRA are consistent; high noise and low noise models and LoRA must be paired accordingly.
1. **High noise** model and **LoRA** loading
* Ensure the `Load Diffusion Model` node loads `wan2.2_fun_camera_high_noise_14B_fp8_scaled.safetensors`
* Ensure the `LoraLoaderModelOnly` node loads `wan2.2_i2v_lightx2v_4steps_lora_v1_high_noise.safetensors`
2. **Low noise** model and **LoRA** loading
* Ensure the `Load Diffusion Model` node loads `wan2.2_fun_camera_low_noise_14B_fp8_scaled.safetensors`
* Ensure the `LoraLoaderModelOnly` node loads `wan2.2_i2v_lightx2v_4steps_lora_v1_low_noise.safetensors`
3. Ensure the `Load CLIP` node loads `umt5_xxl_fp8_e4m3fn_scaled.safetensors`
4. Ensure the `Load VAE` node loads `wan_2.1_vae.safetensors`
5. Upload the starting frame in the `Load Image` node
6. Modify the Prompt (both Chinese and English are acceptable)
7. Set camera control parameters in the `WanCameraEmbedding` node:
* **Camera Motion**: Select the camera motion type (Zoom In, Zoom Out, Pan Up, Pan Down, Pan Left, Pan Right, Static, etc.)
* **Width/Height**: Set video resolution
* **Length**: Set the number of video frames (default is 81 frames)
* **Speed**: Set video speed (default is 1.0)
8. Click the `Run` button or use the shortcut `Ctrl(cmd) + Enter` to execute video generation
This workflow uses LoRA. Ensure the Diffusion model and LoRA are consistent; high noise and low noise models and LoRA must be paired accordingly.
1. **High noise** model and **LoRA** loading
* Ensure the `Load Diffusion Model` node loads `wan2.2_fun_camera_high_noise_14B_fp8_scaled.safetensors`
* Ensure the `LoraLoaderModelOnly` node loads `wan2.2_i2v_lightx2v_4steps_lora_v1_high_noise.safetensors`
2. **Low noise** model and **LoRA** loading
* Ensure the `Load Diffusion Model` node loads `wan2.2_fun_camera_low_noise_14B_fp8_scaled.safetensors`
* Ensure the `LoraLoaderModelOnly` node loads `wan2.2_i2v_lightx2v_4steps_lora_v1_low_noise.safetensors`
3. Ensure the `Load CLIP` node loads `umt5_xxl_fp8_e4m3fn_scaled.safetensors`
4. Ensure the `Load VAE` node loads `wan_2.1_vae.safetensors`
5. Upload the starting frame in the `Load Image` node
6. Modify the Prompt (both Chinese and English are acceptable)
7. Set camera control parameters in the `WanCameraEmbedding` node:
* **Camera Motion**: Select the camera motion type (Zoom In, Zoom Out, Pan Up, Pan Down, Pan Left, Pan Right, Static, etc.)
* **Width/Height**: Set video resolution
* **Length**: Set the number of video frames (default is 81 frames)
* **Speed**: Set video speed (default is 1.0)
8. Click the `Run` button or use the shortcut `Ctrl(cmd) + Enter` to execute video generation