> ## Documentation Index
> Fetch the complete documentation index at: https://docs.comfy.org/llms.txt
> Use this file to discover all available pages before exploring further.
# Pixal3D 图像到3D模型 ComfyUI 工作流示例
> 使用 Pixal3D(腾讯 ARC 推出的像素对齐图像到3D模型),从单张图像生成具有完整 PBR 纹理的高保真 3D 模型。
**Pixal3D** 是来自腾讯 ARC 的开源图像转3D模型,发表于 SIGGRAPH 2026。它可将单张图像转换为具有完整PBR材质的高保真3D资源。
大多数3D原生生成器在规范空间中合成形状,并通过注意力注入图像线索,这导致像素与3D之间的关联不明确。Pixal3D 则采用像素对齐生成:通过反投影建立像素与3D的直接对应关系,因此已生成模型的正面与你的输入图像1:1匹配,不会出现纹理扭曲或错位。
Pixal3D:图像到模型
上传单张图像。生成一个具有完整PBR纹理的高保真3D模型,并与你的输入视角对齐。
该工作流同时包含 TRELLIS.2 管线:`Boolean (Switch to Trellis2)` 节点默认为 `false`,即运行此处描述的 Pixal3D 管线并自动加载 Pixal3D 模型。
 请确保你的 ComfyUI 已经更新。
* [ComfyUI 下载](https://www.comfy.org/download)
* [ComfyUI 更新教程](/zh/installation/update_comfyui)
本指南里的工作流可以在[工作流模板](/zh/interface/features/template)中找到。如果找不到,可能是 ComfyUI 没有更新。
如果加载工作流时有节点缺失,可能原因有:
1. 你用的不是最新版(每夜版)。
2. 启动时有些节点导入失败。
* [Cloud](https://cloud.comfy.org) 会在 ComfyUI 稳定版本发布后更新。
所以,如果你发现本文档中有任何核心节点缺失,可能是因为新核心节点尚未在最新稳定版中发布。请等待下一个稳定版发布。
在Comfy Cloud上立即运行此工作流
下载JSON或在模板库中搜索 "Pixal3D & TRELLIS.2: Image to Model"
**输入素材**
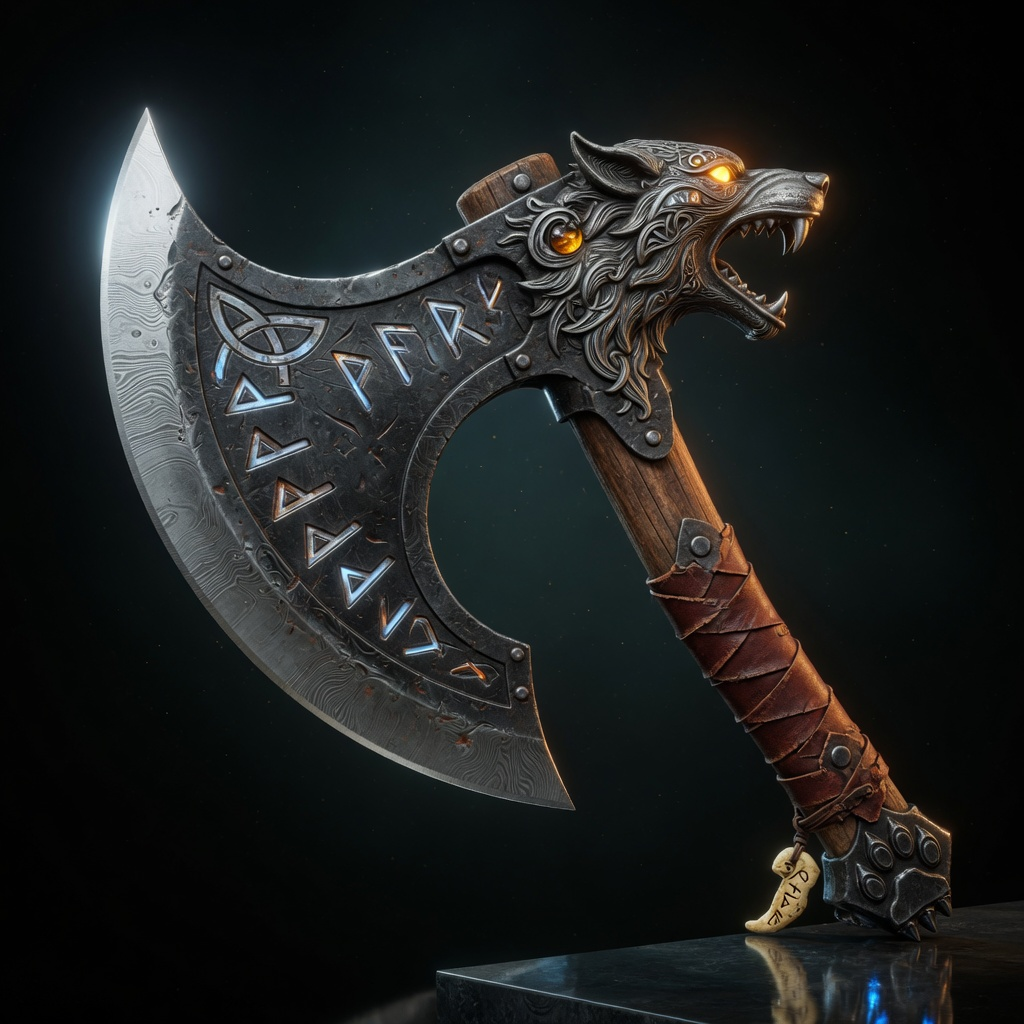
将此文件上传到`LoadImage`节点:
`LoadImage`节点 122 · `viking_wolf_rune_axe.png`
## 工作原理
Pixal3D 将相机感知、像素对齐的生成与完整的网格后处理 pipeline 相结合:
1. **背景移除**:BiRefNet 移除输入图像的背景,工作流将主体裁剪到居中的 1024×1024 画布。可以通过一个切换跳过背景移除。
2. **相机估计**:MoGe 从图像中估计几何和相机视场。该视场驱动像素对齐的条件。
3. **结构生成**:对稀疏结构 Latent 进行采样并解码为体素,然后转换为粗糙网格。
4. **形状细化**:形状阶段和上采样阶段将网格细化到目标分辨率(1536)。
5. **纹理生成**:纹理 diffusion 阶段生成 PBR 材质体素(基础颜色、金属度、粗糙度)。
6. **后处理**:DC 重网格化、QEM 网格简化、UV 展开,并将基础颜色、法线和环境光遮蔽贴图烘焙到最终的纹理网格中。
## 运行步骤
1. **加载图像**:使用 `LoadImage` 节点加载对象的单张图像
2. **将工作流加入队列**:按 Ctrl(macOS 上为 Cmd)+ Enter
3. **等待流水线处理**:结构、形状和纹理阶段依次运行,随后进行后处理
4. **查看结果**:在 `Preview3DAdvanced` 节点中检查网格。GLB 文件保存到 `ComfyUI/output/3d/ComfyUI/`
## 模型下载
下载此工作流使用的模型。两个扩散模型都需要:开关会决定运行哪一个。放到对应的 `models/` 子目录中。
pixal3d\_int8\_convrot.safetensors: Pixal3D 扩散模型(默认加载)
trellis\_2\_int8\_convrot.safetensors: TRELLIS.2 扩散模型(开关设为 `true` 时加载)
trellis\_2\_shape\_vae\_bf16.safetensors: 用于结构和形状解码的 VAE
trellis\_2\_texture\_vae\_bf16.safetensors: 用于纹理解码的 VAE
dino\_v3\_L\_naf\_fp32.safetensors: 用于图像条件的 CLIP 视觉编码器
moge\_2\_vitl\_normal\_fp16.safetensors: 用于像素对齐条件的深度与相机估计
birefnet.safetensors: 用于预处理的背景移除模型
### 模型存储位置
```
📂 ComfyUI/
├── 📂 models/
│ ├── 📂 diffusion_models/
│ │ ├── trellis_2_int8_convrot.safetensors
│ │ └── pixal3d_int8_convrot.safetensors
│ ├── 📂 vae/
│ │ ├── trellis_2_shape_vae_bf16.safetensors
│ │ └── trellis_2_texture_vae_bf16.safetensors
│ ├── 📂 clip_vision/
│ │ └── dino_v3_L_naf_fp32.safetensors
│ ├── 📂 geometry_estimation/
│ │ └── moge_2_vitl_normal_fp16.safetensors
│ └── 📂 background_removal/
│ └── birefnet.safetensors
```
请确保你的 ComfyUI 已经更新。
* [ComfyUI 下载](https://www.comfy.org/download)
* [ComfyUI 更新教程](/zh/installation/update_comfyui)
本指南里的工作流可以在[工作流模板](/zh/interface/features/template)中找到。如果找不到,可能是 ComfyUI 没有更新。
如果加载工作流时有节点缺失,可能原因有:
1. 你用的不是最新版(每夜版)。
2. 启动时有些节点导入失败。
* [Cloud](https://cloud.comfy.org) 会在 ComfyUI 稳定版本发布后更新。
所以,如果你发现本文档中有任何核心节点缺失,可能是因为新核心节点尚未在最新稳定版中发布。请等待下一个稳定版发布。
在Comfy Cloud上立即运行此工作流
下载JSON或在模板库中搜索 "Pixal3D & TRELLIS.2: Image to Model"
**输入素材**
将此文件上传到`LoadImage`节点:
`LoadImage`节点 122 · `viking_wolf_rune_axe.png`
## 工作原理
Pixal3D 将相机感知、像素对齐的生成与完整的网格后处理 pipeline 相结合:
1. **背景移除**:BiRefNet 移除输入图像的背景,工作流将主体裁剪到居中的 1024×1024 画布。可以通过一个切换跳过背景移除。
2. **相机估计**:MoGe 从图像中估计几何和相机视场。该视场驱动像素对齐的条件。
3. **结构生成**:对稀疏结构 Latent 进行采样并解码为体素,然后转换为粗糙网格。
4. **形状细化**:形状阶段和上采样阶段将网格细化到目标分辨率(1536)。
5. **纹理生成**:纹理 diffusion 阶段生成 PBR 材质体素(基础颜色、金属度、粗糙度)。
6. **后处理**:DC 重网格化、QEM 网格简化、UV 展开,并将基础颜色、法线和环境光遮蔽贴图烘焙到最终的纹理网格中。
## 运行步骤
1. **加载图像**:使用 `LoadImage` 节点加载对象的单张图像
2. **将工作流加入队列**:按 Ctrl(macOS 上为 Cmd)+ Enter
3. **等待流水线处理**:结构、形状和纹理阶段依次运行,随后进行后处理
4. **查看结果**:在 `Preview3DAdvanced` 节点中检查网格。GLB 文件保存到 `ComfyUI/output/3d/ComfyUI/`
## 模型下载
下载此工作流使用的模型。两个扩散模型都需要:开关会决定运行哪一个。放到对应的 `models/` 子目录中。
pixal3d\_int8\_convrot.safetensors: Pixal3D 扩散模型(默认加载)
trellis\_2\_int8\_convrot.safetensors: TRELLIS.2 扩散模型(开关设为 `true` 时加载)
trellis\_2\_shape\_vae\_bf16.safetensors: 用于结构和形状解码的 VAE
trellis\_2\_texture\_vae\_bf16.safetensors: 用于纹理解码的 VAE
dino\_v3\_L\_naf\_fp32.safetensors: 用于图像条件的 CLIP 视觉编码器
moge\_2\_vitl\_normal\_fp16.safetensors: 用于像素对齐条件的深度与相机估计
birefnet.safetensors: 用于预处理的背景移除模型
### 模型存储位置
```
📂 ComfyUI/
├── 📂 models/
│ ├── 📂 diffusion_models/
│ │ ├── trellis_2_int8_convrot.safetensors
│ │ └── pixal3d_int8_convrot.safetensors
│ ├── 📂 vae/
│ │ ├── trellis_2_shape_vae_bf16.safetensors
│ │ └── trellis_2_texture_vae_bf16.safetensors
│ ├── 📂 clip_vision/
│ │ └── dino_v3_L_naf_fp32.safetensors
│ ├── 📂 geometry_estimation/
│ │ └── moge_2_vitl_normal_fp16.safetensors
│ └── 📂 background_removal/
│ └── birefnet.safetensors
```