> ## Documentation Index
> Fetch the complete documentation index at: https://docs.comfy.org/llms.txt
> Use this file to discover all available pages before exploring further.
# ComfyUI Flux 文生图工作示例
> 本文将简要介绍 Flux 绘图模型,并指导使用 Flux 模型进行文生图的示例包括原始完整版本和 FP8 Checkpoint 版本。
 Flux 是目前最大的开源AI绘画模型之一,拥有 12B 参数,原始文件大小约为23GB。它由 [Black Forest Labs](https://blackforestlabs.ai/) 开发,该团队由前 Stable Diffusion 团队成员创立。
Flux 以其卓越的画面质量和灵活性而闻名,能够生成高质量、多样化的图像。
目前 Flux.1 模型主要有以下几个版本:
* **Flux.1 Pro:** 效果最佳模型,闭源模型,仅支持通过 API 调用。
* **[Flux.1 \[dev\]:](https://huggingface.co/black-forest-labs/FLUX.1-dev)** 开源但仅限非商业使用,从 Pro 版本蒸馏而来,效果接近Pro版。
* \*\*[Flux.1 \[schnell\]:](https://huggingface.co/black-forest-labs/FLUX.1-schnell)\*\*采用 Apache2.0 许可,仅需4步即可生成图像,适合低配置硬件。
**Flux.1 模型特点**
* **混合架构:** 结合了 Transformer 网络和扩散模型的优势,有效整合文本与图像信息,提升生成图像与提示词的对齐精度,对复杂的提示词依旧有非常好的还原能力。
* **参数规模:** Flux 拥有 12B 参数,可捕捉更复杂的模式关系,生成更逼真、多样化的图像。
* **支持多种风格:** 支持多样化的风格,对各种类型的图像都有非常好的表现能力。
在本篇示例中,我们将介绍使用 Flux.1 Dev 和 Flux.1 Schnell 两个版本进行文生图的示例,包括原始完整版模型和 FP8 Checkpoint 简化版本。
* **Flux 完整版本:** 效果最佳,但需要较大的显存资源(推荐16GB以上),需要安装多个模型文件。
* **Flux FP8 Checkpoint:** 仅需一个 fp8 版本的模型,但是质量相对完整版会有所降低。
本篇示例中的所有工作流图片的 Metadata 中已包含对应模型下载信息,使用以下方式来加载工作流:
* 直接拖入 ComfyUI
* 或使用菜单 `Workflows` -> `Open(ctrl+o)`
如果你使用的不是 Desktop 版本或者部分模型无法顺利下载,请参考手动安装部分保存模型文件到对应的文件夹。
请在开始之前确保你的 ComfyUI 已更新到最新版本。
## Flux.1 原始版本模型文生图示例
请注意如果你无法下载 [black-forest-labs/FLUX.1-dev](https://huggingface.co/black-forest-labs/FLUX.1-dev) 中的模型,请确保你已登录 Huggingface 并同意了对应 Repo 的协议。
Flux 是目前最大的开源AI绘画模型之一,拥有 12B 参数,原始文件大小约为23GB。它由 [Black Forest Labs](https://blackforestlabs.ai/) 开发,该团队由前 Stable Diffusion 团队成员创立。
Flux 以其卓越的画面质量和灵活性而闻名,能够生成高质量、多样化的图像。
目前 Flux.1 模型主要有以下几个版本:
* **Flux.1 Pro:** 效果最佳模型,闭源模型,仅支持通过 API 调用。
* **[Flux.1 \[dev\]:](https://huggingface.co/black-forest-labs/FLUX.1-dev)** 开源但仅限非商业使用,从 Pro 版本蒸馏而来,效果接近Pro版。
* \*\*[Flux.1 \[schnell\]:](https://huggingface.co/black-forest-labs/FLUX.1-schnell)\*\*采用 Apache2.0 许可,仅需4步即可生成图像,适合低配置硬件。
**Flux.1 模型特点**
* **混合架构:** 结合了 Transformer 网络和扩散模型的优势,有效整合文本与图像信息,提升生成图像与提示词的对齐精度,对复杂的提示词依旧有非常好的还原能力。
* **参数规模:** Flux 拥有 12B 参数,可捕捉更复杂的模式关系,生成更逼真、多样化的图像。
* **支持多种风格:** 支持多样化的风格,对各种类型的图像都有非常好的表现能力。
在本篇示例中,我们将介绍使用 Flux.1 Dev 和 Flux.1 Schnell 两个版本进行文生图的示例,包括原始完整版模型和 FP8 Checkpoint 简化版本。
* **Flux 完整版本:** 效果最佳,但需要较大的显存资源(推荐16GB以上),需要安装多个模型文件。
* **Flux FP8 Checkpoint:** 仅需一个 fp8 版本的模型,但是质量相对完整版会有所降低。
本篇示例中的所有工作流图片的 Metadata 中已包含对应模型下载信息,使用以下方式来加载工作流:
* 直接拖入 ComfyUI
* 或使用菜单 `Workflows` -> `Open(ctrl+o)`
如果你使用的不是 Desktop 版本或者部分模型无法顺利下载,请参考手动安装部分保存模型文件到对应的文件夹。
请在开始之前确保你的 ComfyUI 已更新到最新版本。
## Flux.1 原始版本模型文生图示例
请注意如果你无法下载 [black-forest-labs/FLUX.1-dev](https://huggingface.co/black-forest-labs/FLUX.1-dev) 中的模型,请确保你已登录 Huggingface 并同意了对应 Repo 的协议。
 ### Flux.1 Dev 完整版本工作流
#### 1. 工作流文件
请下载下面的图片,并拖入 ComfyUI 中加载工作流。

### Flux.1 Dev 完整版本工作流
#### 1. 工作流文件
请下载下面的图片,并拖入 ComfyUI 中加载工作流。

在 Comfy Cloud 上运行
#### 2. 手动安装模型
* `flux1-dev.safetensors` 文件需要同意 [black-forest-labs/FLUX.1-dev](https://huggingface.co/black-forest-labs/FLUX.1-dev) 的协议后才能使用浏览器进行下载。
* 如果你的显存较低,可以尝试使用 [t5xxl\_fp8\_e4m3fn.safetensors](https://huggingface.co/comfyanonymous/flux_text_encoders/resolve/main/t5xxl_fp8_e4m3fn.safetensors?download=true) 来替换 `t5xxl_fp16.safetensors` 文件。
请下载下面的模型文件:
* [clip\_l.safetensors](https://huggingface.co/comfyanonymous/flux_text_encoders/resolve/main/clip_l.safetensors?download=true)
* [t5xxl\_fp16.safetensors](https://huggingface.co/comfyanonymous/flux_text_encoders/resolve/main/t5xxl_fp16.safetensors?download=true) 当你的显存大于 32GB 时推荐使用。
* [ae.safetensors](https://huggingface.co/black-forest-labs/FLUX.1-schnell/resolve/main/ae.safetensors?download=true)
* [flux1-dev.safetensors](https://huggingface.co/black-forest-labs/FLUX.1-dev/resolve/main/flux1-dev.safetensors)
文件保存位置:
```
ComfyUI/
├── models/
│ ├── text_encoders/
│ │ ├── clip_l.safetensors
│ │ └── t5xxl_fp16.safetensors
│ ├── vae/
│ │ └── ae.safetensors
│ └── diffusion_models/
│ └── flux1-dev.safetensors
```
#### 3. 按步骤检查确保工作流可以正常运行
请参照下面的图片,确保各个模型文件都已经加载完成
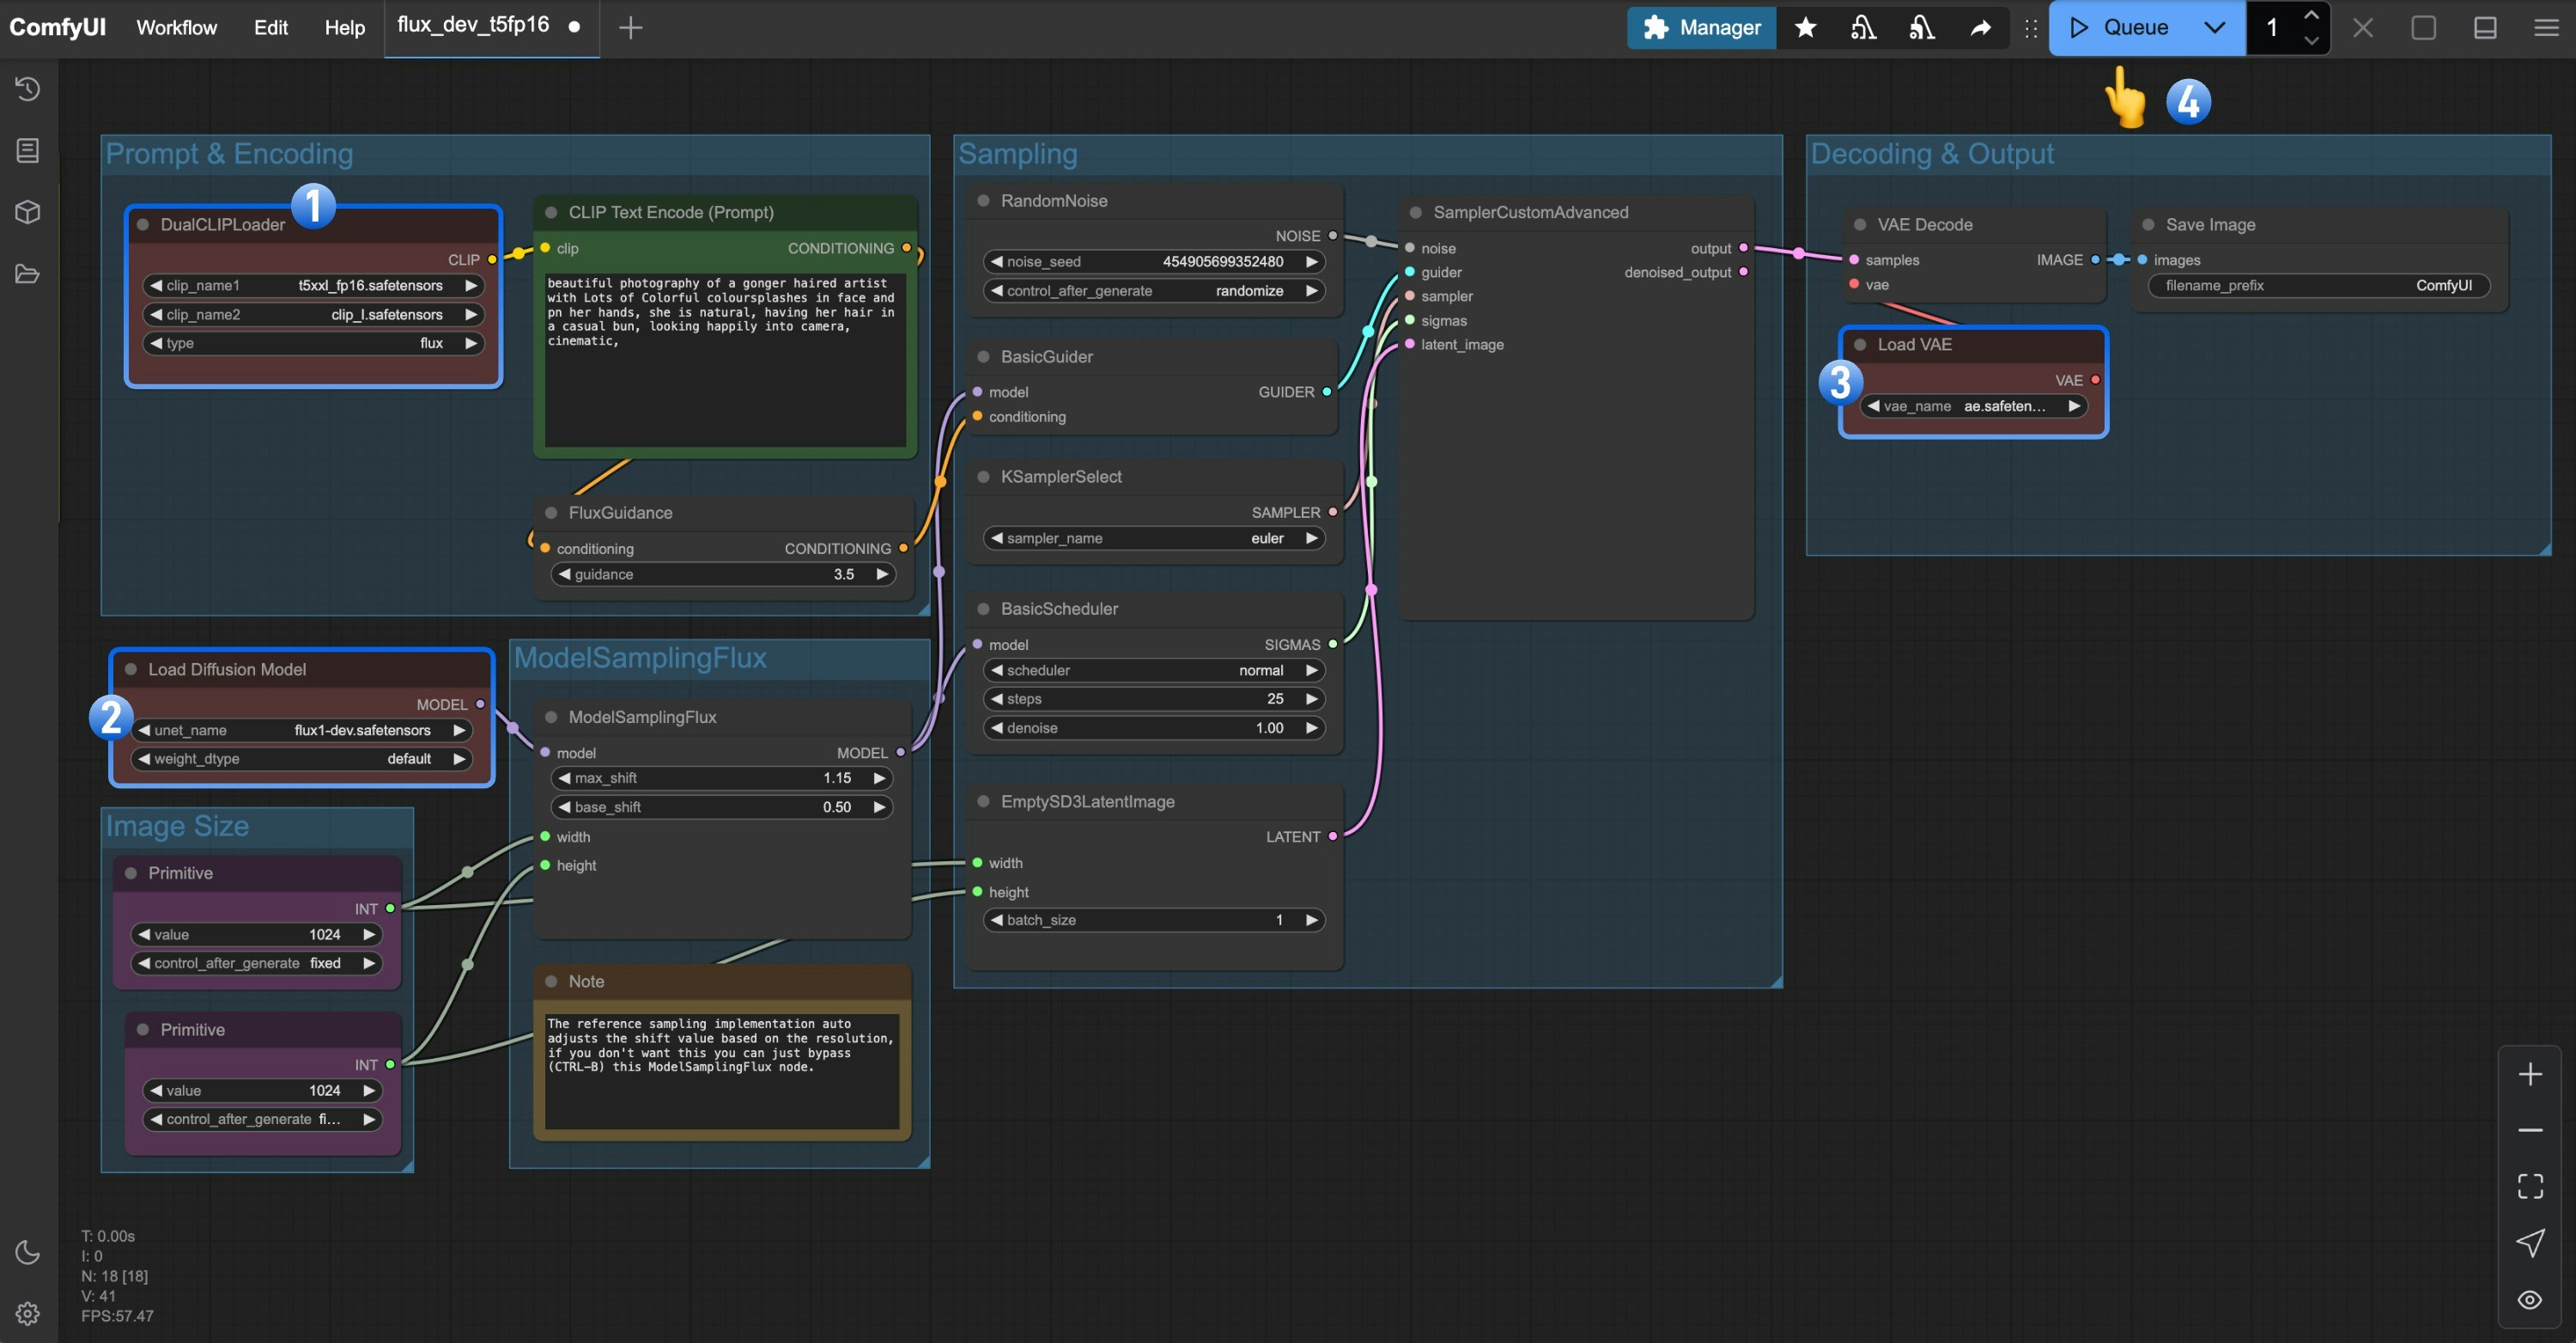 1. 确保在`DualCLIPLoader`节点中下面的模型已加载:
* clip\_name1: t5xxl\_fp16.safetensors
* clip\_name2: clip\_l.safetensors
2. 确保在`Load Diffusion Model`节点加载了`flux1-dev.safetensors`
3. 确保在`Load VAE`节点中加载了`ae.safetensors`
4. 点击 `Queue` 按钮,或者使用快捷键 `Ctrl(cmd) + Enter(回车)` 来运行工作流
得益于 Flux 良好的提示词遵循能力,我们并不需要任何的负向提示词
### Flux.1 Schnell 完整版本工作流
#### 1. 工作流文件
请下载下面的图片,并拖入 ComfyUI 中加载工作流。

1. 确保在`DualCLIPLoader`节点中下面的模型已加载:
* clip\_name1: t5xxl\_fp16.safetensors
* clip\_name2: clip\_l.safetensors
2. 确保在`Load Diffusion Model`节点加载了`flux1-dev.safetensors`
3. 确保在`Load VAE`节点中加载了`ae.safetensors`
4. 点击 `Queue` 按钮,或者使用快捷键 `Ctrl(cmd) + Enter(回车)` 来运行工作流
得益于 Flux 良好的提示词遵循能力,我们并不需要任何的负向提示词
### Flux.1 Schnell 完整版本工作流
#### 1. 工作流文件
请下载下面的图片,并拖入 ComfyUI 中加载工作流。

在 Comfy Cloud 上运行
#### 2. 手动安装模型
在这个工作流中,只有两个模型文件与 Flux1 Dev 版本的工作流不同,对于 t5xxl 你仍可使用 fp16 版本来获得更好的效果。
* **t5xxl\_fp16.safetensors** -> **t5xxl\_fp8.safetensors**
* **flux1-dev.safetensors** -> **flux1-schnell.safetensors**
完整模型文件列表:
* [clip\_l.safetensors](https://huggingface.co/comfyanonymous/flux_text_encoders/resolve/main/clip_l.safetensors?download=true)
* [t5xxl\_fp8\_e4m3fn.safetensors](https://huggingface.co/comfyanonymous/flux_text_encoders/resolve/main/t5xxl_fp8_e4m3fn.safetensors?download=true)
* [ae.safetensors](https://huggingface.co/black-forest-labs/FLUX.1-schnell/resolve/main/ae.safetensors?download=true)
* [flux1-schnell.safetensors](https://huggingface.co/black-forest-labs/FLUX.1-schnell/resolve/main/flux1-schnell.safetensors)
文件保存位置:
```
ComfyUI/
├── models/
│ ├── text_encoders/
│ │ ├── clip_l.safetensors
│ │ └── t5xxl_fp8_e4m3fn.safetensors
│ ├── vae/
│ │ └── ae.safetensors
│ └── diffusion_models/
│ └── flux1-schnell.safetensors
```
#### 3. 按步骤检查确保工作流可以正常运行
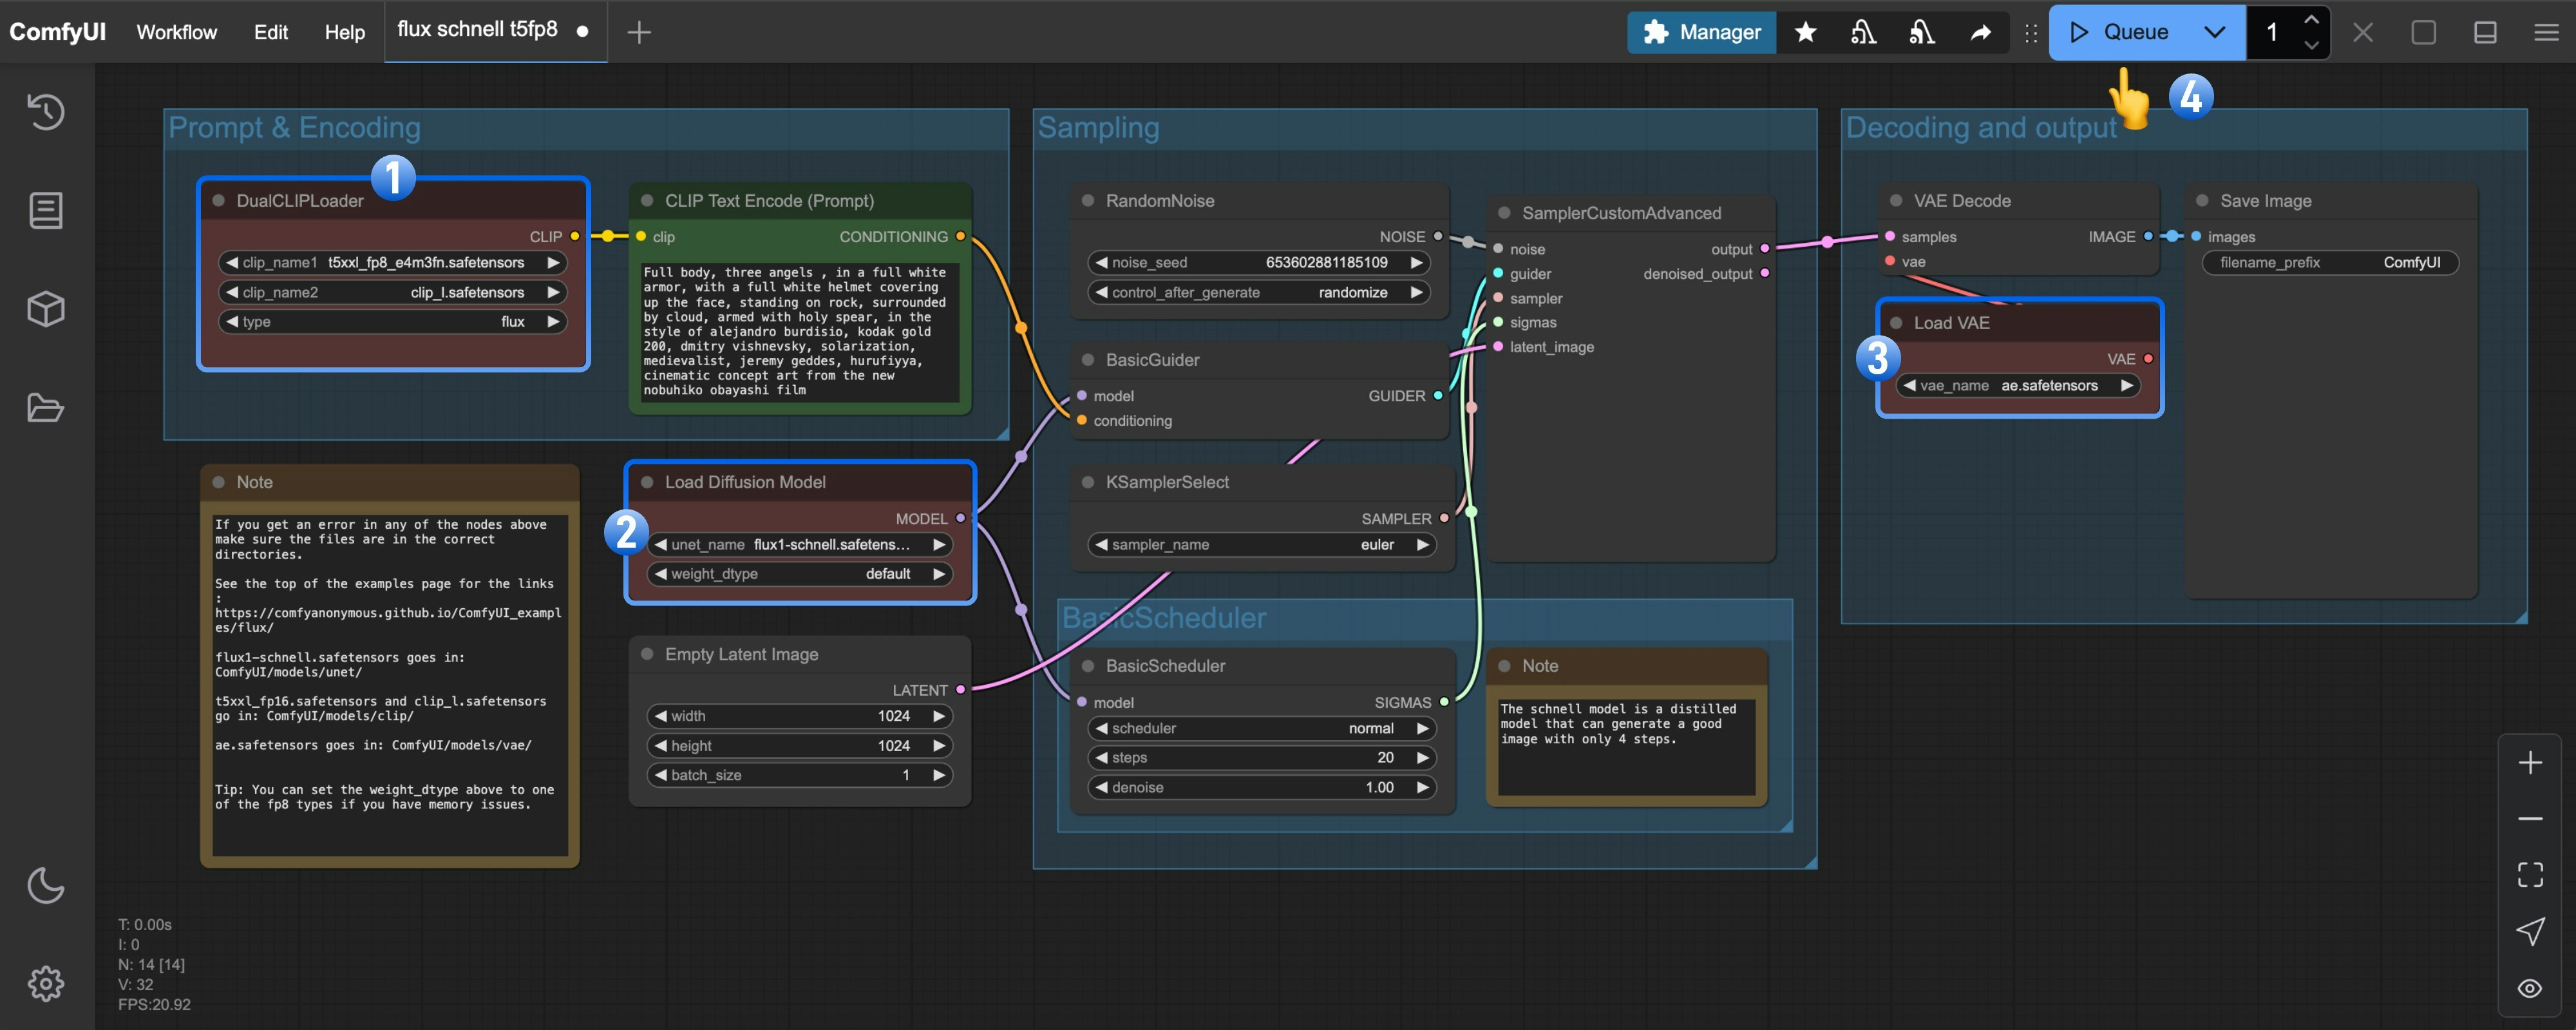 1. 确保在`DualCLIPLoader`节点中下面的模型已加载:
* clip\_name1: t5xxl\_fp8\_e4m3fn.safetensors
* clip\_name2: clip\_l.safetensors
2. 确保在`Load Diffusion Model`节点加载了`flux1-schnell.safetensors`
3. 确保在`Load VAE`节点中加载了`ae.safetensors`
4. 点击 `Queue` 按钮,或者使用快捷键 `Ctrl(cmd) + Enter(回车)` 来运行工作流
## Fp8 Checkpoint 版文生图示例
fp8 版本是对 flux1 原版 fp16 版本的量化版本,在一定程度上这个版本的质量会低于 fp16 版本,但同时它需要的显存也会更少,而且你仅需要安装一个模型文件即可尝试运行。
### Flux.1 Dev fp8 Checkpoint 版工作流
请下载下面的图片,并拖入 ComfyUI 中加载工作流。

1. 确保在`DualCLIPLoader`节点中下面的模型已加载:
* clip\_name1: t5xxl\_fp8\_e4m3fn.safetensors
* clip\_name2: clip\_l.safetensors
2. 确保在`Load Diffusion Model`节点加载了`flux1-schnell.safetensors`
3. 确保在`Load VAE`节点中加载了`ae.safetensors`
4. 点击 `Queue` 按钮,或者使用快捷键 `Ctrl(cmd) + Enter(回车)` 来运行工作流
## Fp8 Checkpoint 版文生图示例
fp8 版本是对 flux1 原版 fp16 版本的量化版本,在一定程度上这个版本的质量会低于 fp16 版本,但同时它需要的显存也会更少,而且你仅需要安装一个模型文件即可尝试运行。
### Flux.1 Dev fp8 Checkpoint 版工作流
请下载下面的图片,并拖入 ComfyUI 中加载工作流。

在 Comfy Cloud 上运行
请下载 [flux1-dev-fp8.safetensors](https://huggingface.co/Comfy-Org/flux1-dev/resolve/main/flux1-dev-fp8.safetensors?download=true)并保存至 `ComfyUI/models/Checkpoints/` 目录下。
确保对应的 `Load Checkpoint` 节点加载了 `flux1-dev-fp8.safetensors`,即可测试运行。
### Flux.1 Schnell fp8 Checkpoint 版工作流
请下载下面的图片,并拖入 ComfyUI 中加载工作流。

请下载[flux1-schnell-fp8.safetensors](https://huggingface.co/Comfy-Org/flux1-schnell/resolve/main/flux1-schnell-fp8.safetensors?download=true)并保存至 `ComfyUI/models/Checkpoints/` 目录下。
确保对应的 `Load Checkpoint` 节点加载了 `flux1-schnell-fp8.safetensors`,即可测试运行。