> ## Documentation Index
> Fetch the complete documentation index at: https://docs.comfy.org/llms.txt
> Use this file to discover all available pages before exploring further.
# ComfyUI Flux.1 Kontext Pro Image 合作伙伴节点 ComfyUI 官方示例
> 本文将介绍如何在 ComfyUI 中使用 Flux.1 Kontext Pro Image 合作伙伴节点来完成图像编辑功能
FLUX.1 Kontext 是由 Black Forest Labs 开发的一款专业的图像到图像编辑模型,专注于智能理解图像上下文并执行精确编辑。
能够在无需复杂描述的情况下实现多种编辑任务,包括对象修改、风格转换、背景替换、角色一致性编辑和文本编辑等。
Kontext 的核心优势在于其出色的上下文理解能力和角色一致性保持,即使经过多次迭代编辑,也能确保人物特征、构图布局等关键元素保持稳定。
目前,ComfyUI 中支持了 Flux.1 Kontext 的两个模型:
* **Kontext Pro** 适合编辑、合成和混音。
* **Kontext Max** 在排版、提示词精确度和速度方面突破极限。
本篇指南,我们将通过对应的工作流来简单介绍如何使用 Flux.1 Kontext 的相关 合作伙伴节点来完成图像编辑。
使用 API 节点需要保证你已经正常登录,并在受许可的网络环境下使用,请参考[API 节点总览](/zh/tutorials/partner-nodes/overview)部分文档来了解使用 API 节点的具体使用要求。
请确保你的 ComfyUI 已经更新。
* [ComfyUI 下载](https://www.comfy.org/download)
* [ComfyUI 更新教程](/zh/installation/update_comfyui)
本指南里的工作流可以在 ComfyUI 的[工作流模板](/zh/interface/features/template)中找到。如果找不到,可能是 ComfyUI 没有更新。
如果加载工作流时有节点缺失,可能原因有:
1. 你用的不是最新开发版(nightly)。
2. 你用的是稳定版或桌面版(没有包含最新的更新)。
3. 启动时有些节点导入失败。
* 桌面版是基于 ComfyUI 稳定版本构建的,它会在有新的桌面稳定版本发布时自动更新。
* [Cloud](https://cloud.comfy.org) 会在 ComfyUI 稳定版本发布后更新,我们会同步更新 Cloud。
所以,如果你发现本教程中有任何核心节点缺失,那是因为对应的节点支持还在开发中没有发布正式的稳定版,请等待下一个稳定版本发布。
## Flux.1 Kontext 多图输入工作流
我们最近更新支持了多图输入工作流,使用新增的 `Image Stitch` 节点,将允许你将多张图像拼接成一张图像,并使用 Flux.1 Kontext 进行编辑。
### 1. 工作流文件下载
下面的图片的`metadata`中已经包含工作流信息,请下载并拖入 ComfyUI 中加载对应工作流。

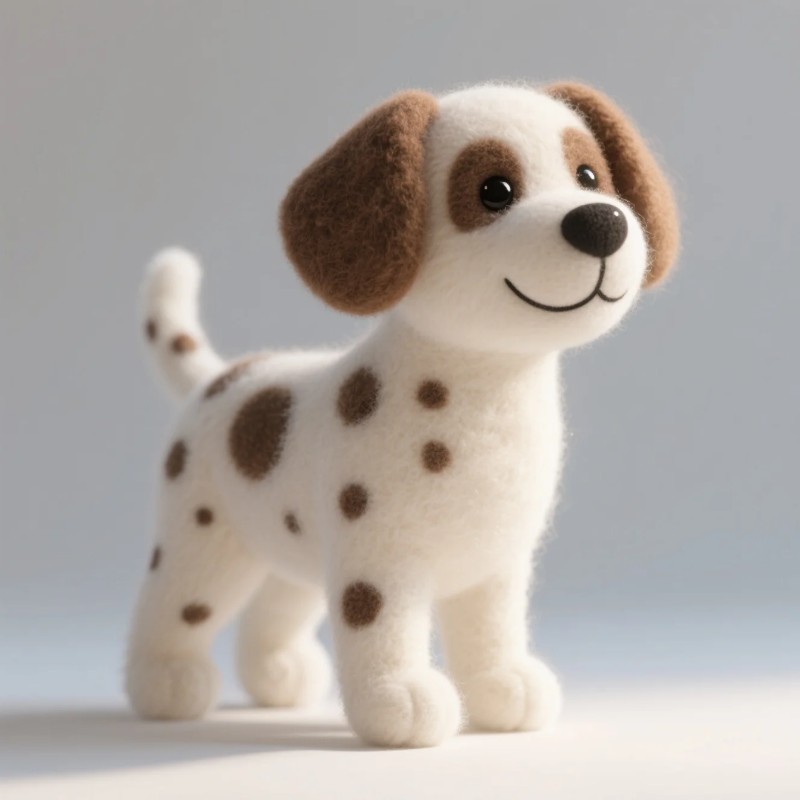
下载下面的图片用于输入或者使用你自己的图片:


### 2. 按步骤完成工作流的运行
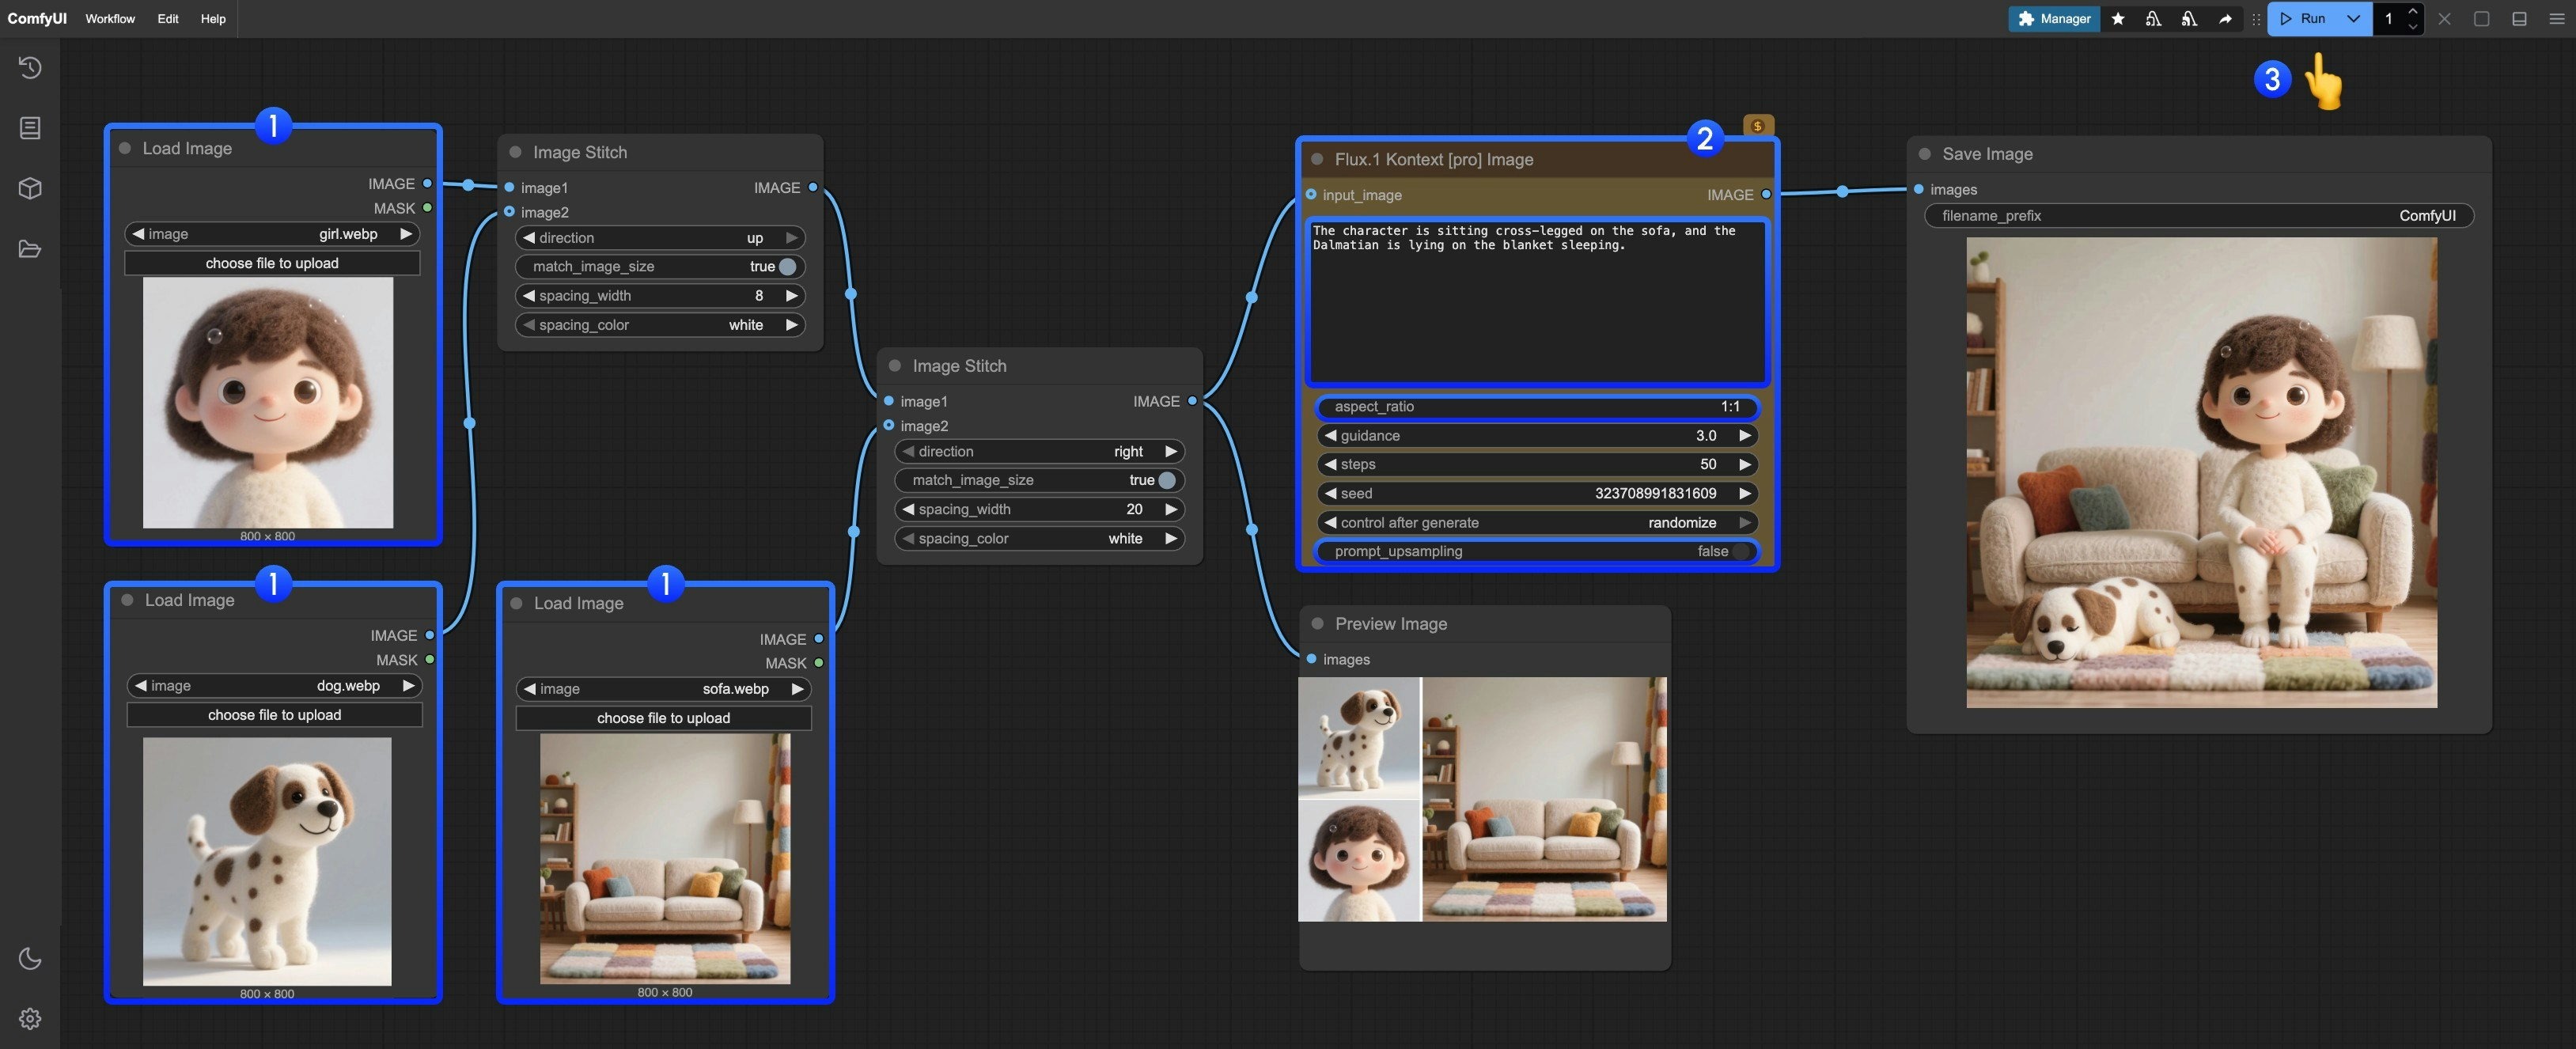 你可参考图片中的序号来完成图工作流的运行:
1. 在 `Load image` 节点中请分别上传提供的图片
2. 在 `Flux.1 Kontext Pro Image` 修改必要的参数:
* `prompt` 输入你想要编辑的图像的提示词
* `aspect_ratio` 设置原图的高宽比,比例必须在 1:4 到 4:1 之间
* `prompt_upsampling` 设置是否使用提示词上采样,如果开启,会自动修改提示词以获得更丰富的结果,但结果是不可重复的
3. 点击 `Run` 按钮,或者使用快捷键 `Ctrl(cmd) + Enter(回车)` 来执行图像的编辑。
4. 等待 API 返回结果后,你可在 `Save Image` 节点中查看编辑后的图像,对应的图像也会被保存至 `ComfyUI/output/` 目录下。
后续的两个工作流只是使用的 合作伙伴节点不同,实际上你只需要基于多图输入工作流修改即可,没有太大的差别
## Flux.1 Kontext Pro Image 合作伙伴节点 工作流
### 1. 工作流文件下载
下面的图片的`metadata`中已经包含工作流信息,请下载并拖入 ComfyUI 中加载对应工作流。

下载下面的图片用于输入或者使用你自己的图片:

### 2. 按步骤完成工作流的运行
你可参考图片中的序号来完成图工作流的运行:
1. 在 `Load image` 节点中请分别上传提供的图片
2. 在 `Flux.1 Kontext Pro Image` 修改必要的参数:
* `prompt` 输入你想要编辑的图像的提示词
* `aspect_ratio` 设置原图的高宽比,比例必须在 1:4 到 4:1 之间
* `prompt_upsampling` 设置是否使用提示词上采样,如果开启,会自动修改提示词以获得更丰富的结果,但结果是不可重复的
3. 点击 `Run` 按钮,或者使用快捷键 `Ctrl(cmd) + Enter(回车)` 来执行图像的编辑。
4. 等待 API 返回结果后,你可在 `Save Image` 节点中查看编辑后的图像,对应的图像也会被保存至 `ComfyUI/output/` 目录下。
后续的两个工作流只是使用的 合作伙伴节点不同,实际上你只需要基于多图输入工作流修改即可,没有太大的差别
## Flux.1 Kontext Pro Image 合作伙伴节点 工作流
### 1. 工作流文件下载
下面的图片的`metadata`中已经包含工作流信息,请下载并拖入 ComfyUI 中加载对应工作流。

下载下面的图片用于输入或者使用你自己的图片:

### 2. 按步骤完成工作流的运行
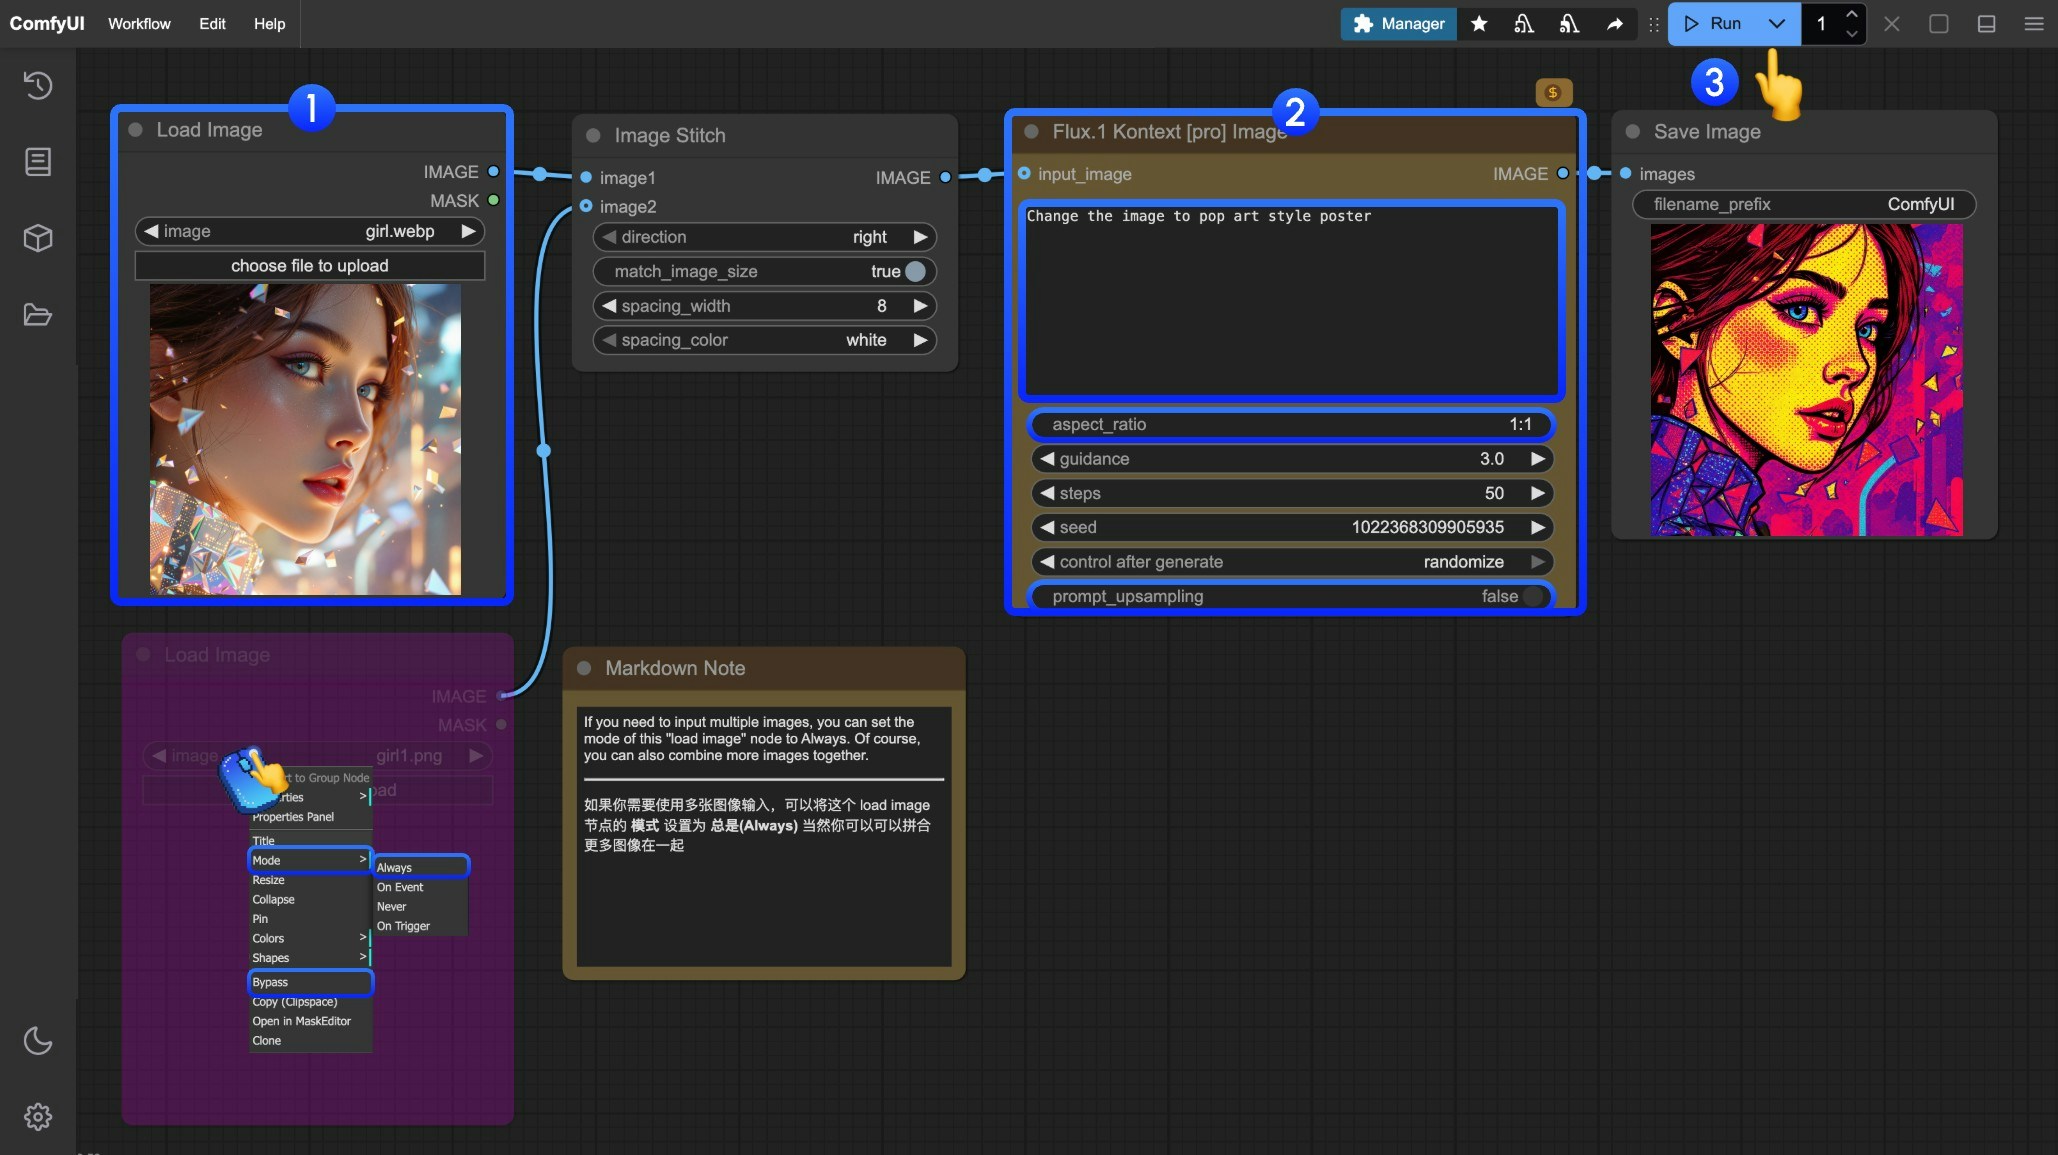 你可参考图片中的序号来完成图工作流的运行:
1. 在 `Load Image` 节点中加载需要编辑的图像
2. 在 `Flux.1 Kontext Pro Image` 修改必要的参数
3. 点击 `Run` 按钮,或者使用快捷键 `Ctrl(cmd) + Enter(回车)` 来执行图像的编辑。
4. 等待 API 返回结果后,你可在 `Save Image` 节点中查看编辑后的图像,对应的图像也会被保存至 `ComfyUI/output/` 目录下。
## Flux.1 Kontext Max Image 合作伙伴节点 工作流
### 1. 工作流文件下载
下面的图片的`metadata`中已经包含工作流信息,请下载并拖入 ComfyUI 中加载对应工作流。

下载下面的图片用于输入或者使用你自己的图片进行演示:

### 2. 按步骤完成工作流的运行
你可参考图片中的序号来完成图工作流的运行:
1. 在 `Load Image` 节点中加载需要编辑的图像
2. 在 `Flux.1 Kontext Pro Image` 修改必要的参数
3. 点击 `Run` 按钮,或者使用快捷键 `Ctrl(cmd) + Enter(回车)` 来执行图像的编辑。
4. 等待 API 返回结果后,你可在 `Save Image` 节点中查看编辑后的图像,对应的图像也会被保存至 `ComfyUI/output/` 目录下。
## Flux.1 Kontext Max Image 合作伙伴节点 工作流
### 1. 工作流文件下载
下面的图片的`metadata`中已经包含工作流信息,请下载并拖入 ComfyUI 中加载对应工作流。

下载下面的图片用于输入或者使用你自己的图片进行演示:

### 2. 按步骤完成工作流的运行
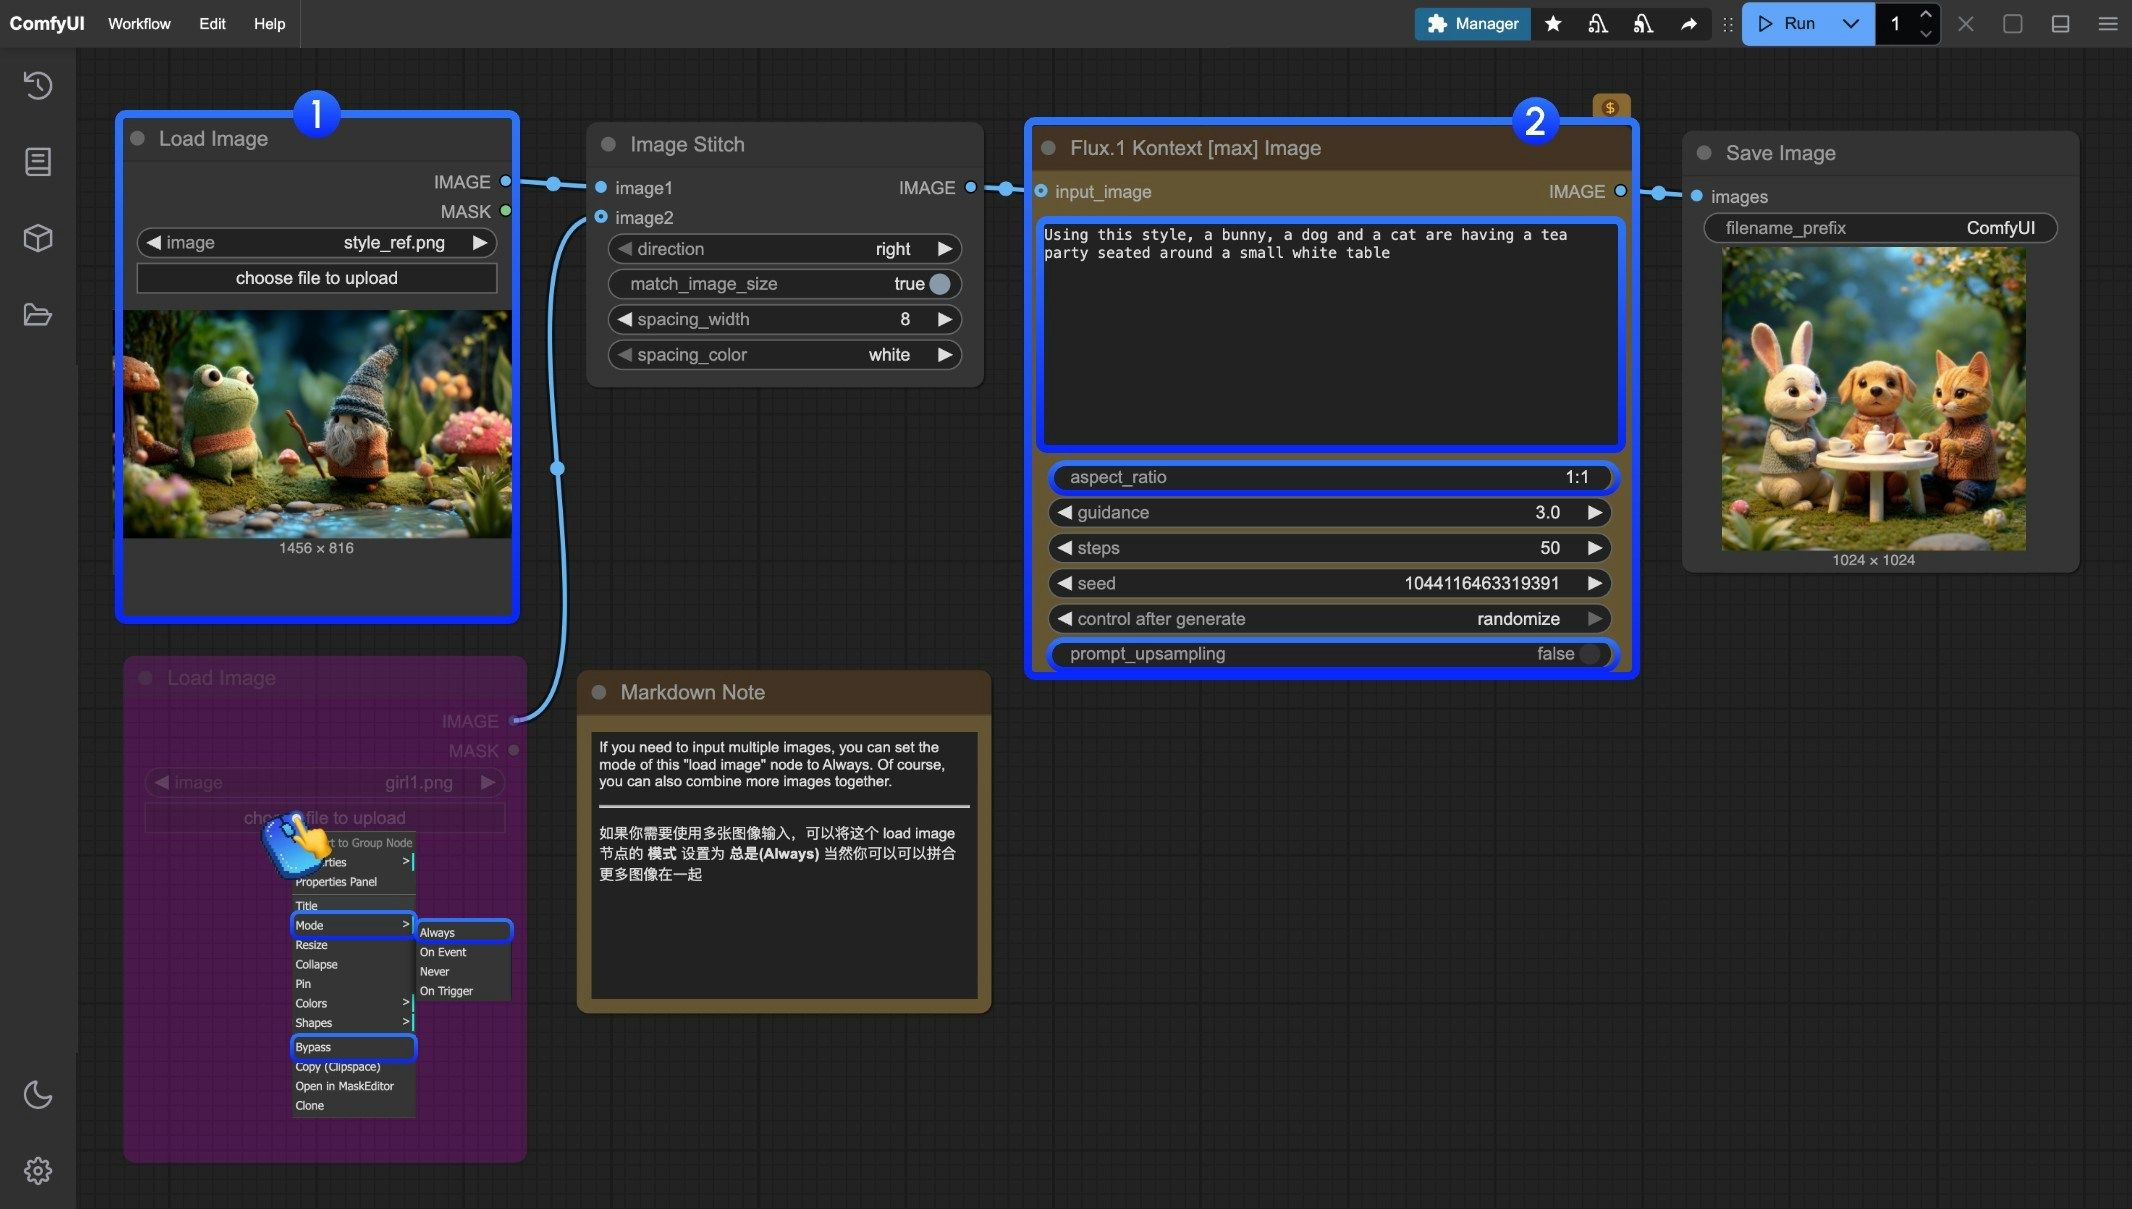 你可参考图片中的序号来完成图工作流的运行:
1. 在 `Load Image` 节点中加载需要编辑的图像
2. 在 `Flux.1 Kontext Max Image` 修改必要的参数
3. 点击 `Run` 按钮,或者使用快捷键 `Ctrl(cmd) + Enter(回车)` 来执行图像的编辑。
4. 等待 API 返回结果后,你可在 `Save Image` 节点中查看编辑后的图像,对应的图像也会被保存至 `ComfyUI/output/` 目录下。
## Flux Kontext 提示词技巧
### 1. 基础修改
* 简单直接:`"Change the car color to red"`
* 保持风格:`"Change to daytime while maintaining the same style of the painting"`
### 2. 风格转换
**原则:**
* 明确命名风格:`"Transform to Bauhaus art style"`
* 描述特征:`"Transform to oil painting with visible brushstrokes, thick paint texture"`
* 保留构图:`"Change to Bauhaus style while maintaining the original composition"`
### 3. 角色一致性
**框架:**
* 具体描述:`"The woman with short black hair"`而非`"she"`
* 保留特征:`"while maintaining the same facial features, hairstyle, and expression"`
* 分步修改:先改背景,再改动作
### 4. 文本编辑
* 使用引号:`"Replace 'joy' with 'BFL'"`
* 保持格式:`"Replace text while maintaining the same font style"`
## 常见问题解决
### 角色变化过大
❌ 错误:`"Transform the person into a Viking"`
✅ 正确:`"Change the clothes to be a viking warrior while preserving facial features"`
### 构图位置改变
❌ 错误:`"Put him on a beach"`
✅ 正确:`"Change the background to a beach while keeping the person in the exact same position, scale, and pose"`
### 风格应用不准确
❌ 错误:`"Make it a sketch"`
✅ 正确:`"Convert to pencil sketch with natural graphite lines, cross-hatching, and visible paper texture"`
## 核心原则
1. **具体明确** - 使用精确描述,避免模糊词汇
2. **分步编辑** - 复杂修改分为多个简单步骤
3. **明确保留** - 说明哪些要保持不变
4. **动词选择** - 用"change"、"replace"而非"transform"
## 最佳实践模板
**对象修改:**
`"Change [object] to [new state], keep [content to preserve] unchanged"`
**风格转换:**
`"Transform to [specific style], while maintaining [composition/character/other] unchanged"`
**背景替换:**
`"Change the background to [new background], keep the subject in the exact same position and pose"`
**文本编辑:**
`"Replace '[original text]' with '[new text]', maintain the same font style"`
> **记住:** 越具体越好,Kontext 擅长理解详细指令并保持一致性。
你可参考图片中的序号来完成图工作流的运行:
1. 在 `Load Image` 节点中加载需要编辑的图像
2. 在 `Flux.1 Kontext Max Image` 修改必要的参数
3. 点击 `Run` 按钮,或者使用快捷键 `Ctrl(cmd) + Enter(回车)` 来执行图像的编辑。
4. 等待 API 返回结果后,你可在 `Save Image` 节点中查看编辑后的图像,对应的图像也会被保存至 `ComfyUI/output/` 目录下。
## Flux Kontext 提示词技巧
### 1. 基础修改
* 简单直接:`"Change the car color to red"`
* 保持风格:`"Change to daytime while maintaining the same style of the painting"`
### 2. 风格转换
**原则:**
* 明确命名风格:`"Transform to Bauhaus art style"`
* 描述特征:`"Transform to oil painting with visible brushstrokes, thick paint texture"`
* 保留构图:`"Change to Bauhaus style while maintaining the original composition"`
### 3. 角色一致性
**框架:**
* 具体描述:`"The woman with short black hair"`而非`"she"`
* 保留特征:`"while maintaining the same facial features, hairstyle, and expression"`
* 分步修改:先改背景,再改动作
### 4. 文本编辑
* 使用引号:`"Replace 'joy' with 'BFL'"`
* 保持格式:`"Replace text while maintaining the same font style"`
## 常见问题解决
### 角色变化过大
❌ 错误:`"Transform the person into a Viking"`
✅ 正确:`"Change the clothes to be a viking warrior while preserving facial features"`
### 构图位置改变
❌ 错误:`"Put him on a beach"`
✅ 正确:`"Change the background to a beach while keeping the person in the exact same position, scale, and pose"`
### 风格应用不准确
❌ 错误:`"Make it a sketch"`
✅ 正确:`"Convert to pencil sketch with natural graphite lines, cross-hatching, and visible paper texture"`
## 核心原则
1. **具体明确** - 使用精确描述,避免模糊词汇
2. **分步编辑** - 复杂修改分为多个简单步骤
3. **明确保留** - 说明哪些要保持不变
4. **动词选择** - 用"change"、"replace"而非"transform"
## 最佳实践模板
**对象修改:**
`"Change [object] to [new state], keep [content to preserve] unchanged"`
**风格转换:**
`"Transform to [specific style], while maintaining [composition/character/other] unchanged"`
**背景替换:**
`"Change the background to [new background], keep the subject in the exact same position and pose"`
**文本编辑:**
`"Replace '[original text]' with '[new text]', maintain the same font style"`
> **记住:** 越具体越好,Kontext 擅长理解详细指令并保持一致性。