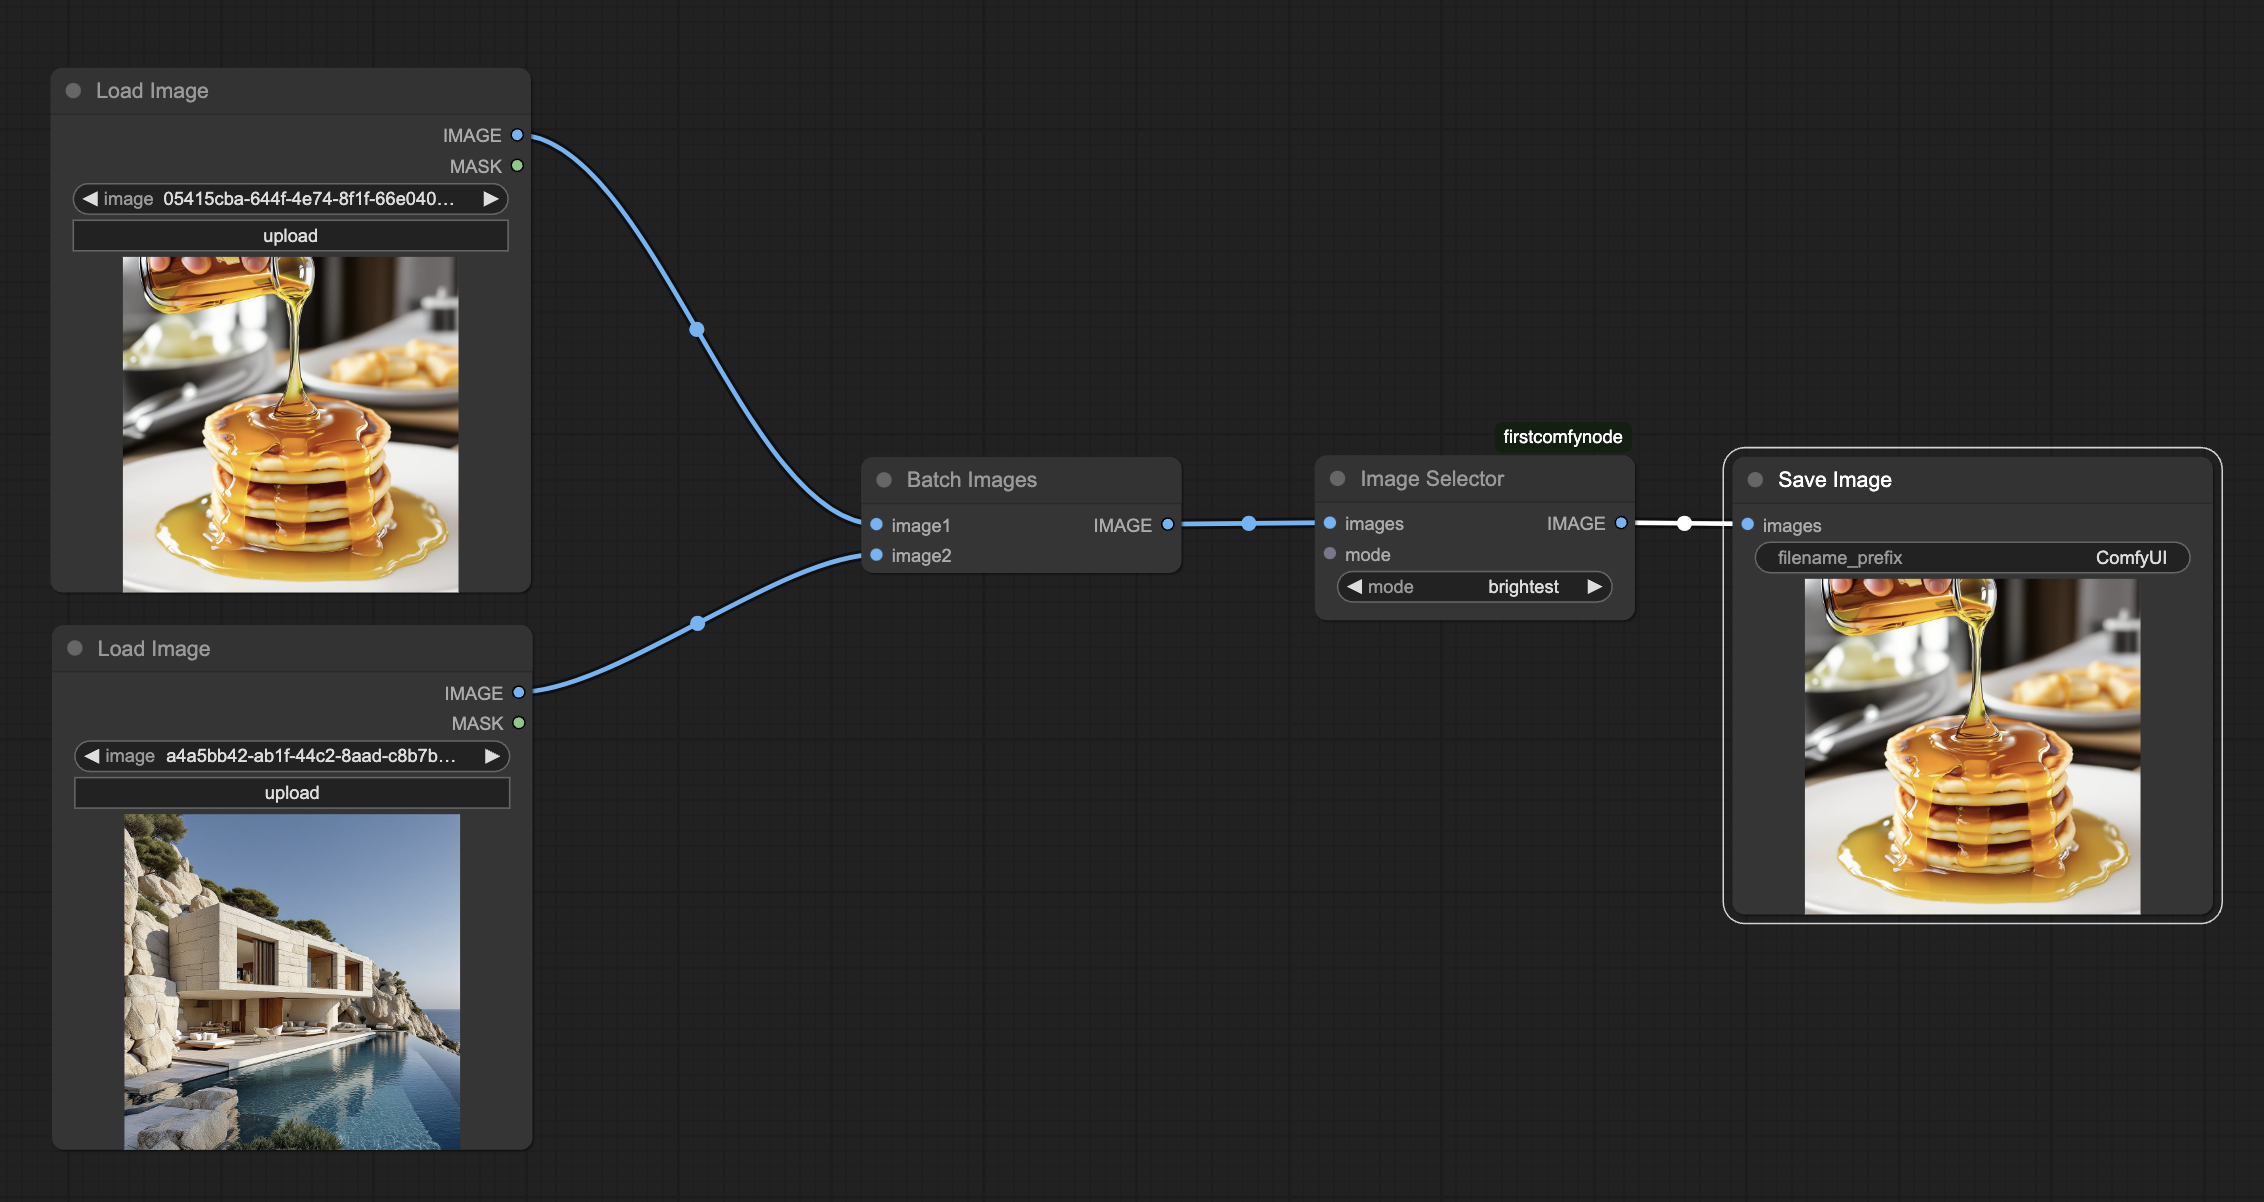
This page will take you step-by-step through the process of creating a custom node.

Our example will take a batch of images, and return one of the images. Initially, the node will return the image which is, on average, the lightest in color; we’ll then extend it to have a range of selection criteria, and then finally add some client side code.

This page assumes very little knowledge of Python or Javascript.

After this walkthrough, dive into the details of backend code, and frontend code.

Write a basic node

Prerequisites

  • A working ComfyUI installation. For development, we recommend installing ComfyUI manually.
  • A working comfy-cli installation.

Setting up

cd ComfyUI/custom_nodes
comfy node scaffold

After answering a few questions, you’ll have a new directory set up.

 ~  % comfy node scaffold
You've downloaded .cookiecutters/cookiecutter-comfy-extension before. Is it okay to delete and re-download it? [y/n] (y): y
  [1/9] full_name (): Comfy
  [2/9] email (you@gmail.com): me@comfy.org
  [3/9] github_username (your_github_username): comfy
  [4/9] project_name (My Custom Nodepack): FirstComfyNode
  [5/9] project_slug (firstcomfynode): 
  [6/9] project_short_description (A collection of custom nodes for ComfyUI): 
  [7/9] version (0.0.1): 
  [8/9] Select open_source_license
    1 - GNU General Public License v3
    2 - MIT license
    3 - BSD license
    4 - ISC license
    5 - Apache Software License 2.0
    6 - Not open source
    Choose from [1/2/3/4/5/6] (1): 1
  [9/9] include_web_directory_for_custom_javascript [y/n] (n): y
Initialized empty Git repository in firstcomfynode/.git/
✓ Custom node project created successfully!

Defining the node

Add the following code to the end of src/nodes.py:

src/nodes.py
class ImageSelector:
    CATEGORY = "example"
    @classmethod    
    def INPUT_TYPES(s):
        return { "required":  { "images": ("IMAGE",), } }
    RETURN_TYPES = ("IMAGE",)
    FUNCTION = "choose_image"
The basic structure of a custom node is described in detail here.

A custom node is defined using a Python class, which must include these four things: CATEGORY, which specifies where in the add new node menu the custom node will be located, INPUT_TYPES, which is a class method defining what inputs the node will take (see later for details of the dictionary returned), RETURN_TYPES, which defines what outputs the node will produce, and FUNCTION, the name of the function that will be called when the node is executed.

Notice that the data type for input and output is IMAGE (singular) even though we expect to receive a batch of images, and return just one. In Comfy, IMAGE means image batch, and a single image is treated as a batch of size 1.

The main function

The main function, choose_image, receives named arguments as defined in INPUT_TYPES, and returns a tuple as defined in RETURN_TYPES. Since we’re dealing with images, which are internally stored as torch.Tensor,

import torch

Then add the function to your class. The datatype for image is torch.Tensor with shape [B,H,W,C], where B is the batch size and C is the number of channels - 3, for RGB. If we iterate over such a tensor, we will get a series of B tensors of shape [H,W,C]. The .flatten() method turns this into a one dimensional tensor, of length H*W*C, torch.mean() takes the mean, and .item() turns a single value tensor into a Python float.

def choose_image(self, images):
    brightness = list(torch.mean(image.flatten()).item() for image in images)
    brightest = brightness.index(max(brightness))
    result = images[brightest].unsqueeze(0)
    return (result,)

Notes on those last two lines:

  • images[brightest] will return a Tensor of shape [H,W,C]. unsqueeze is used to insert a (length 1) dimension at, in this case, dimension zero, to give us [B,H,W,C] with B=1: a single image.
  • in return (result,), the trailing comma is essential to ensure you return a tuple.

Register the node

To make Comfy recognize the new node, it must be available at the package level. Modify the NODE_CLASS_MAPPINGS variable at the end of src/nodes.py. You must restart ComfyUI to see any changes.

src/nodes.py

NODE_CLASS_MAPPINGS = {
    "Example" : Example,
    "Image Selector" : ImageSelector,
}

# Optionally, you can rename the node in the `NODE_DISPLAY_NAME_MAPPINGS` dictionary.
NODE_DISPLAY_NAME_MAPPINGS = {
    "Example": "Example Node",
    "Image Selector": "Image Selector",
}
For a detailed explanation of how ComfyUI discovers and loads custom nodes, see the node lifecycle documentation.

Add some options

That node is maybe a bit boring, so we might add some options; a widget that allows you to choose the brightest image, or the reddest, bluest, or greenest. Edit your INPUT_TYPES to look like:

@classmethod    
def INPUT_TYPES(s):
    return { "required":  { "images": ("IMAGE",), 
                            "mode": (["brightest", "reddest", "greenest", "bluest"],)} }

Then update the main function. We’ll use a fairly naive definition of ‘reddest’ as being the average R value of the pixels divided by the average of all three colors. So:

def choose_image(self, images, mode):
    batch_size = images.shape[0]
    brightness = list(torch.mean(image.flatten()).item() for image in images)
    if (mode=="brightest"):
        scores = brightness
    else:
        channel = 0 if mode=="reddest" else (1 if mode=="greenest" else 2)
        absolute = list(torch.mean(image[:,:,channel].flatten()).item() for image in images)
        scores = list( absolute[i]/(brightness[i]+1e-8) for i in range(batch_size) )
    best = scores.index(max(scores))
    result = images[best].unsqueeze(0)
    return (result,)

Tweak the UI

Maybe we’d like a bit of visual feedback, so let’s send a little text message to be displayed.

Send a message from server

This requires two lines to be added to the Python code:

from server import PromptServer

and, at the end of the choose_image method, add a line to send a message to the front end (send_sync takes a message type, which should be unique, and a dictionary)

PromptServer.instance.send_sync("example.imageselector.textmessage", {"message":f"Picked image {best+1}"})
return (result,)

Write a client extension

To add some Javascript to the client, create a subdirectory, web/js in your custom node directory, and modify the end of __init__.py to tell Comfy about it by exporting WEB_DIRECTORY:

WEB_DIRECTORY = "./web/js"
__all__ = ['NODE_CLASS_MAPPINGS', 'WEB_DIRECTORY']

The client extension is saved as a .js file in the web/js subdirectory, so create image_selector/web/js/imageSelector.js with the code below. (For more, see client side coding).

app.registerExtension({
	name: "example.imageselector",
    async setup() {
        function messageHandler(event) { alert(event.detail.message); }
        app.api.addEventListener("example.imageselector.textmessage", messageHandler);
    },
})

All we’ve done is register an extension and add a listener for the message type we are sending in the setup() method. This reads the dictionary we sent (which is stored in event.detail).

Stop the Comfy server, start it again, reload the webpage, and run your workflow.

The complete example

The complete example is available here. You can download the example workflow JSON file or view it below: