모델의 기본 개념
ComfyUI에서 모델이란 실제로 워크플로우를 실행하는 가중치 파일을 말합니다. 여기에는 체크포인트, VAE, LoRA, ControlNet, 업스케일러 등이 포함됩니다. 앱 설치 파일은 작으며, 이러한 파일들은 기본적으로 포함되어 있지 않습니다. 보통 웹에서 다운로드한 후ComfyUI/models/ 아래에 배치하거나(또는 템플릿의 안내를 따르세요) 캔버스에서 오른쪽 로더 노드에서 해당 파일을 선택하면 됩니다(이 노드들은 이름이 Load로 시작하는 경우가 많습니다).
ComfyUI에서 지원하는 모델
- 내장된 1차 지원 범위는 의도적으로 제한되어 있지만, ComfyUI와 오픈소스 생태계가 발전함에 따라 점차 늘어납니다. 모델이 일급 지원을 받으면 보통 **워크플로우 템플릿 라이브러리**에 새로운 항목이 추가되며, 예상되는 그래프와 모델 조합이 표시됩니다.
- 모든 체크포인트나 가중치 파일이 바로 사용 가능한 것은 아닙니다. 기본적으로 지원되는 모델과 그에 따른 일반적인 가중치 파일의 경우, ComfyUI를 최신 상태로 유지( /installation/update_comfyui)하고 템플릿 라이브러리( /interface/features/template)에 해당 워크플로우가 있는지 확인한 후에야 파일이 잘못된 위치에 있는 것이 아니라는 것을 확신할 수 있습니다.
- 다수의 다른 모델은 커뮤니티의 커스텀 노드를 통해 활성화됩니다. 경로, 로더 노드, 그래프 레이아웃은 이 페이지의 일반적인
ComfyUI/models/안내와 다를 수 있으므로 각 프로젝트의 README나 문서를 반드시 따르세요. ComfyUI는 매우 확장성이 뛰어나므로 구현 방식은 저자마다 다릅니다. 설치 및 문제 해결 방법은 커스텀 노드 설치 방법을 참조하세요.
ComfyUI에서 모델 사용하기
- 파일을 올바른 위치에 가져오기 — Hugging Face, Civitai 또는 GitHub의 프로젝트 페이지와 같은 커뮤니티 사이트에서 다운로드한 후, 해당 유형의 하위 폴더(예:
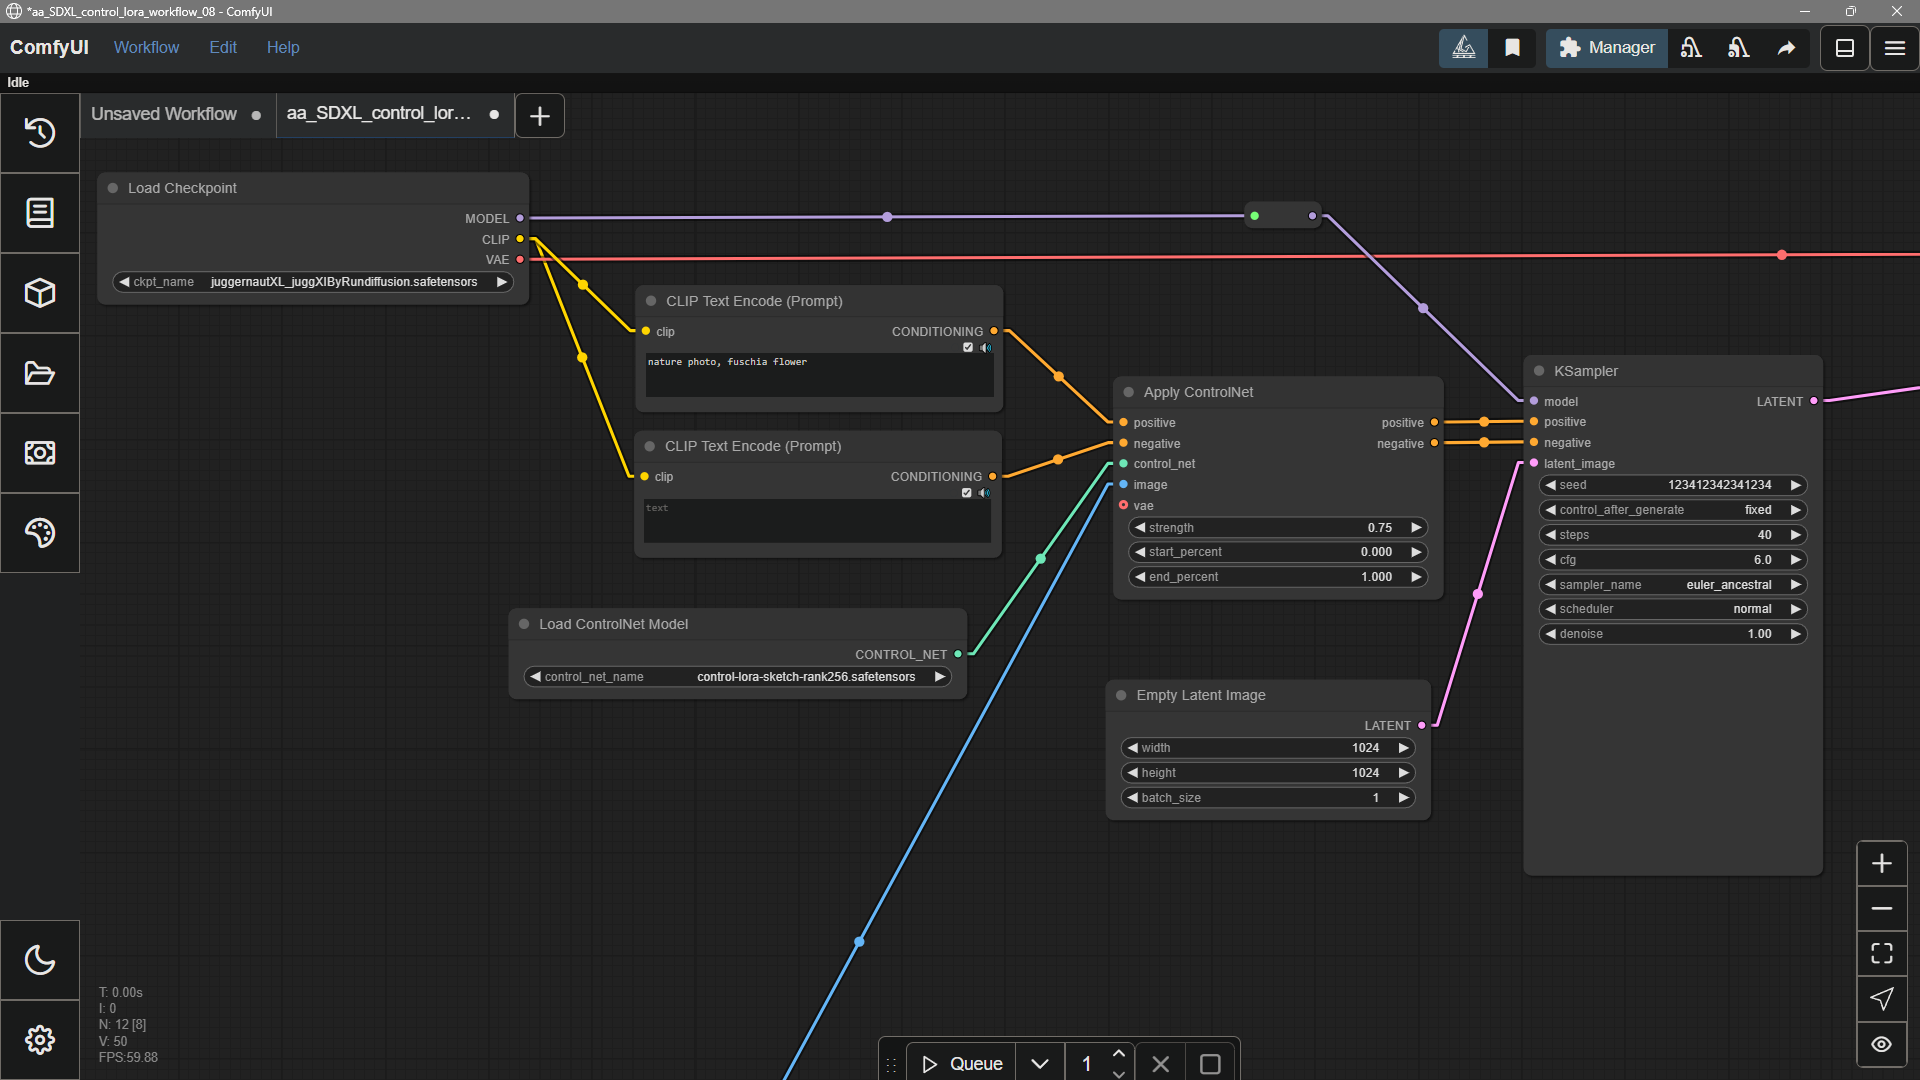
checkpoints,loras,vae)에ComfyUI/models/아래에 넣으세요. - 적합한 로더 노드 추가하기 — 해당 모델 유형(체크포인트, LoRA, VAE 등)에 맞는 로더를 선택하세요. 노드 목록에서 제목은 종종 Load로 시작합니다.
- 로더 노드에서 파일 선택하기 — 해당 로더 노드의 드롭다운 메뉴에서 파일을 선택하세요.
- 로더 노드를 나머지 그래프에 연결하기 — ComfyUI가 열려 있는 동안 직접 파일을 복사했다면, 앱을 재시작하거나 필요에 따라 새로고침하여 목록이 최신으로 업데이트되도록 하세요.
대용량 다운로드를 예상하세요
단일 생성 모델은 종종 수 기가바이트에 달합니다. 다운로드하거나 동기화할 때 디스크 공간과 시간을 충분히 준비하세요.메인 체크포인트 외에도
메인 디퓨전 체크포인트는 많은 일을 하지만, 많은 워크플로우에서는 작은 보조 모델을 추가하기도 합니다. 예를 들면:- LoRA — 스타일, 캐릭터, 또는 컨셉에 맞게 조정된 경량 추가물
- ControlNet — 에지, 깊이, 자세 등에서 추가적인 안내 제공
- 인페인팅 — 기존 이미지 내부의 영역을 채우거나 교체
모델 제거하기
현재 UI에는 ‘제거’ 버튼이 없습니다. 모델을 삭제하려면,ComfyUI/models/ 폴더에서 해당 모델이 저장된 파일(또는 여러 파일)을 삭제하세요.
추가 모델 경로 추가하기
ComfyUI/models 외부에서 모델 파일을 관리하고 싶다면 다음과 같은 이유가 있을 수 있습니다:
- 여러 개의 ComfyUI 인스턴스를 사용하고 있으며 디스크 공간을 절약하기 위해 모델 파일을 공유하고 싶습니다.
- 서로 다른 유형의 GUI 프로그램(예: WebUI)을 사용하고 있으며 동일한 모델 파일을 사용하고 싶습니다.
- 모델 파일이 인식되지 않거나 찾을 수 없습니다.
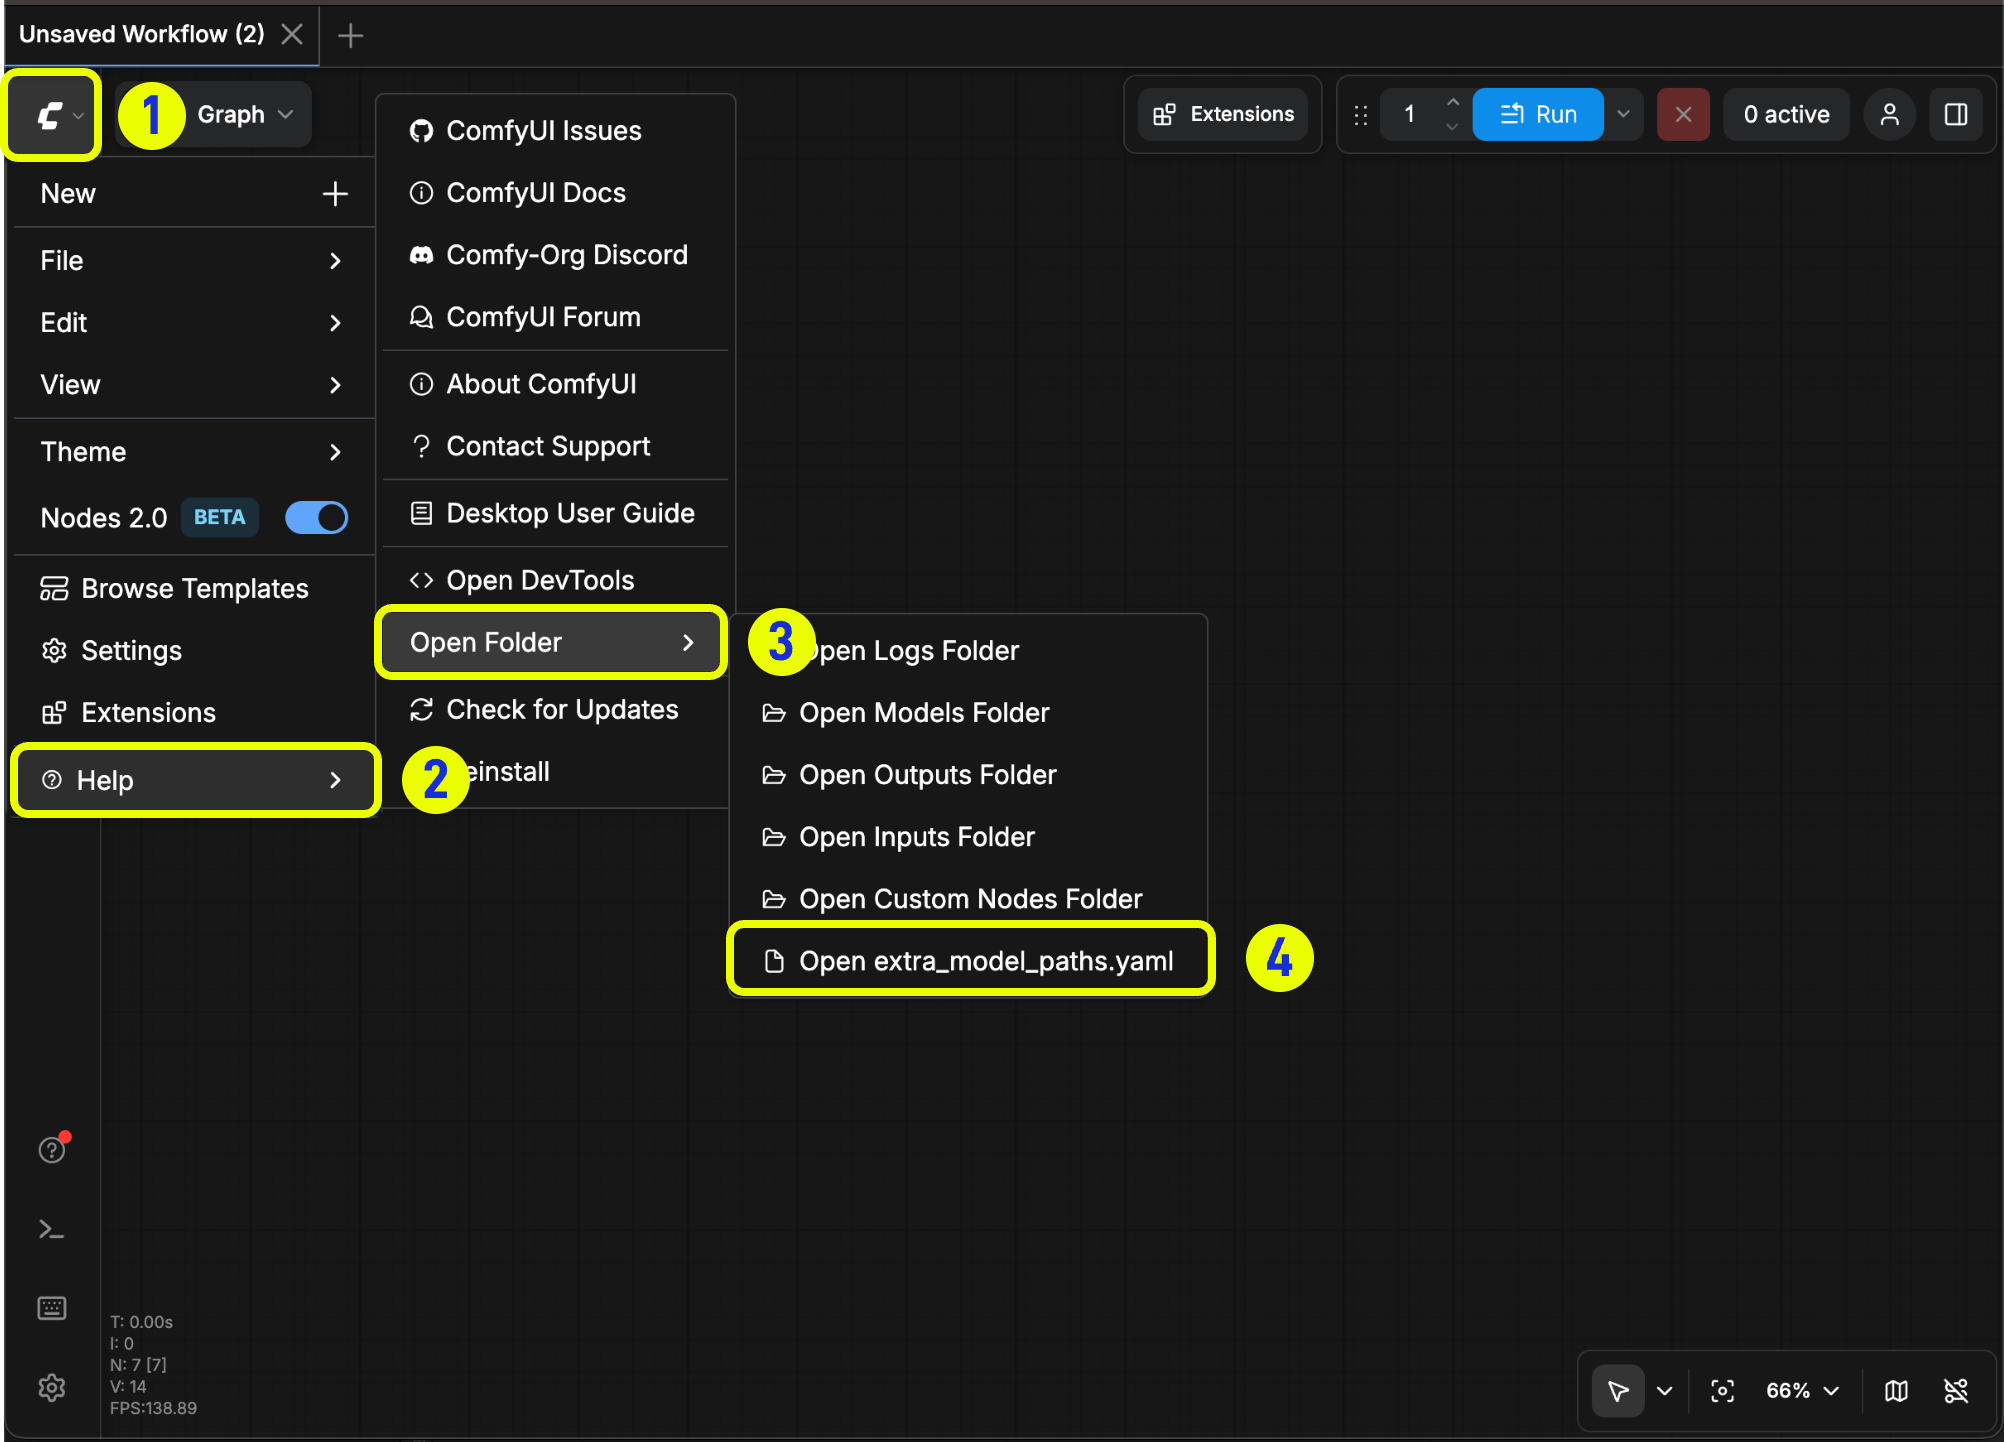
extra_model_paths.yaml 구성 파일을 통해 추가 모델 검색 경로를 추가할 수 있는 방법을 제공합니다.
구성 파일 열기
- 휴대용/수동 설치
- Comfy 데스크톱
예제 구조
다음과 같은 모델 경로를 ComfyUI에 추가하고 싶다고 가정해 보겠습니다:extra_model_paths.yaml 파일을 아래와 같이 설정하여 ComfyUI가 기기의 모델 경로를 인식하도록 할 수 있습니다:
D:\stable-diffusion-webui\에 위치한다면, 해당 구성은 아래와 같이 수정할 수 있습니다:
추가 커스텀 노드 경로 추가하기
외부 모델을 추가하는 것 외에도, ComfyUI의 기본 경로에 없는 커스텀 노드 경로를 추가할 수도 있습니다. 아래는 간단한 구성 예제입니다(맥OS), 실제 상황에 맞게 수정해 해당 구성 파일에 추가하고 저장한 후 ComfyUI를 다시 시작해 변경 사항이 적용되도록 하십시오:일반적인 문제
ComfyUI는 GGUF 형식 모델을 지원하나요?
ComfyUI는 GGUF 형식 모델을 지원하나요?
ComfyUI는 기본적으로 GGUF 형식 모델을 지원하지 않습니다. GGUF 모델을 사용하려면 ComfyUI-GGUF와 같은 커뮤니티 커스텀 노드를 설치해야 합니다.
왜 내 모델을 찾을 수 없나요?
왜 내 모델을 찾을 수 없나요?
모델을 설치했는데 ComfyUI에서 찾을 수 없다면 다음 단계를 시도해 보세요:
- 모델이 올바른 위치에 있는지 확인하세요:
- Comfy 데스크톱: 도움말 메뉴 → 폴더 열기 → 모델 폴더 열기를 클릭해 모델 설치 경로를 확인하세요.
- 모델 파일이 올바른 하위 폴더(예:
checkpoints,loras,vae)에 저장되었는지 확인하세요.
r키를 눌러 노드 정의를 새로 고쳐 ComfyUI가 모델을 인식하도록 하세요.- ComfyUI를 재시작하세요.
- 로더 노드에서 올바른 모델이 선택되었는지 확인하세요.
좀 더 자세한 배경 정보가 필요하신가요?
여기서 '모델'이란 무엇을 의미하나요?
여기서 '모델'이란 무엇을 의미하나요?
여기서 모델이란 네트워크가 학습한 내용을 담은 데이터 파일을 말합니다. 입력값(텍스트 및 노이즈 등)을 출력값(이미지 등)으로 변환할 수 있을 정도로 충분한 정보를 포함하고 있습니다. 이미지 워크플로우에서 흔히 사용되는 예는 디퓨전 체크포인트, CLIP와 같은 텍스트/이미지 인코더, 그리고 RealESRGAN과 같은 업스케일러입니다.
기본 모델과 커뮤니티 변형
기본 모델과 커뮤니티 변형
연구실과 오픈소스 프로젝트에서 제공하는 큰 기본 모델은 범용적으로 사용됩니다. 커뮤니티에서는 이를 튜닝하거나 새로운 체크포인트와 LoRA로 합쳐 특정 스타일에 더 잘 맞거나, 조금 더 가볍게 작동하거나, 새로운 동작을 추가하기도 합니다. 마치 Civitai나 Hugging Face에서 좋아하는 체크포인트를 고르는 것과 같은 원리입니다.