- Flux.1 Pro: The best performing model, closed-source, only available through API calls.
- Flux.1 [dev]: Open-source but limited to non-commercial use, distilled from the Pro version, with performance close to the Pro version.
- Flux.1 [schnell]: Uses the Apache2.0 license, requires only 4 steps to generate images, suitable for low-spec hardware.
- Hybrid Architecture: Combines the advantages of Transformer networks and diffusion models, effectively integrating text and image information, improving the alignment accuracy between generated images and prompts, with excellent fidelity to complex prompts.
- Parameter Scale: Flux has 12B parameters, capturing more complex pattern relationships and generating more realistic, diverse images.
- Supports Multiple Styles: Supports diverse styles, with excellent performance for various types of images.
- Flux Full Version: Best performance, but requires larger VRAM resources and installation of multiple model files.
- Flux FP8 Checkpoint: Requires only one fp8 version of the model, but quality is slightly reduced compared to the full version.
Flux.1 Full Version Text-to-Image Example
If you can’t download models from black-forest-labs/FLUX.1-dev, make sure you’ve logged into Huggingface and agreed to the corresponding repository’s license agreement.

Flux.1 Dev
1. Workflow File
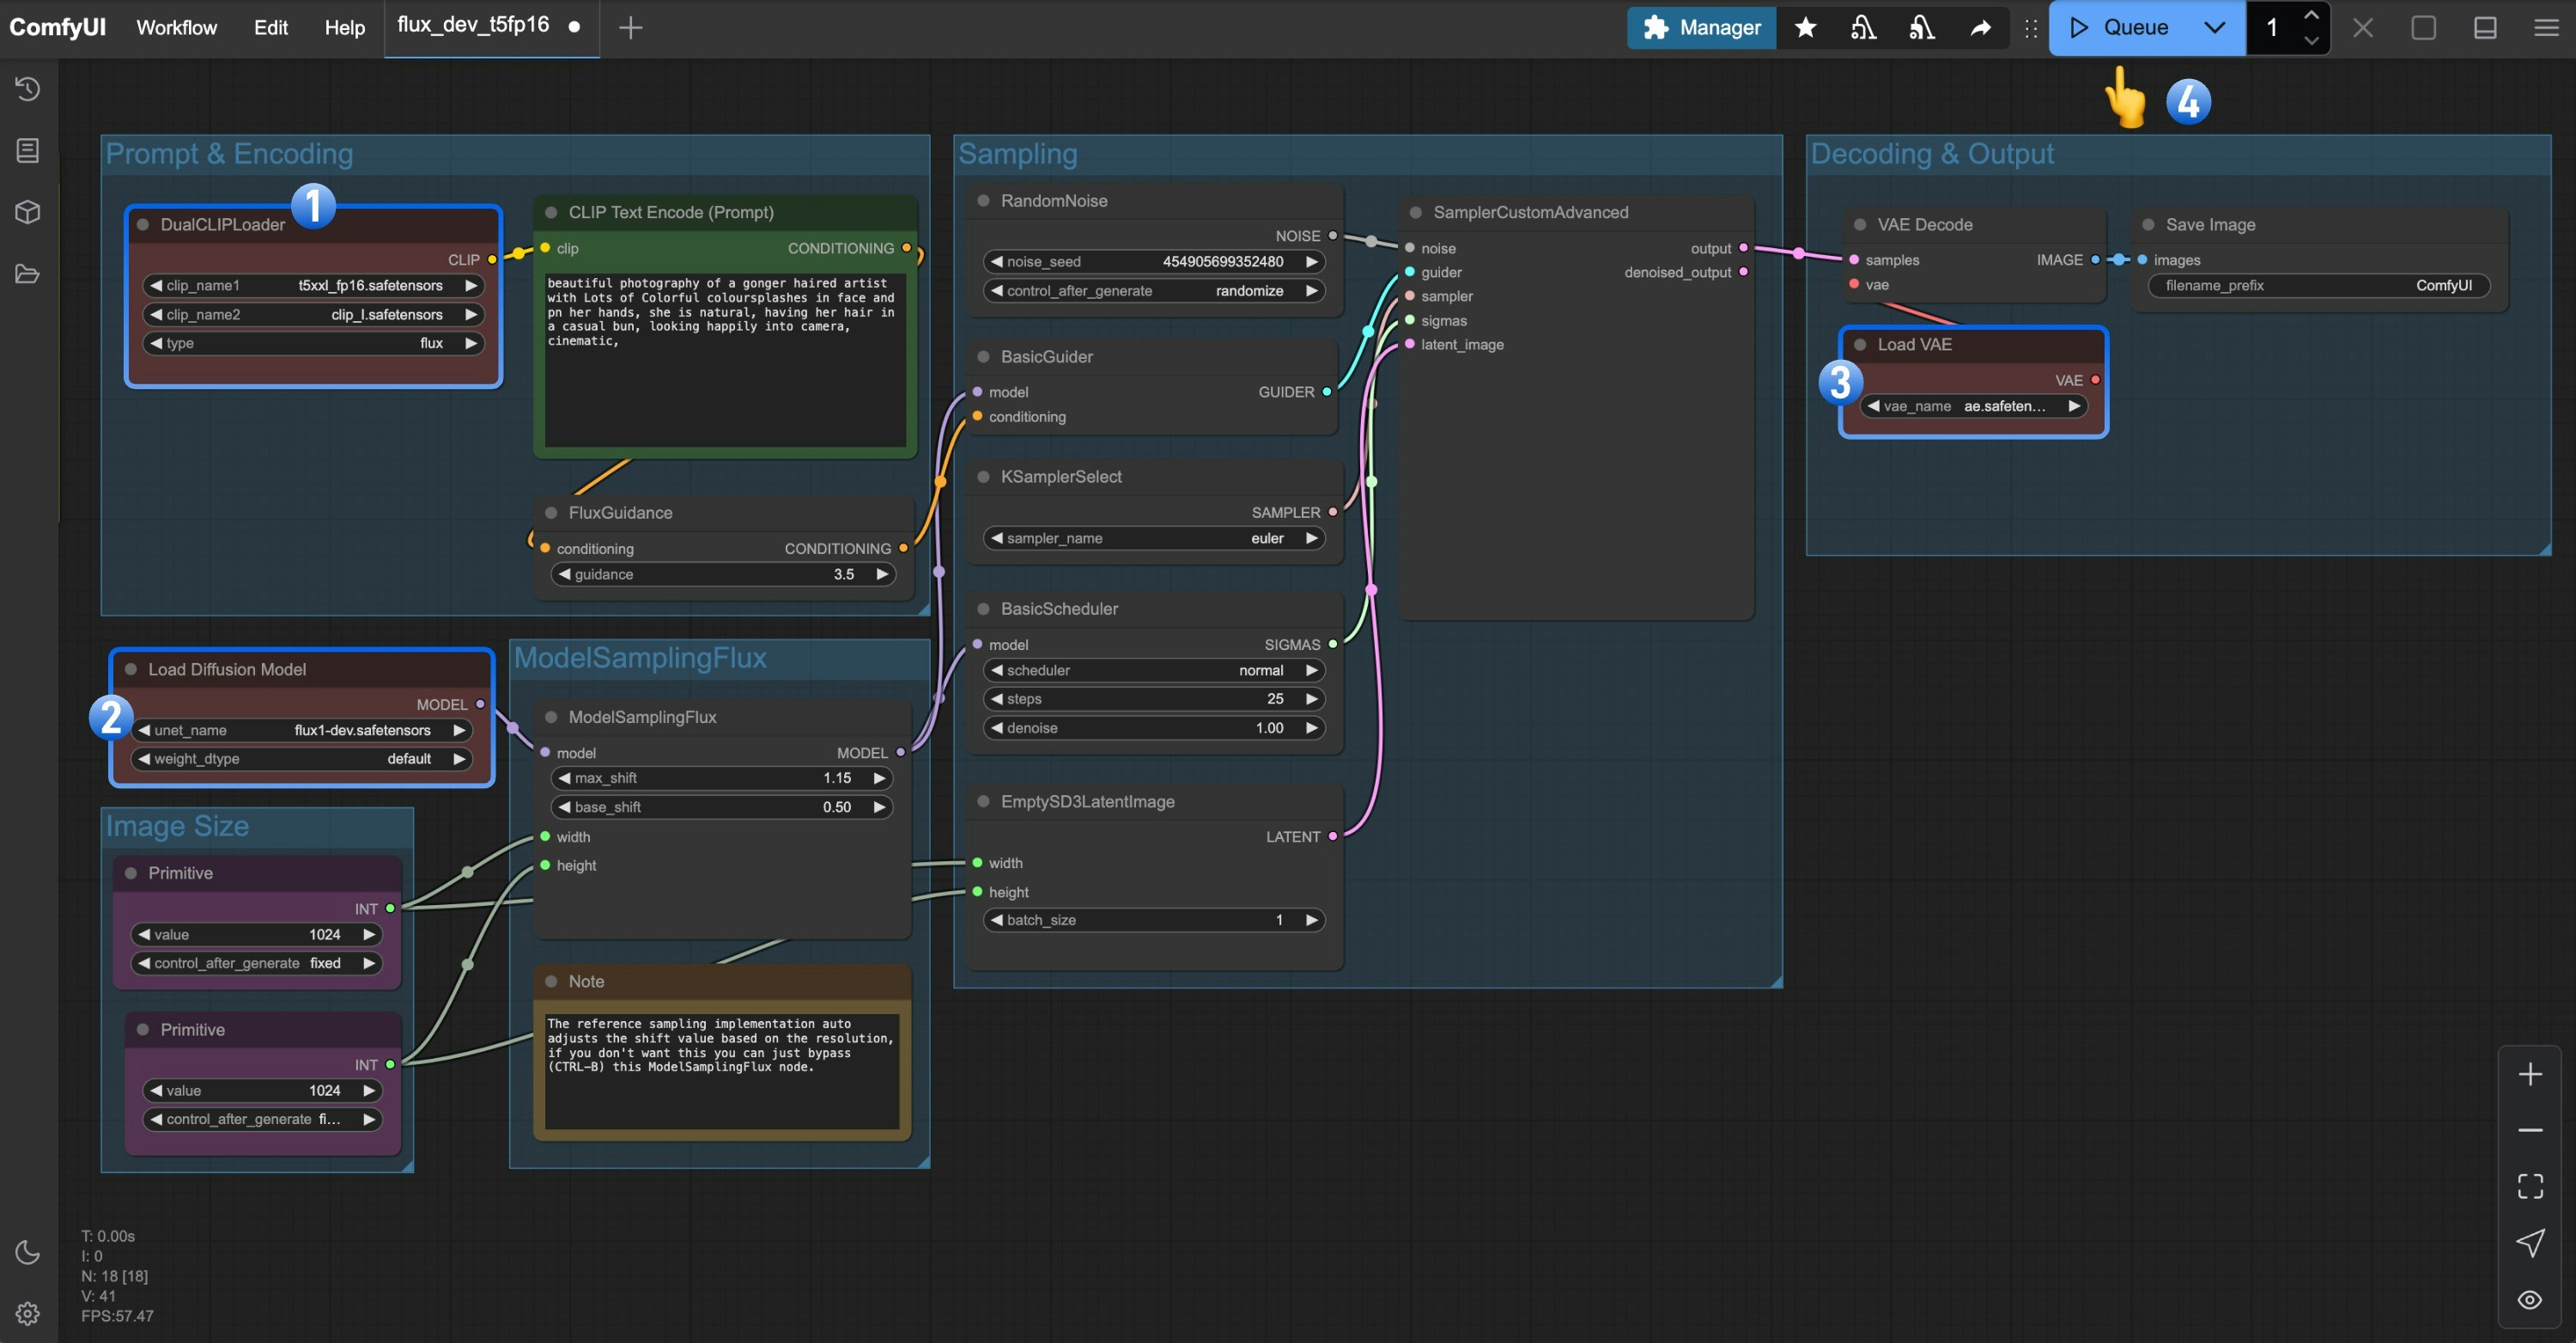
Please download the image below and drag it into ComfyUI to load the workflow.
Run on Comfy Cloud
2. Manual Model Installation
- The
flux1-dev.safetensorsfile requires agreeing to the black-forest-labs/FLUX.1-dev agreement before downloading via browser. - If your VRAM is low, you can try using t5xxl_fp8_e4m3fn.safetensors to replace the
t5xxl_fp16.safetensorsfile.
- clip_l.safetensors
- t5xxl_fp16.safetensors Recommended when your VRAM is greater than 32GB.
- ae.safetensors
- flux1-dev.safetensors
3. Steps to Run the Workflow
Please refer to the image below to ensure all model files are loaded correctly
- Ensure the
DualCLIPLoadernode has the following models loaded:- clip_name1: t5xxl_fp16.safetensors
- clip_name2: clip_l.safetensors
- Ensure the
Load Diffusion Modelnode hasflux1-dev.safetensorsloaded - Make sure the
Load VAEnode hasae.safetensorsloaded - Click the
Queuebutton, or use the shortcutCtrl(cmd) + Enterto run the workflow
Flux.1 Schnell
1. Workflow File
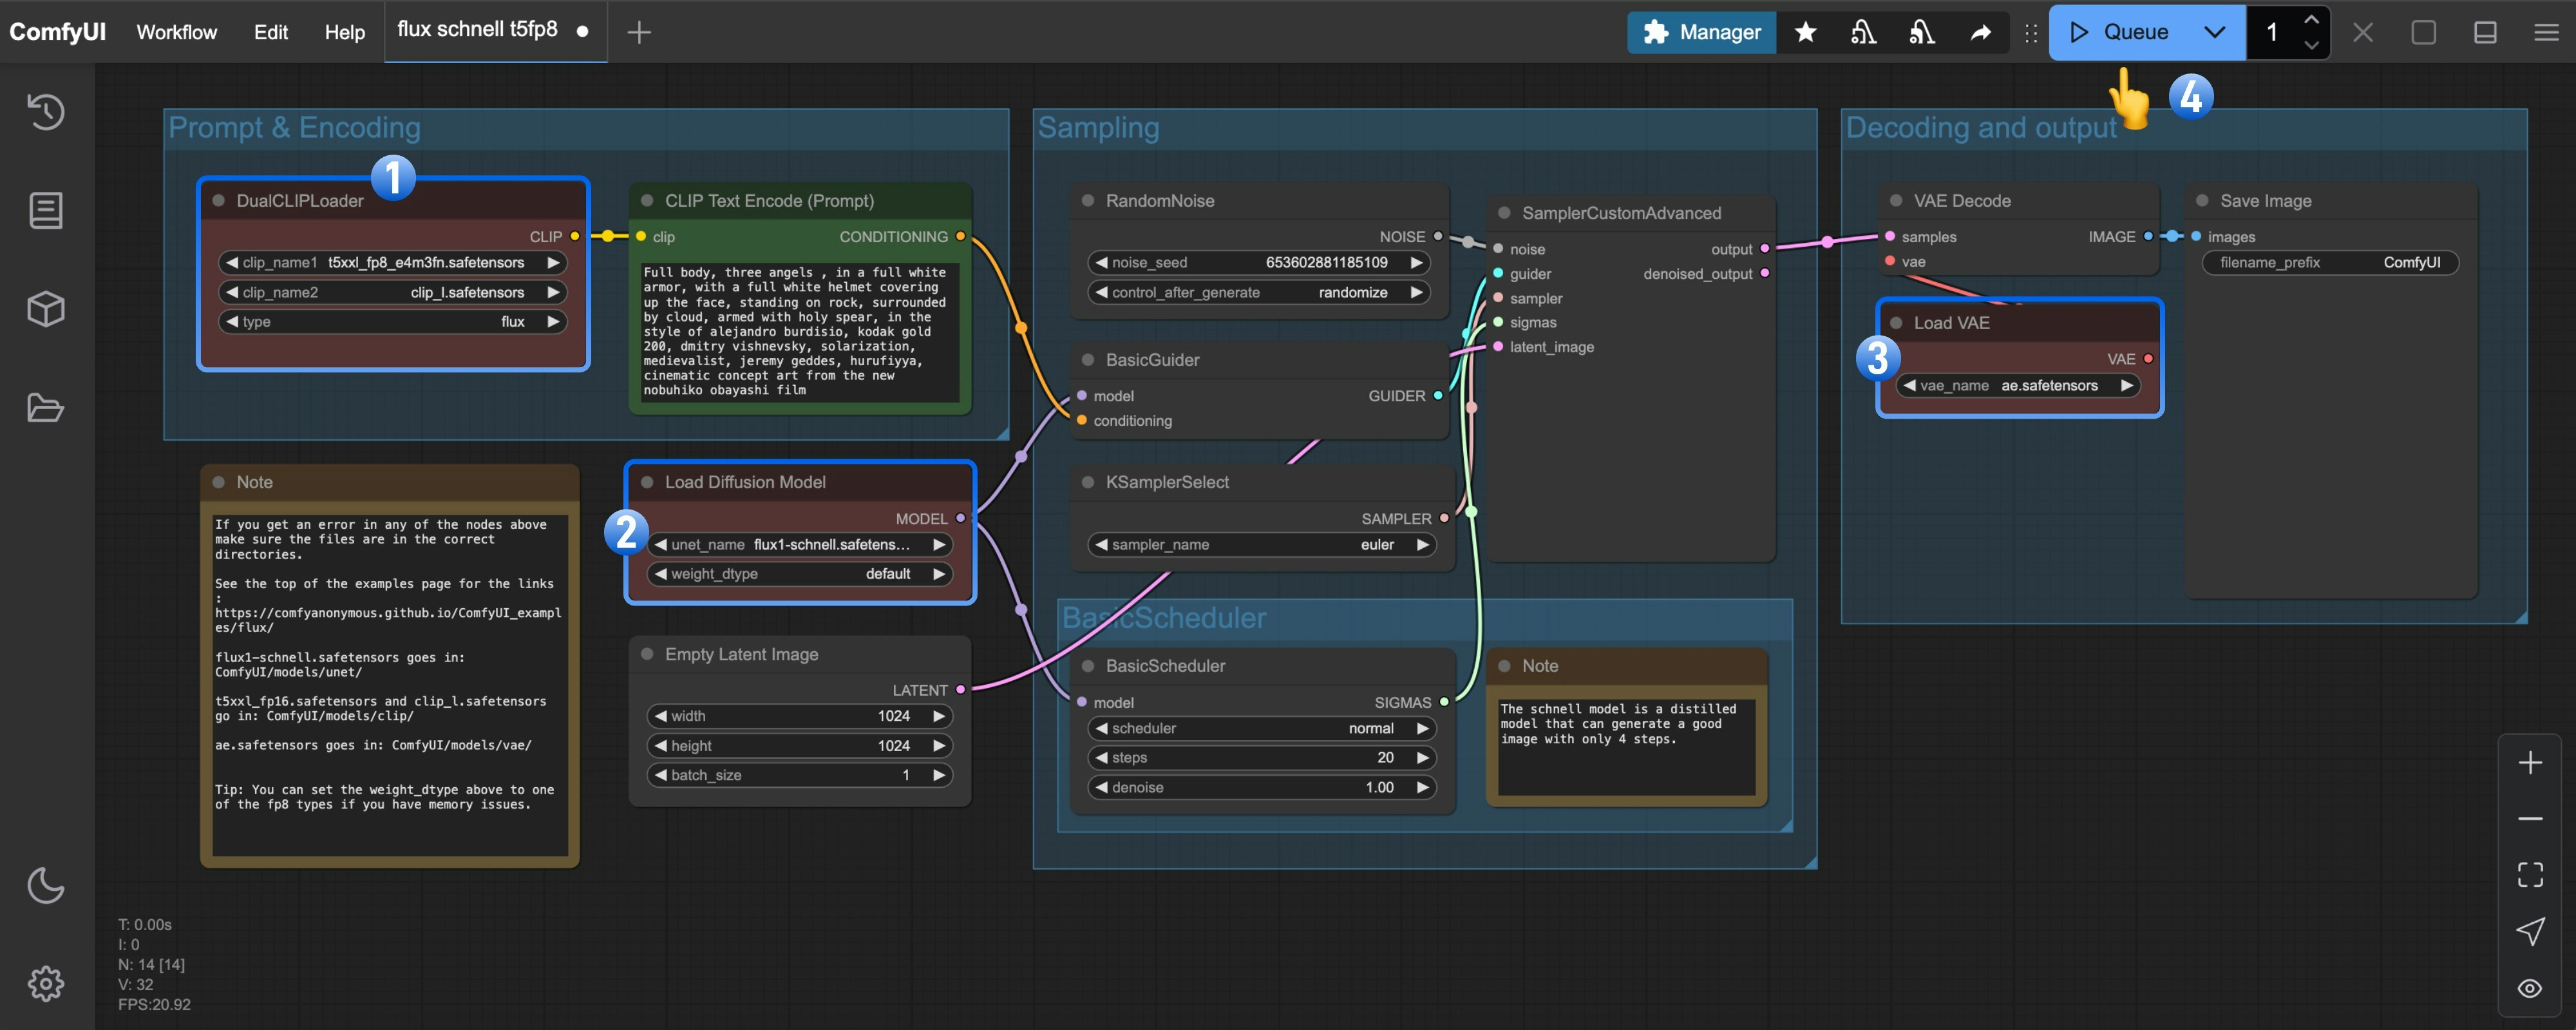
Please download the image below and drag it into ComfyUI to load the workflow.
Run on Comfy Cloud
2. Manual Models Installation
In this workflow, only two model files are different from the Flux1 Dev version workflow. For t5xxl, you can still use the fp16 version for better results.
- t5xxl_fp16.safetensors -> t5xxl_fp8.safetensors
- flux1-dev.safetensors -> flux1-schnell.safetensors
3. Steps to Run the Workflow

- Ensure the
DualCLIPLoadernode has the following models loaded:- clip_name1: t5xxl_fp8_e4m3fn.safetensors
- clip_name2: clip_l.safetensors
- Ensure the
Load Diffusion Modelnode hasflux1-schnell.safetensorsloaded - Ensure the
Load VAEnode hasae.safetensorsloaded - Click the
Queuebutton, or use the shortcutCtrl(cmd) + Enterto run the workflow
Flux.1 FP8 Checkpoint Version Text-to-Image Example
The fp8 version is a quantized version of the original Flux.1 fp16 version. To some extent, the quality of this version will be lower than that of the fp16 version, but it also requires less VRAM, and you only need to install one model file to try running it.Flux.1 Dev
Please download the image below and drag it into ComfyUI to load the workflow.
Run on Comfy Cloud
Please download flux1-dev-fp8.safetensors and save it to theComfyUI/models/checkpoints/ directory.
Ensure that the corresponding Load Checkpoint node loads flux1-dev-fp8.safetensors, and you can try to run the workflow.
Flux.1 Schnell
Please download the image below and drag it into ComfyUI to load the workflow. Please download flux1-schnell-fp8.safetensors and save it to the
 ComfyUI/models/checkpoints/ directory.
Ensure that the corresponding Load Checkpoint node loads flux1-schnell-fp8.safetensors, and you can try to run the workflow.