This is a Comfy Cloud feature and is only available in the cloud version. To learn more about Comfy Cloud, see Comfy Cloud.
Public beta. Comfy Cloud MCP is in public beta. APIs, tools, and behavior may change while we iterate. See Feedback to report issues or share suggestions.
Overview
The Comfy Cloud MCP server connects AI agents to Comfy Cloud over the Model Context Protocol. Once connected, you can generate images, video, audio, and 3D, search models, nodes, and templates, and run ComfyUI workflows from a chat with your agent. The server runs remotely atcloud.comfy.org/mcp. Workflows execute on Comfy Cloud GPUs, so you do not need a local GPU. Your agent talks to the server over HTTPS; the server translates tool calls into authenticated requests to Comfy Cloud on your behalf.
Any MCP-compatible client can connect to the same server URL. Claude Code, Claude Desktop, Cursor, Codex, and OpenClaw have first-class setup below. Windsurf, Amp, and other agents use the same URL with OAuth or an API key.
Install Comfy Cloud MCP
You need a Comfy Cloud account before connecting. Sign up if you do not have one yet. OAuth sign-in during setup uses your Comfy account.
- Claude Desktop
- Claude Code
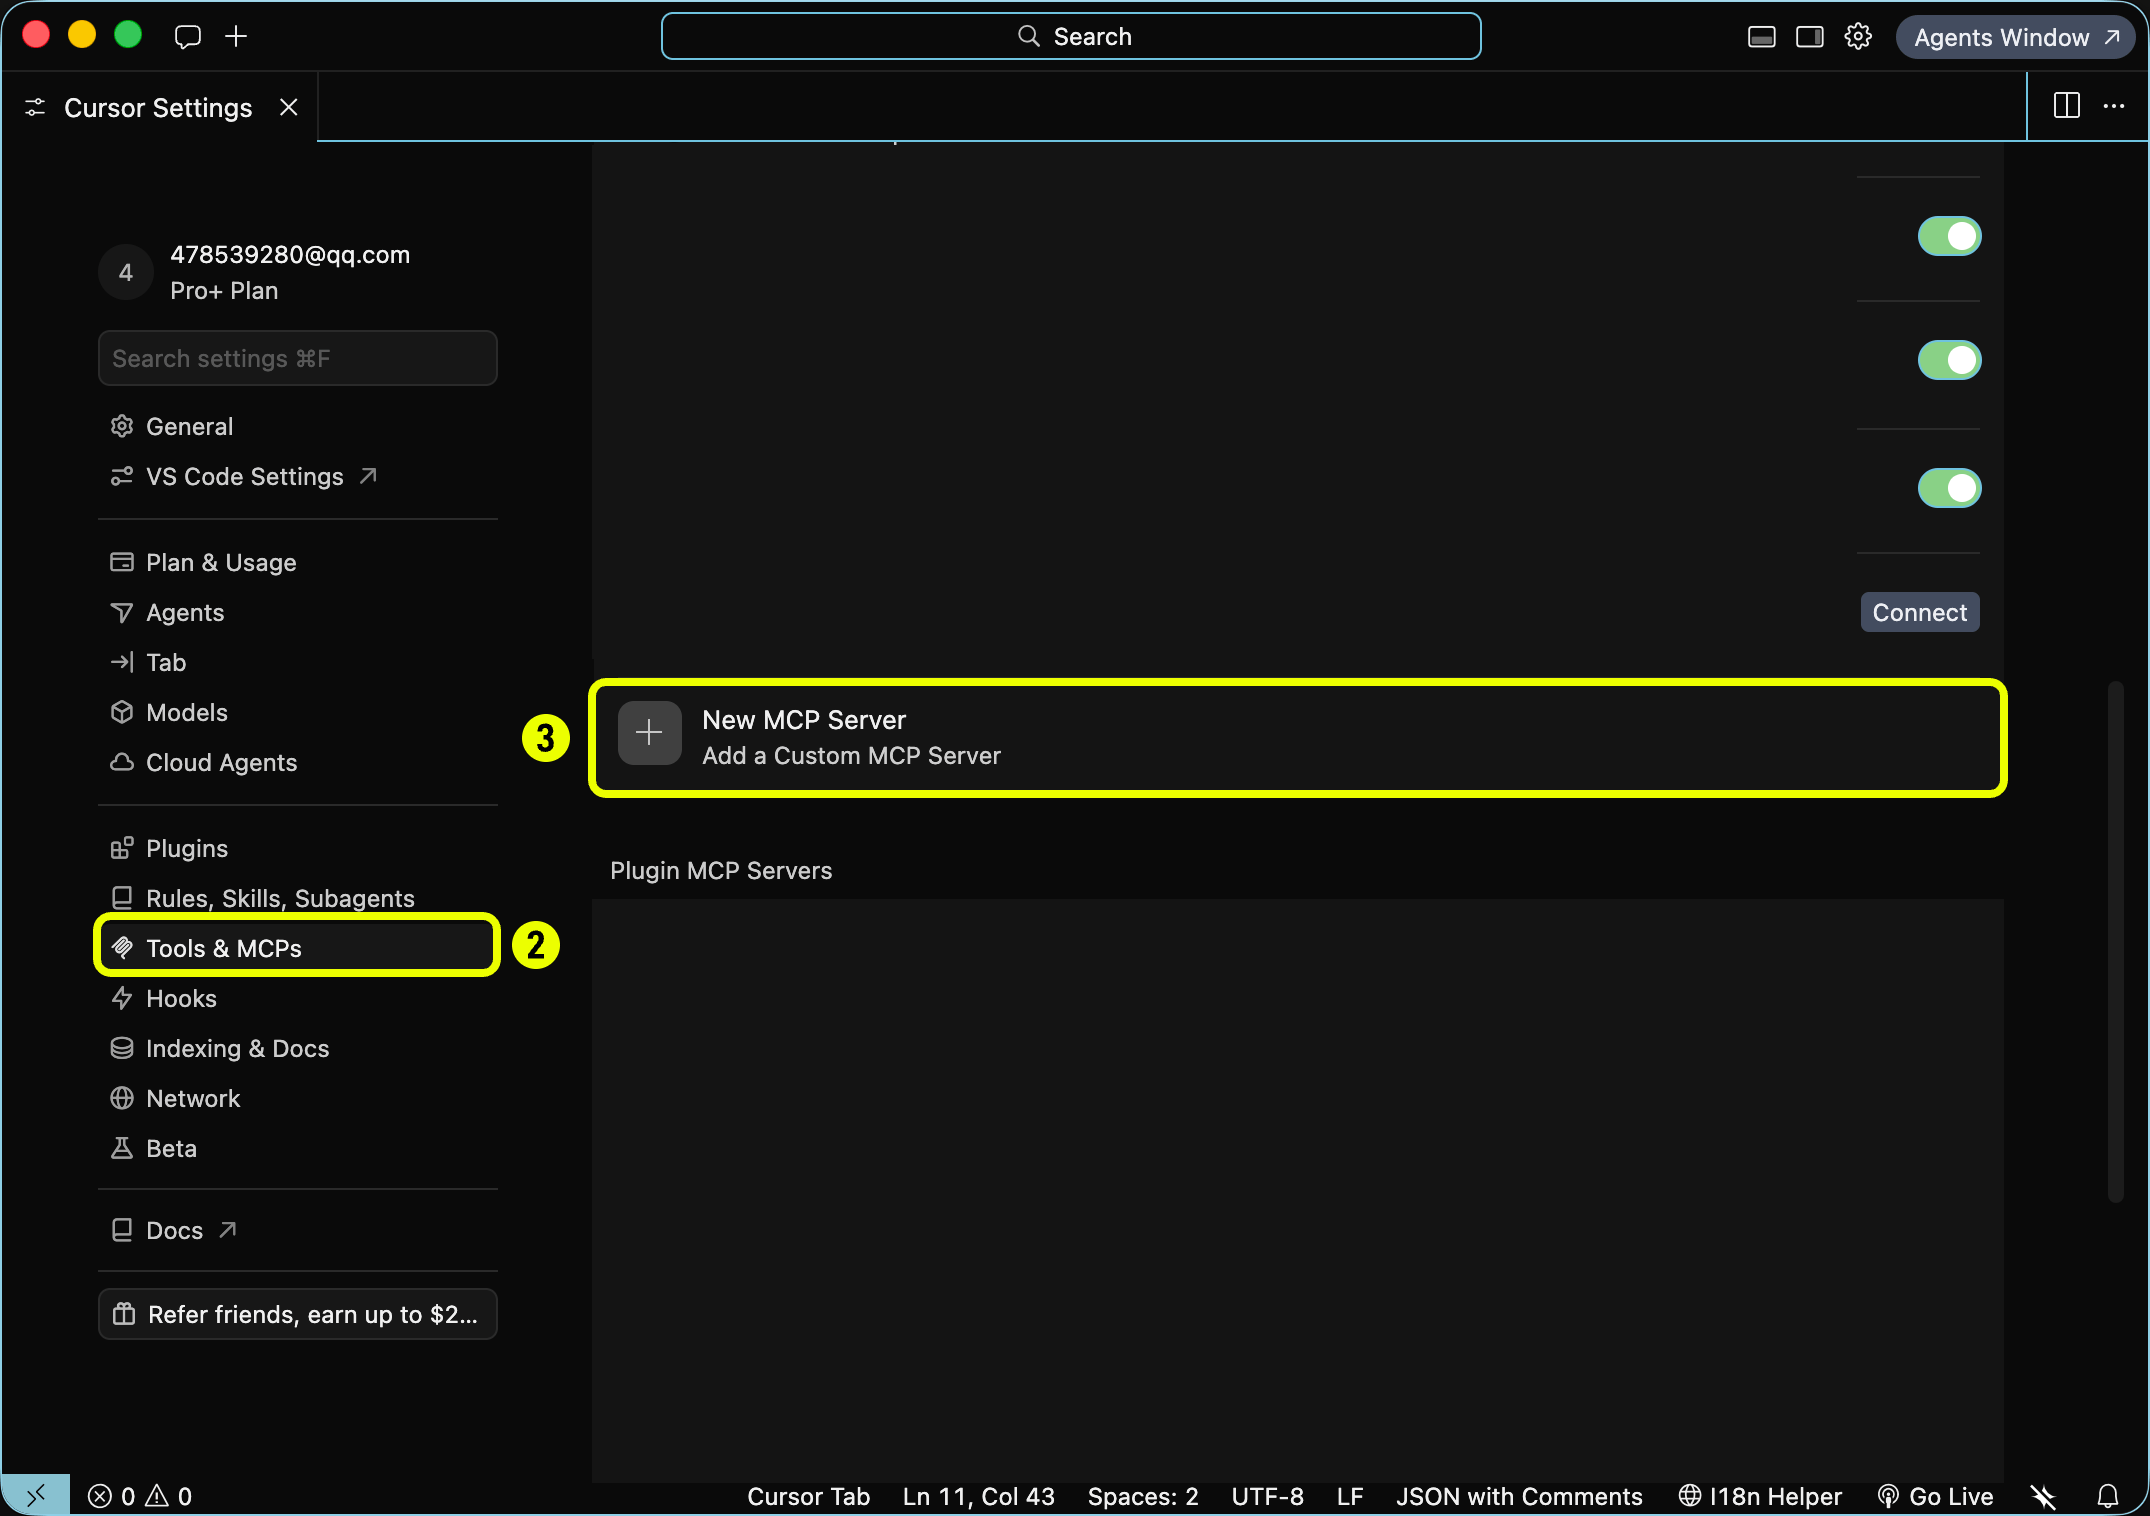
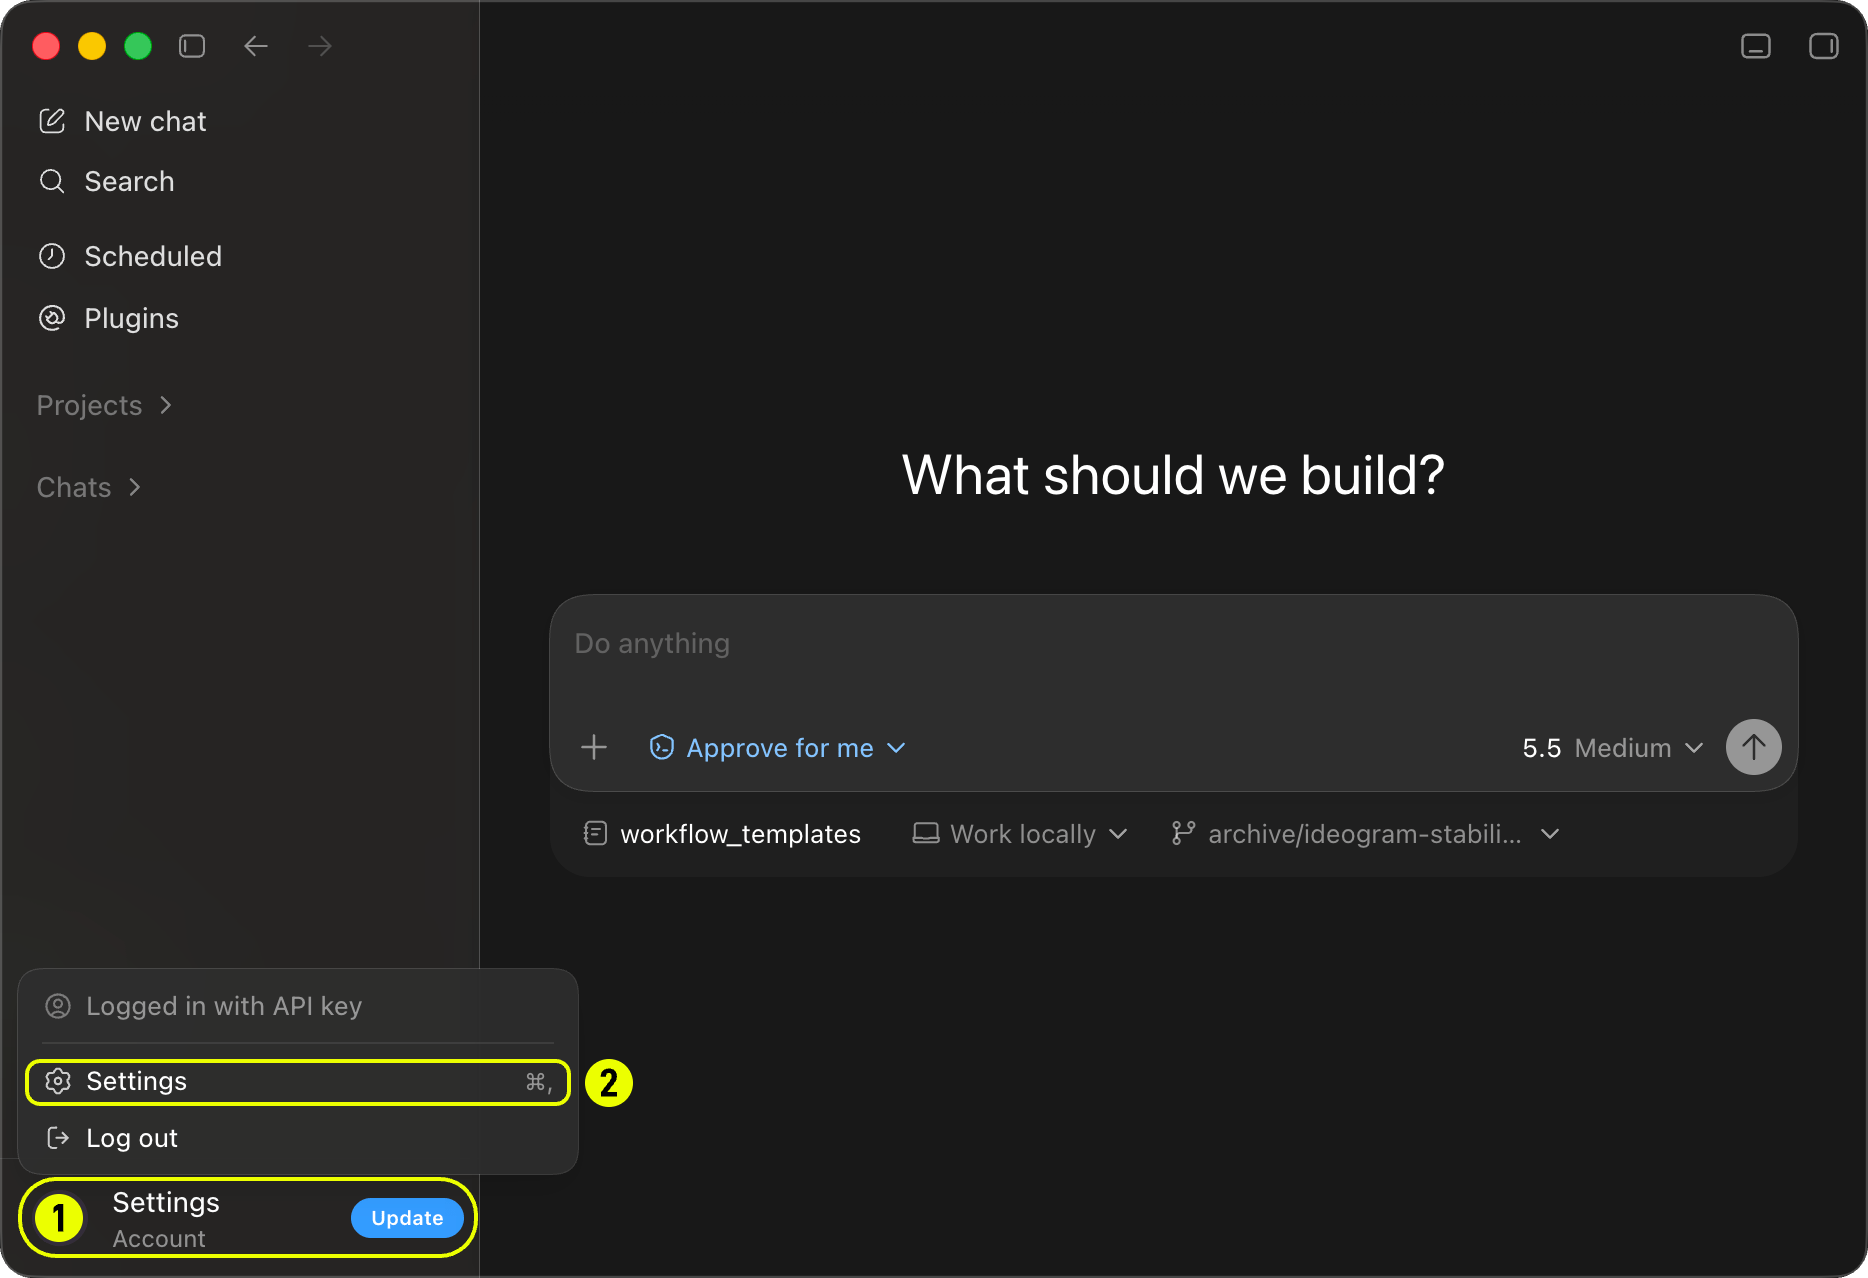
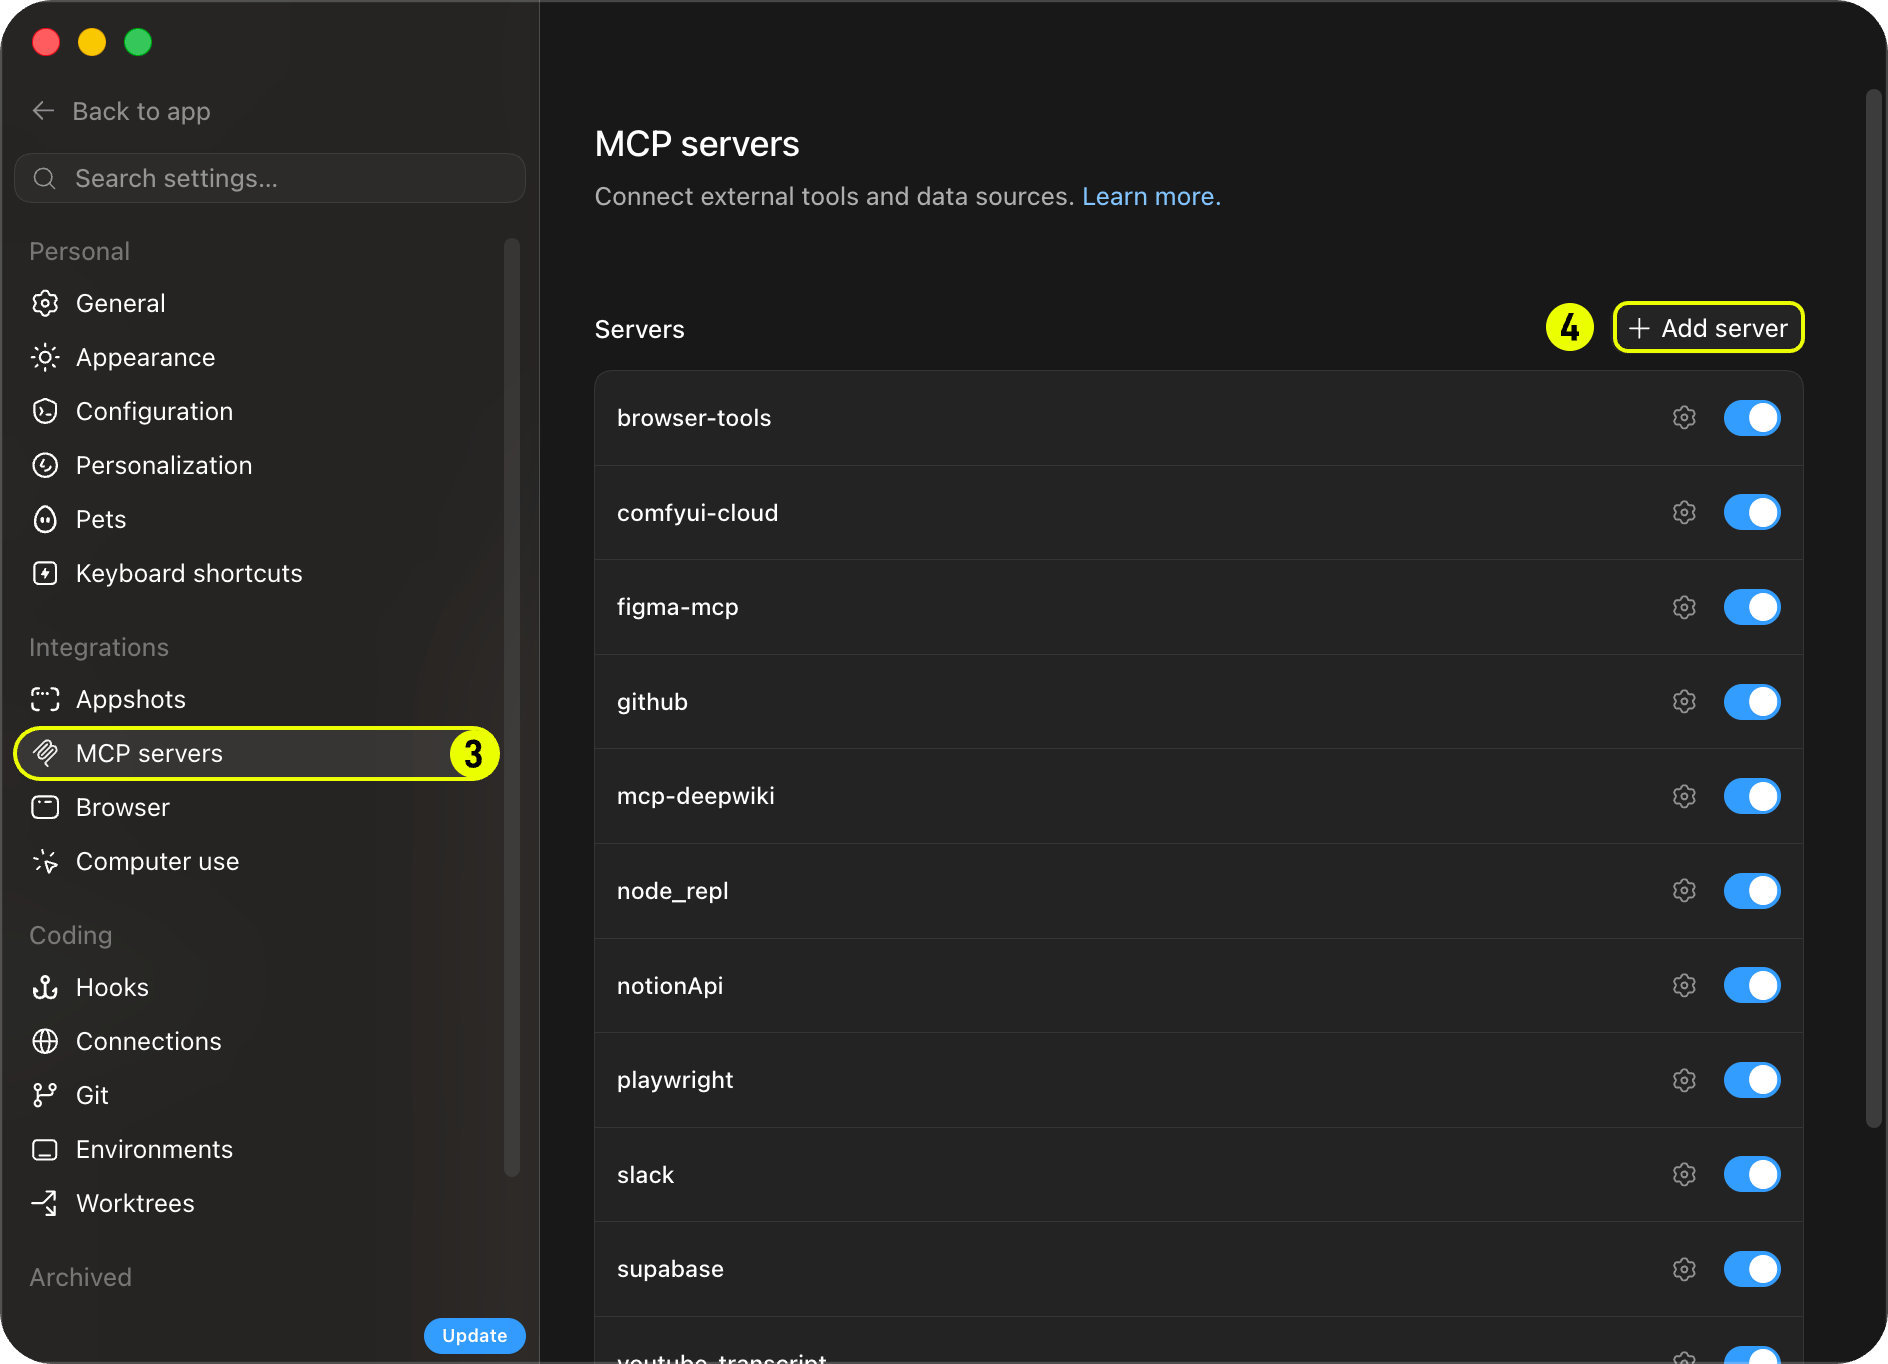
- Cursor
- Codex
- OpenClaw
- Other clients
Claude Desktop adds Comfy Cloud as a custom connector through its UI, then runs the OAuth sign-in.Claude Desktop does not support Claude Code slash commands. Instead, open the prompt picker for the same workflows:
1
Open Customize
In the sidebar, click Customize (labeled 1).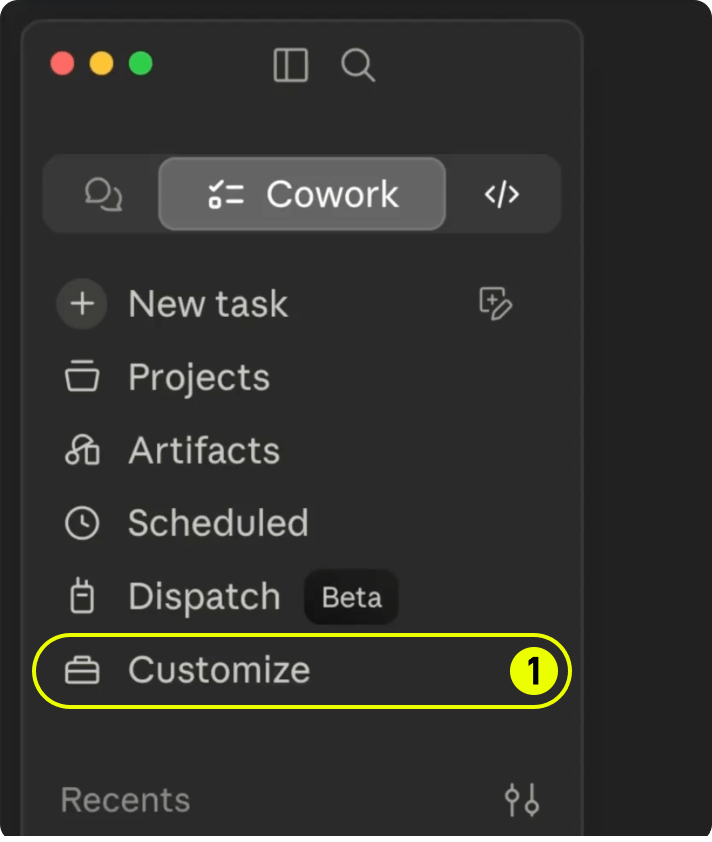
2
Open Connectors
Click Connectors (labeled 2).
3
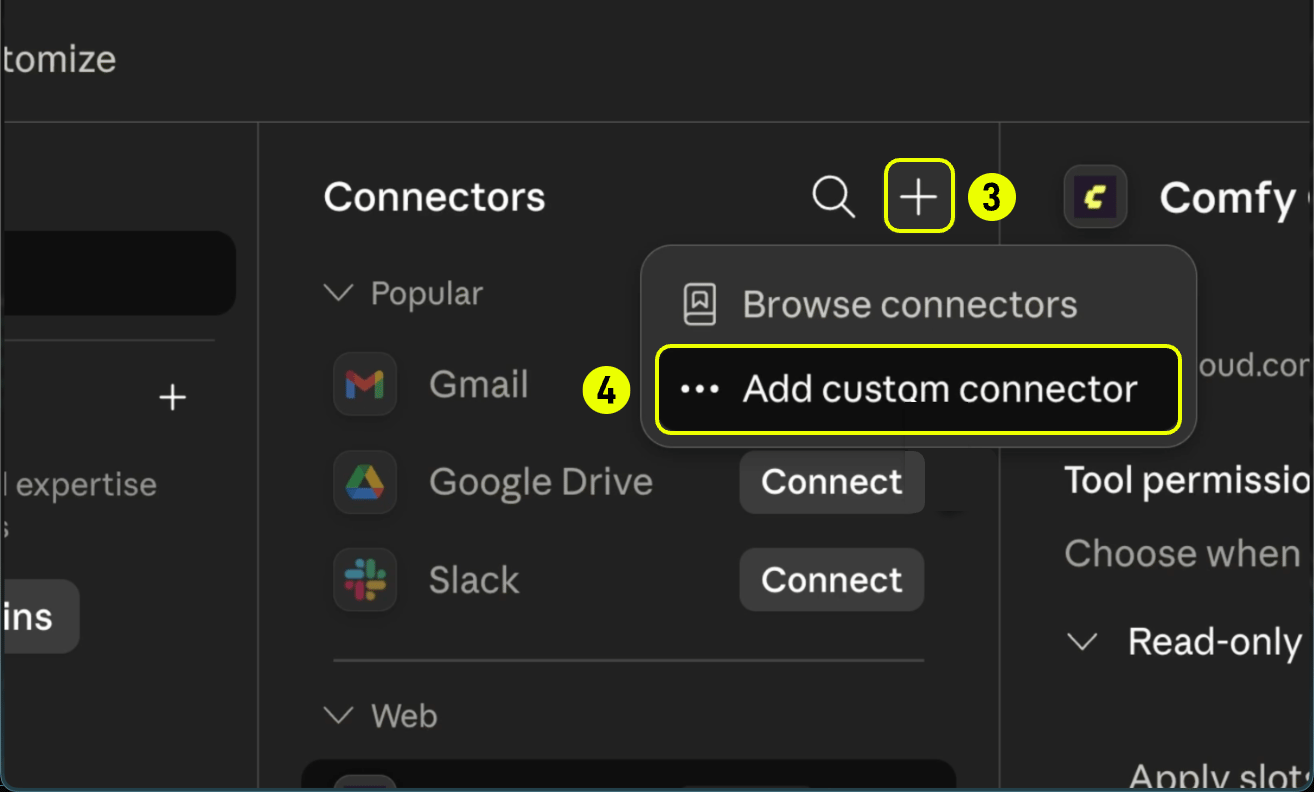
Add a custom connector
- Click the + button (labeled 3) in the Connectors header.
-
Choose Add custom connector (labeled 4).
4
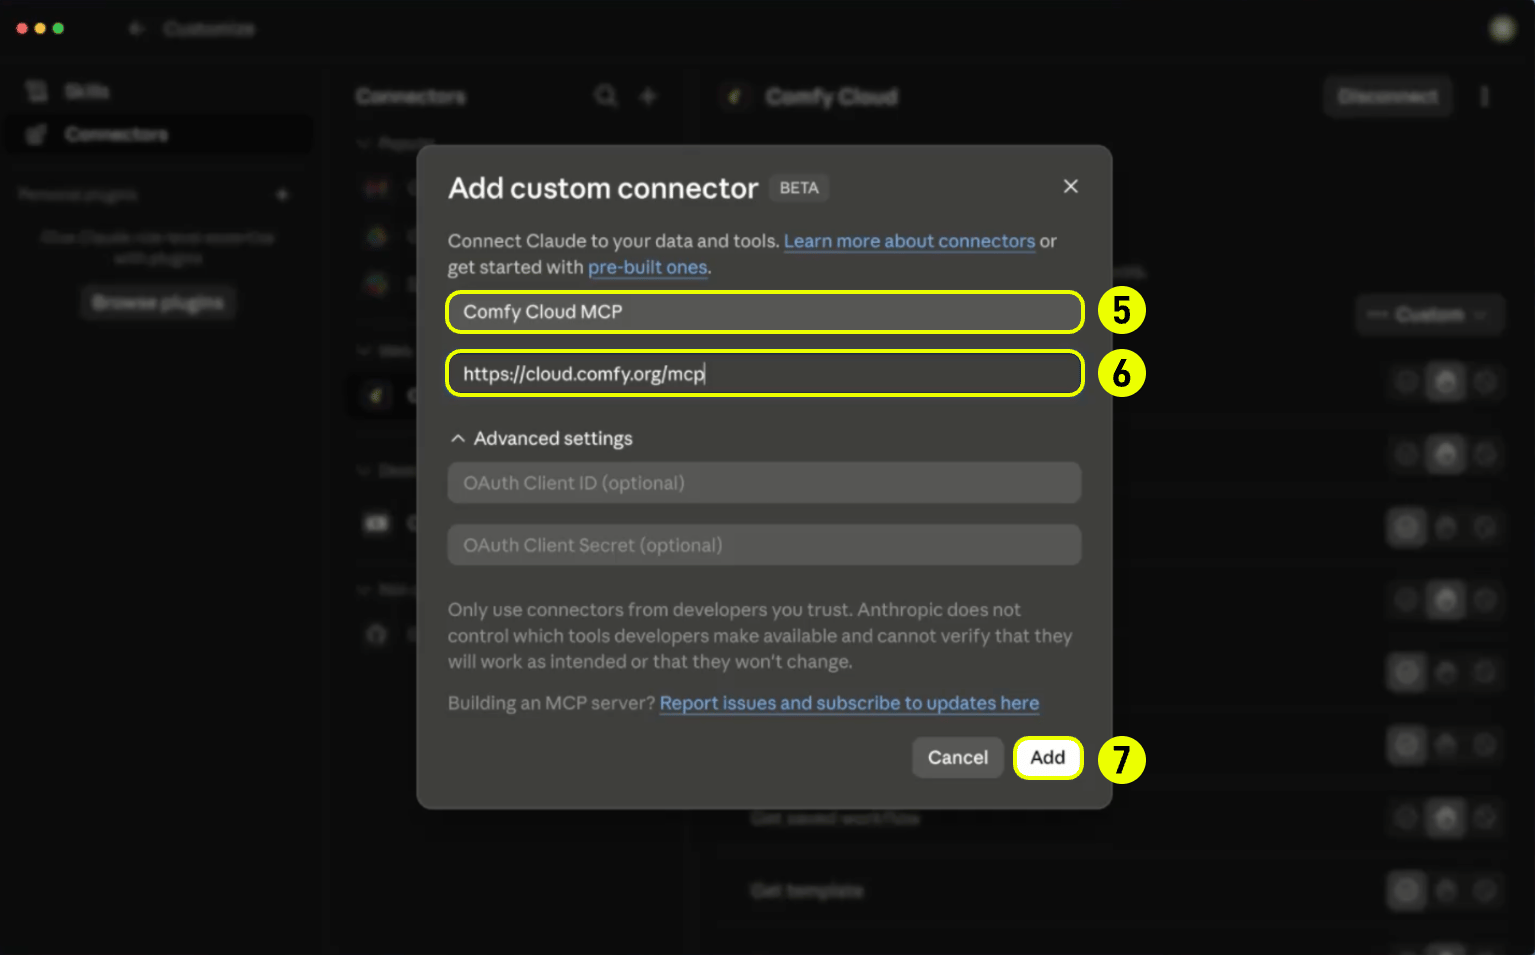
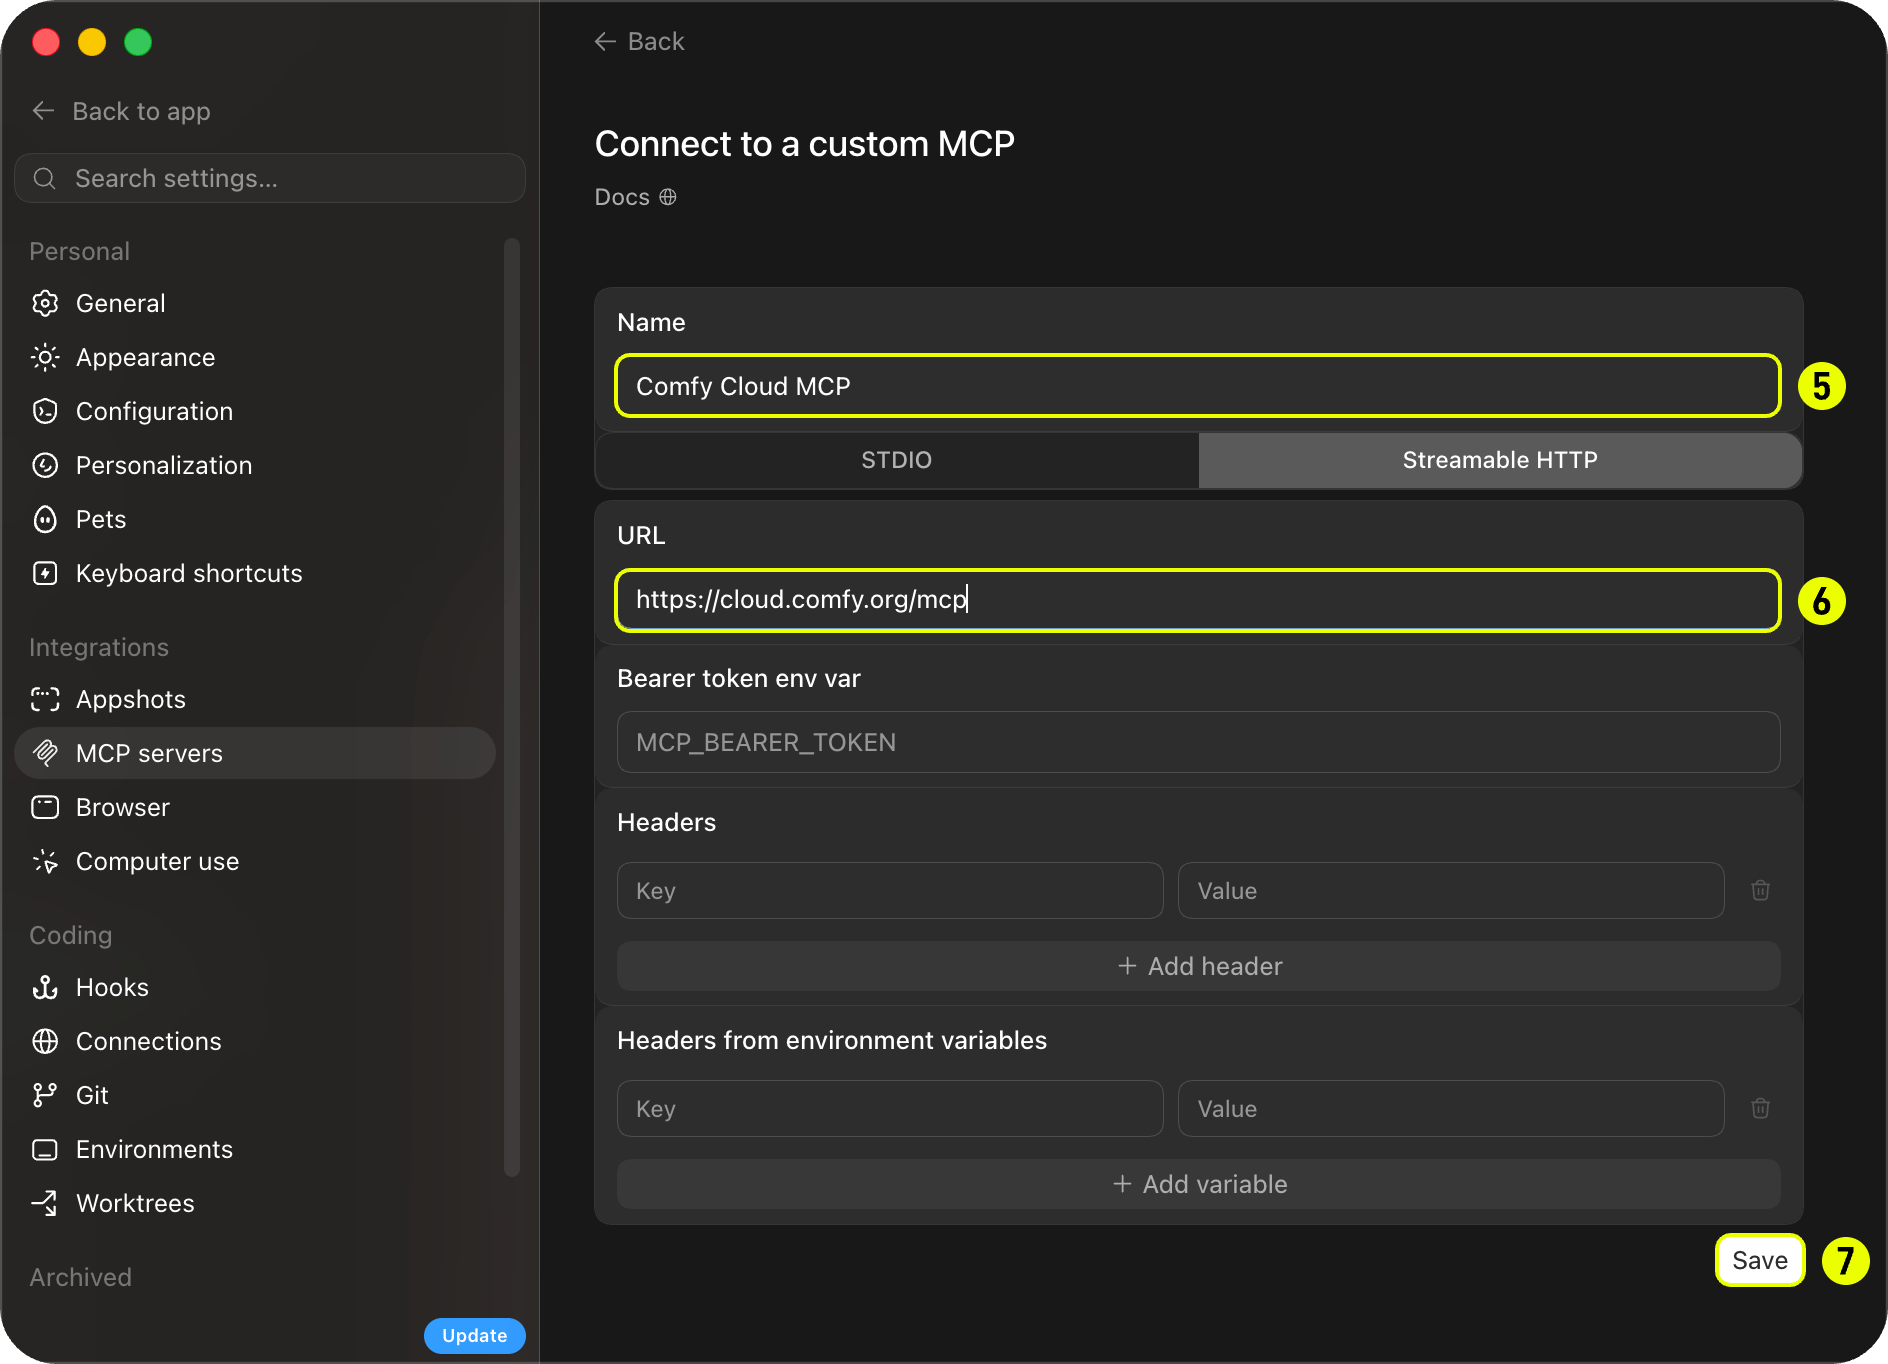
Enter server details
- Enter a name such as Comfy Cloud MCP in the Name field (labeled 5).
-
Set the Remote MCP server URL to
https://cloud.comfy.org/mcp(labeled 6). -
Click Add (labeled 7).
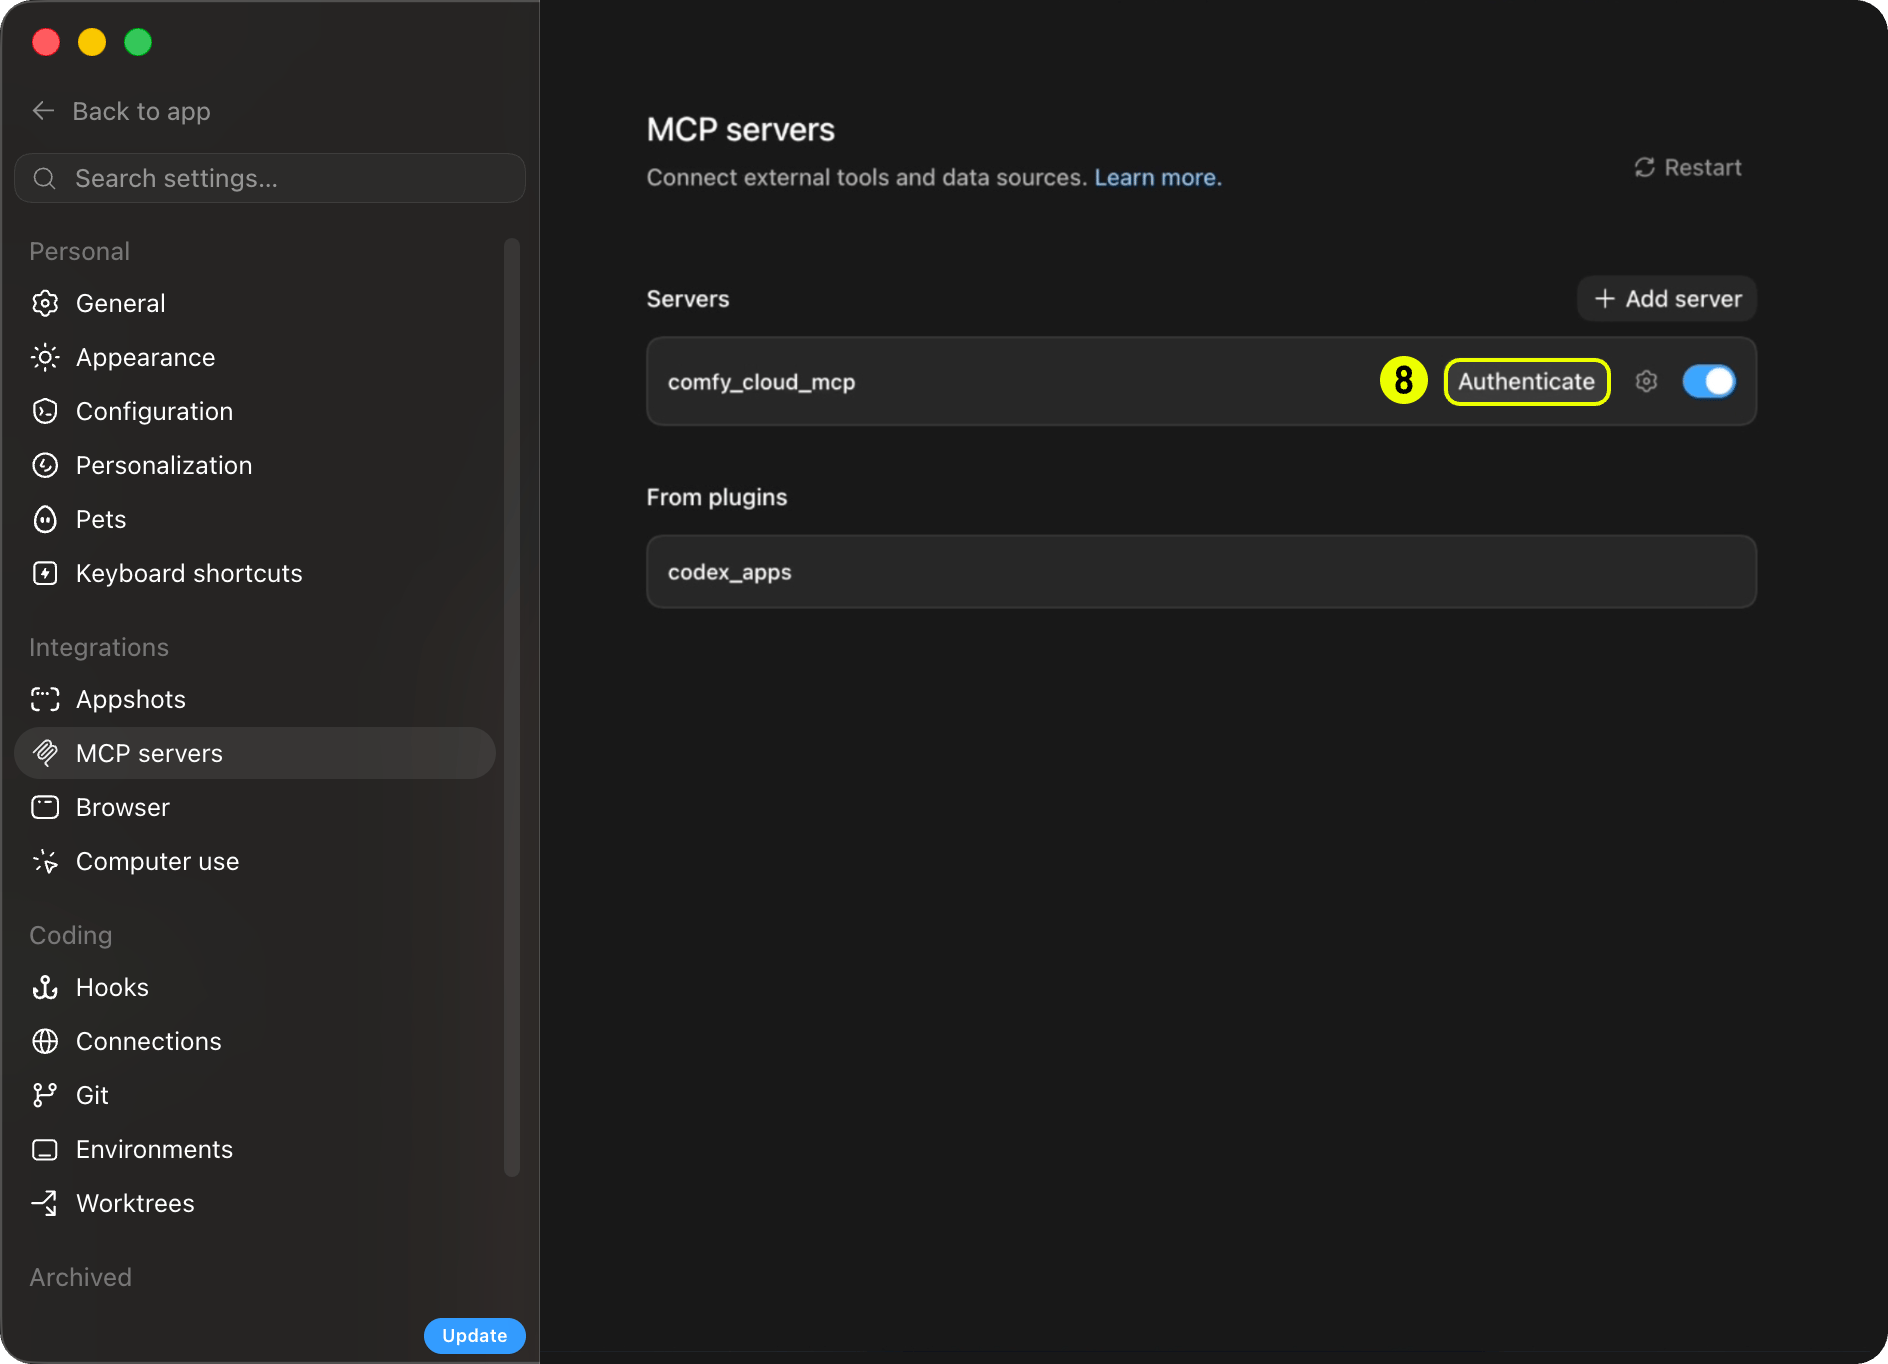
5
Sign in
- When the browser opens, choose your workspace (for example Personal Workspace).
-
Click Continue to authorize the connector. You are connected.

You can also skip prompts and ask in plain language. The MCP tools work the same way.
What your agent can do
You do not call MCP tools yourself. Your agent picks the right tool based on what you ask for. Slash commands and prompts (below) are shortcuts that steer the agent toward common tasks, but plain language works too (“generate an image of a cat astronaut”, “upscale this photo”, “find a Wan 2.2 video template”). Typical flow:- Discover what is available (
search_templates,search_models,search_nodes, orcqlfor graph-style questions). - Run a generation:
run_templatefor a matching pre-built template,submit_workflowfor a custom workflow (withupload_filewhen an input image is needed), orpartner_generatefor partner models like Flux, Grok, Gemini, OpenAI, Ideogram, and Seedance. - Wait and retrieve outputs (
wait_for_job, thenget_outputreturns a download command your agent runs in your shell).
MCP tools
These are the tools your agent has access to once connected. Names match what appears in MCP client logs and debugging.Discovery
Generation
Jobs and batches
Saved workflows
Sharing workflows
Hub URL share IDs: the trailing hyphen-delimited hex token in a
comfy.org/workflows/<slug>-<hex> hub URL is the share ID. For example, comfy.org/workflows/topaz-starlight-upscale-1c77e82713b7 has share ID 1c77e82713b7. Pass that token to import_shared_workflow as share_id. The share_url parameter only accepts ?share=<id> query URLs like https://cloud.comfy.org/?share=..., not hub page URLs.
Apps and links
Account and session
Credits and spending
Discovery is free:search_templates, search_models, and search_nodes work with just a Comfy account. Running generations consumes Comfy Cloud credits and requires a subscription or credit balance.
Tools that spend real money are spend-gated. When a generation uses a paid partner model (partner_generate) or a workflow/template containing paid API nodes (run_template, run_saved_workflow, submit_batch), the server blocks execution until your agent confirms you agreed to spend credits — so expect the agent to check with you before those runs. Free, local-only workflows never prompt.
You can ask your agent about your balance at any time (“how many credits do I have?”) — it answers via get_billing_status.
Outputs and downloads
The MCP server runs in the cloud and never writes files to your machine. When a generation completes, your agent callsget_output, which returns:
- A temporary signed download URL (valid for a short window).
- A ready-to-run shell command (
curlon macOS and Linux,curl.exeon Windows).
Related resources
Related: Comfy In-App Agent
Want the agent experience inside Comfy Cloud (chat that builds and edits your graph), not an external MCP client?Comfy In-App Agent
Private alpha on Comfy Cloud. Join the waitlist to request access.
Feedback
Comfy Cloud MCP is in public beta. Please try it out and tell us what works and what doesn’t:- Feedback survey: report bugs, request features, or share general impressions.
- Discord: #comfy-mcp-and-cli on the Comfy Discord for questions and discussion.
Known limitations
Comfy Cloud MCP is an early release. These limitations are known and being worked on: Workflows- Editor-to-executable conversion has rough edges. Saved workflows run by filename via
run_saved_workflow(the server converts them automatically), but some node configurations still convert imperfectly. - Assets generated via
submit_workflowmay not embed workflow metadata. They might not reopen the originating workflow when opened in ComfyUI. - Workflow building depends on agent accuracy. Complex multi-node workflows may need a retry or refinement.
- Outputs require a shell download step. See Outputs and downloads.
- Upload size limits may apply depending on your MCP client. Some clients impose their own limits on file uploads.
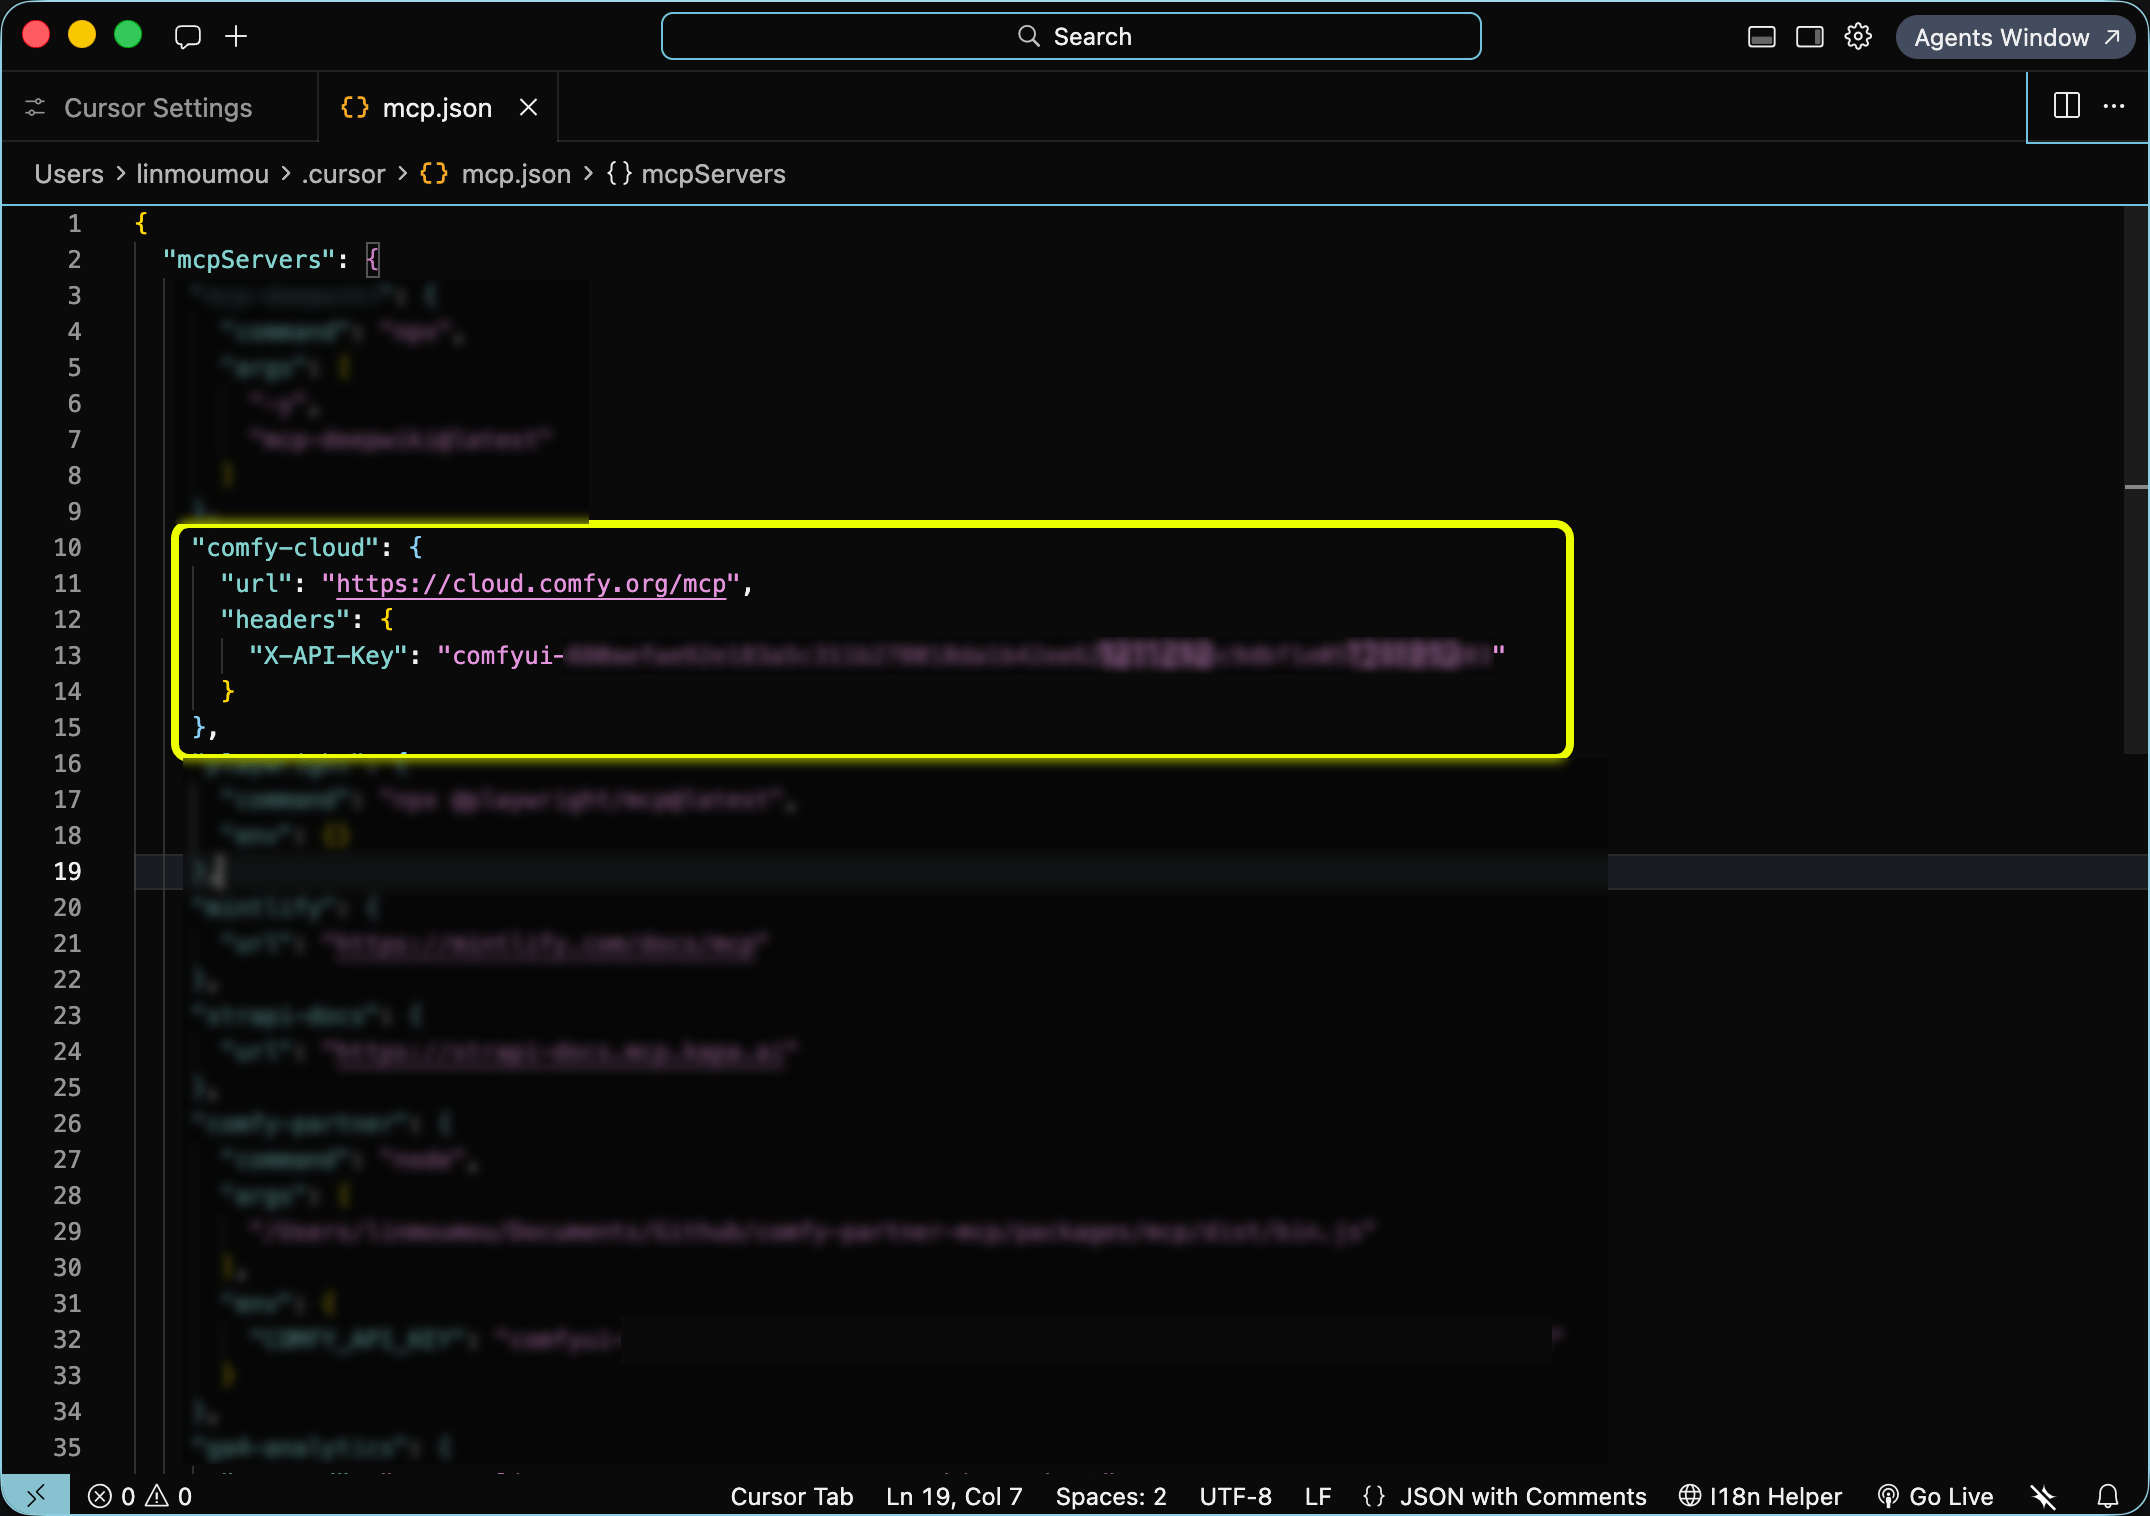
- OAuth or API key. Claude Code and Claude Desktop use a one-time browser OAuth flow. Cursor requires a Comfy Cloud API key in your MCP config (no OAuth). Other headless clients can pass a Comfy Cloud API key via the
X-API-Keyheader instead. A device-code OAuth flow for clients that cannot open a browser is planned.
FAQ
Which clients are supported?
Which clients are supported?
Any MCP-compatible client that supports remote HTTP transport can connect to
https://cloud.comfy.org/mcp. We document first-class setup for Claude Code, Claude Desktop, Cursor, Codex, and OpenClaw. Windsurf, Amp, and other agents follow the same URL with OAuth or an API key. See Install Comfy Cloud MCP.Do I need an API key?
Do I need an API key?
Not for interactive clients that support OAuth (Claude Code, Claude Desktop, Codex, OpenClaw, and others). Cursor requires a Comfy Cloud API key in your MCP config. An API key is also needed for other headless or CI setups with no browser. See the Cursor tab, OpenClaw tab, or Other clients tab under Install Comfy Cloud MCP.
Why does my agent ask before generating?
Why does my agent ask before generating?
Paid generations are spend-gated: when a run would consume Comfy Cloud credits (a partner model, or a workflow/template with paid API nodes), the server requires your explicit agreement before executing. See Credits and spending.
Do the slash commands work in Claude Desktop?
Do the slash commands work in Claude Desktop?
No. Slash commands ship in the Claude Code plugin. Claude Desktop connects to the same MCP server (the tools work if you ask in plain language or use the prompt picker), but it does not support Claude Code plugins or slash commands.
I typed /comfy or /cloud and nothing came up.
I typed /comfy or /cloud and nothing came up.
There is no
/comfy or /cloud command. Commands appear under one of two prefixes depending on how you connected:- Plugin (recommended):
/comfy-cloud:generate-image,/comfy-cloud:generate-video, … — type/comfy-cloud:to see them all. - Direct connection (no plugin):
/mcp__comfy-cloud__generate-image, … — type/mcp__to see them.
The sign-in did not open a browser.
The sign-in did not open a browser.
In Claude Code, run
/mcp, select comfy-cloud, and choose Authenticate. In Claude Desktop, reopen the connector from Customize → Connectors and trigger sign-in.What about running Comfy locally with an agent?
What about running Comfy locally with an agent?
Comfy Cloud MCP is our hosted offering, but local agent workflows have existed since ComfyUI was open-sourced. See What about local ComfyUI? on the Agent Tools overview for why Cloud shipped first, community MCP servers you can use today, and Comfy CLI as another option.