About VACE
VACE 14B is an open-source unified video editing model launched by the Alibaba Tongyi Wanxiang team. Through integrating multi-task capabilities, supporting high-resolution processing and flexible multi-modal input mechanisms, this model significantly improves the efficiency and quality of video creation. The model is open-sourced under the Apache-2.0 license and can be used for personal or commercial purposes. Here is a comprehensive analysis of its core features and technical highlights:- Multi-modal input: Supports multiple input forms including text, images, video, masks, and control signals
- Unified architecture: Single model supports multiple tasks with freely combinable functions
- Motion transfer: Generates coherent actions based on reference videos
- Local replacement: Replaces specific areas in videos through masks
- Video extension: Completes actions or extends backgrounds
- Background replacement: Preserves subjects while changing environmental backgrounds
Related model weights and code repositories:
Model Download and Loading in Workflows
Since the workflows covered in this document all use the same workflow template, we can first complete the model download and loading information introduction, then enable/disable different inputs through Bypassing different nodes to achieve different workflows. The model download information is already embedded in the workflow information in specific examples, so you can also complete the model download when downloading specific example workflows.Model Download
diffusion_models wan2.1_vace_14B_fp16.safetensors wan2.1_vace_1.3B_fp16.safetensors VAE Choose one version from Text encoders to download File save locationModel Loading
Since the models used in the workflows covered in this document are consistent, the workflows are also the same, and only the nodes are bypassed to enable/disable different inputs, please refer to the following image to ensure that the corresponding models are correctly loaded in different workflows.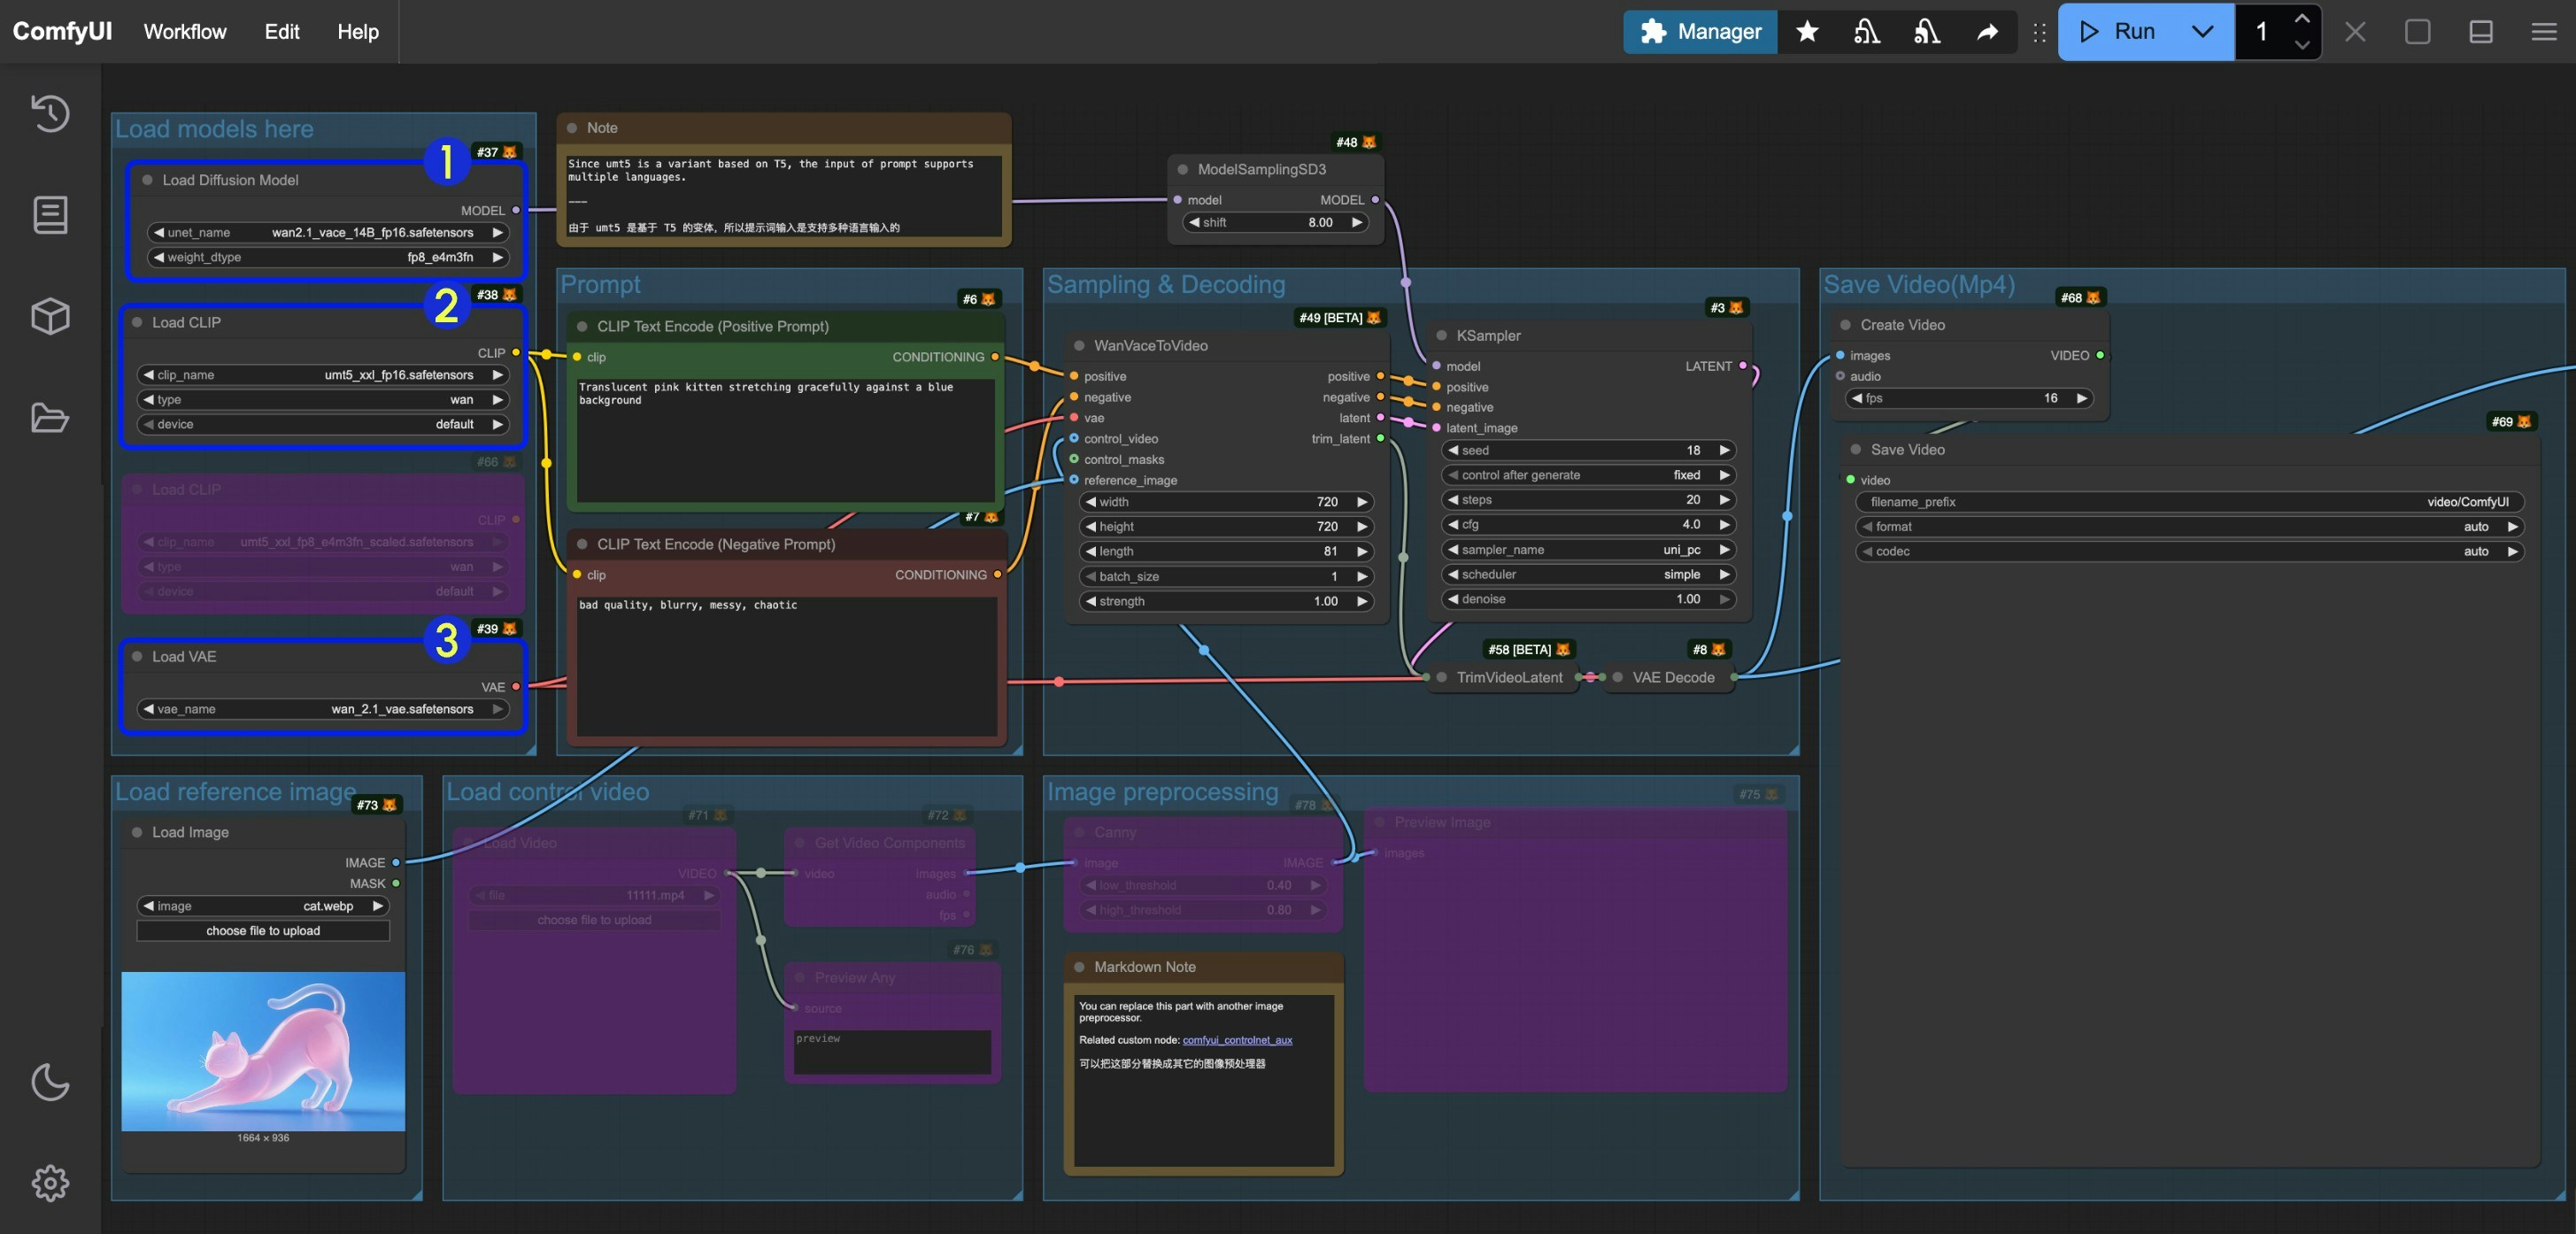
- Make sure the
Load Diffusion Modelnode has loadedwan2.1_vace_14B_fp16.safetensors - Make sure the
Load CLIPnode has loadedumt5_xxl_fp8_e4m3fn_scaled.safetensorsorumt5_xxl_fp16.safetensors - Make sure the
Load VAEnode has loadedwan_2.1_vae.safetensors
How to toggle Node Bypass Status
When a node is set to Bypass status, data passing through the node will not be affected by the node and will be output directly. We often set nodes to Bypass status when we don’t need them. Here are three ways to toggle a node’s Bypass status: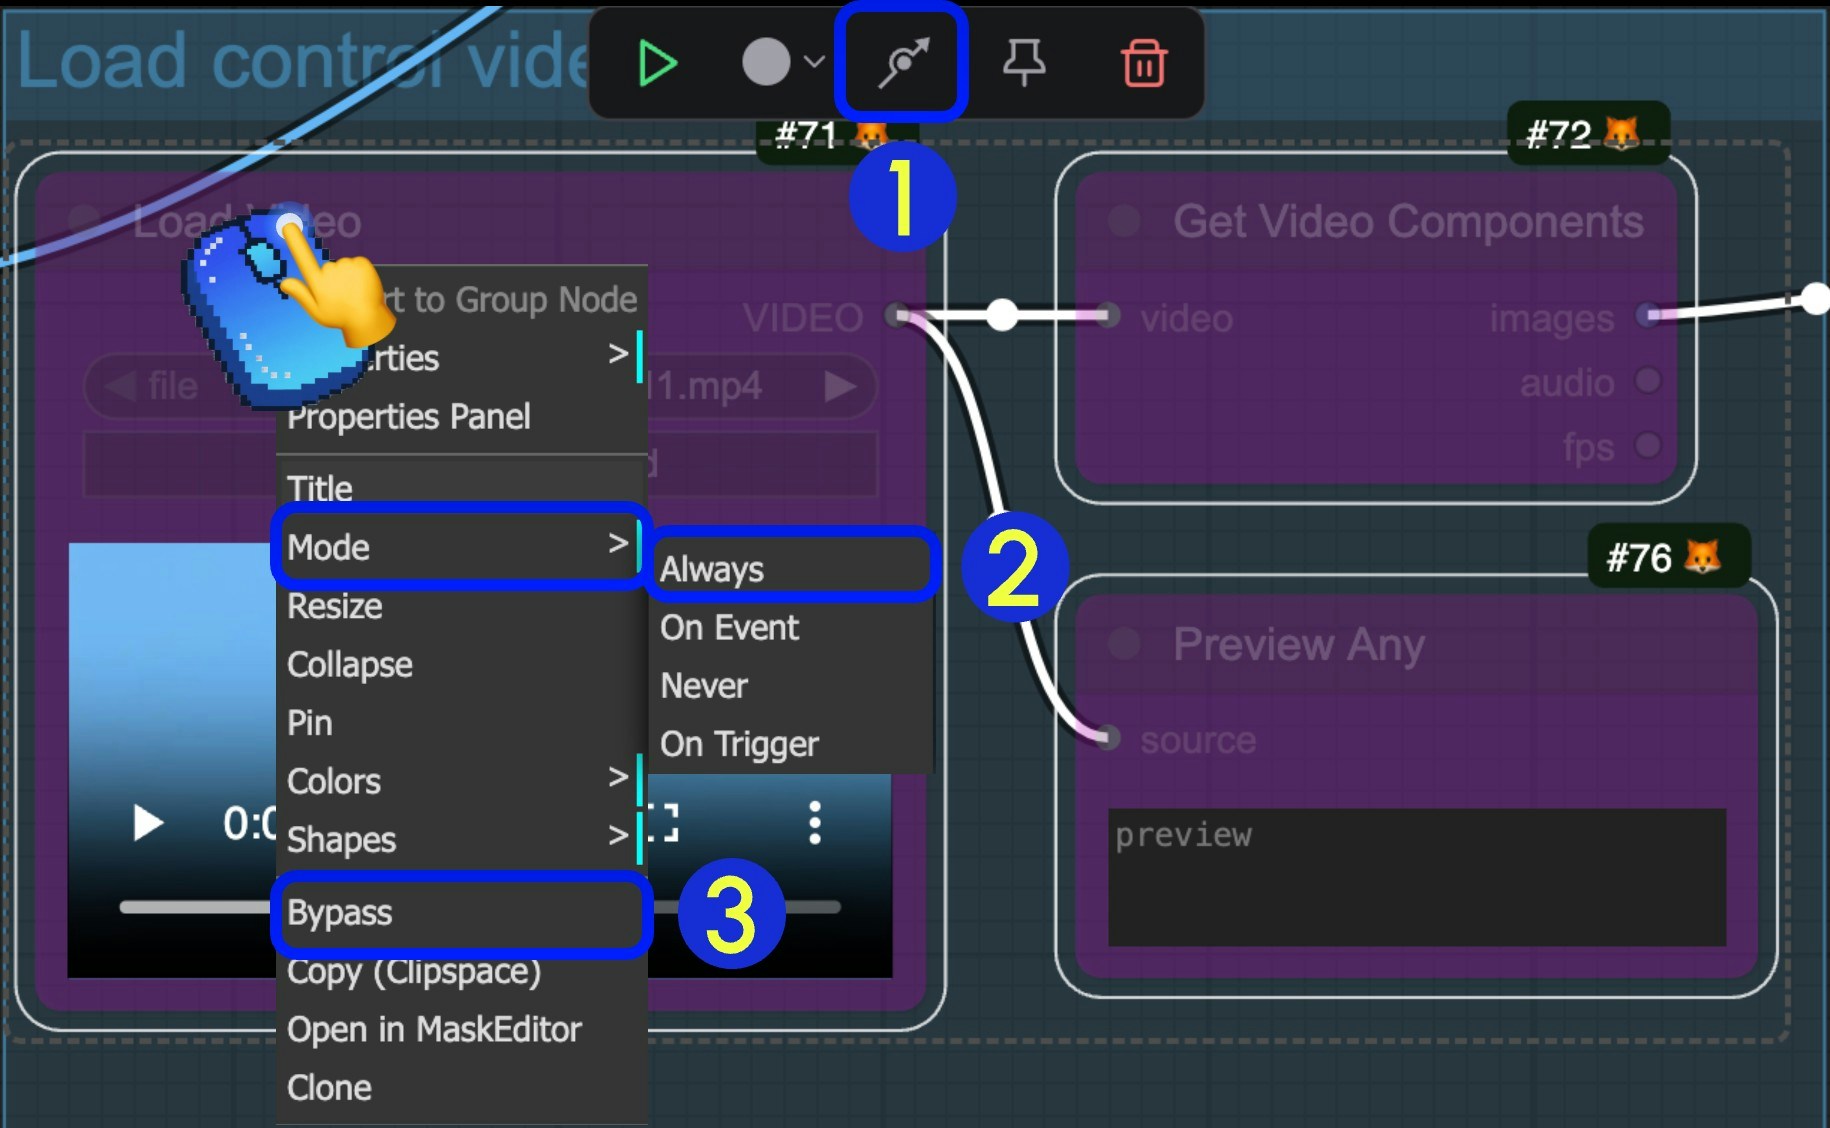
- After selecting the node, click the arrow in the indicator section of the selection toolbox to quickly toggle the node’s Bypass status
- After selecting the node, right-click the node and select
Mode->Alwaysto switch to Always mode - After selecting the node, right-click the node and select the
Bypassoption to toggle the Bypass status
VACE Text-to-Video Workflow
1. Workflow Download
Download the video below and drag it into ComfyUI to load the corresponding workflow2. Complete the Workflow Step by Step
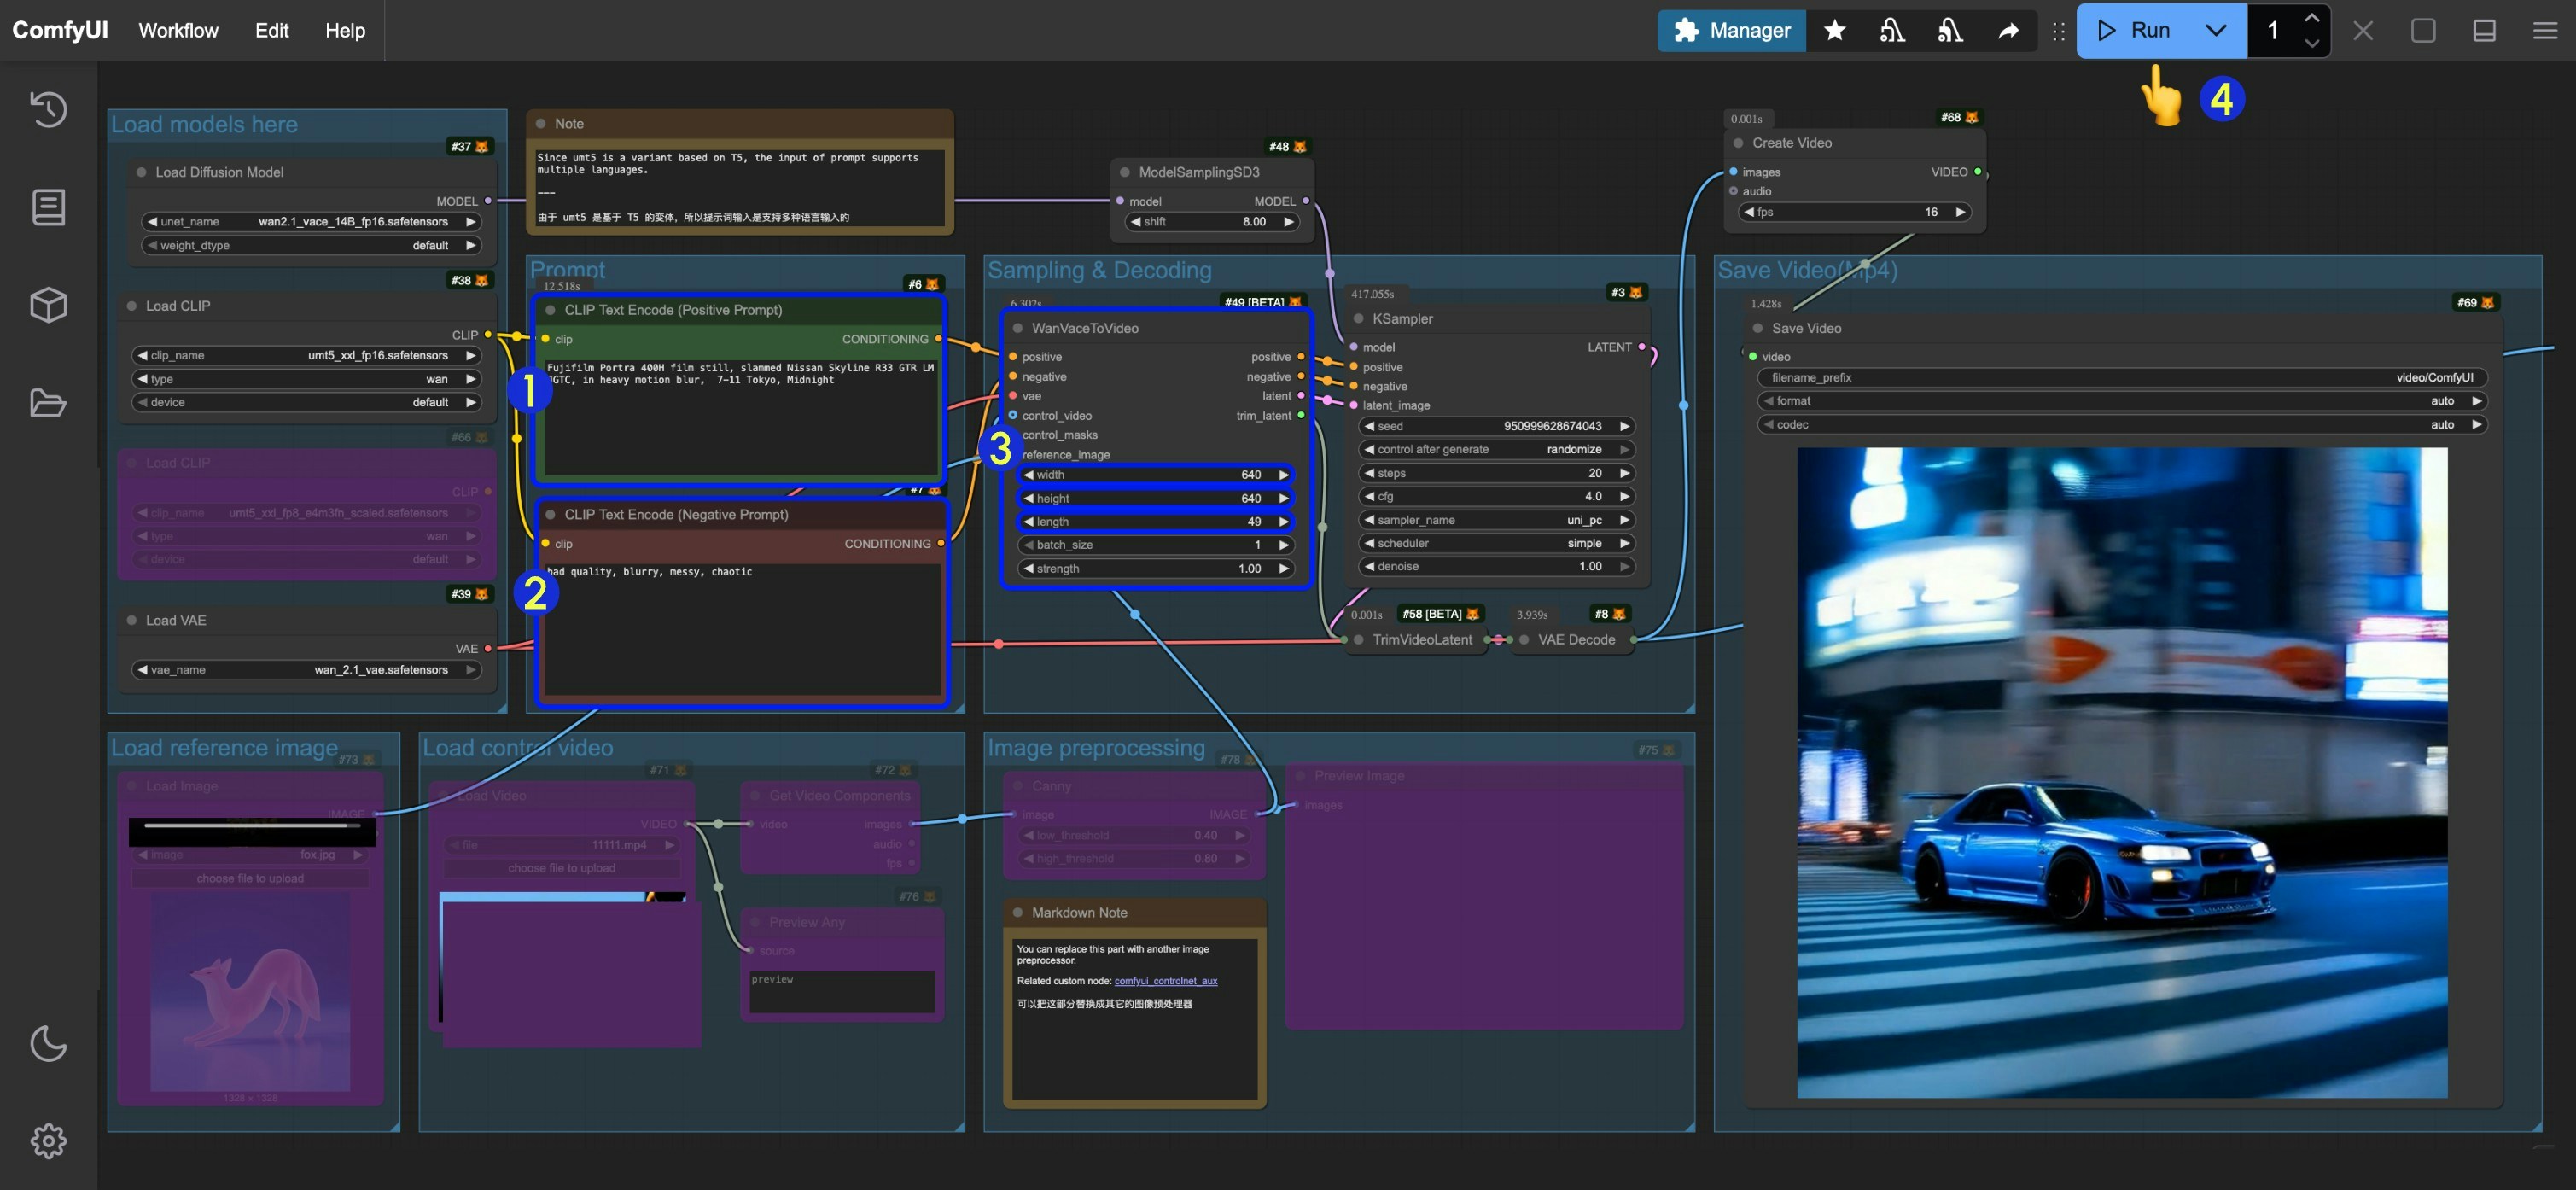
- Enter positive prompts in the
CLIP Text Encode (Positive Prompt)node - Enter negative prompts in the
CLIP Text Encode (Negative Prompt)node - Set the image dimensions (640x640 resolution recommended for first run) and frame count (video duration) in
WanVaceToVideo - Click the
Runbutton or use the shortcutCtrl(cmd) + Enterto execute video generation - Once generated, the video will automatically save to
ComfyUI/output/videodirectory (subfolder location depends onsave videonode settings)
VACE Image-to-Video Workflow
You can continue using the workflow above, just unbypass theLoad image node in Load reference image and input your image. You can also use the image below - in this file we’ve already set up the corresponding parameters.
1. Workflow Download
Download the video below and drag it into ComfyUI to load the corresponding workflow Please download the image below as input
2. Complete the Workflow Step by Step
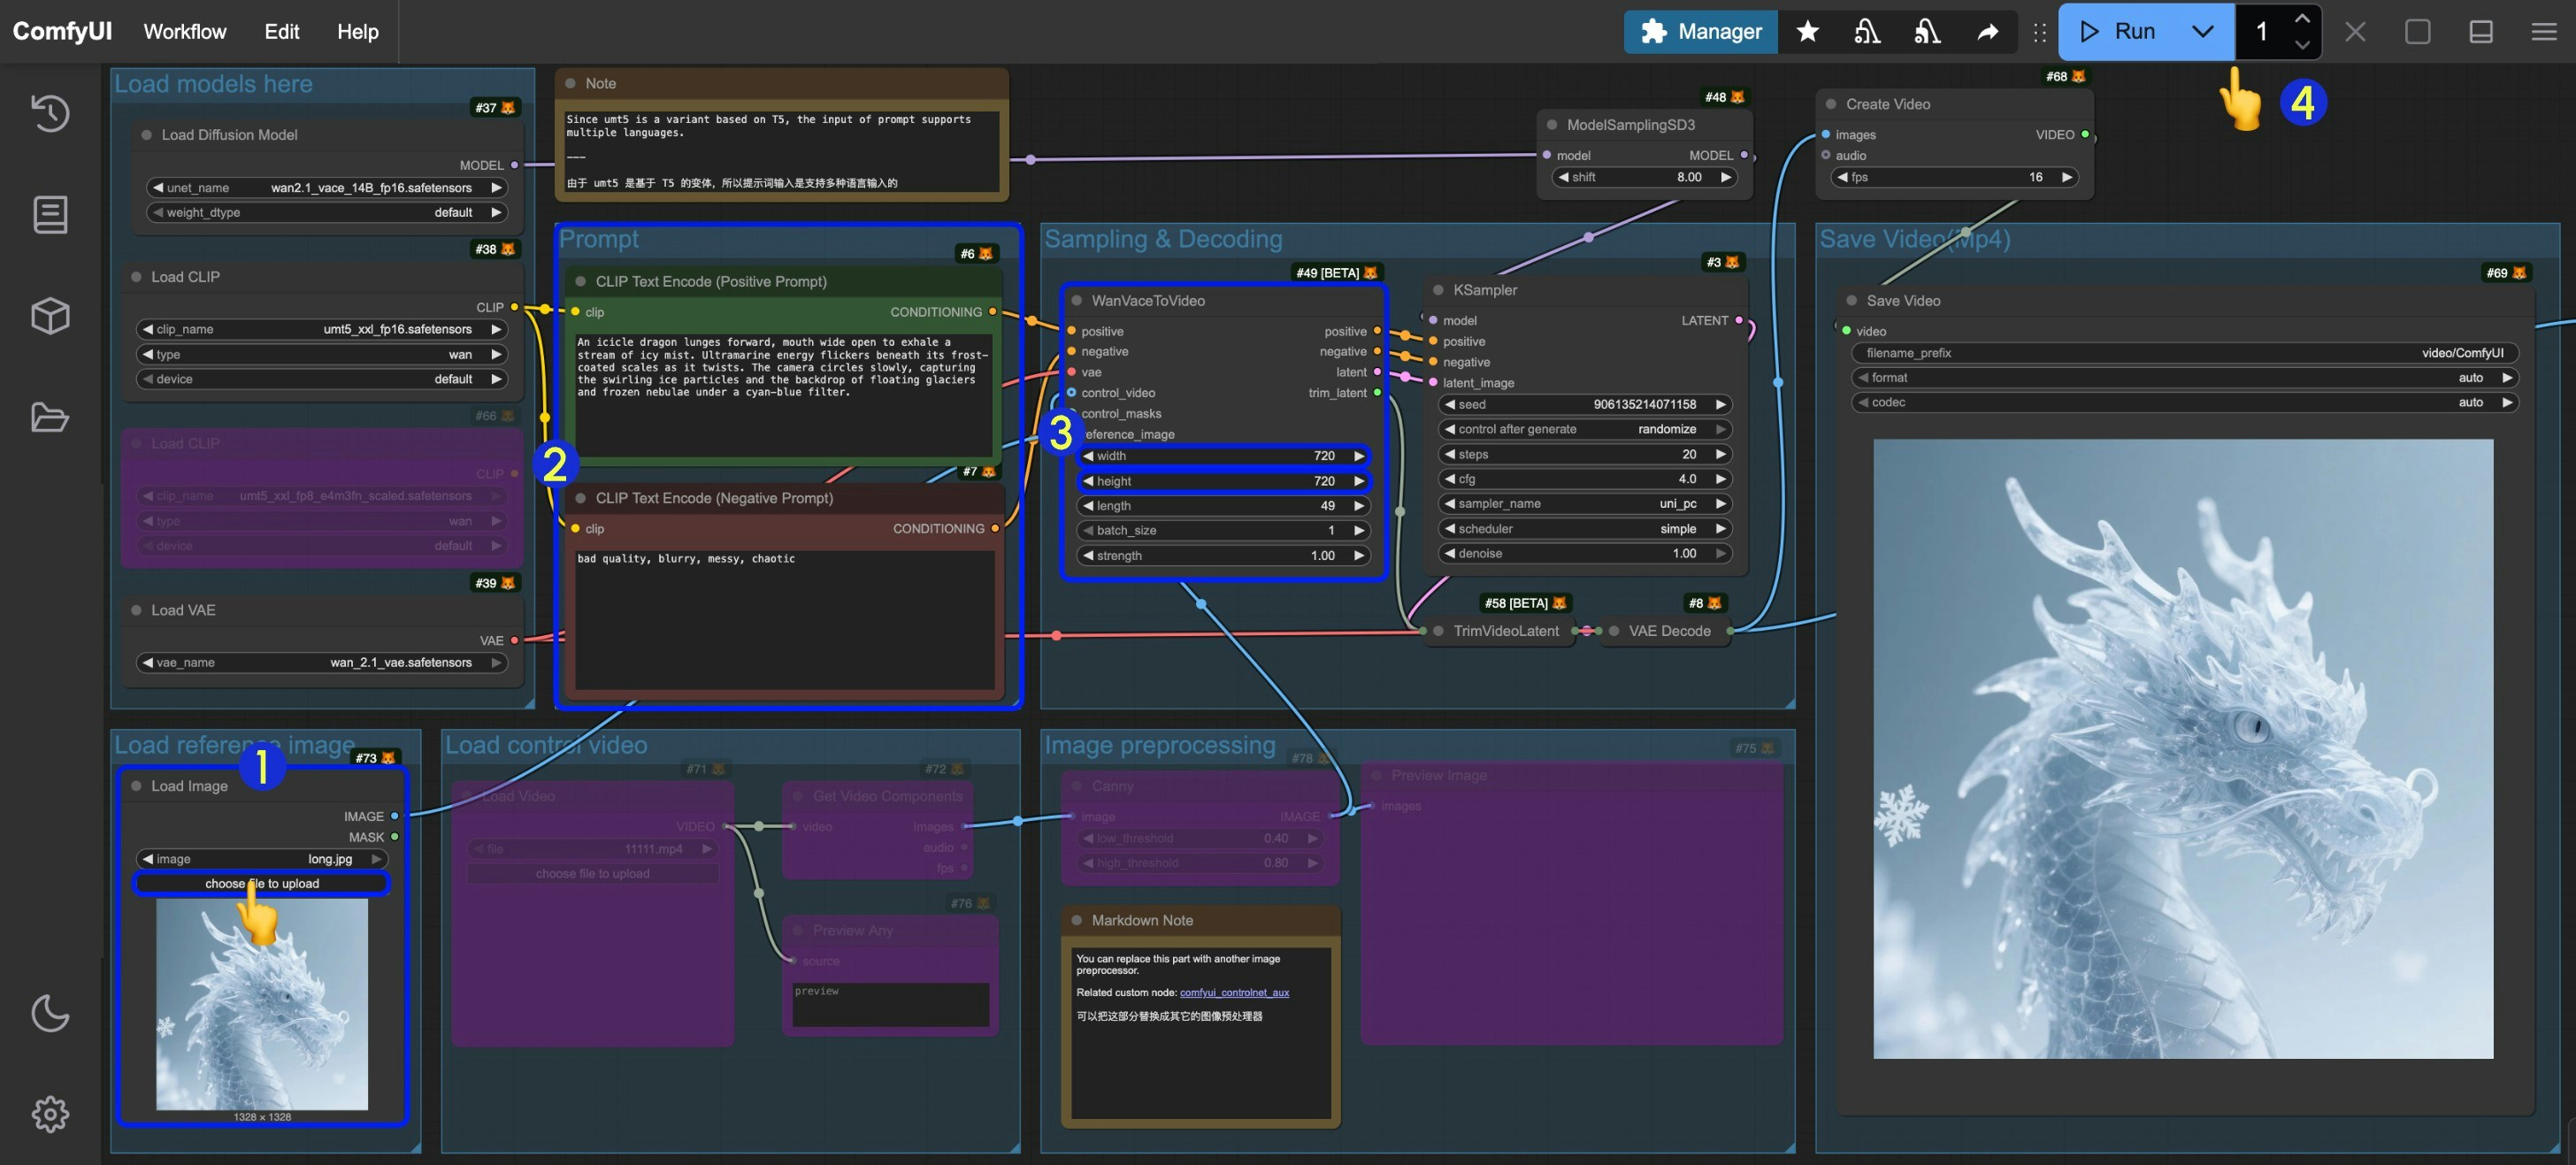
- Input the corresponding image in the
Load imagenode - You can modify and edit prompts like in the text-to-video workflow
- Set the image dimensions (640x640 resolution recommended for first run) and frame count (video duration) in
WanVaceToVideo - Click the
Runbutton or use the shortcutCtrl(cmd) + Enterto execute video generation - Once generated, the video will automatically save to
ComfyUI/output/videodirectory (subfolder location depends onsave videonode settings)
3. Additional Workflow Notes
VACE also supports inputting multiple reference images in a single image to generate corresponding videos. You can see related examples on the VACE project pageVACE Video-to-Video Workflow
1. Workflow Download
Download the video below and drag it into ComfyUI to load the corresponding workflow We will use the following materials as input:-
Input image for reference

- The video below has been preprocessed and will be used to control video generation
- The video below is the original video. You can download these materials and use preprocessing nodes like comfyui_controlnet_aux to preprocess the images
2. Complete the Workflow Step by Step

- Input the reference image in the
Load Imagenode underLoad reference image - Input the control video in the
Load Videonode underLoad control video. Since the provided video is preprocessed, no additional processing is needed - If you need to preprocess the original video yourself, you can modify the
Image preprocessinggroup or usecomfyui_controlnet_auxnodes to complete the preprocessing - Modify prompts
- Set the image dimensions (640x640 resolution recommended for first run) and frame count (video duration) in
WanVaceToVideo - Click the
Runbutton or use the shortcutCtrl(cmd) + Enterto execute video generation - Once generated, the video will automatically save to
ComfyUI/output/videodirectory (subfolder location depends onsave videonode settings)
VACE Video Outpainting Workflow
[To be updated]VACE First-Last Frame Video Generation
[To be updated] To ensure that the first and last frames are effective, the videolength setting must satisfy that length-1 is divisible by 4.
The corresponding Batch_size setting must satisfy Batch_size = length - 2